How to Raise the Mainsail
Trevor Adeline / Getty Images
- Snowboarding
- Scuba Diving & Snorkeling
Raising the mainsail is one of the first steps in setting sail. Although usually a simple, easy process, beginners may experience snags if they’re not careful. Follow these guidelines to get the main up smoothly and the boat underway.
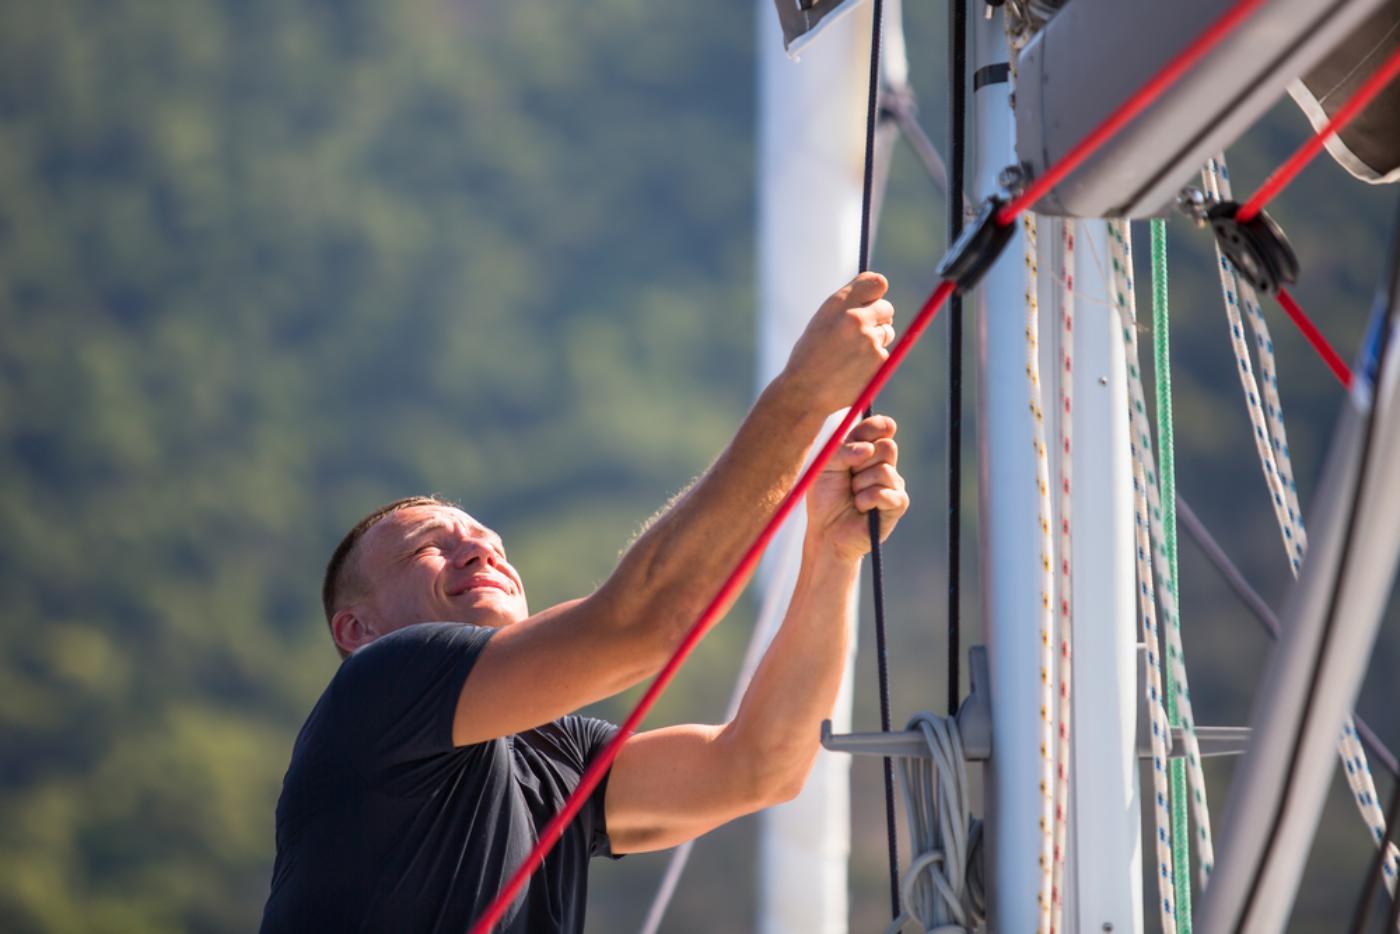
The mainsail is raised up the mast by the main halyard, a rope or wireline that rises from deck level to the masthead, through a block, and down to a shackle that connects to the top corner of the mainsail, the head. The halyard may also rise up through the mast to reduce windage aloft, as in the boat shown in this photo, and exit at a point near the deck. Pulling down on the halyard raises the sail. In most cases, the mainsail is raised and the boat is underway before the jib is raised or unfurled.

Steps to Raising the Mainsail
- On a small sailboat on a dock or mooring , the mainsail is typically raised before the boat is underway, following these steps:
- Attach the shackle to the clew in the head of the mainsail. Use pliers or a shackle knife to ensure it is tight, or vibration could release the shackle while sailing.
- Release or loosen the mainsheet so that wind against the rising sail does not cause resistance. The goal is for the leading edge of the sail to face into the wind so that the sail is not strained by wind blowing against either side.
- Ensure the sail is ready to be hoisted, with the boltrope or sail slugs at the sail's luff in the sail groove of the mast.
- Pull the halyard down by hand until the luff is tight. If the halyard becomes tight before the sail is up, check that the bolt rope or sail slugs are not jamming, and look aloft to ensure the free section of the main halyard has not wrapped around something. If there is a jam, lower the sail a bit to clear it, then proceed.
- When the luff is as tight as you can get it, cleat off the halyard.
- Now you’re ready to go. Sheet in the main to get the boat moving forward, or back the main (manually push the boom out into the wind) to turn the boat off the wind to begin sailing.
Raising the Mainsail on Large Boats
On a larger sailboat with a bigger mainsail, the process is similar but usually involves additional steps:
- Because the bow must point directly or nearly into the wind to ease tension on the mainsail as it rises, the sailboat usually motors off the dock and into the wind in preparation for raising the main. At anchor or on a mooring, unless there is a strong counter-current, the bow will naturally face into the wind.
- After ensuring the shackle is tight and the halyard clear to run up, loosen the mainsheet slightly while the boat maintains its orientation into the wind. Then start raising the main by hand.
- On a larger boat, a winch is usually needed at some point because of the weight of the mainsail. The winch may be located on the mast, a straight pull down on the halyard from the masthead, or in the cockpit, where the halyard is led through one or more turning blocks. Wrap the halyard on the winch and start cranking to continue hoisting the main until the luff is tight.
- As with a smaller boat, keep watching that the sail is moving up smoothly and does not jam. Because of the winch’s power, if you keep cranking in the halyard when the sail or halyard jams, you may break something!
- When the luff is tight, cleat off the halyard. Bring in the main with the mainsheet to start the boat underway.
Problems to Watch For
- Loose shackle: Many sailors remove the mainsail shackle after each sail and affix it elsewhere such as to the lifeline; then they tighten it each time. Sailors who leave the halyard attached to the sail for extended periods, however, should check occasionally to ensure it hasn’t loosened up.
- Jammed sail slugs: Sail slugs wear and may jam in the sail slot, or the slot may become dirty and cause jamming. If the sail is getting harder to raise, check the slugs to see if they need replacing and lubricate the sail track .
- Snagged halyard: A halyard that is too loose may flop around and snag on any mast fitting, such as an attachment for lazy jacks, or may even wrap around a spreader.
- Frayed halyard: A seriously frayed halyard may jam in the block at the masthead. Although the sail can usually still be moved up and down, inspect the length of the halyard to see if it has frayed or worn at any point. If so, replace it before it breaks.
- Broken halyard block: If the halyard is running free but seems to jam at the masthead, you may need to climb the mast to inspect the block. Its sheave could be cracked or damaged. In such case have it repaired right away. It can be dangerous not to be able to drop the mainsail immediately if the wind comes up suddenly.
- Learn How to Sail a Small Sailboat – 1. The Parts of the Boat
- Simple Reefing System for Sailors
- How to Use a Topping Lift
- How to Use Roller Furling
- How to Tack a Sailboat
- Using a Sailboat Boom Vang in Sailing
- How to Rig a Preventer Line
- How to Tow a Dinghy Behind a Sailboat
- How to Gybe a Sailboat
- How to Use a Mainsheet Traveler
- How to Heave To a Sailboat
- How to Anchor a Sailboat
- Control Your Tiller Without a Tiller-Tamer
- Choosing a Centerboard or Fixed Keel Sailboat
- How to Use a Sailboat's Outhaul
- Top 100 Alternative Albums of the 2000s
How To Raise And Hoist The Mainsail

Last Updated by
Daniel Wade
June 15, 2022
Sailing is one of the best adventures that you can have. You do not need an expert to guide you on this adventure, you can do it on your own. You just need to learn the basic things and terms in sailing, and off you are to a voyage of fun and adventure. This article will guide you on the the raising and hoisting of the main sail for a fun filled sailing adventure.
Raising as well as hoisting the mainsail is one of the steps you have to take when setting sail. Normally, this is not a difficult task, but for those people who are quite new in sailing, it might present some few challenges. If you are a beginner in this, you don’t have to worry because you will soon know how to do it perfectly well.
Just remember that for you to have a smooth sail, you should raise and proceed to hoist the mainsail the right way. If things are not in the right condition, there might be a problem. That is why sailors need to be careful on this. Here are steps you can follow to undertake this task quickly, smoothly, and easily without any problems.
Table of contents
1. Preparation
If the sailboat is a larger one, you should ensure that its bow is pointing in the direction of the wing prior to hoisting. The significance of this is that it will help you to minimize the tension of the wind. Proceed to take the sailboat away from the dock and steer the sailboat in the direction of the wind. Unless there is a strong counter-current, the bow should obviously point towards the direction of the wind. The use of a small sailboat on a dock or on a mooring, requires that you do the same prior to the sailboat being underway.
The next step is the fixing of the shackle to the mainsails head clew. It has to be tight enough for you to have a smooth sail. A shackle or even a pair of pliers can do a good job when tightening the shackle. If for any reason you fail to tighten it well enough, it might be released because of the vibration resulting from sailing. It is important that you ensure that it is tight enough in order to avoid poor outcomes.
3. Loosening the Mainsheet
Loosening or the release of the mainsheet is very important. The wind can cause a lot of resistance when raising the sail. Therefore, the main aim of loosening or releasing the mainsheet is to ensure that the wind doesn’t cause a lot of resistance. It’s pivotal that one ensures the leading sail edge should face the wind. The point of this is to make sure that the mainsail is not strained as the wind blows against either side.
4. Checking if the Halyard Can Run Up
Confirm if the Halyard is ready to run up. Also, check how tight the shackle is. Be very sure in this step because if you fail to verify correctly, you are highly likely to encounter challenges that might delay you from heading into the deep waters.
5. Be Ready For Hoisting
Before you begin the hoisting of the sail, it’s advisable for you to double-check if everything is set. Remember, there are multiple factors that affect the quality of the hoisting process; hence, be careful that nothing affects it.
6. Pulling the Halyard Down
Pulling of the Halyard down and checking how tight the luff is, is a very critical stage. There are a few things you should check out during this process. Firstly, if the halyard is tightened prior to the sail being up, it’s good to ensure the optimal functioning of the rope and the sail lugs. Additionally, examine the halyard free part to make sure it doesn’t have anything covering it up. Check if there is something jamming your process. If there is, the best thing to do is to lower the sail and make sure that everything is functioning at its best.
7. Using the Winch
At some point, utilize a sailboat winch . This is particularly so when you are dealing with a larger boat. In such a situation, you will need a winch because of the mass of the huge mainsail. If you will find it necessary to use the winch, the halyard should be wrapped and continue turning over to hoist the sail up to the point when the luff gets tight. You have to note, however, that you should be very careful during this step not to break anything. Be sure that the mainsail and the halyard are not jammed. In case these parts are jammed, you might end up breaking things. This can be compounded by winch power.
8. Cleating the Halyard
The next step is to cleat the halyard. Check to make certain the luff is not loose before cleating the halyard. Remember, the luff has to be tight enough to avoid any complications. Therefore, the luff should be tightened before cleating the halyard.
9. You Are Now Ready To Go
At this point, you are ready to get going and discover the waters. You should sheet the boat in order to start moving. You can also opt to manually set the boom in motion. Do bear in mind that when you are on the water, your safety matters a lot, and this is a factor which should not be underestimated.
10. It’s Time to Enjoy Your Sailing Adventure
All you need to do is to put on your sunglasses and enjoy your adventure.
Potential Issues
It’s important that you take note of the following issues because they can cause serious problems if you fail to provide proper attention to them.
1. Loose Shackle
The shackle should not be loose. You should always ensure that when you are raising and hoisting the mainsail, the shackle is tight enough. If by any chance you happen to leave the shackle attached to the halyard for a long period of time, it’s advisable to make sure that it is tight prior to sailing. If you remove a shackle after a sail and you attach it prior to raising the sail for another sailing trip, that is not a problem. What you need to always be aware of is that it’s tight enough for quality functioning.
2. Frayed Halyard
A frayed or worn out halyard is not good for a sail. The halyard should be in a good condition for you to have a successful sailing trip. In the case you want to use a frayed halyard, there is a likelihood that it might end up jamming, which is definitely not good when you want to sail. While a frayed halyard can still work, it’s wise to do an inspection to ascertain whether you should use it or replace it. If it’s seriously damaged, just replace it.
3. Jammed Sail Slugs
When the sail is becoming problematic to raise, check if the problem is with the sail slugs. There is a possibility of the sail slugs not being at their best and, as a result, they may jam and cause some serious problems. The sail slot may be dirty and make the sail slugs not function at their best. You have to check and ascertain whether you need to lubricate the sail track or replace the sail slugs. This will help to minimize cases of jammed sail slugs.
4. Snagged Halyard
The halyard should not be too loose. If it’s very loose, it will make it difficult for you to do the raising and hoisting of the mainsail. Check this to be certain that it’s at its best.
5. Broken Halyard Block
In the case the halyard is having problems at the masthead, this should signal to you that something is not right and, therefore, action should be taken immediately. This might deem it necessary to have the halyard block replaced. In cases where the halyard jams, it could be because the halyard block is broken. Hence, the best thing to do is to replace it in order to avoid possible inconveniences.
This is a very important exercise before you start sailing. You should clearly follow the steps involved in the raising and hoisting of the mainsail. It shouldn’t be a big problem for you to succeed in this task if you follow the steps correctly. Again, remember to take note of the aspects that you should be aware of to avoid any complications. As you take your next sailing trip, learn about the raising and hoisting of mainsail well, and you will, definitely, be in a position to enjoy your sailing experience.
Related Articles
I've personally had thousands of questions about sailing and sailboats over the years. As I learn and experience sailing, and the community, I share the answers that work and make sense to me, here on Life of Sailing.
by this author
How to Sail
Most Recent

What Does "Sailing By The Lee" Mean?
October 3, 2023

The Best Sailing Schools And Programs: Reviews & Ratings
September 26, 2023
Important Legal Info
Lifeofsailing.com is a participant in the Amazon Services LLC Associates Program, an affiliate advertising program designed to provide a means for sites to earn advertising fees by advertising and linking to Amazon. This site also participates in other affiliate programs and is compensated for referring traffic and business to these companies.
Similar Posts

How To Choose The Right Sailing Instructor
August 16, 2023

How To Sail From California To Tahiti
July 4, 2023

How To Tow A Skier Behind A Boat
May 24, 2023
Popular Posts

Best Liveaboard Catamaran Sailboats
December 28, 2023

Can a Novice Sail Around the World?
Elizabeth O'Malley

4 Best Electric Outboard Motors

How Long Did It Take The Vikings To Sail To England?

10 Best Sailboat Brands (And Why)
December 20, 2023

7 Best Places To Liveaboard A Sailboat
Get the best sailing content.
Top Rated Posts
Lifeofsailing.com is a participant in the Amazon Services LLC Associates Program, an affiliate advertising program designed to provide a means for sites to earn advertising fees by advertising and linking to Amazon. This site also participates in other affiliate programs and is compensated for referring traffic and business to these companies. (866) 342-SAIL
© 2024 Life of Sailing Email: [email protected] Address: 11816 Inwood Rd #3024 Dallas, TX 75244 Disclaimer Privacy Policy
- Sailing 101: The mastery of hoisting and setting sails
The mainsail, with its expansive canvas, plays a pivotal role in powering a sailboat. Its mastery can enhance the sailing experience, ensuring safety and efficient navigation. But how do you raise and hoist the mainsail effectively?
Basics of a mainsail
The mainsail, as the name suggests, is the primary sail on a sailboat. Before understanding the hoisting technique, it's vital to grasp its components:
- Boom: The horizontal pole at the base.
- Luff: The front edge attached to the mast.
- Leech: The trailing edge.
This triangular sail transforms wind into forward motion, enabling the boat to glide smoothly across waters.
Safety precautions
Before hoisting, always check your equipment for wear and tear. A frayed rope or a damaged pulley can be hazardous. Additionally, always assess the weather; calm conditions are ideal for beginners.
Read our top notch articles on topics such as sailing, sailing tips and destinations in our Magazine .
Step by step guide to raising the mainsail
Raising the mainsail is a fundamental skill every sailor should master. Whether you're a novice or just looking for a refresher, here's a step-by-step guide to help you hoist the mainsail smoothly and safely.
Prepare the deck and cockpit
- Ensure the boat is pointing into the wind to reduce pressure on the sail.
- Tidy the cockpit, removing any obstacles and ensuring all lines are free from entanglement.
Inspect the sail
- Lay the mainsail out on the deck and inspect it for any damages, such as rips or worn areas.
- Make sure all battens are securely in place.
Attach the halyard
- Connect the main halyard (the rope used to raise the sail) to the head of the mainsail.
- Ensure there's no twist in the halyard and that it runs freely.
Loosen the mainsheet and boom vang
- These control the tension of the sail and boom angle. Make sure they're loose so the boom can lift freely as the sail is raised.
Feed the sail slugs
- If your sail has slugs or cars, make sure they are fed into the mast track correctly. Start from the bottom and feed each one individually.
Begin hoisting
- Pull on the main halyard steadily, raising the sail up the mast. Use winches if your boat has them to make the job easier.
Keep an eye on the sail
- As you're raising the sail, ensure that it doesn’t snag or catch anywhere, especially if you have sail slugs or cars.
Secure the halyard
- Once the sail is fully raised, make sure the halyard is securely cleated off so the sail doesn’t slide down.
Tighten the mainsheet and boom vang
- Adjust them to the desired tension, depending on the sailing conditions.
Final check
- Look aloft to ensure the sail is set correctly and not twisted. Adjust as necessary.
Safety tips:
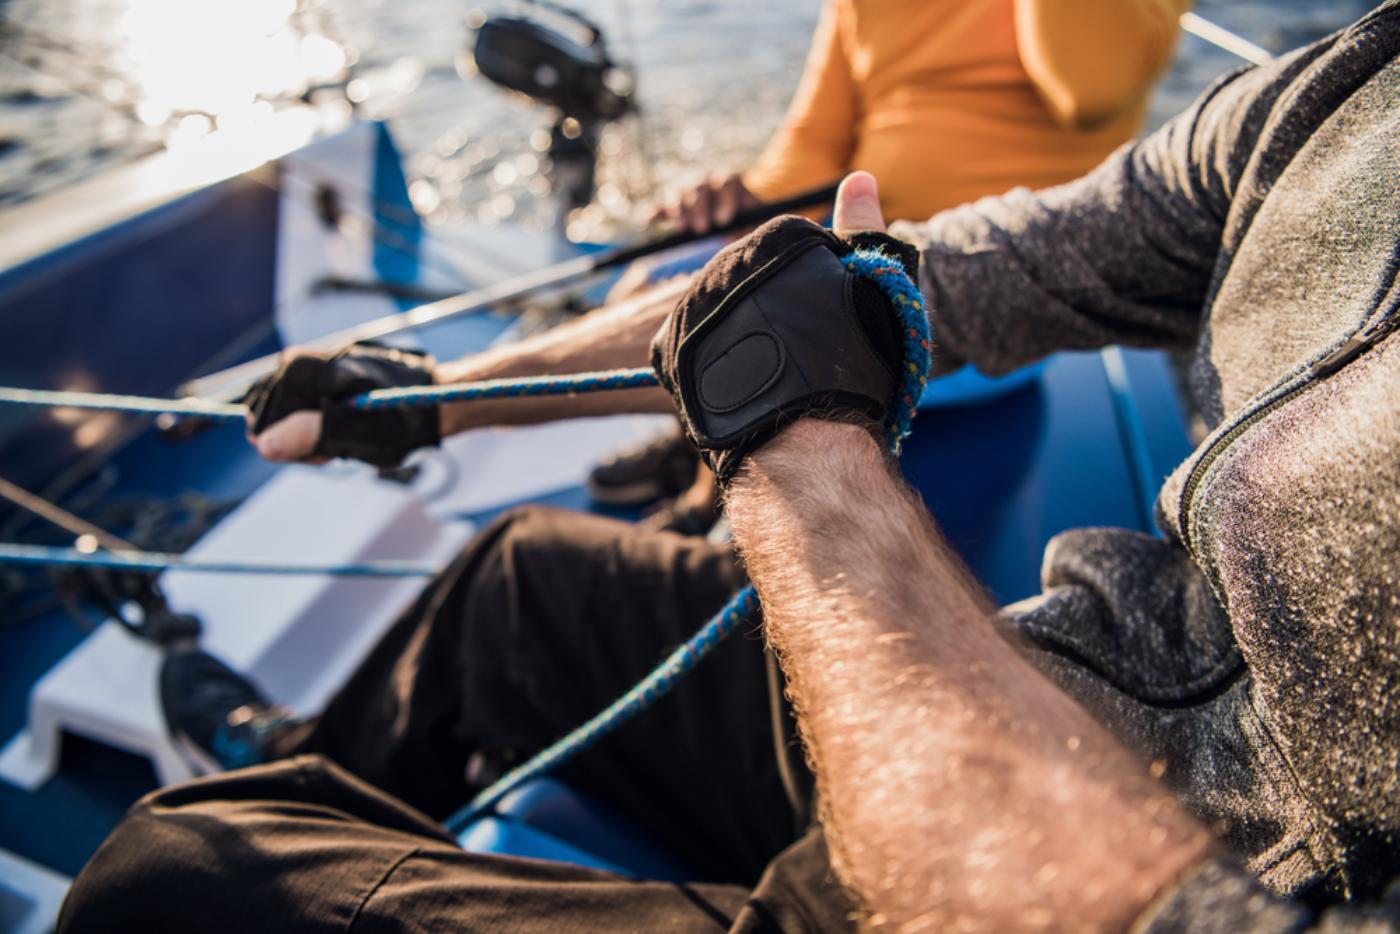
- Always wear gloves when handling ropes to prevent burns or injuries.
- Ensure all crew members are informed and aware when you're about to raise the mainsail.
- If raising the sail becomes difficult, stop and check for snags or obstructions.
With practice, raising the mainsail will become a swift and smooth operation. Remember to always prioritize safety and never rush the process. Happy sailing!
Enjoy the power of the wind.
Maintaining tension and setting the sail
Once raised, the mainsail's tension is crucial. Adjust the halyard to eliminate any wrinkles along the luff. Use the outhaul to stretch the sail horizontally and the Cunningham for vertical tension.
Common issues
Jamming: If the sail doesn't rise smoothly, check for obstructions or twists in the lines.
Flapping and luffing: This indicates that the sail isn't catching the wind properly. Adjust your boat's direction or the sail's tension.
Always be aware of the wind's direction. Hoisting the mainsail while facing into the wind can make the process smoother. Also, effective communication with your crew can prevent mishaps.
Dropping the mainsail safely
When it's time to lower the mainsail, release the halyard gradually, ensuring the sail descends in a controlled manner. Once down, fold and stow it away, ready for the next adventure.
Raising and hoisting the mainsail is an art that, when mastered, offers a gratifying sailing experience. With practice, patience, and the above guidelines, you'll be navigating the waters with confidence in no time.
So what are you waiting for? Take a look at our range of charter boats and head to some of our favourite sailing destinations .
How Raise or Unfurl Sails
If you’re hoping to learn how to sail, at some point, you’ll need to raise (i.e., “hoist”) or unfurl your sails. First things first. When someone says “unfurl”, they mean to unroll and open up your sails (and there are a few ways that this can happen). When someone says that a sail needs to be “raised” or “hoisted” – this means that it has been stored (“stowed”) without being rolled, but it needs to be “raised” up the mast rather than “unrolled” or “unfurled”. Whether you’re going to be unfurling or raising depends entirely on how your boat stores its sails.
How mainsails can be stored:
- Lowered and lashed onto the boom
- Lowered into a stack pack (a long bag permanently mounted above the boom)
- Rolled into the mast (mast-furled mainsail)
- Rolled onto the boom (boom-furled mainsail)
- Removed and folded into a sail bag for stowage below
One of the fun things about sailing (or teaching about sailing) is that everyone has an opinion about the “best” way to do something. It makes for fun debate! What we’ve found is that while there are certainly wrong ways to do things like raise/unfurl a sail (ways that are unsafe for the sailors or the boat), there can also be multiple right ways. Everyone has their own preferences, often relating to the specific boat they are sailing — we sure do!
And speaking of teaching, portions of this post come out of Module 5 of our Introduction to Sailing NauticEd course. If you’d like to learn how to sail, we highly recommend starting with a course like this so you can get used to the sailing terminology and learn some basics.
As you get more comfortable with sailing, you’ll find that you’ll develop your own process, especially for the tasks you do every time you sail (like raising or unfurling the sails). A process that stays the same each time is an excellent recipe for success, especially if you need to move quickly. Here are the ways that we start teaching beginners how to raise/unfurl the sails.
How to raise or unfurl the mainsail (the basics)
- Prepare: loosen the mainsheet, boomvang, cunningham, and reefing lines (if taut)
- Steer into the wind and stay directly in the wind (you might need to keep a little engine speed to maintain steerage)
- Raise (hoist) or unfurl the mainsail (we go through the most common ways to do this in Intro to Sailing)
- Cleat off the halyard and tighten down on the cunningham
- Tighten the mainsheet appropriately
- Bear away from the wind and get the boat sailing
- Turn off the engine
The amount of tension in the leading edge (luff) through the halyard or cunningham relates to wind strength. Light winds? Slight tension so that the sail stays baggy and has lots of shape. High winds? High tension so the sail is less curved.
How to unfurl the headsail
- Have the downwind jib already wrapped 2-3 turns around its winch (you can’t hold it by hand if the wind is strong).
- Check the jib furling line and make sure it’s laid out and won’t tangle when it flows out.
- Pull (haul) on the downwind jib sheet and the headsail will unfurl and start filling with wind.
- Ideally, keep light tension on the jib furling line to keep it from jamming or overlapping in the drum.
- Control how quickly it unfurls by wrapping the jib furling line around a winch or cleat to slow it down.
- If the furling lines are allowed to unfurl as quickly as they want to (you’re not controlling them), you can create bird’s nest in the furling drum. Just to make sure, check the furling drum after the jib is up.
- Look aloft! Chase every line its full length with your eyes as you winch in. If it’s tangled, whoever is cranking the winch is just pulling against the furling system.
How to raise the headsail
- Select the appropriate size headsail (high winds = smaller sail needed): #1 is the largest (the genoa), #2 is for midrange, #3 is the smallest for high winds.
- Prepare the headsail for deployment before leaving the marina: – Lay the headsail out on the foredeck. – Attach the headsail halyard to the head (the top connection point) of the headsail – Attach the tack of the headsail to a clip mounted at the base of the forestay – Attach the clew of the headsail to the jib sheets (we recommend using the bowline knot ) – Run the jib sheets back through the appropriate fairleads that will guide the jib sheets back to the cockpit. – Clip the hanks (small clips permanently attached every 2-3 feet around the bolt rope of the leading/luff edge of a headsail) onto the forestay. – Use sail ties or bungies to secure the sail down to the foredeck. Alternatively, many sailors permanently attach shock cord to the toe rails to quickly secure the headsail to the foredeck.
- When your mainsail is up and you’re sailing, untie the sail ties as another crew member pulls on the headsail halyard.
- Move back to the cockpit (flapping headsail and jib sheets can be dangerous)
- Trim the leeward headsail sheet with the headsail sheet winch.
You’ll notice that we didn’t go into detail about the mainsail because it is so dependent on how the mainsail is stored and requires a little more space than a blog post. In the Intro to Sailing online sailing course , we talk about these different ways to unfurl or raise a mainsail and then also have some handy interactive graphics for all of us visual learners. This really is a great place to start, especially if you’d like to go sailing as a crew member and want to feel like you know the language and some basic sailing principles. In other words, you can impress your skipper!
Introduction to Sailing Course
No experience required. If you're just getting started in sailing and want to dip your toes in, then this course is for you. We'll "show you the ropes" so to speak - but actually, we'll show you a lot more than just the ropes.
Start with 2 Free Sailing Courses
Sign-up and get 2 free courses and a free sailing eLogbook to build your sailing resume for charter companies worldwide.
- Recent Posts

- Best Mediterranean Wine Regions to Explore on a Yacht Charter - August 27, 2023
- Best Family-Friendly Charter Destinations - August 27, 2023
- Yacht Charter Options - August 27, 2023
You might also like

TWEET ABOUT

FIGHT CHILDHOOD CANCER
NauticEd is a fully recognized education and certification platform for sailing students combining online and on-the-water real instruction ( and now VR ). NauticEd offers +24 online courses , a free sailor's toolkit that includes 2 free courses, and six ranks of certification – all integrated into NauticEd’s proprietary platform. The USCG and NASBLA recognize NauticEd as having met the established American National Standards. Learn more at www.nauticed.org .

The NauticEd Vacations team are Expert Global Yacht Charter Agents – when you book a sailing vacation or bareboat charter through NauticEd, we don’t charge you a fee – we often save you money since we can compare prices from all yacht charter companies. PLUS, we can give you advice on which destination or charter company will suit your needs best. Inquire about a Sailing Vacation or Charter .
Online Sailing Courses Sailing Vacations | Charters Practical Sailing Courses Sailing Certification | License
Sign up for 2 FREE Sailing Courses Try sailing in Virtual Reality! Gift a Friend a Sailing Course Sailing Events | Opportunities
About NauticEd Contact Us NauticEd Support Privacy Policy

Yachting Monthly
- Digital edition

Mainsail furling systems: an expert guide
- Graham Snook
- December 21, 2020
Some sailors swear by mainsail furling systems, others swear at them. Graham Snook looks at way to keep your furling mainsail in check

In-mast furling mainsails (left) have evolved significantly, and vertical battens allow more roach and better sail shape. Credit: Graham Snook
Mainsail furling systems have come on a long way.
Sails no longer need to be wrapped around a boom, nor does an in-mast mainsail need to be the hollow-leached, baggy triangle we first saw decades ago.
Furling mainsail systems can now offer more sail area than a traditional slab-reefed mainsail.
Be that as it may, every slab-reefed sailor knows a horror story about in-mast or in-boom furling that is enough to make them steer well clear, while those that have furling mains wouldn’t put to sea without one.
There is little doubt that furling mainsails are gaining in popularity, even for serious offshore cruising boats.

Get mainsail furling wrong and it can lead to costly and potentially dangerous problems. Credit: Graham Snook
In 2018, 38% of boats sailing round the world in the World ARC had furling mainsail.
Hallberg Rassy reports that almost all new owners buying boats over 40ft opt for furling mainsail systems, with Discovery reporting a similar trend.
So has the reputation of furling mainsails been unfairly tainted, and are they more prone to user error, or have the systems ironed out the glitches?
Whether you’ve got a furling main on your own boat, or if you’ll be using one when you charter, it’s worth knowing how to avoid the pitfalls of furling mainsails.
How do furling mainsail systems work?
In an age where we expect everything just to be simple and to work, letting off one line, and pulling another to make the mainsail appear or disappear sounds appealing, but what is the best way to furl the mainsail?
Is there a correct way to do it?
‘Carefully,’ replies Jeremy White,of Elvstrøm Sails UK. ‘They’re mechanical systems and they need to be operated correctly.’
Whether you have in-boom or in-mast, they both work on a similar principle which anyone with a furling genoa will be familiar with.
Inside the mast is an aluminium foil that takes the luff of the mainsail, and in a boom a mandrel takes the foot of the mainsail; both the foil and the mandrel revolve to roll up the sail.
A lot of issues with in-mast furling are caused by the sail not furling properly inside the mast and the furl being too bulky or the sail rubbing on the inside of the mast.
Many in-boom problems are caused by an uneven furl with the sail bunching at one end or the other.
There are a number of issues to look out for with each system to ensure stress-free furling.
Different options
If you’ve bought a new boat that was ‘good value’ and it came with sails, question how good those sails really are.
Many original Dacron sails are built to a price that will get you on the water and get you sailing, but they may not be built for longevity or performance unless you’ve specified them and know what you’re getting.
There has been much advancement in furling mainsail design, improved materials, vertical battens, and increased sail area.
Many new furling mainsail systems present a larger sail area than that of a conventional slab reefing sail.
But what should you be looking for when buying a new sail?
‘Whichever sailmaker you choose, get the highest quality material you can afford,’ advises Jeremy.
It’s a false economy to buy cheaper sailcloth as it will stretch and you’ll be left with a baggy sail after a few seasons.
For example, the luff of laminate sail (on a 45ft yacht) might only stretch 15mm over its lifetime, but on a polyester sail that might be as much as 15 cm.
That excess sail has to roll up in the same space as did when it was new.
For those wanting maximum sail area, and sail support, full-length vertical battens are the way forward.
These support the leech giving a good full roach, and importantly, they support the sail over its full height which gives it rigidity while it’s being furled, whereas shorter, vertical roach battens can leave the sail unsupported at their base causing furling problems.
For those without the budget or desire for a battened sail using modern materials, a sail with a hollow leech still offers many advantages over a slab reefing system, namely ease of reefing, the ability to set exactly the right amount of sail, and the simplicity of stowing, even if you do lose some power from a smaller sail area and a less perfect aerofoil sail shape.
If you’re having new sails made consider getting them silicone-coated.
This helps the sail slide over itself making the furl inside the mast tighter.
In-mast furling
It may be a simple system, but how you unfurl and furl the main will help avoid problems.
If you were to look down from the top of the mast, the foil usually rolls onto the foil in anti-clockwise direction, that is, the unfurled sail comes off the starboard side of the foil, though it’s worth checking on yours.
This is the key to getting in-mast furling to work correctly; trying to furl on a port tack drags the full height of the sail over the side of the mast slot, adding friction where there shouldn’t be any.
Furling on starboard tack obviates most of this friction while you furl.

Full-height battens support a larger roach, but make the furled sail more bulky. Credit: Graham Snook
Whether letting the sail in or out, the first thing is to release the backstay (to straighten the mast so the foil doesn’t rub) and put the boat on a starboard tack – with the wind slightly forward of the beam – this is so the sail feeds cleanly into the mast and around the furler inside.
Unfurling the sail is usually pain-free if the sail was furled correctly.

With the yacht on a starboard tack and the wind forward of the beam, release the mainsheet and vang.
Ensure the furling line is released then pull out the sail using the outhaul.

Ease the outhaul as your furl so the sail doesn’t flog but isn’t loaded up either. Credit: Theo Stocker
You shouldn’t need to control the furling line as there should be no pressure on the sail, even on a windy day.
If you intend to be reefed, however, don’t let it run unchecked. When the right amount of sail is out, make off the furling line. If you’re reefed, tension the outhaul to give the sail the correct shape (flatter in stronger winds and when close-hauled) then set the mainsheet and vang and away you sail.
- Release the backstay (if you have one)
- Put the boat on a starboard tack – with the wind slightly forward of the beam
- Release the mainsheet and vang
- When the right amount of sail is out, make off the furling line
- Tension the outhaul to give the sail a correct shape, then sheet in
To furl the sail, after letting off the backstay and putting her on a starboard tack with the wind slightly forward of the beam, let off the mainsheet and then ease the outhaul a little and start to furl.
Always look at the sail as you’re furling – you’ll be able to notice issues as they happen and not after you’ve wound an inch-thick clump of sail through a half-inch gap.

Having different coloured lines can make things simpler for your crew. Credit: Theo Stocker
If your sail has full-length vertical battens ensure the first batten is parallel with the mast when it enters, and if reefing, leave a batten just outside the mast groove.
Keeping too much tension on the outhaul will drag the foil aft in the mast, bending it and causing the sail to rub against the inside of the mast, creating friction.
Once you’ve taken the slack out of the sail, ease the outhaul and take in on the furling line again.
Try not to let the sail flog as this also bends the foil and causes more friction.
Repeat the ease-furl process until only the UV protection strip is showing.

Sail on starboard with wind forward of the beam for easy furling. Credit: Theo Stocker
If you have laminate sails, and they have been furled away wet, try to dry them at the first opportunity.
If you’re having problems furling using the lines, don’t be afraid to go to the mast with a winch handle and furl the sail at the mast.
Try it one day, it is remarkably easy.
If you’re having to do anything different, such as raising the boom or chanting a prayer to the god of furling fails, it’s worth looking at your system in detail for problems.
- Release the backstay
- Ease the outhaul a little
- Take in on the furling line
- Keep easing the outhaul and taking in on the furling line
- Furl the sail until the UV strip is showing at the mast
Problem solving
If furling the right way still isn’t working for you, there are a number of things to consider…, 1. understand your system.
First to check is to have a look inside your mast at which way your system should furl.
If your furling system has the option, put a winch handle in the furling mechanism at the mast and turn it the direction indicated to make sure the sail is going into the mast in the correct direction.
Clicking over the ratchet at the mast before it’s time to furl will ensure it always rolls in the right direction.
2. Assess your sails
The biggest cause of problems is the sail itself – how old it is and the material it is made from.
Stretch in the cloth makes baggy sails, which furling systems will happily munch on.
Furling mainsails are cut flatter than conventional slab-reefing sails as accommodating the belly of the sail is problematic.

An old or baggy sail may cause jams, as will creases from not enough halyard tension. Credit: Theo Stocker
Some older furling mains may have be made with an inappropriate, fully-bellied shape.
If your polyester sails have a deep belly, think about getting new ones as you’ll be fighting a losing battle.
As the belly folds, it doubles the thickness of the furl, causing unsightly and inefficient creases at best, and hideous sail jams or rips at worst.
3. Adjust halyard tension
Excess halyard tension can also cause the fabric to bunch up; vertical creases at the luff cause the sail to fold over itself.

Vertical creases at the luff reveal too much halyard tension, and potential for more snags. Credit: Theo Stocker
To resolve this, release the halyard until you have horizontal creases at the luff, then add just enough tension to remove them, though you may need to adjust this when underway.
4. Check the backstay
While the mast is bending, the foil inside it remains straight; the furled sail will bind at the apex of the mast’s bend.
If all of this fails, it’s worth calling a rigger to check the foil tension.
If this has gone slack, as you furl the foil will bend and rub against the mast.
5. Smooth it out
The next thing to look at is reducing friction.
As is often the case, the lines to your furling gear and outhaul are led through various fairleads and blocks across the deck and up the mast.

Move deck organisers to give slacker turning angles. Credit: Theo Stocker
Make sure all the angles they have to go through are a wide as possible – consider moving them if not – and all blocks and sheaves are running smoothly.
A good wash with fresh water and a squirt of dry lubricant can work wonders.
In-boom furling
Not a new concept, in-boom furling is an elegant solution, but brings its own challenges.
Unlike in-mast furling, in-boom systems can be retrofitted in place of conventional slab reefing.
For an in-boom furling system to work efficiently, however, it has to overcome a number of problems.

To start with, have a crew on deck to watch the sail as it furls to spot any issues. Credit: Advanced Rigging and Hydraulics
First of all, the sail has to be led from the boom to the mast, but there needs to be space for the bearings for the central mandrel and the boom’s gooseneck fitting, so the whole sail has to move aft along the boom.
To combat this, many in-boom systems have a protruding track on the trailing edge of the mast, while other units have the reefing mechanism at the aft end of the boom, or sometimes you’ll find a combination of both.
Whatever the system, there is usually a flexible feeder to guide the sail from the boom and feed it into the mast track.

The furling drum at the outboard end of the boom brings the main closer to the mast. Credit: Advanced Rigging and Hydraulics
Another issue with in-boom furling is the bolt rope, as Andy Cross from Crusader sails explains.
‘The sail has to use a bolt rope, and with it comes friction. Unlike a furling genoa that may only be raised and lowered once a season, the mainsail is nearly always used so the luff tape has to be reinforced.’
Any wear or damage to the bolt rope also requires a new bolt rope along the full luff of the sail, as any repairs would soon wear through and increase the friction.
The necessary extra reinforcement at the luff brings with it another problem: extra cloth thickness at the front end of the sail.

When reefing, stop when a batten is just above the mandrel, then take in on the furling line. Credit: Graham Snook/Yachting Monthly
As the sail rolls around the mandrel there is more sail material at the luff than across the rest of the sail.
The solution?
To slightly raise the aft end of the boom, allowing the extra sailcloth at the luff to roll at a rate that matches the leech.
The angle from the mast to the top of the boom has to be 87° to the mast, 3° above perpendicular.
The full-length battens in the mainsail help stabilise the sail as it furls and the batten pockets have been attached to the sail to match the mandrel angle.
It’s the thickness of cloth at the luff and the battens that make the correct boom angle the most important part of the system.

The necessary bulk of the boltrope makes the boom angle critical.
Get that right and your life suddenly becomes a whole lot easier.
It’s essential to mark the vang when the boom angle is correct.
Some owners choose to make a strop, running next to the vang, out of a low-stretch material like Dyneema, so the topping lift can be pulled taught and the strop prevents the boom raising higher than it should.
When marking or limiting the boom angle, it must be easy for any crew to see, by day or night.
How to get it right
1. prepare to set sail.
‘Before raising, lowering, or reefing the mainsail,’ explains Kim Petersen, Elvstrøm Denmark’s in-boom sail specialist, ‘get into the habit of always releasing the backstay tension – this will successfully straighten the mast and takes any flattening tension out of the sail – and then making sure the boom is at the correct angle – this is extremely important.’

Be careful with electric winches not to over-tighten halyards. Credit: Graham Snook
To raise the sail, after slackening the back stay and adjusting the boom level, point the boat into the wind, release the mainsheet and take up on the mainsail halyard, making sure that the furling line can run free as you hoist the mainsail.
Once set, increase the halyard tension until the horizontal creases at the luff have just gone.
2. Reducing sail power
If you don’t need full sail, only raise the sail until the nearest batten is at the mandrel.
Rather than being able to reef at any point, where the lower battens are fitted, the sailmaker will have reinforced the sail to take the clew loads.
Not reefing at these points means an area of unreinforced leech could be required to take a load it was not designed for.

Each batten represents a reefing point. Credit: Graham Snook
You’ll end up with fullness at the foot of the sail and a stretched leech, or a damaged sail.
If you need to flatten the sail, for better pointing or in stronger winds, take in on the furling line without adjusting the halyard tension.
This will give the same result as using a cunningham to tighten the luff.
Furling the main
When lowering the sail, release the backstay and set the boom at the correct angle.
It’s then best to take all the pressure off the sail by heading into the wind.
It doesn’t matter if the sail is flogging; the battens keep the sail rigid and support it as it furls.
If there is any pressure on the sail, this will cause it to furl unevenly.

With in-boom reefing you should still have a good sail shape even when deeply reefed. Credit: Graham Snook/Yachting Monthly
Unlike an in-mast furling system, where the sail is visible, on an in-boom system everything is happening on top of the boom, overhead and out of sight.
If you have a crew member spare and it’s safe, sending them to the mast to keep an eye on the sail as it furls can prevent damage, at least for the first few times using the system.
Pull in on the furling line, slowly and smoothly releasing the mainsail halyard, but keep a bit of tension on it.
Continues below…

The tools and spares you shouldn’t sail without
Give a thought to your inventory this winter to keep you cruising next season, says Rachael Sprot

Why you should regularly check your deck fittings
What’s really going on under your deck fittings? Ben Sutcliffe-Davies investigates the hidden weaknesses

Essential reefing tips for cruisers
Reefing: how, when and why do we do it? The answers may not be as straightforward as you think, says…
How to: replace a halyard
Whether you’re replacing an old halyard for new, or mousing the mast over winter, Rubicon 3’s Rachael Sprot explains how…
If you have too much tension the sail will want to roll away from the mast; if you’re seeing creases running from the bottom of the track to the boom at 45°, release the halyard a little more.
If the sail is rolling up toward the mast, you’ll need to increase the tension a little.
As the sail furls, the luff tape will naturally first roll aft, then move forward and repeat this – it’s all perfectly normal.
Once the sail is fully down, tuck the head into the boom if your system allows it, and add the sail cover.
Reefing underway
To reef when sailing, release the backstay and set the boom angle.
In rough weather, or when there are big seas, it’s best to take up on the boom’s topping lift to secure the boom and stop it rising and falling as the yacht goes over the wave crest.

Cover the sail once stowed to protect from UV. Credit: Advanced Rigging and Hydraulics
You’ll find it easier if you can bring the boat onto the wind and release the mainsheet to remove all drive from the mainsail; if the sail is flogging it’s depowered and can still be furled.
Next, take in on the furling line while slowly and smoothly easing the halyard as the sail furls.

Graham Snook is a marine photographer and journalist who has been involved in testing yachts and equipment for over 20 years. Credit: Graham Snook
Once you’ve reached a point where the batten is at the mandrel on top of the boom, make off the halyard and then furl the sail until the batten is under the mandrel.
Without reefing pennants to hold and support the clew of the sail, the loads are transferred to the batten and the cloth around it.
Because of this, it’s recommended that for in-boom reefing mainsails, a stronger stretch-resistant cloth like Dacron reinforced with Vectran or Dyneema or a tough cruising laminate cloth be used.
Whichever mainsail furling system you have or choose, spending a bit of time practising what works and what doesn’t on your system, at a time when it’s convenient to you, will pay dividends when you find you do need to reef.
Mainsail furling has had a bad reputation in the past, but used properly and with a little care, there’s no reason why it shouldn’t give you trouble-free sailing for years to come.
To raise the sail
- Release the backstay tension
- Make sure the boom is at the correct angle – use a strop or mark the vang if necessary
- Head up into the wind – it doesn’t matter if the main flogs as it goes up
- Release the mainsheet
- Take up on the mainsail halyard, but do not overtighten
To lower the sail
- Make sure the boom is at the correct angle
- Point the yacht into the wind
- Take in on the furling line as you ease the halyard at a steady rate
Search form
Sailing with lazy jacks and stack packs.

What are lazy jacks and stack packs?
Lazy jacks are networks of lines that are rigged along each side of the mainsail from multiple points on the boom or a stack pack to a point on the mast just above the spreaders, at about 60% the mast's height. Their purpose is to hold the mainsail on top of the boom when it is lowered.
Typically, lines called "legs" are joined with single lines called "risers" to form two upside-down Y shapes. However, lazy jack legs and risers can be rigged in a variety of configurations. Also, the legs can be joined to the risers with blocks, rings, or even tied together. The space between the two sets of lazy jacks on either side of the sail is known as the "pocket."
The stack pack (sometimes called a lazy pack or lazy bag) is a modern type of a sail cover. It is secured to the boom and zips closed at the top to protect the sail from sun damage when it's not in use.
Lazy jacks can be set up with or without a stack pack. When a stack pack is present, the lazy jacks are tied to the stack pack to support it. With no stack pack, the lazy jacks are rigged directly to the boom.
lazy jacks and stack pack system image.jpg

Nine yachts in the Modern Sailing School & Club fleet are equipped with lazy jack systems. Only one of these has lazy jacks with no stack pack.
- Fiore Italia (Beneteau Oceanis 31)
- Kokomo (Catalina 320) - lazy jacks only, no stack pack
- Traharta (Beneteau Oceanis 35)
- Auriah (Beneteau Oceanis 37)
- Sijambo (Beneteau Oceanis 423)
- Ry Whitt (Jeanneau 409)
- Coho II (Spencer 1330)
- Vela Mare (Seawind 1160 Catamaran)
- Kanaloa (Fontaine Pajot Lavezzi 40 Catamaran)
Advantages
- On larger boats, a mainsail can be very heavy and unweildy to handle, especially in high winds. When dousing, lazy jacks guide the mainsail into the stack pack and keep it neatly flaked on top of the boom - instead of flopping all over the deck. In San Francisco Bay, lazy jacks and stack packs are particularly useful, even on smaller boats.
- Since a stack pack remains on the boom even while sailing, there's no separate sail cover to wrestle with and no need to fiddle with snaps or clasps at the bottom. After dousing the mainsail, simply zip up the stack pack and you're done!
- When hoisting the mainsail, batten ends can get snagged on the lazy jacks. It takes a bit of caution and precision steering to raise the main without snagging it.
- A stack pack adds windage that can detrimentally affect sailing performance to some degree. For many leisure sailors and cruisers, this is not a major concern.
- Lazy jacks are not intended to replace the topping lift as support for the boom. Never loosen the topping lift to the point that the lazy jacks bear the boom's weight.
How To Hoist a Mainsail with Lazy Jacks
Your goal is raise the mainsail without snagging the battens on the lazy jacks. The trick is for the helmsman to watch the sail as it goes up, steer carefully, and use the breeze to help keep the mainsail in the pocket between the lazy jacks.
- Steer the boat to head the bow into the wind. Keep the boat pointed as straight into the wind as possible.
- Loosen the mainsheet and begin hoisting the mainsail.
- As the mainsail approaches the point where the legs join the risers, keep a close eye on the sail. If the wind is pushing the sail into one of the legs, steer towards the wind until the sail is luffing evenly between the lazy jacks (in the pocket) on both sides again.
- If a batten gets snagged on the lazy jack, immediately instruct your crew to stop hoisting, then lower the sail until the batten is clear of the line. Steer the boat towards the wind just until the wind pushes the sail back into the pocket.
Additional Tips
- In "Hurricane Alley" (the entrance to Richardson Bay, the Sausalito arm of San Francisco Bay), winds often blow in a circular or erratic pattern, which can complicate hoisting a mainsail with battens and lazy jacks. Before hoisting the mainsail, check the masthead windex frequently to determine if wind direction is steady. If not, consider motoring to a location such as Racoon Straights or The Slot where the wind direction may be more steady. Note that heavy winds will luff the mainsail more vigorously, increasing the odds that you'll experience a snag. (Wind conditions and directions on the Bay may vary by season and weather.)
- Never force a stuck sail by grinding hard on a winch. Excessive force could damage the sail, lazy jacks, or other components.
How To Douse the Mainsail
Hoisting the mainsail may require attention and skill, but dousing is a breeze - and the best part of sailing with lazy jacks!
- If conditions and crew size permit, send a crew member forward to stand in front of the mast and evenly flake the luff of the sail as it comes down.
- Steer to point the boat's bow into the wind and loosen the mainsheet.
- If a crew member is at the mast to flake the sail, ease the main halyard in a controlled manner to facilitate flaking. Otherwise, simply douse the sail and let it fall into the stack pack.
- Zip the stack pack closed. That's it!
Additional Tip
If the mainsail didn't flake evenly into the stack pack as it was doused, the stack pack may be difficult (or impossible) to zip closed. If conditions at the dock permit, hoist and douse the sail again and stand at the mast to flake it evenly as it comes down. Also, it helps to tug the leech to straighten out the sail, if necessary.
Coho II mainsail lazy jacks and stack pack.jpg

Article by Mary Elkins on February 6, 2020
Share This Page
Testimonials.
I try to get out on the water every week: out the Gate, around Angel, up Raccoon - I love it all. After 18 years as a member of OCSC in Berkeley, I learned to sail the bigger boats at Modern by taking ASA 103 and 104. My ASA 104 instructor Dave Russell was terrific. Also, Captain Bill Moreland has been very generous in giving informal advice whenever I’ve asked him. Thanks to Bill, I no longer have any anxiety about docking!
I would like to compliment Stan Lander for his coaching, counseling and teaching Heavy Weather Offshore Sailing. Stan was very accommodating to all of the student's interests and shared his many years of insight on handling the boat in heavy seas. I would certainly recommend Stan and this course to sheltered waters sailors. My confidence in handling a boat of this size was certainly enhanced by the experience.
WE LOVED IT! The whole team was so honored and thankful. Thanks so much for all of your team's hard work and excellence in organizing our party. Of the 22 of us, only 4 had ever been sailing and not in the Bay. The guys had an incredible experience, the skippers were all really great, allowing each of us to be at the wheel. They were kind and empowering. Plus the weather and wind were perfect! It was definitely one of the top 3 experiences that we have shared as leaders in the past 5 + years. We couldn't have asked for a better day!
View All Testimonials
Follow us on Social Media

Modern Sailing School & Club
Sausalito Location 2310 Marinship Way, Sausalito, CA 94965 (415) 331-8250 (800) 995-1668
Berkeley Location 1 Spinnaker Way, Berkeley, CA 94710 (415) 331-8250 (800) 995-1668
Map / Directions
You are here.
Raising and Lowering the Sails
Published by admin on may 27, 2019 may 27, 2019.
On a cruiser, the sails are typically down at the dock and they stay down until the boat is at sea. Of course, if you have no motor, the sails must be used to cast off, but we’ll discuss that later. For now, we’ll assume that the boat is out at sea with the sails tied down.
Raising the Main
The mainsail is raised first, and this can be done with the motor idling. The boat should be pointed with the bow facing into the wind. This alignment means the sail will be luffing when raised, making it easier to bring in the halyard and less likely that the sail will fill unexpectedly and knock the boat around.
The boom vang should be loose so that it does not resist the tension you’ll put on the main halyard. The mainsheet should also be somewhat loose for the same reason, but it shouldn’t be completely free since you don’t want the boom swinging around in an uncontrolled manner.
When the boat is pointing into the wind and the boom vang and mainsheet are loose, the cover and ties can be removed from the main and the halyard brought in to raise the mainsail. The halyard should be able to be pulled in most of the way by hand – if not, there may be something resisting it, such as the boom vang, or it may be caught – and then brought the final one or two feet by using a winch.
Once the sail is fully raised and the halyard cleated, the topping lift should be let out, which will cause the boom to drop slightly, which will flatten out the sail. The boom vang and mainsheet can be tightened again.
Since the boat is pointing into the wind, it’s easiest to start sailing on a close hauled tack. You can use the motor to turn out of irons and then it should be cut off. You’re sailing!
Raising the Jib
The jib should be deployed only after the main is up and the boat is sailing, and the process is fairly simple, whether for a furling or non-furling jib. We’ll assume that the jib shackles are hooked to the forestay if the jib is non-furling. Also it is assumed that the jib sheets are already rigged to run through the fairlead and back to the cockpit.
For a non-furling jib, the sail is simply raised using the jib halyard. The wind fills the sails and the leeward jib sheet is used to set the sail. To prevent the sail from flapping uncontrollably and pulling the jib sheet out of the blocks, the leeward jib sheet can be pulled in slightly prior to raising the jib.
To unfurl a furling jib, the process is even simpler. The furling line is uncleated, but kept taught, and the leeward jib sheet is taken in as the furling line is slowly released. This action unfurls the jib, which immediately fills with wind.
Lowering the sails
Lowering the sails basically involves carrying out the sail hoisting procedure in reverse order. First the jib is lowered or furled, then the main.
The jib can be furled anytime. The boat does not necessarily need to be pointed into the wind, but heading on an upwind tack or being in irons will help the jib furl tighter and more neatly. Keep tension on the active jib sheet, slowly releasing it while brining in the furling line. When the jib is completely furled, the furling line can be cleated.
To bring down a non-furling jib, a crew member needs to go to the bow and pull the jib down by hand, bunching it up. Another crew member should uncleat the jib halyard and release it slowly as the jib is brought down. Also, the jib sheet should be let out slowly, but this can be done after the sail is down if there aren’t enough crew hands to let out the halyard and the jib sheet at the same time. Once the jib is down, it can be held in place temporarily using bungees, to be stowed below deck upon return to the dock.
When lowering the main, it helps to point the boat into the wind, and in some cases the boat can be positioned so that a hill or tall building on shore blocks the wind to make things easier. Similarly to the jib, one crew member slowly lets down the halyard while another pulls the sail down by hand. As the sail is lowered, the bungees or straps used to hold it to the boom are replaced.
This process is best done with one crew standing forward of the mast, bringing down the sail, one crew lowering the halyard, and another wrapping bungees around the sail as it comes down. Obviously, when fewer crew are available, it’s a bit more hectic.
Related Content
Related posts.

Cruising Education
Troubleshooting marine outboard engines.
We've all been there. Eager to jump in the dinghy and land on shore after laying anchor on the mothership. Just one problem, the dinghy outboard wort start.

Education Safety Sailing Basics
Servicing type v personal flotation devices (pfds).
If you're like a lot of recreational boaters, you may not pay a much attention to your life vest. You might not even know what PFD stands for - Personal Floatation Device. You may have even purchased a type V PFD with your #1 criteria being comfort. You throw it on each time you go out, mainly just to make a show of it, and take it off as soon as you're outside the marina - confident that you'll remember to put it back on if the weather picks up.

Best Coffee Brewing Methods for Cruising Sailors
Coffee is life. If you’re like me, you need your cup of joe first thing every morning. There is nothing quite like a great cup of coffee onboard as the sun comes up over your Read more…
How To Reef Your Sails (Mainsail, Jib, Furling, Loose)
Learning to reef your sails is a critical skill for on the water safety and enjoyable sailing. When the wind picks up, you want to know the best way to keep your boat under control, and reefing is your first response to building breeze.
What is reefing your sails? Reefing is reducing sail area in the sail without removing or dousing the sails. Depending on your boat, you can reef sails by partially furling them, or the halyard and tying them off. With reefed sails, your boat will be easier to handle in heavier weather.

On this page:
When should you reef a sail, what happens when you reef, how do you reef the main sail, how do you reef the headsail, preparing boats for reefing, preparing for various reefing scenarios.
Reefing is not hard to learn. An important part of how to reef is knowing when to reef. Also know that reefing is a normal strategy for sailing . It's not just a survival skill for extreme conditions, it's a skill that lets you sail better in heavy wind.
Our rule for when to reef was when someone asks "do you think we should reef?" Meaning the first time the weather and wind build enough to give us some discomfort about the developing conditions, it was time to reef.
Because we had furling main and headsails, reefing was quick and easy for us so we reefed early. After all, you can always shake out the reef if conditions don't continue to deteriorate. You can't really reef too early. If you are uncomfortable with what you see happening on the water, reef the sails.
Reefing early when you're learning is smart because it takes time, especially if you have to leave the cockpit to do it. While you work, the wind may continue to build as conditions deteriorate, so the longer you wait the harder it may be to reef. You'll get faster as you do it more often, but when you're learning it's better to get an early start.
Specific signs that it may be time to reef:
- Sustained increase in wind speed, especially with large, powerful gusts.
- Out of control feeling to the boat that you can't ease by de-powering the sails.
- Storm/dark clouds on the horizon, especially in the direction you're sailing.
- Building wind-lashed waves and chop
Situational awareness when you are sailing into big breeze is critical. You don't want heavy wind to sneak up on you.
A reefed boat will sail well with a balanced helm, so get in the habit of reefing when you feel you're fighting the boat and the wind. Once you've mastered the skill you'll know when it's time, and you'll know when it's faster and more in control to reduce sail.
The aim of reefing is to reduce the sail area that you expose to the wind. This lowers the forces on the boat, reduces heeling, and restores control to the helm and sail controls in overpowering conditions. You are reefing so you can keep sailing, but with more control and less power in the rig.
One downside to this is that you often lose some sail shape. Sails are cut to be flown full, but shortening sail can impact the efficiency. When you need to reef there's usually enough wind to keep the boat moving, even with a suboptimal shape that's harder to trim. The major performance impact is on upwind sailing. Without that nice headsail shape, you may not point as high.
You'll often find that sailing reefed is as fast as sailing with all your sails out, because the boat is in control and spends less time with the rail buried, rounding up, and sailing all over as you fight the rudder to keep the boat straight. And you'll be more comfortable.
To reduce your main, you either furl it in if you can, or you drop the halyard to a set point and tie the main off on the boom with sail ties and reefing lines. The specifics vary with your rig, your equipment, and your boat and how you've set things up beforehand.
Reefing the main sail with jiffy or slab system
For boats without furling or sail handling systems, jiffy or slab reefing is the most common and easiest main reefing. You will need to leave the cockpit and work on deck to use most of these setups.
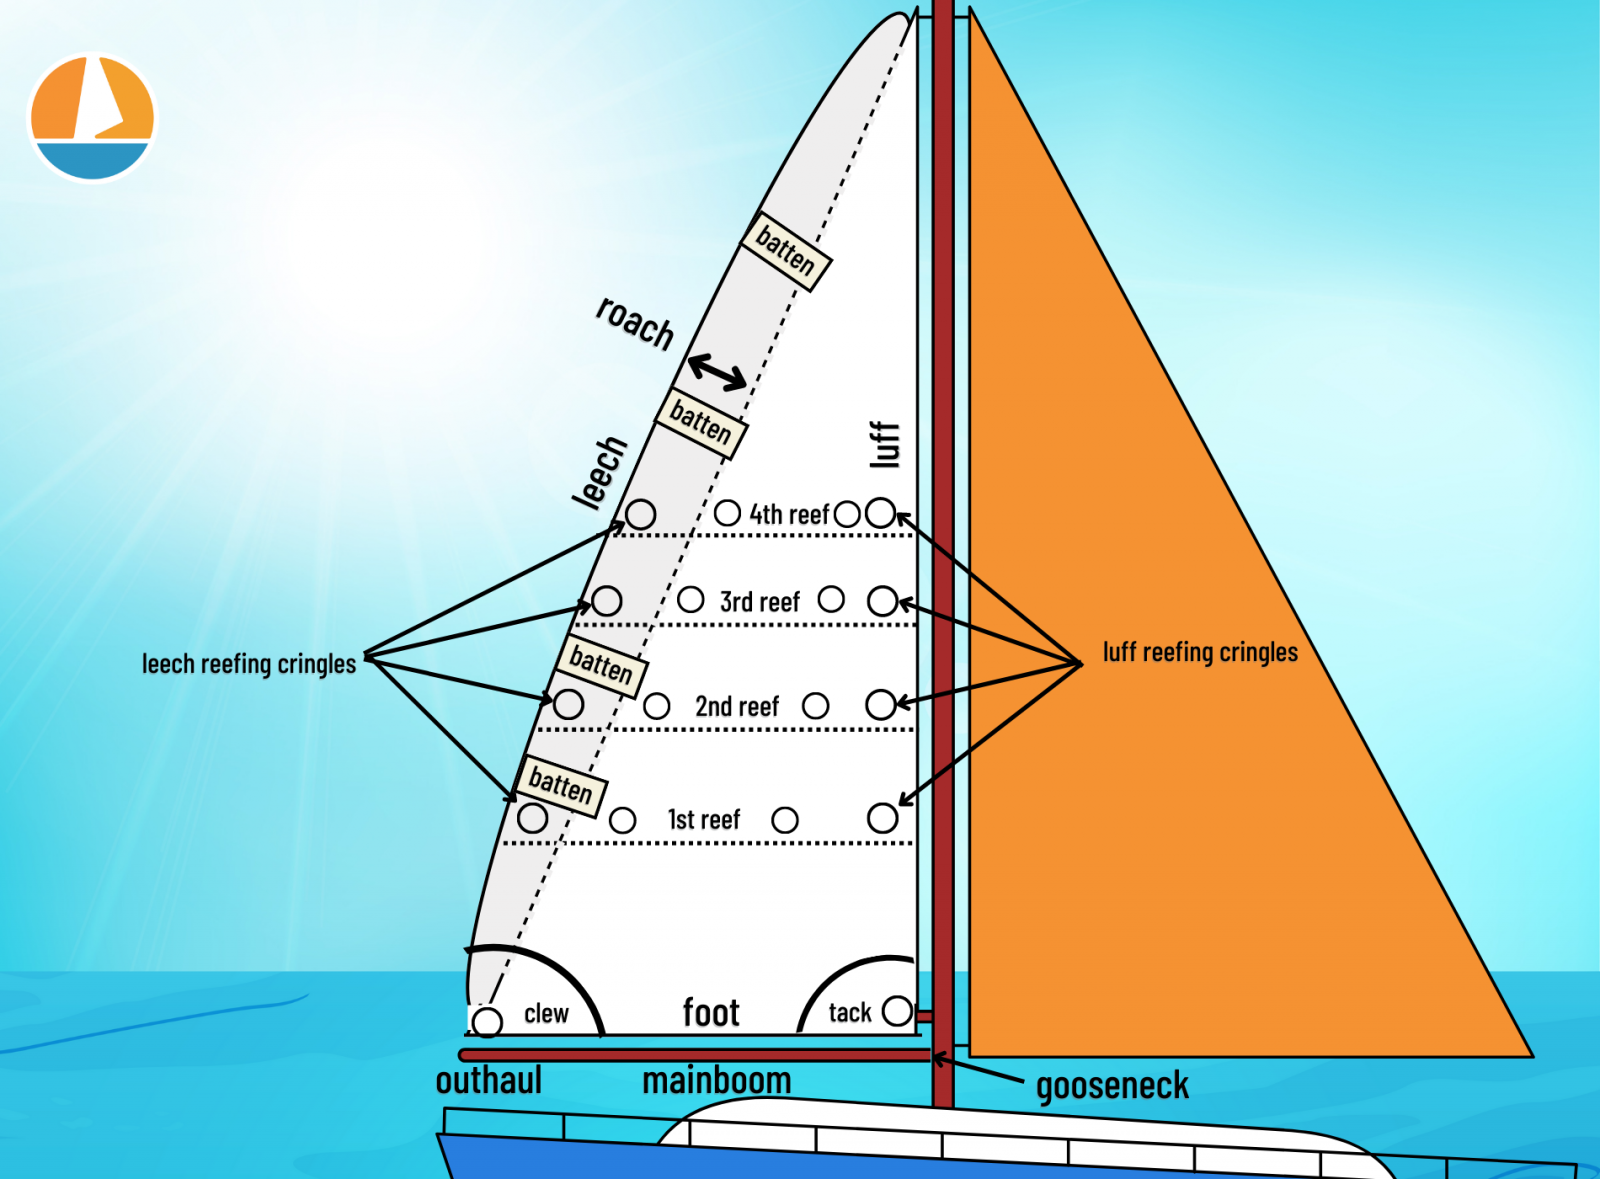
Your sails will have one or more reef points on them. Each reef point is a row of holes with grommets (called cringles ) through the sails and parallel to the foot, with a larger hole on the luff and leach of the sail. Many boats will have a reef hook , a metal hook with the end facing the deck, on the boom or near the gooseneck. Reef lines are rigged through the large cringles on the leech and tie to the boom, with one line per leech cringle. Some sails may have tie-down lines at the cringles, but this is less common on newer sails since they add weight and drag. For most sails, you will also need sail ties - short lengths of line or web meshing - for each cringle between the leech and luff.
The basic process for most mainsails follows these steps. Follow this for any reef point on the sail.
- Sail upwind to center the main and take the load off. You can work with the main to the side, but it's more difficult.
- Snug up the topping lift (if needed) to keep the end of the boom from dropping.
- Ease the mainsheet and vang a little.
- Ease the main halyard until it's far enough to attach the luff cringle to the reefing hook (if there is one) or until it's at the boom if you need to tie it.
- Hook the luff cringle to the reefing hook, or tie it firmly to the boom with a sail tie.
- Pull the matching reef line down until the leech cringle is tight to the boom and tie it off.
- Gather the body of the sail into folds.
- Put a sail tie through each sail body cringle and around the boom and tie them off so the sail is tight against the boom.
- Snug the main halyard to add appropriate luff tension, ease the topping lift, and trim the vang.
The sail is now reefed, and you can sail normally and trim it again.
To "shake out the reefs" or unreef the sail, reverse the process. Ease the halyard, undo the ties, ease the reef line, undo the reef hook, and hoist the main halyard back up.
Reefing an in-mast furling main sail
In mast furling has a lot fewer steps, since you're just putting the main partially away. It’s like fully dousing the sail, but you only go partway and stop.
Most in mast furling systems have a way they like to be put away to avoid jams going in and out, and it's important that you keep this in mind when you reef. Our furler liked the boom centered and parallel to the deck, and a little tension on it as we furled. If we reefed with the boom way out over the side on a broad reach, we were taking our chances if we didn't shake the reefing out before we furled fully. We also eased the backstay before furling in or out normally, which isn't practical when the wind is hooting up.
As a good rule of thumb, always take the reef out of your main and stow it normally after you reef . Don't just keep furling the sail in if you've reefed with a different boom and sheet tension than usual, as you may end up jamming your sail.
So keep in mind how your furler works and what you need to do for smooth furling, and don't violate those guidelines as you do these steps.
- Head upwind to take tension off the main.
- Center the boom as much as is practical.
- Ease the outhaul as you furl the sail to reduce sail area. You may have to get a little ahead with the outhaul as you ease.
- Trim the outhaul properly after you finish furling.
That's all there is to it. To unreef, just ease the sail back out all the way while unfurling. If possible, do this without changing sheet or vang tension from when you reefed in, just to be sure the sail doesn't bind.
Reefing a boom-furling main sail
When boom furling, you'll need to ease the halyard as you furl the sail to the reefed position. Because the sail furls on the boom, the foot stays taught just like a slab reefed sail, but you don't need any lines to hold it.
Like main furling, if there are any specific steps you need to take like setting the boom height or position on the boat, take care to do as much of this as possible when you reef.
Different boom furling systems have different tolerances for furling and reefing at different wind angles. Some furlers do not work will furling off the wind, while others are fine on almost any point of sail. Consult your manual for your model boom furler for directions about furling and unfurling on different points of sail, and follow them when reefing.
- Head upwind to take tension off the main halyard.
- Ease the halyard to the desired height while furling the sail.
- Check halyard tension in case you got ahead furling.
Just raise the sail again to shake out the reef when the wind drops.
Headsail reefing is easier with roller furling, but hank on sails have a few challenges if they aren't set up for reefing.
Reefing a furling headsail
Like furling mainsails, reefing a furling headsail is just putting the sail partially away. Sine the sail isn't attached to the boom, it’s even easier. All you have to change are the jib cars.
To reef a furling headsail:
- Head upwind to take load off the sail.
- Furl the sail partway to the reefing point.
- Adjust jib cars forward for new sail length.
Removing the reef is just unfurling the sail and moving the jib cars back.
Reefing the headsail with hank-on sails
Most sailors with hank-on sails "reef" by swapping the headsail out for a smaller sail. But if a hank-on headsail has reef points, it may be less work to reef it then douse and bend on a new sail.
A jib rigged for reefing will have a cringle on the luff to attach near the deck, and a cringle at the leech for a second attachment point for the sheets. Note that most hanks are not strong enough to handle the load as the tack attachment point on the sail. You want a dedicated cringle with a sturdy grommet to attach the new tack point while reefed.
To reef a jib with a hank-on headstay:
- Ease the jib halyard so the cringle in the reef point is near the deck.
- Attach the luff cringle to the reef hook or tie it to the base of the forestay.
- Move the sheets from the normal clew and tie them to the leech cringle, or use a second set of sheets if you have them.
- Bunch up the sail under the reefed areas as you can and tie with sail ties or bungees so it doesn't flap.
- Re-tension the halyard to the new position and trim the sail.
As you can see, there's going to be extra sail on the deck, which isn't as easy to contain without a boom to tie it to, and moving the sheet takes more work than main reefing.
With no preparation, boats without furling systems cannot reef those sails at all. And if you have everything you need, if you don't prepare it in advance, reefing will be much more work.
Adding foam strips to furling sails
Furling headsails lose shape and get baggy when reefed, but a sail with foam strips to stiffen the luff keeps its shape better. It won't be perfect, but it will reef in a better shape with the support.
Getting hank on and track sails
For non-furling sails you will need:
- Reef points on the sails.
- Reef lines.
- A reefing hook is best, but you can tie the sail.
In addition, you'll need to run the reefing lines through the sail before you can reef. Where the reefing line runs to on your boat varies, but the far end of each line must go through the leech cringle for that reef point then down to the boom, where it ties with a bowline around the boom or to an installed block or ring.
Most sailors don't leave reefing lines rigged because they flop around and add drag to the sails. They aren't used often in fair weather sailing and many just don't go out when a big breeze is expected. But if there is wind in the forecast, take the time to rig one or more reef points so you don't have to do it in building seas and heavy wind.
Mark your main halyard for each reef point to save time and make it easier when you're dropping the halyard. Iit will get you close enough to get the job done before you do the final trim. Use a sharpie or put a few stitches of high visibility thread in the cover at each point.
Reefing sails is the same on monohulls and catamarans, as it's the sail and rig you're worried about and the hulls have little to do with it. But other rigs and configurations beyond a sloop rig may require different or extra steps.
How you can reef when solo sailing
Reefing takes a lot of steps, and it's not always easy to do with one hand. Sailing by yourself, there won't be anyone to hold the wheel or ease lines as you haul others and tie things off.
For furling systems, the easiest way to reef with one hand (or person) is to do it step wise. As you head upwind, wase the outhaul (main) or sheet (headsail) a little, pull in the furler. Ease again, pull in again, until your sail is reefed where you want it. You can use the autopilot or your other hand to keep you on course.
For non-furling sails, single-line reefing systems can simplify the operation, as does running your reef lines, halyards, and topping lift to where you can reach them from all one place or with minimal movement.
Bring a single-line reefing kit
A single-line reefing system is a kit you install with several blocks and lines on the boom and mast to pull the tack and clew of a sail down together. It gets you out of hooking the luff cringle onto the reefing hook, since it pulls the luff down with the leech. If you need to tie down the middle of the sail, you still will need to move forward, but with the right setup, you can reef from the cockpit. It is more complex to install, but can be faster to use.
Leave a comment
Own your first boat within a year on any budget.
A sailboat doesn't have to be expensive if you know what you're doing. If you want to learn how to make your sailing dream reality within a year, leave your email and I'll send you free updates . I don't like spam - I will only send helpful content.
Ready to Own Your First Boat?
Just tell us the best email address to send your tips to:

Mastering the Art: Learn How to Sail a Sailboat with Expert Guidance
Alex Morgan

Sailing a sailboat is an exhilarating and rewarding experience that allows you to harness the power of the wind and navigate through the waters. Whether you’re a beginner or have some sailing experience, learning how to sail a sailboat is a valuable skill that opens up a world of adventure. In this article, we will explore the essential aspects of sailing and provide a step-by-step guide to get you started on your sailing journey.
Introduction to Sailing
To begin, we will introduce you to the world of sailing, discussing its basics, terminology, and the various types of sailboats available. Understanding the fundamentals of sailing is crucial to ensure a safe and enjoyable experience on the water.
Understanding the Basics of a Sailboat
We will delve into the different parts of a sailboat, including the mast, boom, sails, and rigging, explaining their functions and how they work together to harness the wind’s power. we will explore the different types of sailboats, such as dinghies, keelboats, and catamarans, highlighting their unique characteristics and uses.
Essential Skills and Techniques for Sailing
Mastering the essential skills and techniques for sailing is vital for a successful sailing voyage. We will cover topics such as wind awareness, sailing terminology, sail trim, points of sail, steering, and navigation. These skills form the foundation of sailing and will allow you to control the boat effectively and maneuver in various conditions.
Learning to Sail: Step-by-Step Guide
Taking a step-by-step approach, we will guide you through the process of learning to sail. We will discuss important safety precautions and equipment, boarding and leaving the dock, raising and lowering sails, tacking and jibing, and maneuvering and docking. Following this guide will help you gain confidence and develop the necessary skills to handle a sailboat with ease.
Improving Your Sailing Skills
Once you have grasped the basics, we will provide tips on how to improve your sailing skills. This includes practicing sailing techniques, understanding wind patterns and conditions, and considering options for taking sailing courses and lessons. Continuously honing your skills will enhance your sailing abilities and make each sailing excursion even more enjoyable.
Important Safety Tips for Sailing
We will emphasize the importance of safety while sailing. Sailing can present its challenges, so we will provide essential safety tips to keep you and your crew safe on the water. From wearing the right safety gear to being aware of weather conditions, these tips will ensure a secure and enjoyable sailing experience.
By the end of this article, you will have a comprehensive understanding of how to sail a sailboat, feel confident in your skills, and be ready to embark on your sailing adventures with knowledge and enthusiasm. So hoist your sails, catch the wind, and set sail towards exciting and unforgettable journeys on the water.
Key takeaway:
- Learning how to sail a sailboat maximizes adventure: Sailing experience allows individuals to explore the open water, enjoying the thrill of the wind and waves.
- Understanding the basics of a sailboat adds to safety: Familiarizing oneself with the parts of a sailboat and the different types of sailboats ensures safe and efficient navigation.
- Essential skills and techniques for sailing enhance performance: Developing knowledge in wind awareness, sail trim, points of sail, and navigation enables sailors to optimize their sailing experience.
Embark on an exciting journey as we dive into the world of sailing and unveil the basics of a sailboat. Discover the various components that make up a sailboat, and gain insights into the different types of sailboats out there. Whether you’re a seasoned sailor or a novice eager to learn, this section holds the key to understanding the fundamental aspects of sailing. So, fasten your life jackets and get ready to set sail into a world of knowledge and adventure !
Parts of a Sailboat
Hull: The main body of a sailboat provides buoyancy and supports all other components.
Mast: A tall vertical pole that supports the sails and stands upright on the boat.
Boom: A horizontal pole that extends from the mast and holds the foot of the mainsail.
Sails: These are large pieces of fabric that catch the wind and propel the sailboat forward. The sails include the mainsail, jib, and spinnaker.
Keel: This fin-like structure extends downward from the hull to provide stability and prevent capsizing.
Rudder: A vertical plate or blade at the back of the sailboat, controlled by the tiller or wheel, that steers the sailboat.
Tiller: This handle, attached to the rudder, allows the sailor to control the direction of the sailboat.
Winches: Mechanical devices used to control and adjust the tension of the sails and lines.
Lines/Ropes: These are used for various purposes such as raising and trimming sails, securing the boat, and controlling rigging.
Deck: The upper surface of the sailboat where sailors stand and various components are located.
Types of Sailboats
There are different types of sailboats, each with unique features and purposes. Here is a table that provides information about the different types:
These are just a few examples of sailboat types. The selection depends on preferences, uses, and experience level. Whether you want a comfortable cruising experience, the thrill of racing, or leisurely day trips, there is a sailboat suitable for every sailor.
Embark on a journey into the world of sailing as we dive into the essential skills and techniques needed to master the art of sailing. From wind awareness and sailing terminology to sail trim and adjustments, we’ll explore how to harness the power of the wind and optimize the performance of your sailboat. Get ready to navigate the points of sail and enhance your steering and navigation skills, all while feeling the exhilarating rush of the open waters.
Wind Awareness and Sailing Terminology
When sailing, having a keen sense of wind awareness and a solid understanding of sailing terminology are vital. Here are some key points to keep in mind:
1. Sail Trim: One must adjust the sails correctly to harness the maximum power of the wind and maintain control over the boat’s speed and direction. The sails should be trimmed by either tightening or loosening the attached sheets (lines).
2. Points of Sail: It is essential to sail at different angles relative to the wind. These angles include close-hauled (which is the closest to the wind), reaching (at an angle to the wind), and running (downwind).
3. Apparent Wind: As a sailor, it is crucial to feel the wind on the boat. This wind is a combination of the true wind and the wind generated by the boat’s movement. Understanding how the apparent wind changes while sailing is crucial for making necessary adjustments.
4. Tacking and Jibing: Changing the boat’s direction effectively involves turning the bow of the boat through the wind for tacking and the stern for jibing. These maneuvers take advantage of the wind to change the boat’s course successfully.
5. Sailing Terminology: It is important to familiarize yourself with various sailing terms. Terms like port (which refers to the left side of the boat facing the bow), starboard (which refers to the right side of the boat facing the bow), and luffing (sails flapping due to insufficient wind) are common and necessary to know.
Remember, possessing wind awareness and a solid grasp of sailing terminology are fundamental skills for becoming a skilled sailor. These abilities allow you to navigate and control the boat effectively, ensuring a safe and enjoyable sailing experience.
Fact: Sailors make use of wind indicators called telltales, small pieces of fabric attached to the sails, to gauge wind direction and optimize their sailing performance.
Sail Trim and Adjustments
When sailing, sail trim and adjustments optimize boat performance. Consider these factors:
- Sail tension: Properly tension sails for optimal performance. Adjust tension by tightening or loosening the halyard and/or sheet.
- Twist: Adjust the angle between the top and bottom of the sail to control power and balance.
- Shape: Cunninghams, outhauls, and boom vangs control sail shape based on wind conditions.
- Telltales: These small pieces of yarn or ribbon indicate correct sail trim. Ensure smooth airflow over the sail.
- Reefing: Reduce sail surface area in challenging conditions. Become familiar with the reefing system and practice reefing maneuvers.
Maximize speed, efficiency, and maneuverability by properly trimming and adjusting sails. Experiment, practice, and observe boat speed, wind direction, and balance for optimal performance.
Points of Sail
In sailing, understanding the points of sail is crucial for navigating different wind directions. When sailing close-hauled , the boat sails as close to the wind direction as possible, while on a beam reach , the wind comes from the side of the boat. The broad reach involves sailing with the wind coming from behind at an angle, while running means sailing directly downwind. Between close-hauled and beam reach, lies the close reach position, and between a beam reach and running comes the broad reach position. By knowing these different points of sail, sailors can adjust their sails and boat’s position to optimize speed and performance in various wind conditions.
Steering and Navigation
Steering and navigation are essential skills to acquire in sailing. When it comes to steering the sailboat effectively, it is crucial to understand wind direction and make adjustments accordingly.
One important aspect of navigation is the ability to read nautical charts and utilize navigational aids like buoys and markers. Using a compass or GPS can help determine the boat’s heading and navigate towards the desired destination.
Plotting a course and being flexible in adjusting it based on changing winds and currents is another key point in navigation. It is important to navigate around potential hazards such as rocks, sandbars, and other vessels, while also employing proper communication and signaling techniques.
Practicing various sailing techniques and adjusting the sail trim accordingly is essential for different conditions. Familiarity with right of way rules is crucial for safely navigating in crowded waterways or around other boats.
Continuous monitoring of weather conditions is necessary to make course adjustments for safety reasons. Having a backup plan for emergencies or unexpected changes in the navigation plan is always a wise precaution.
By honing your steering and navigation skills, you can confidently navigate your sailboat and fully enjoy the exhilarating experience of sailing.
Learning to sail a sailboat can be an exhilarating adventure ! In this step-by-step guide , we’ll cover everything you need to know to set sail with confidence . From essential safety precautions and equipment to the art of maneuvering and docking , each sub-section will bring you closer to mastering the art of sailing . So grab your life jacket , hop aboard, and let’s embark on this exciting journey together!
Safety Precautions and Equipment
When sailing, it is crucial to prioritize safety. It is important to consider and have the following safety precautions and equipment on board:
1. Life jackets: Ensure that everyone on board wears properly fitting life jackets, especially when navigating through rough waters.
2. Navigation tools: Equip your sailboat with a compass, charts, and a GPS to stay on course and navigate effectively.
3. First aid kit: Stock your sailboat with a well-equipped first aid kit to handle any medical emergencies that may arise.
4. Communication devices: Carry a VHF radio or a mobile phone with a waterproof case to effectively communicate with the shore or other vessels.
5. Emergency flares: Keep distress flares on board to signal for help if the need arises.
6. Fire extinguisher: Have a working fire extinguisher readily available to deal with any onboard fires that may occur.
7. Safety harnesses and tethers: Utilize safety harnesses and tethers to secure yourself to the boat and prevent any accidental falls or overboard incidents.
8. Anchor and anchor line: Always ensure that you have a reliable anchor and an adequate length of anchor line to secure your sailboat when necessary.
It is important to familiarize yourself with all the safety equipment on your sailboat and know how to use it properly. Regular maintenance and inspections are essential to ensure that everything functions correctly. Always prioritize safety and enjoy your sailing adventures!
Boarding and Leaving the Dock
When boarding and leaving the dock on a sailboat, follow these steps for a safe and successful departure or arrival.
- Check the dock lines: Ensure the dock lines are properly secured and won’t get tangled or caught when leaving.
- Prepare the fenders: Attach fenders to the sides of the boat to protect it from damage as you leave the dock.
- Notify the crew: Inform your crew members that you’re about to leave the dock and they should be ready to assist.
- Untie the lines: Carefully release the dock lines one at a time and ensure the boat remains secure.
- Use the engine: Start the engine and use it to maneuver away from the dock cautiously.
- Steer away: Once you’ve moved away from the dock, steer the boat in the desired direction.
The practice of boarding and leaving the dock has been essential to sailing for centuries. Ancient sailors used various techniques to navigate harbors safely. While technology has evolved, the principles remain the same. Sailors rely on their skills and knowledge to maneuver sailboats with precision and confidence . By following proper procedures, sailors can ensure smooth starts and ends to their sailing adventures.
Raising and Lowering Sails
To successfully raise and lower sails on a sailboat, it is important to follow these steps while incorporating the keywords naturally:
- Begin by preparing the sails appropriately, ensuring they are folded and stowed properly. Take the time to check for any damage or signs of wear to guarantee their functionality.
- Attach the halyards securely. The halyards are crucial in both raising and lowering the sails, so fasten them tightly to prevent any mishaps.
- Hoist the sail using a smooth and steady motion until it reaches its full height. It is crucial to pay attention to its alignment and tension to ensure optimal performance.
- Once the sail is fully raised, make sure to secure it in place with a secure knot or by using a cleat. This will prevent any sudden movements or accidents while sailing.
- For desired shape and position adjustments, utilize sail controls such as sheets and trim lines. These controls will help you achieve the perfect configuration for optimal sailing.
- Gradually lower the sails by releasing tension on the halyards, all the while remaining cautious of any sudden gusts of wind. Accidents can be avoided by maintaining awareness of the surroundings.
- After fully lowering the sails, secure the halyards again and make sure to coil and stow them neatly. This will prevent any entanglements or damage during storage.
Always prioritize safety and be aware of your surroundings when handling sails. Ensure that all crew members are clear of the sail and rigging to avoid any potential accidents. Regularly practicing these steps will help you become proficient in sailboat sail handling.
Tacking and Jibing
Tacking and jibing are important maneuvers in sailing to change the sailboat’s direction. Here is a step-by-step guide on performing tacking and jibing:
Assess wind direction and determine if a tack change is needed.
Steer the boat towards the wind until it is approximately 45 degrees off the bow.
Release the jib or genoa sheet and let it flap in the wind while turning.
As the bow passes through the wind, quickly pull in the jib or genoa sheet on the opposite side to fill the sail.
Trim the mainsail and adjust the boat’s course as necessary.
Determine if a jibe is necessary based on wind direction.
Steer the boat away from the wind until it is approximately 135 degrees off the bow.
Ease out the mainsail as you turn to allow it to swing across the stern.
As the mainsail crosses to the opposite side, quickly adjust the mainsheet to trim the sail on the new side.
Steer the boat on the new course and adjust the jib or genoa sheet as needed.
Remember to communicate with your crew members and be aware of other boats nearby when tacking or jibing. Practice these maneuvers regularly to enhance your sailing skills and improve proficiency on the water.
Maneuvering and Docking
Maneuvering and docking a sailboat requires skill and technique to ensure a smooth and safe experience. Here are the steps to effectively maneuver and dock a sailboat:
1. Approach the dock at a controlled speed with enough momentum to reach the desired position.
2. Plan your approach based on wind direction , current , and any obstacles or other boats in the area.
3. Communicate with your crew members to prepare them for the docking procedure.
4. As you near the dock, prepare your fenders and dock lines to secure the boat.
5. Gradually reduce your speed while maintaining control of the boat.
6. Use your sails , engine , and rudder to make small adjustments in your course and position.
7. Aim to approach the dock at a slight angle for better control over the boat’s movements.
8. Coordinate with your crew to toss the dock lines onto the dock and secure them properly .
9. Slowly bring the boat alongside the dock, allowing the crew to step off and secure the boat.
10. Once the boat is securely docked , turn off the engine and adjust the sails.
Remember, practice is key when maneuvering and docking a sailboat. With experience, you will become more confident in your abilities.
Become a skilled sailor by honing your sailing abilities in various ways. From practicing sailing techniques to understanding wind patterns and conditions, and even taking professional sailing courses and lessons , this section will delve into the different aspects of improving your sailing skills. Get ready to set sail on a journey of knowledge and mastery that will empower you to navigate the waters with confidence and expertise .
Practicing Sailing Techniques
Practicing sailing techniques is crucial for skilled sailors. Here is a comprehensive guide to help you enhance your sailing abilities:
1. Start by mastering basic maneuvers: Dedicate time to practicing tacking and jibing to effectively change direction while sailing.
2. Focus on sail trim: Make adjustments to the sails to optimize their position and shape, ensuring maximum efficiency.
3. Hone your skills in different points of sail: Learn to navigate effectively at various angles to the wind, mastering the art of sailing in all directions.
4. Enhance your boat handling abilities: Develop the expertise to control the boat proficiently in different weather and water conditions.
5. Improve your wind awareness: Pay close attention to wind patterns and fluctuations, enabling you to make effective sailing decisions.
To advance your sailing skills further, it is highly recommended to consider enrolling in sailing courses or taking lessons from experienced instructors. They can offer invaluable guidance and additional techniques for you to practice. Remember, practice makes perfect! Therefore, make it a priority to spend as much time as possible on the water, continuously honing and refining your skills.
Understanding Wind Patterns and Conditions
Understanding wind patterns and conditions is essential for successful sailing. Active observation and analysis of the wind can have a significant impact on a sailor’s performance. It is crucial to comprehend how wind direction, speed, and shifts can influence a sailboat.
When sailing downwind, with the wind coming from behind, it allows for faster speeds. When sailing upwind, zigzagging maneuvers are necessary to make progress. Properly adjusting the sails based on wind conditions will maximize propulsion.
A comprehensive understanding of wind patterns helps sailors anticipate changes and make strategic decisions. The observation of ripples or waves on the water’s surface can indicate shifts or gusts. Familiarity with the local wind patterns specific to the sailing area can provide a competitive advantage.
Sailors must also take into consideration other factors that can affect wind patterns, such as land masses or obstacles. Mountains , buildings , and geographical features can create wind shadows or accelerations that need to be considered.
By understanding wind patterns and conditions, sailors can make informed decisions to optimize their sailing experience and enhance their overall performance on the water.
Taking Sailing Courses and Lessons
Taking sailing courses and lessons can greatly enhance your sailing skills. These courses provide structured instruction and guidance from experienced instructors who teach techniques and safety precautions for sailing. By enrolling in these courses, you have the opportunity to learn valuable skills such as maneuvering the sailboat, understanding wind patterns, and navigating effectively.
Sailing courses and lessons offer a hands-on learning experience, allowing you to practice sailing techniques in real-life situations. It is highly recommended to research and choose reputable sailing schools or organizations that offer certified courses. These courses cover theory, practical exercises, and provide valuable hands-on training. Upon completion, certifications may be provided, which can be beneficial for employment or participation in sailing events.
Whether you are a beginner or an experienced sailor, taking sailing courses and lessons provides invaluable learning opportunities and helps you grow as a sailor. Consider enrolling in these courses to boost your sailing skills and cultivate a deeper understanding of sailing.
Remember, practice makes perfect, so continue to practice and refine your skills even after completing the courses. With time and dedication, you can become a proficient and confident sailor.
Always remember these important safety tips for sailing. First and foremost, always wear a life jacket while sailing to prioritize your safety.
Ensure to check the weather conditions beforehand to avoid any unexpected storms or strong winds that could jeopardize your journey.
Before setting sail, it is crucial to inspect your boat thoroughly for any signs of damage or mechanical issues that may occur during your trip.
Inform someone trustworthy about your sailing plans and provide them with an estimated return time in case of any emergencies.
Stay vigilant of other boats and objects in the water to prevent any collisions or accidents.
Follow proper navigation techniques and abide by maritime rules and regulations to ensure a smooth and secure sailing experience.
It is also essential to have an emergency safety plan in place and familiarize yourself with the usage of communication devices in case of any unforeseen circumstances.
Take care of yourself by staying hydrated and protecting your skin from the harmful sun rays with sunscreen and a hat .
Avoid consuming alcohol while sailing as it impairs judgement and coordination, increasing the risk of accidents.
Regularly check and maintain your safety equipment, including fire extinguishers and first aid kits, to ensure they are in good working condition.
By incorporating these important safety tips into your sailing routine, you can enjoy a safer and more enjoyable experience on the water.
Some Facts About Learning How To Sail A Sailboat:
- ✅ Learning to sail involves specific knowledge, honed skills, and a gut instinct for the wind and the feel of the boat.
- ✅ Familiarizing oneself with sailing vocabulary, including terms like port, starboard, leeward, halyard, and tacking, is crucial for beginners.
- ✅ Understanding the points of sail is crucial as it determines the directions a sailboat can maneuver and the corresponding sail positions.
- ✅ Knowing the different parts of a boat, such as vang, downhaul, mizzen, and centerboard, is important for beginners.
- ✅ Knot tying is an essential skill for sailors as there are many lines on a boat that require different knots.
Frequently Asked Questions
1. what are the basic sailing skills beginners should learn.
Beginners learning how to sail should start by familiarizing themselves with sailing vocabulary, understanding the points of sail, and learning the different parts of a boat. They should also practice knot tying, understand sail trim, and learn the rules of the road to sail safely.
2. What are some popular destinations to learn how to sail?
Some popular destinations for learning how to sail include the Gulf of Mexico, the British Virgin Islands, the Great Lakes, the Chesapeake Bay, and other places with nice resorts and marinas. These locations offer ideal settings for beginners to practice their sailing skills.
3. What type and size of boat is recommended for beginners to learn how to sail?
It is recommended for beginners to learn how to sail on keelboats like the Colgate 26. These boats provide stability and safety, making it easier for beginners to develop their sailing skills and confidence on the water.
4. How can I find a reputable sailing school to learn how to sail?
When looking for a sailing school, it is advisable to seek recommendations from others with experience. Word of mouth is a good source of information about reputable schools. It is also important to check if the instructors are certified and if the school offers a comprehensive package that fits your goals.
5. What is the best time of year to learn how to sail?
The best time to learn how to sail depends on your location, but spring and fall usually have the best winds for learning. It’s important to consider the local weather patterns and seasons to ensure optimal conditions for practicing and developing your sailing skills.
6. What are some essential items to bring when learning how to sail?
When learning how to sail, it is important to bring a waterproof jacket, sun lotion, a wide-brim hat, nonskid sneakers, and any other appropriate clothing and accessories to protect yourself from the elements. Also, it is advisable to carry a float plan and any necessary equipment recommended by the sailing school or instructor.
About the author

Leave a Reply Cancel reply
Your email address will not be published. Required fields are marked *
Save my name, email, and website in this browser for the next time I comment.
Latest posts

The history of sailing – from ancient times to modern adventures
History of Sailing Sailing is a time-honored tradition that has evolved over millennia, from its humble beginnings as a means of transportation to a beloved modern-day recreational activity. The history of sailing is a fascinating journey that spans cultures and centuries, rich in innovation and adventure. In this article, we’ll explore the remarkable evolution of…

Sailing Solo: Adventures and Challenges of Single-Handed Sailing
Solo Sailing Sailing has always been a pursuit of freedom, adventure, and self-discovery. While sailing with a crew is a fantastic experience, there’s a unique allure to sailing solo – just you, the wind, and the open sea. Single-handed sailing, as it’s often called, is a journey of self-reliance, resilience, and the ultimate test of…

Sustainable Sailing: Eco-Friendly Practices on the boat
Eco Friendly Sailing Sailing is an exhilarating and timeless way to explore the beauty of the open water, but it’s important to remember that our oceans and environment need our protection. Sustainable sailing, which involves eco-friendly practices and mindful decision-making, allows sailors to enjoy their adventures while minimizing their impact on the environment. In this…
Home > Resources > Reefing 101: How to reef a mainsail and when to do it
Reefing 101: How to reef a mainsail and when to do it
17 September 2019
Ask Precision Sails , Design , Featuring - Partners , Hardware , Headsail , Mainsail , Sails , Technical Tags: furling headsail , How to , reduce sail area , reefing headsail , reefing mainsail , sail area , sail reduction , sailcloth durability , sailcloth stretch resistance , sailcloth weight , sailing uma
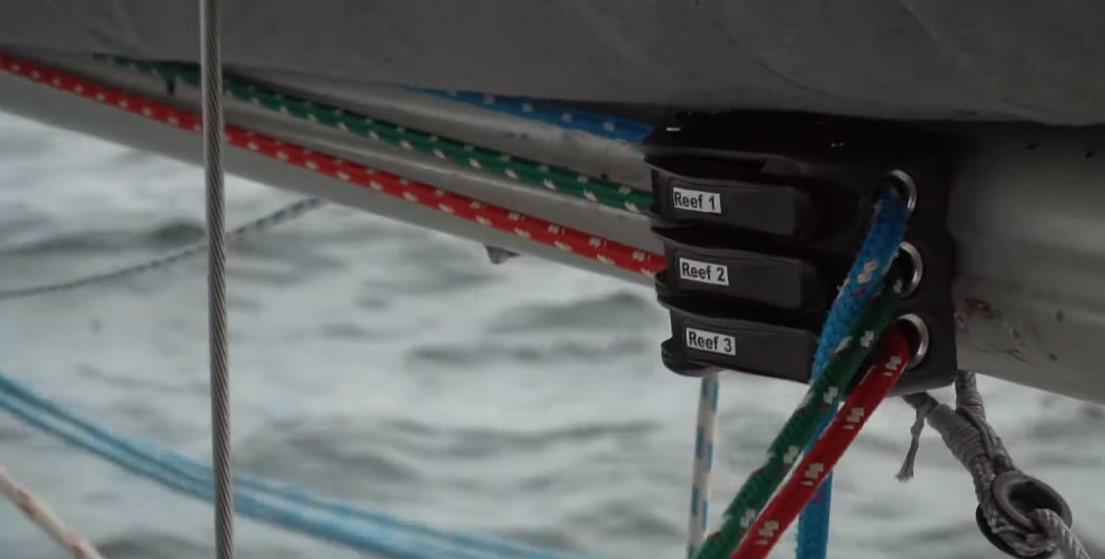
Reefing is meant to increase your ease-of-use, flatten sail shape, reduce sail area, and re-position the boat’s center of effort. This reduces heeling and de-powers your sails to improve safety and stability in rough weather.
Reefing is an important part of sailing to learn and understand how to do efficiently and effectively. This guide is meant to give a general overview of the process and discuss the preparation a sailor should take. There are various methods of reefing and each sailor has their own process. Nonetheless, whether you are slab reefing, in-boom reefing, in-mast reefing your mainsail, or furling in your headsail the principles remain the same.
Preparation is essential
Being prepared for heavier winds and identifying when to reef is key to maximizing the performance and safety of the boat. Here are several things every sailor can do to be prepared:
Keep lines organized
Make sure to have your lines organized beforehand and a reefing plan in place. This will assure that each time a crew member reefs the same actions are taken to re-organize the lines so no time is lost figuring out what the preceding person has done.
Practice Makes Perfect
Taking time to exercise your reefing routine will ensure that your crew is ready when that gale approaches. Additionally, having a plan in place will keep your crew focused during turbulent weather by overcoming their hesitation with confidence to handle the situation swiftly and correctly.
Check the Forecast
With the multitude of devices and apps which show weather patterns, wind speeds, and forecast predictions available today no sailor should be fully unprepared for the weather they are going to face.
Reef Before You Need To
When it comes to knowing when to reef, not every sailor, boat, sail or breeze is equal.
“It depends on the boat, and the sailor,” says one of our designers, Jeremy Roszmann, “more cautious sailors will reef earlier, and some boats will heel more in different winds”. A boat’s design, sail inventory, and crew experience are all factors in determining when reefing should take place.
“It’s pretty difficult to give an ‘at 15 knots take your mainsail to reef 1’… headsails sort of follow the same line. You can theoretically run your 150 Genoa up to 20 knots, and I’ve had clients ask for extra reinforcements because they do, but you risk causing undue stress on the cloth, running into shape issues quicker and in-time sail failures”.
One common saying about reefing is that if you think you need to reef, you should have already reefed. “I avoid telling clients when to reef because if they feel they should reef, they should. Until either, they are more experienced sailors or they are more comfortable sailors”. Every boat is going to handle wind speeds differently due to their design and sail inventory. It is important to practice reefing so that you can be fully prepared and know when to reef before you need to.
How to Reef
While there are many methods to reefing the core concept is the same: to efficiently reduce sail area in order to stabilize the boat in varying winds. Sailing Uma has made a wonderful video on how they go about reefing their mainsail, watch the video below and visit Sailing Uma’s partner page , and website to show some support.
Reefing your mainsail
- Ease the main-sheet. This will cause the mainsail to luff, stabilizing the boat by reducing heel and easing the tension on the mainsail making it easier to drop.
- Lower the main halyard, and hook the reefing point onto a carabiner or ram’s horn to set the new tack position of the sail. Tie sail ties around the boom through the grommets if necessary to contain the loose material left over. If you use a stack-pack the loose material will be gathered inside the folds.
- Haul in the first reef line.
- Tension the main halyard. Don’t be afraid to crank it tight, your sail is reinforced at it’s Cunningham.
- Tighten up the boom vang in its new position.
- Trim the main-sheet.
- Bonus Uma Tip : Stow your main halyard and lines, in the same way, each time. Then no time is wasted figuring out what the previous person had done.
Shaking Out a Reef
Follow the above steps in reverse order, making sure to re-tension and trim for the new position of the sail.
Don’t Forget Your Headsail
Adjusting your Genoa or Jib can help balance out the boat and reduce heeling. Furling in your headsail is a great way to reduce sail area.
Simply furl in your headsail as you normally would but stop prematurely to determine the size reduction you want to make.
For areas with seasonal variance in wind strength or for those sailors traveling to areas with different conditions, if you find yourself constantly furling your 150% down to 115% that you might want to consider increase your sail inventory. When you constantly are partially furling your headsail you are doing two things:
- Furling away sail shape which causes a decrease in performance compared to a sail meant for the conditions.
- Increasing the pressure applied to the unfurled portion of the sail while the other portion remains untouched from the stretching causing your sail to become “baggy” over time.
How Many Reefs Should a Mainsail Have?
Again, this will be different based on the sail inventory, experience, boat, and sailing conditions for each person. Ron, our Lead Sail Consultant regularly recommends that “one reef keeps you sailing, two gets you home safely”.
Can Reefing Damage Your Sails?
The size of the sail, cloth weave, weight, and design will all play large factors in determining how fast a sail will stretch. As Jeremy said earlier, “you can theoretically run [a] 150 Genoa up to 20 knots… but you risk causing undue stress on the cloth, running into shape issues quicker, and in-time sail failure.”
Think of it this way, if you have a 150 Genoa and you are furling it to a smaller size constantly due to the wind conditions where you sail you are not only furling away sail shape (making it less efficient) but you are also using the sail outside of its intended conditions. Having a few sails in your inventory, like a 115, 150, and a Trysail is a great option as it allows you to reduce sail area more efficiently depending on the conditions.
“Reefing sails to induce the qualities of another sail, i.e. reefing to third reef instead of a Trysail on-board, can damage specific areas of the sail, damaging the smooth vertical representation that we design in the sail. In the example above you would slightly bag out the top of the sail which means that you have a deeper top which encounters higher velocities, and could cause weather helm in the boat.”
Likewise, if you are constantly reefing your mainsail to the first or the second reef the exposed area is being stretched at a greater rate than the hidden section. This can cause the sails to become baggy and impairs the efficiency of the design of the sail.
This isn’t to say you shouldn’t reef. Well built sails will be able to handle the strain that comes from sustaining a reef and there are many ways to reinforce your sails to prolong their lifespan.
Panel Layout and Sailcloth Weight Are Important
Higher quality Dacron sailcloth has increased resistance to stretch and UV damage to prolong their shape-holding life. Meaning you can sail more aggressively without being concerned about stretching too early. Tri-Radial Dacron sails have greater resistance to stretch due to their design and the load-bearing properties of the seam layout. Laminate sails are the complete solution to stretching, but unfortunately, lack the resistance to UV that is needed for longevity. You can learn more about sailcloth and crosscut vs tri-radial designs in our blog.
Cloth Weight
For a long time it was thought that the heavier the sailcloth, the better the sail. We still get asked this question everyday but heavier cloth does not mean that it will last longer. Here is what our designer Jeremy had to say about it: “Cloth weight is determined on the size of the boat, usually in LOA (ft/m). Larger boats induce more displacement and require a larger sail which will have to undertake more force to move the boat. Too light of cloth, while providing superior performance, risks tearing or warping very quickly. ”
Design is Crucial for New Sails
The design of your sail is a crucial step in preparing your it to perform well in heavier winds. Precision Sails prides ourselves on our leading design consultations to build the best sail possible for your boat. Our designers get to know you, your boat, the conditions your sailing in, long term plans, and experience level to select the best cloth, weight, and features for your sail. Here are some of the features your new sail can have:
“A foam luff allows you to furl in the sail partially and maintain lift in the front camber of the sail, this allows someone with a 150 Genoa to furl it into a 140 and sail in higher winds.” Think of a sail like an airplane wing, it has a specific curved surface. When you furl you are changing the draft of the sail, the curve, which causes it to be less efficient.
Offshore package
Designed for those looking to do offshore sailing in areas with more aggressive winds and increased UV. This package includes:
- Double tapes along the Leech, Luff, and Foot of the sail.
- Wider seams with three rows of stitching.
- Reinforcement belts on reefs, Leech and Luff.
- Leech seam wedgies.
You can learn more about our Offshore Package here .
Elite Package
Our elite package includes many of the sail enhancements listed here and many that are not, as well as up to a 1-hour design consult with your designer where you can see your requested changes to your sail in real-time.
Learn more about our elite package by submitting a quote request.
Block and Radial patching:
These corners have been designed to better distribute the load. Our unique radial corner design is stronger and more durable than the competition and prevents premature material failure.
And Many More
Precision Sails prides ourselves on building custom sails for your boat and sailing conditions. Our sails are fully customizable and we have many other sail enhancements and customization options for you to consider.
Thinking about getting new sails?
Start the conversation by scheduling an appointment with one of our sail consultants.
precisionsails
Related Posts

Full Battens vs Partial Battens vs 2 Full plus 2 Partial Battens
Full Battens VS Partial Battens At
Precision Sails we are asked every day during our customer quote consultation “Should I choose Full Battens or Partial Battens for my new mainsail?” Whether you are cruising or racing you will need to examine the pros and cons of adding full battens to your main sail.Positive Aspects of Full […]

Memories of Sail Repairs, Replacement Sails and FINALLY New Sails
I have had a Tanzer 26 for over 20 years now. The vessel, without much imagination I call The Boat, has served me well and without complaint through yearly cruises on Lake Ontario with my three kids and day sailing with the wife. Did I mention that my wife is a good sport but a definitive lover of a good.

My Need for Cruising Speed Demands a Great Suit of Sails
My Need for Cruising Speed Demands a Great Suit of SailsI like to sail fast mostly in the heavy winds that Lake Ontario throws.
" * " indicates required fields
How to Reef the Mainsail: A Step-by-Step Guide
by Emma Sullivan | Aug 4, 2023 | Sailing Adventures

== Short answer how to reef the mainsail: == Reefing the mainsail is a process of reducing its area to cope with strong winds. It involves lowering, securing, and re-hoisting a smaller portion of the sail. This is typically done by gathering excess fabric and fastening it to the boom or mast using reefing points or a reefing line. The exact method may vary depending on the specific boat and its rigging system .
Understanding the Basics: How to Reef the Mainsail Step by Step
Title: The Sailing Essentials Unveiled: An In-Depth Guide on Reefing the Mainsail, Guiding You Step by Step
Introduction: Whether a novice sailor or an experienced seafarer, understanding the fundamentals of reefing the mainsail is vital to ensure safe and successful sailing. This technique, reducing the sail area in high winds, helps maintain control and stability while powering through adverse weather conditions. In this comprehensive guide, we unveil the step-by-step process of reefing, empowering you with knowledge to master this important skill.
Step 1: Gauging the Need for Reefing The first step towards effectively reefing the mainsail requires assessing whether it is necessary depending on current wind conditions. As a rule of thumb, consider reefing when winds reach around 15 to 20 knots or if your boat feels overpowered and challenging to control. However, keep in mind that sea state and boat size can influence this decision as well.
Step 2: Understanding Your Sail Plan Before diving into reefing details, let’s familiarize ourselves with sail plan terminologies for a better grasp of our subject matter. The mainsail possesses crucial components including reef points and tack hooks. Reef points are small lines sewn into the mainsail to secure its rolled-up portion when reduced in size. Tack hooks are metal fasteners attached near the foot of the mast used to tie down clews during reefing.
Step 3: Preparing for Reefing To ensure smooth execution during adverse conditions at sea , there are several preparatory measures worth considering. Start by decreasing tension in halyards and vang (a rope controlling mainsail’s leech), as it eases stress once pressure transfers solely onto these components upon reducing sail size. Additionally, secure loose items on board to prevent accidental damage.
Step 4: Identifying Appropriate Timeframes Timing plays a pivotal role when reefing, and it’s essential to wait for a lull or relative calm in the weather. Attempting reefing during vigorous wind gusts can be dangerous and significantly hinder successful execution. Patience is key; keep a watchful eye on changing conditions before proceeding.
Step 5: Lowering the Headsail Reefing greatly relies on reducing sail area, so if you have a headsail deployed, take this step first. Lower the headsail completely to ease wind pressure as the mainsail reduction progresses. Be cautious during this process and ensure the sheets are properly secured to avoid any complications.
Step 6: Slowing Down Your Boat To reduce tension on the mainsail while preparing for reefing, shift your boat closer into the wind by turning either upwind or downwind slightly. This maneuver minimizes stress when taking actions involving unfurling lines and maneuvering around sails at heightened speeds . Keep adjusting until you find an optimal sail balance.
Step 7: Securing Reef Points Now comes the crux of reefing – securing the mainsail at designated points laid out by your sail plan’s reef points. Typically located towards mid-luff section of your mainsail, these points are connected with reef lines responsible for pulling down excess material once in use. Carefully thread these lines through designated cringles (small metal rings) while remaining mindful of potential entanglement risks on board.
Step 8: Reducing Sail Area With reef lines securely bar-tightened, start feeding them through their respective cleats located near your cockpit area. As you pull down each line, observe how gradually but surely your mainsail loses excess exposed area while retaining desired shape and functionality.
Step 9: Tidy Up Loose Ends Once you’ve successfully completed all reef point tie-downs and ensured a snug reduced configuration, tidy up loose ends by neatly stowing any leftover slack from the reef lines. This diligent step ensures unimpeded movement on deck and enhances overall safety.
Conclusion: Congratulations! Equipped with this detailed, witty, and clever understanding of the reefing process, you are now armed with the knowledge to handle reduced mainsail situations with finesse. By gauging the need for reefing, comprehending sail plan intricacies, and meticulously executing each step outlined in this guide, you can confidently navigate adverse weather conditions while ensuring smooth sailing experiences. May favorable winds always grace your seafaring adventures!
Common Questions Answered: Your How to Reef the Mainsail FAQ’s
When it comes to sailing, one crucial maneuver that every sailor needs to master is reefing the mainsail. Reefing refers to reducing the sail area in order to maintain control and balance in strong winds. It’s a technique that ensures safety and prevents potential damage to both the sail and the boat . However, even experienced sailors may have questions or uncertainties about how to properly reef the mainsail. That’s why we’ve put together this comprehensive FAQ guide, addressing common questions and providing professional tips and tricks.
Question 1: What exactly is reefing?
Reefing involves reducing the total area of your mainsail by either partially lowering or folding away a portion of it. This is typically done by attaching additional lines, known as reefing lines, to specific points on the sail . It allows you to adapt to changing wind conditions while maintaining control over your boat .
Question 2: When should I consider reefing?
Knowing when to reef is crucial for maintaining optimal performance and safety. As a general rule of thumb, if you find yourself straining at the helm or your boat starts heeling excessively, it’s time to consider reefing. Additionally, if winds exceed your comfort level or you are expecting increasing winds ahead, taking precautionary measures by reefing early can prevent potential problems later on.
Question 3: How do I properly set up my mainsail for reefing ?
Before attempting any maneuver on the water, make sure you familiarize yourself with your boat’s specific rigging setup and consult its user manual for instructions tailored to your vessel. In most cases, preparing your mainsail for reefing involves identifying designated attachment points (usually located near the luff and leech), securing appropriate length lines (reefing lines) onto these points, and running them back through specific blocks or pulleys towards your cockpit area.
Question 4: What steps should I follow when actually reeving my mainsail?
Reefing often requires the coordination of multiple crew members or efficient solo maneuvering. Here’s a step-by-step breakdown:
1. Prepare your boat: Steer into the wind as closely as possible (heading upwind) to reduce pressure on the sail.
2. Release halyard tension: Ease off halyard tension to allow for easier attachment or detachment of reefing lines.
3. Attach reefing lines: Securely tie reefing lines to their designated points on the mainsail using appropriate knots, making sure there is enough tension without risking damage to the sail.
4. Lower the sail: Gradually lower the mainsail until it reaches the desired reefing point, carefully guiding it down using both hands and avoiding any snags or entanglements.
5. Securely fasten clew and tack: Once you’ve reached your desired reef point, secure both clew (the rear corner of the sail) and tack (lower front corner) using reef ties or hooks designed for this purpose.
6. Trim and hoist again: Lastly, trim the freshly reefed sail by adjusting its sheets accordingly and gradually hoist it back up while keeping an eye out for proper alignment and tension.
Question 5: Are there any specific tips for single-handed sailors?
Reefing alone can be challenging but is entirely achievable with practice and careful planning. Consider implementing these strategies:
– Practice beforehand in calm conditions until comfortable with all aspects of reefing. – Pre-mark your mainsail at predetermined intervals corresponding to various levels of reefs to facilitate quicker decision-making. – Utilize autopilot or self-steering devices to maintain control while taking care of multiple tasks simultaneously. – If conditions allow, heave-to (a sailing technique slowing down forward progress) before attempting any maneuvers, allowing more time to focus on handling sails.
In conclusion, mastering how to properly reef your mainsail is crucial knowledge for any sailor. By understanding the purpose, procedure, and best practices involved in reefing, you can ensure the safety of yourself, your crew, and your boat. Remember to always consider the specific characteristics of your boat when reefing and consult with experienced sailors or professionals if in doubt. Happy sailing!
Getting Started: A Simplified Guide on How to Reef the Main Sail
Introduction:
Reefing the main sail is an essential skill for any sailor. Whether you’re a seasoned veteran or new to sailing, understanding how to safely reef the main sail can be a game-changer when it comes to maintaining control in strong winds. In this comprehensive guide, we will simplify the process of reefing the main sail , breaking it down into easy-to-follow steps and providing you with valuable tips along the way.
Step 1: Assess the Need for Reefing
Before diving into reefing, it’s crucial to assess whether it’s necessary. Keep an eye on wind speed and direction to determine if conditions warrant reducing sail area. If gusts are becoming increasingly powerful or your boat is heeling excessively, it’s time to think about reefing.
Step 2: Preparation
Once you’ve decided that reefing is required, take a moment to prepare yourself and your crew. Communication is key here – make sure everyone understands their respective roles and responsibilities during the process. Check that all necessary equipment is easily accessible and in good working condition; this includes reef lines, jiffy reefs (if applicable), and cleats.
Step 3: Head into the Wind
To safely reef the main sail, position your boat so that it heads directly into the wind. This maneuver allows for greater stability and ease while handling the sails .
Step 4: Ease Halyard Tension
Start by easing halyard tension gradually while holding onto both sides of the boom securely. The goal here is to lower the mainsail smoothly without any sudden drops or jerks.
Step 5: Secure Reef Cringle
Once enough tension has been released from the halyard, secure one of the reef cringles (small loops found on either side of your mainsail) with a sturdy line called a reef line or jackline. Ensure that this line passes through both cringles before tying off at an accessible cleat or winch.
Step 6: Tension the Halyard
With one reef cringle secured, start tensioning the main halyard again to create a smooth and wrinkle-free shape on your reduced sail . This step ensures efficient airflow and maintains optimal sailing performance even with a smaller sail area.
Step 7: Repeat for Second Reef Cringle (if applicable)
If conditions require further reduction, repeat steps 4-6 for the second reef cringle. This double-reef configuration provides an additional safety margin in extreme conditions.
Tips and Tricks:
1. Practice Makes Perfect: Smooth execution of reefing maneuvers takes practice. Familiarize yourself with the process during calm weather so that you can perform it confidently when things get rough.
2. Maintain Communication: Clear communication among crew members is crucial throughout the entire process. Ensure everyone is aware of each step and their roles to avoid confusion or mishaps.
3. Regular Inspection: Make it a habit to inspect your mainsail’s reefing gear before setting sail . Check for any signs of wear or damage that might compromise its functionality.
4. Optimal Timing: Don’t wait until winds become dangerously strong before deciding to reef. Reefing early ensures better control over your boat , allowing you to enjoy sailing while maintaining safety.
Conclusion:
Reefing the main sail may appear challenging at first, but by breaking down the process into manageable steps, anyone can master this vital skill. Remember to assess when reefing is necessary, prepare yourself beforehand, position your boat correctly, secure the reef cringles, maintain proper tension on the halyard, and repeat if needed. By following these guidelines and taking note of our tips and tricks, you’ll feel confident in safely handling your main sails regardless of weather conditions – ensuring enjoyable and secure sailing adventures!
Mastering the Technique: Expert Tips and Tricks for Reefing the Mainsail
In the exhilarating world of sailing, there is one crucial technique that every sailor must master: reefing the mainsail. Reefing refers to reducing the sail area to manage strong winds, ensuring optimal safety and control while out on the open water . For novice sailors, this may seem like a daunting task, but fear not! We have compiled a handy guide filled with expert tips and tricks that will turn you into a reefing aficionado in no time.
First and foremost, understanding when to reef is pivotal. As a general rule of thumb, if you find yourself heeling excessively or struggling to maintain control due to overpowering winds, it’s time to reef. However, keep in mind that different boats and sailors have varying comfort levels, so don’t be afraid to reef earlier than others if you feel uncomfortable or uncertain.
When it comes to actually executing the reefing process, preparation is key. Before heading out onto the water, familiarize yourself with your boat’s specific rigging setup. This includes identifying your reefs and their corresponding lines or straps. A well-prepared sailor should be able to locate these quickly and efficiently when needed.
Once you’re ready for action, start by easing tension on halyards and topping lifts before attempting to reef. This reduces strain on your equipment and makes it easier to lower the sail smoothly . Next up is securing the luff (front) of the sail. Using leech (rear) lines or reefing hooks provided by some modern sail designs, gather excess material towards the boom end by pulling horizontally towards you.
Remember that teamwork makes dream work – especially in challenging situations like reefing during strong winds. Communication between skipper and crew members is essential for a smooth operation. Establish clear signals or commands ahead of time so everyone knows their role when it’s time to drop anchor…no wait – drop sails!
Now let’s dive into some clever tricks that can enhance your reefing technique. One such trick is the “Jiffy Reefing” method, a popular choice among experienced sailors . This ingenious system incorporates small reefing lines and rings that make it effortless to quickly reduce sail area in increments. By using this tactic, you can gradually adapt to changing wind conditions without having to go through the entire reefing process at once.
Another nifty hack involves utilizing a “reef point pinger.” This smart little device emits an audible sound when your sail is properly secured into the reef cringle – ensuring accuracy and reducing chances of error. Don’t be surprised if fellow sailors start wondering how you effortlessly nail your reefs every time!
Last but certainly not least, always remember that practice makes perfect! Head out on the water regularly to fine-tune your skills and develop muscle memory in reefing maneuvers. Experiment with different techniques, adjust for various wind strengths, and don’t shy away from seeking advice or feedback from seasoned sailors.
So there you have it – a comprehensive guide on mastering the technique of reefing the mainsail. With these expert tips and tricks up your sleeve, you’ll be prepared to tackle any gusts that come your way while maintaining control and safety on the high seas. Happy sailing!
Safety First: Essential Considerations When Learning How to Reef the Mainsail
Safety on the water should always be at the forefront of any sailor’s mind. Whether you are a seasoned sailor or just starting your sailing journey, it is crucial to understand the importance of reefing the mainsail safely. Reefing refers to reducing the sail area to maintain control and stability in windy conditions. While this skill is vital for any sailor, learning how to reef the mainsail requires careful attention and consideration to ensure everyone’s safety on board.
One of the first things to consider when learning how to reef the mainsail is knowing when it’s time to do so. It’s essential to gauge weather conditions accurately and have a solid understanding of your boat’s capabilities. Wind can be unpredictable, and sudden gusts can turn a pleasant sailing trip into a dangerous situation if not properly prepared. Therefore, keeping an eye on wind speed through reliable weather forecasts or using onboard instruments is crucial.
Once you determine that it’s time to reef, the next step is selecting which reefs will be necessary. Most modern boats offer multiple options for reef points – positions along the luff of the mainsail where additional lines can be attached to reduce its size. Choosing which reefs to use depends on multiple factors such as wind strength, boat type , crew size, and experience level.
Before attempting to reef, make sure you are familiar with your boat’s rigging setup especially precise points where lines need attachment during this process. This knowledge helps prevent confusion or mistakes while executing this maneuver, ensuring a smooth operation even in more challenging situations.
Now comes one of the most critical considerations: crew communication and coordination. A clear plan needs to be established before initiating the reefing process – every member onboard should know their respective roles during this procedure thoroughly. Assign tasks such as helm control, managing halyards and sheets, releasing tension from battens (if applicable), and controlling mast furling mechanisms (for furling main systems) efficiently distributed among the crew.
While executing the reefing process, it is crucial to pause and reflect on safety precautions. A common danger during the process of reefing is getting tangled in lines or sails; thus, wearing appropriate safety gear such as harnesses and life jackets is essential. It’s also essential to stay vigilant about keeping the cockpit tidy and free of loose ropes or clutter that could cause accidents or entanglements.
Furthermore, remain attentive to potential hazards above deck. Pay close attention to any overhead obstructions like lazy jacks or bimini tops that may interfere with proper sail handling . Taking note of these potential obstacles beforehand can save you from unnecessary complications when attempting to reef.
Finally, practicing reefing techniques in calm weather conditions before venturing into more challenging situations is highly advisable. Repetition builds confidence and muscle memory among the crew, making this critical procedure feel more routine when sailing in inclement weather .
In summary, learning how to reef the mainsail requires a meticulous approach centered around safety first. Understanding weather conditions, determining when it’s time to reef, selecting appropriate reefs based on various factors, knowing your boat’s rigging setup inside-out, establishing clear crew communication protocols, and using safety gear are all crucial aspects to consider before embarking on a sailing trip. With careful planning and practice, you’ll be well-prepared to handle any situation that arises while safeguarding yourself and your fellow crew members at all times.
Troubleshooting and Solutions: Overcoming Challenges While Reefing the Mainsail
Reefing the mainsail can be both a thrilling and nerve-wracking experience for every sailor out there. As you navigate through unpredictable winds and challenging weather conditions, it’s not uncommon to encounter various obstacles that may require quick thinking and problem-solving skills. In this blog post, we will delve into some common challenges faced while reefing the mainsail and explore clever solutions to overcome them with ease.
Challenge 1: Strong Winds Causing Difficulty in Controlling the Sail
Sailing enthusiasts often find themselves struggling to maintain control over the mainsail when strong gusts start hitting their vessel. The excessive force of the wind can lead to overpowered sails, causing difficulties in steering and maneuvering properly.
Solution: The key lies in proper sail trim. By easing out the main halyard slightly and tightening the boom vang, you can flatten the sail’s shape effectively, reducing its power without sacrificing too much speed or stability. Additionally, adjusting your sheet tension accordingly will help you regain control by depowering the sail .
Challenge 2: Getting Stuck with Jammed Slides While Lowering or Raising the Sail
Jammed slides on mast-track systems are a widespread issue encountered during reefing maneuvers. These frustrating obstacles can significantly slow down your progress or even prevent you from safely deploying or stowing your mainsail.
Solution: A simple yet effective solution is lubricating your mast track system with silicone spray or dry lubricants before setting off on any sailing adventures . Regular maintenance like cleaning debris or sand from individual slides is also imperative for smooth operation. Furthermore, inspecting your sail’s cars and attaching points can help identify any damaged components that may be hindering their movement.
Challenge 3: Difficulty in Finding Appropriate Reef Points
Deciding when and how much to reef requires careful consideration under ever-changing conditions. Making this judgment call accurately ensures optimum sail control while avoiding potential damage due to excessive strain on the rigging.
Solution: A smart practice is to mark your sail with reef points in advance, enabling effortless and quick identification when it’s time to reef. Using grommets or webbing loops strategically placed along the luff and foot of the mainsail will provide clear reference points for reducing sail area. Additionally, investing in a well-designed reefing system that allows for easy adjustment can enhance your ability to make timely decisions in challenging situations.
Challenge 4: Tangled or Misaligned Reefing Lines
Tangled or misaligned reefing lines can be a frustrating setback while attempting to quickly secure your reefed mainsail. The confusion caused by these entanglements may result in prolonged exposure to adverse conditions, compromising safety.
Solution: Regular maintenance and organization of your reefing lines are essential. Ensuring proper alignment and untangling any knots beforehand will save you precious time when under pressure. Furthermore, consider using color-coded or labeled lines to distinguish between different reefs – an ingenious technique that eliminates confusion during hurried moments.
By understanding these common challenges and equipping yourself with clever solutions, you’ll become a more confident sailor capable of overcoming obstacles encountered while reefing the mainsail. Remember, sailing is an ever-evolving journey that demands adaptability and active problem-solving skills. Embrace the thrill of troubleshooting, as it further enhances your expertise on the water!
Recent Posts

- Sailboat Gear and Equipment
- Sailboat Lifestyle
- Sailboat Maintenance
- Sailboat Racing
- Sailboat Tips and Tricks
- Sailboat Types
- Sailing Adventures
- Sailing Destinations
- Sailing Safety
- Sailing Techniques
- Forums New posts Unanswered threads Register Top Posts Email
- What's new New posts New Posts (legacy) Latest activity New media
- Media New media New comments
- Boat Info Downloads Weekly Quiz Topic FAQ 10000boatnames.com
- Classifieds Sell Your Boat Used Gear for Sale
- Parts General Marine Parts Hunter Beneteau Catalina MacGregor Oday
- Help Terms of Use Monday Mail Subscribe Monday Mail Unsubscribe
Mainsail Tough to Raise
- Thread starter Rob Edgcombe
- Start date May 3, 2005
- Hunter Owner Forums
Rob Edgcombe
I have purchased a 1993 Hunter 35.5. I recently had the opportunity to raise the mainsail for the first time using the cockpit-lead running rigging. I hand to wench the sail up the whole way. I was expecting to hoist by hand and only have to tighten by wench. Is my running rigging behaving as it should or do I have a problem somewhere? Thank you in advance for any help you can provide.
Wish I had that problem I truly admire anyone who can get his wife/girlfriend to do it...Most of us use a winch. Sorry but couldn't resist. The problem is friction at the various turning points around blocks, etc. Many raise the sail from the mast base which eliminates most of the turns. You might try lubricating the sail slides with the appropriate non-grease lube and check the slides for size and rough edges. Otherwise, you can replace the halyard winch with an electric. Don
single line reefing The rigging for the single line reefing causes a lot of friction when raising the mainsail. On my 1995 35.5 I can raise the main by hand until I reach the first reef point - then must use the winch the rest of the way. To me this is not really a big issue but if you are concerned about it there is a lot of info in the archives on this forum for upgrading the blocks in the single line reefing system to reduce the friction.
Thanks Thank you. I failed to mention this boat is missing its reefing system but I can see where that would increase the purchase required.
Mental Lapse Thank you. I stand corrected. By the way, you spelled truly wrong.

Jim Rushing
Normal for a 35.5 to have to strain when raising the mainsail. I have cleaned the track and lubed the track and it is still a pain the last 10 feet. If I thought that these battery powered offset motors would work, I would buy one.
Check the Dutchman This is a very common problem but not a "normal" one. Check the archives... My control lines were slightly misaligned causing the sail and battens to be forced forward into the mast. A little misalignment causes too much friction. This is caused by the fact that the slugs were offset from the batten end causing the slug to twist. The harder you pull, the greater the twisting force. The plastic slugs were sticky too - probably from WD40. Cleaned them off, cleaned the track and used McLube for a track lubricant. I got some Batslides but have yet to put them on. I readjusted the control lines on the Dutchman and I can raise the main all the way to the top by hand - no winch. You must adjust the control lines together with the lift component of the topping lift to get it right. If the boom end is too low, that contributes to the problem as well.
Raising the main On my 1990 H35.5 I can hoist my main up all but the last 5 - 6 feet by hand. But to do so I have to be sure we are basically dead into the wind - if not the wind loads up the full battens and binds the cars in the mast track. I also sprayed large amounts of McLube last spring on the sail slugs and the track groove and that really seemed to help. The only time I have a problem is when we are shaking out a reef and the single line system has so much friction that hoisting it up is a chore. That is on the to-do list. Good luck.

Are you single.. or with crew We too have the same problem with our main. Something slippery on the tracks is a big help. Also making sure your rig is in tune is crucial. We have found the easiest way for us to raise the mainsail and this is getting her almost to the top of the track is.... I have my first (and only) mate stand at the mast and grab the halyard there. She pulls (no pun there) and I get down by the winch and give her the "ol heave ho". Loosening the mainsheet for wind shifts keeps her in luff. Goes right up pretty painless..lee. As long as you have any bend in the mast and you arent auto furling, your gonna suffer this fate. Cheers Rick Whiskey Chaser

Marybeth and Rip
Same problem on Hunter 31 We had the same problem with our Hunter 31. We added a "Strong System" sail track and had Sail Care (Ford City, PA) install the special batten-cars on our main sail. That helped a lot. We could get the sail to within 3 feet by hand. Sail Care said it should be even easier and suggested we check the halyard sheaves at the top of the mast. Sure enough, several of them were frozen to the pin and would not turn. The halyards had worn grooves in one side of them. We are replacing them this Spring with sheaves with bearings in them. Then we should get the full benefit of the "Strong System". Harkin also sells a mast track/slide system. We bought the Sail Care version because we saw it at the Chicago Boat Show and got a deal. I don't know how much benefit we would have seen if we had replaced the sheaves first. If I had it to do again, I would try replacing the sheaves first.
35 and 40.5 main raising We have a Hunter 40.5, but had the same experience on an older Hunter 35. I lube the slides every so often with McLube and this helps alot. But raising it from the cockpit will always take more effort. Here is what we usually do: If the seas are not rough, I hand raise our large main from the mast, while my wife tails. She is also at the wheel. Since the halyard's cabin-top rope clutch is engaged, she doesn't use any strength, just pulls out the slack. At the mast, I can hand raise the sail about 1/2 way between the top spreader and top of mast. I then go back to the cockpit and use the winch to raise it the rest of the way. If the seas are rough, I raise the main from the cockpit, but use the winch for most of it. We don't have anything binding up, but the friction from raising it in the cockpit just makes it harder. The reason I keep the halyard run back to the cockpit is that I can reef the main without leaving the cockpit. I took out the reef lines from the first reef points. I immediately reef to the 2nd set, with one reef line for the tack and on reef line for the clue.
RIP Rip: I was going to do the same thing to our H'31 (sheaves with bearings). It was suggested that we DO NOT do that. The reasoning was the fact that the halyards have a static load on them. The bearing tend to get flat sides on them. Something you may also consider is getting metal sheaves. They sell them at Rig-Rite for the Isomat spar. I am not telling you NOT to do this, it was only a suggestion from one of the vendors at the boat show a couple of years ago. We actually solved our problem with just a matter of using a 7/16" Sta-set halyard instead of the 1/2" (Hunter specs)Sta-setx, that we were using. I always thought that the 1/2" line was to large and after swapping it out, it confirmed my suspicions.
You guys are all working too hard try some adjusting - maybe raise the boom a little. I can lift mine all the way to the top from the cockpit by hand. It is a little workout but not nearly so hard as it used to be on our 37.5.

We raise ours... ...to the black band by hand very easily. All of this problem you are experiencing is due to friction in the system. The masthead sheeve is the weakest link. The mast base sheeve is another. The track for the sail slugs needs to be clean and can be lubricated with bees wax. Also a smaller diameter line than the stock double braid will make a big difference. If you add all these friction points together its a wonder you can get the sail up at all. Of course, I'm assuming you know to release the mainsheet, vang, traveler and cunningham when you hoist.
The 35.5 main has always been a workout The previous skipper of our 35.5 installed a $3K Harken Battcar system. I have replaced all the reefing rigging with new blocks, which are constructed with Delrin ball bearing sheaves, and new line. Still need to winch the final 1/3 to 1/4 of a full main deployment.
Same thing, but found one problem Same problem on my 40.5 I can easily pull all the way if I stand at the base of the mast. I did pull up the cover when the lines separate in front of the hatch, and the pulleys were worn and flatspotted. Does anyone know how to get in touch with Garhouer? And do they make a better pulley with sealed bearings? The originals are just a plastic wheel with a metal bushing, wearing going all everywhere!
Garhauer Hey Roger, Try: http://garhauermarine.com/ And I have the same problem with my 40.5. I figure raising the main is a great way to get a workout.
Bill O'Donovan
Tip sheet 1. Loosen the mainsheeet. 2. Loosen the boom vang. 3. Lube track with Dawn detergent, syringe. 4. Crank at the mast, not the cockpit. 5. Install a $5 clutch on mast for quick hold. 6. Be sure to be upwind, and motoring. 7. Get Tom Sawyer to raise it, Huck. 8. Don't forget to unhook the topping lift.
Thanks! Fantastic!! Thanks so much. Tried a Google search under the company name and no luck. This is perfect!
No Problem No problem Roger, the people at Garhauer are great to deal with and very responsive. They even made me a 60-inch stainless flagpole for around $50. So now I can use the 1 inch flagpole socket that Hunter installed on the railing.
- This site uses cookies to help personalise content, tailor your experience and to keep you logged in if you register. By continuing to use this site, you are consenting to our use of cookies. Accept Learn more…

- Forum Listing
- Marketplace
- Advanced Search
- All Topics Sailing
- Skills & Seamanship
- Learning to Sail
- SailNet is a forum community dedicated to Sailing enthusiasts. Come join the discussion about sailing, modifications, classifieds, troubleshooting, repairs, reviews, maintenance, and more!
Raising the main in the marina
- Add to quote
I've read this a few times. I am solo so this seems ideal for me. When I raise the main in the marina do I simply slacken the main sheet allowing the boom to move freely as I motor out? Thanks from a newbie.
Depends on the situation.... Since you are motoring and not needing the sail, you do raise it and let the boom swing to let the sail flap. But you have to watch where that boom goes so its not sweeping people off the docks or poking holes on other people's boats. You can also sail out of the marina if winds are favorable. Maybe you'll sail out on the main... maybe on the jib, maybe both. These are decisions based on space available, winds, currents and your skills. Go out in the protected waters, but where there is plenty of room and do some practicing.

You always want the mainsheet slacked when you raise the sail. That said, I would not raise while still in the marina. It could fill when you don't want it to and start driving you in a direction and faster than you want to go. Get the sail ready to go with cover off, halyard attached, etc. and when out in a clear area, head into the wind and raise the mainsail.

What Jim said... Unless you are lucky enough to have a perfect slip location (Like last slip out, nothing to whack, with prevailing winds in the direction you need to go) I would say it's a bit premature to raise the sail in the slip on a 40 ft boat. As we all know, wind near land gets flukey, it gusts and changes direction. If it gusts and the main sheet catches on a winch or jams in it's hardware you could be in for a crash course in how not to make your way into one of those Youtube videos about boat crashes.

Raising the mainsail on a larger boat with lots of 'momentum & inertia' in a slip can be problematic. If the marina has an 'outer' dock, typically a long dock, thats the place to raise your mainsail. An outer dock, aligned with the normal prevailing winds will enable you to raise, then go; and, without the danger of sudden crashes into (many?) other boats. Of course in any busy outer fairway, you can bet your assets that just as soon as you raise your sails, 'backwind' and then 'release' from the outer dock, every 'noodnick', including 25 novice kayakers, will be entering the outer fairway ALL at the same time. Solo sailing and raising the mainsail works best with an electric autopilot (remote controller in your pocket - preferred) and the sail raising done out and away from any 'danger'. **Electro-mechanical AUTOPILOT - with remote control**. ;-)
I will raise in the slip if its mild wind and on the nose just for maintenance etc. I wouldn't do any more than that as others have said.

No, don't do that. You may get blown off course and have worse trouble. You wait until you are out and have room and are able to motor at idle speed + - into the wind.

Hey, I raise the main on my boat in the HARBOR all the time. My boat is on a mooring. My mooring is just south of the channel. To exit the harbor I proceed west for .5nm and then north for .25nm and then I am in the wide open Long Island Sound. I frequently sail solo so if conditions are good I will prepare to leave, then raise the main, drop the mooring, and motor sail out of the harbor. Conditions are good (to me) if: The wind is from the SW to NE The wind is 10 kts or less Traffic in the harbor is light While still on the mooring, my procedure is: Prepare boat for sailing - all covers off, all lines ready, all winch handles in position, etc. Engine on and in neutral Dinghy connected to one mooring pendant, the other still on a bow cleat Main sheet slack Topping lift set Final check for no boat traffic Raise the main drop the remaining mooring pendant Motor to channel Sheet in the main and motor sail out of the harbor. On my return I will leave the main up only if the wind is 5 kts or less, in which case I will get on the mooring and then drop the sail. Barry
We are willing to do a lot of sailing on/off moorings, on/off anchor, but I'm reluctant to do it in and out of anyplace where fast maneuvers in arbitrary directions which don't align with wind direction maybe required to avoid other boats in motion. Not to go to the rule book but your rights as a sailor are severely limited in narrow channels, etc. Even if there were not, the likelihood that the other guy will get out of your way (the guy in the sea ray that doesn't have a clew....not to pick on anyone in particular), isn't good. I think twice about sailing through a narrow channel especially if there is other boat traffic. My neighborhood in the summer becomes crowded w/weekend warriors w/little or no experience and/or boating education. I assume we are talking about larger keel boats here. Different story with dingy sailors. My rule, for what it's worth, under power or sail I don't like to put myself into a situation where I don't have a plan B if things don't go as planned or others behave unpredictably. Reverse is your friend. YMMV, and if it was the right situation with no traffic, right wind direction, etc...I wouldn't rule it out, but doesn't happen very much here.

think about this-- there are gusts which are unannounced. there are obstacles as you leave, even at the mouth of the bay or inlet in which you berth your boat. on a mooring oh yes. learn to sail on and off that ball as you may need that knowledge. boat control is as important as car control. consider all the options possible. everything even if seemingly remote and irrelevant are important, as even the tiniest of things can quit your day. remember that tides change, winds change, currents change, everything changes. and as you leave you are passing rocks and boats and other obstacles potentially obstructions. jib rises first, to steer your course while you avoid incidents due to engine fail or other unsuspecting challenges as they arise with the mega yacht in your path . oops. uhhhh huuchhh'm oops. "i could not" is no reason for the damages in your wake. work it out before you attempt to effect so you donot affect. there is no such word as "cannot" or "could not" this is called responsibility for actions. do you wish to have responsibility for all of that which occurs in your wake? not many nations practice tort law with frivolous lawsuits as does usa. you will need to know these bits of information so you are able to maintain your freedoms. figure out ALL possible potentials then raise your main or not. i choose to raise my genoa, which is my headsail only if i need to augment engine on my way out of a harbor. engines fail. jib keeps you off rocks . main cannot as it doesnot steer the boat.,, is a driving sail on a sloop. headsail is the steering sail. headsail pulls bow. rudder turns stern which in turn aids in steering bow, but if your rudder fails....... gotta cover it all. stuff fails. as for the potential of slamming booms.....i learned at age 7 that when the boom slams into your skull you can lose the ability to stand upright and you see black with stars. i sware that to be truth. most of these newfangled short boom marconi sail rigs are too short to hit you directly, but if your traveler block suddenly fails, can you prevent a concussion and subsequent possible permanent blackout? had a traveller block which appeared perfect fail in gom on opb. that was much too close..... when i am out in open ocean i will add main should i desire. the only sail i raise before leaving any harbor is my mizzen. until my jib is raised , it does absolutely nothing, except lend visibility to an otherwise difficult to see thing in water, and has zero potential for causing damages to me. after raising headsail, it lends a knot to boat speed, potentiating the headsails power in the avoidance of rocky places when engine stops..oops.... i know you think i didnt answer your question, but i did... if you can see potential damages under any and all potential circumstances, then do it or donot do it a s situation merits. personally i would not, if only for the visibility factor. i like to see what is coming at me and try to avoid the worst case scenario. .
- ?
- 173.9K members
Top Contributors this Month

Aft : The rear of a boat, close to the stern Backstay : A mast support that runs from the top of the mast to the stern of the boat. It may be adjustable in order to bend the mast backward or to increase tension on the forestay tool Ballast : Weight in the keel of a boat that adds stability Beam : A boat's greatest width Beating : Sailing (or pointing) at an angle into the wind or upwind. Since sailboats cannot sail directly into the wind, "beating" is the closest course to the wind they can sail. Bilge : The lowest part of a boat's hull
Blanketing : A tactical maneuver in which one boat slows a competitor by positioning itself to obstruct the competitor's wind Block : An assemblage of one or more sheaves (pulleys) housed in a plastic or metal case that changes the direction of travel of a line (rope) and may be attached to a boat's deck, spar or other stationary object Boom : Spar to which a sail's lower edge or foot is attached. The boom is attached to the mast at the gooseneck. Boom vang : Lines that control the boom. These lines run from the boom to the base of the mast and are used when reaching and running. Bow : The front of the boat Broach : When in a downwind situation, the boat turns uncontrollably and is pushed by the wind onto its side, lying with the mast parallel to the water. As a rule, the boat will right itself. Buoy : A floating marker Cam cleat : A mechanical cleat used to hold a line automatically. It uses two spring-loaded cams that come together to clamp their teeth on the line, which is placed between them. Also known as jam cleat . Centerboard : Like a keel, it is a weighted appendage projecting below the boat that keeps it from capsizing and also supplies the hydrodynamic lateral force that enables the boat to sail upwind. Unlike a keel, it is retractable. Cleat : A fitting, typically with projecting ends, that holds a line against the tension from the sails, rigging or mooring Clew : The lower corner of a mainsail or jib and either lower corner of a spinnaker Coming about : Turning the boat so the bow crosses through the eye of the wind, thereby changing the side of the yacht on which the sails are carried. Also known as tacking. Covering : A tactical maneuver in which a boat stays between a competitor and the wind or the next mark Daggerboard : An adjustable fin primarily used to stop the boat moving sideways through the water. Also known as centerboard. Dinghy : The Laser, Laser Radial, 470, and Finn are all dinghies that have been used in Olympic sailing - they all have one hull and a centreboard or daggerboard Downwind : The point of sail when the wind blows from aft of the boat's beam Drag : The negative or retarding force acting on a body, such as a boat moving through a fluid parallel and opposite to the direction of motion Fall off : A maneuver in which a boat turns away from the wind Fleet racing: Competition format were entries race against each other around a course Foot : The bottom edge of a sail Genoa/Headsail/Jib : The smaller sail set in front of the mast Gooseneck : A fitting that attaches the boom to the mast Gybe : Turning the boat so the stern crosses through the eye of the wind, (thereby changing the side of the boat on which the sails are carried (opposite of tacking). Also spelled jibe. Halyard : A line used to hoist and hold up a sail Header : Wind shift that causes the boat to head away from the mark Helmsman : The crew member who steers the boat; also the skipper, or the "driver" Hiking out : Leaning out of the craft in order to change the center of gravity in the boat and go faster Hiking straps : Straps attached to the feet that help a sailor hike out more, minimizing the chance of falling out of the boat Hull: The main body or shell of a ship or other vessel, including the bottom, sides, and deck ISAF : International Sailing Federation, the world governing body of sailboat racing Jam cleat : A device used to grip a line (rope). It has two rows of V-shaped molded teeth that grip the line when it is jammed in the groove. Also known as cam cleat. Jib : A foresail that overlaps the shroud base and is used for sailing upwind Jibe : Same as the gybe -- turning the boat so the stern crosses through the eye of the wind, thereby changing the side of the yacht on which the sails are carried (opposite of tacking) Kee l: A weighted, non-moveable appendage projecting below the boat that keeps it from capsizing and also supplies the hydrodynamic lateral force that enables the boat to sail upwind Kite : Large, light ballooning sails that are only attached to the mast at the corners. They are used when sailing downwind. Also known as spinnaker . Knot : One nautical mile per hour Lay : To sail a course that clears an object or racecourse marker buoy such as the windward and leeward marks. When a boat is doing so, it is said to be "laying the mark." Layline : An imaginary line projecting at an angle and corresponding to the wind direction from either side of a racecourse marker buoy that defines the optimum sailing angle for a boat to fetch the mark or the finish line. When a boat reaches this point, it is said to be "on the layline." Going beyond the layline means the boat is sailing a greater distance to reach the mark or finish line. Leech : The trailing edge of a sail or the curve of a sail Leeward : The side furthest away from the wind Lines : A nautical term for ropes Luff, to : Bubbling or flapping of a sail when it is not trimmed enough or is being back winded by another sailor when the course sailed is too close to the wind Mainsail : The sail behind the mast Mark : A buoy used in a racecourse Mast : The vertical spar that holds up the sails Match racing : A racing format in which only two boats compete at a time, as opposed to fleet racing, wherein three or more boats sail at once Medal race : The final race in the series. Only the top-10 boats after the opening series compete and scores are doubled. Multihull : Nacra 17 (boat used in its inaugural event at the 2016 Rio Olympic Games) - A boat with more than one hull. A boat with two hulls is also known as a catamaran and a boat with three hulls is knows as a trimaran. Nautical mile : The unit of geographical distance used on saltwater charts; one nautical mile equals 6,076 feet or 1.15 statute miles. Therefore, one statute mile equals 0.87 of a nautical mile. Off the wind : Sailing away from the wind; also downwind, reaching or running Plane : A boat planes when it sails over her own bow wave so only a small section of the hull is in the water. This allows the boat to go faster than the theoretical maximum hull speed. Pointing : Sailing at an angle into the wind or upwind. Depending on a boat's design, some will "point higher" or sail more directly into the wind and thus sail a shorter course to a given mark on the racecourse. Port : Nautical term for the left side of a boat when facing forward Port tack : Sailing with the wind blowing onto the port side and the mainsail on the starboard side Race officials : The officials responsible for running the race and enforcing the rules. This group includes the measurers who ensure that each sailor's equipment is equal and within the rules, the race officers who run the races and the judges and umpires who are rules experts and make decisions about whether rules have been broken. Reef : To decrease a sail's size Rigging : The wires, lines, halyards and other items used to attach the sails and the spars to the boat. The lines that do not have to be adjusted often are known as standing rigging. The lines that are adjusted to raise, lower and trim the sails are known as running rigging. Rudder : A moveable fin located underneath the back of the boat that steers the craft Running rigging : All moving rods and lines that support and control the mast and sails Shackle : A metal connector that attaches to other fittings with the use of a pin that is inserted through the arms of a U Sheet : A line that controls sails Skiff : 49er - A light open dinghy with a self-draining hull Slalom finish : A technical section of the windsurfing (RS:X) course involving multiple changes of direction in quick succession Spar : A basic term for a mast, boom or yard Spinnaker : Large, light ballooning sails that are only attached to the spars at the corners. They are used when running or reaching, sailing downwind. Starboard : Nautical term for the right half of the boat when facing forward Starboard tack : Sailing with the wind blowing onto the starboard side and the mainsail on the port side Stern : The rear of the boat Tacking : Turning the boat so the bow crosses through the eye of the wind, thereby changing the side of the boat on which the sails are carried (opposite of gybing) Tiller : A lever used to turn the rudder of a boat from side to side Trapeze : To stand on the side of the boat to maximize the effect of the body weight Trim : To adjust the sail to the right shape and angle to the wind. The process of "hiking out," or changing the center of gravity of the boat in order to go faster. Upwind : Toward the direction from which the wind blows; windward. Way : Forward motion of a boat. A term typically used in the context of saying that a boat is making way, is underway, or has way on. Windward : The side closest to the wind
Note: Some components of NBCOlympics.com may not be optimized for users browsing with Internet Explorer 11, 10 or older browsers or systems.
Here's who could be responsible for paying for the Baltimore bridge disaster
- The Francis Scott Key Bridge in Baltimore collapsed after a container ship collided with it.
- Several entities could be on the hook to foot the bill in the aftermath of the disaster.
- The maritime insurance industry will likely be saddled with the highest costs.
The Francis Scott Key Bridge in Baltimore collapsed on Tuesday after a large container ship ran into it, leading to six presumed deaths and millions of dollars in possible damage.
It's still too early to estimate the total economic impact of the disaster, but between the cost of rebuilding the decades-old bridge, compensating the victims' families , and paying out damages for disruptions to the supply chain, the eventual cost of the disaster is expected to be significant.
Who will pay to rebuild the bridge?
President Joe Biden said on Tuesday the federal government should be responsible for paying to reconstruct the damaged Francis Scott Key Bridge.
"It is my intention that the federal government will pay for the entire cost of reconstructing that bridge, and I expect Congress to support my effort," Biden said.
The bridge was built in the 1970s for about $60 million, but the cost of rebuilding it could be 10 times its original price tag, an engineering expert told Sky News.
Baltimore is among the busiest ports in the nation , with more than a million shipping containers passing through each year. The collapse — which closed the port to all maritime and most road traffic until further notice — is already beginning to wreak havoc on the supply chain.
The cost of building the bridge back fast enough to offset diversions as much as possible could saddle the government with a more than $600 million bill, David MacKenzie, the chair of the engineering and architecture consultancy COWIfonden, told Sky News.
Who will pay for damages to the ship and its cargo?
The container ship, the Dali , is owned by a Singapore-based firm. The ship's charterer, Maersk, confirmed to Business Insider that vessel company Synergy Group operates the ship.
However, the companies with cargo aboard the Dali could ultimately be responsible for some of the ship's damages and cargo costs, according to Ryan Petersen , the CEO of the supply-chain-logistics company Flexport, which had two containers on the ship.
Related stories
The Dali was carrying 330 containers that must now be rerouted, Petersen said in an X thread.
An ancient maritime law known as " general average " dictates that companies with even a single container aboard a ship split certain damages pro rata based on the number of containers they had on board, ensuring all the stakeholders benefiting from the voyage are splitting the risk, Petersen said.
General average situations can occur when a ship is stranded or when cargo is damaged or thrown overboard to save the vessel, according to Flexport . The concept helps ensure that all parties who have a vested interest in the vessel share the cost and concern of protecting it.
It's too soon to know whether damages incurred to free the Dali in the coming days will qualify as a case of general average.
Who will pay for everything else?
The majority of the financial fallout is likely to lay primarily with the insurance industry, according to media reports.
Industry experts told the Financial Times that insurers could pay out losses for bridge damage, port disruption, and any loss of life.
The collapse could drive "one of the largest claims ever to hit the marine (re)insurance market," John Miklus, the president of the American Institute of Marine Underwriters, told Insurance Business.
He told the outlet that the loss of revenue from tolls while the bridge is being rebuilt will be expensive, as will any liability claims from deaths or injuries.
The Dali is covered by the Britannia Steam Ship Insurance Association Ltd., known as Britannia P&I Club, according to S&P Global Market Intelligence.
In a statement to Business Insider, Britannia said it was "working closely with the ship manager and relevant authorities to establish the facts and to help ensure that this situation is dealt with quickly and professionally."
Britannia is one of 12 mutual insurers included in the International Group of P&I Clubs, which maintains more than $3 billion of reinsurance cover, sources familiar with the matter told Insurance Business.
Britannia itself is liable for the first $10 million in damages, both FT and Insurance Business reported. Whatever remains is dealt with by the wider mutual insurance group and Lloyd's of London, a reinsurance market in the UK, the FT reported.
Update: March 28, 2024 — This story has been updated to include additional information about general average and clarify that it is too soon to know whether general average will apply in the case of the Dali.
Watch: The container ship that destroyed the Francis Scott Key Bridge has crashed before
- Main content
share this!
March 28, 2024
This article has been reviewed according to Science X's editorial process and policies . Editors have highlighted the following attributes while ensuring the content's credibility:
fact-checked
trusted source
Mercury could be the perfect destination for a solar sail
by Mark Thompson, Universe Today

Solar sails rely upon pressure exerted by sunlight on large surfaces. Get the sail closer to the sun and, not surprisingly, efficiency increases. A proposed new mission called Mercury Scout aims to take advantage of this to explore Mercury. The mission will map the Mercurian surface down to a resolution of 1 meter and, using the highly reflective sail surface to illuminate shadowed craters, could hunt for water deposits.
Unlike conventional rocket engines that require fuel which itself adds weight and subsequently requires more fuel, solar sails are far more efficient. Light falling upon the sail can propel a prob across space. It's a fascinating concept that goes back to the 1600s when Johannes Kepler suggested the idea to Galileo Galilei. It wasn't until the beginning of the 21st Century that the Planetary Society created the Cosmos 1 solar sail spacecraft. It launched in June 2005 but a failure meant it never reached orbit. The first successfully launched solar sail was Ikaros, launched by the Japanese Aerospace Exploration Agency it superbly demonstrated the feasibility of the technology.
It has been known since 1905 that light is made up of tiny little particles known as photons. They don't have any mass but while traveling through space, they do have momentum. When a tennis ball hits a racket, it bounces off the strings and some of the ball's momentum is transferred to the racket. In a very similar way, photons of light hitting a solar sail transfer some of their momentum to the sail giving it a small push. More photons hitting the sail give another small push and as they slowly build up, the spacecraft slowly accelerates.

Mercury Scout will take advantage of the solar sail idea as its main propulsion once it has reached Earth orbit. The main objectives for the mission are to map out the mineral distribution on the surface, high-resolution imaging down to 1 meter resolution and identification of ice deposits in permanently shadowed craters. The solar sail was chosen because it offers significant technical and financial benefits lowering overall cost and reducing transit time to Mercury.
To propel the Mercury Scout module, the sail will be around 2500 square meters and 2.5 microns thick. The material is aluminized CP1 which is similar to that used in the heat shield of the James Webb Space Telescope. The sail's four separate quadrants unfurl along carbon fiber supports and will get to Mercury in an expected 3.8 years. On arrival it will transfer into a polar orbit and then spend another 176 days mapping the entire surface.
To enable the entire planet to be mapped the the orbit will have to be maintained by adjusting the angle of the sail. In the same way, the captain of a sailing ship can sail against, or sometimes into wind by adjusting sail angle and position so the solar sail can be used to generate thrust in the required direction.
Unlike other more traditional rocket engines whose life is usually limited to fuel availability, the solar sail is limited by degradation in sail material. Its life expectancy is around 10 years. Additional coatings are being explored to see if the life of the sail can be extended further.
Provided by Universe Today
Explore further
Feedback to editors

Engineers 'symphonize' cleaner ammonia production
8 minutes ago

Old crystal, new story for enhancing deep ultraviolet laser performance
31 minutes ago

Canada lynx historic range in US likely wider than previously thought
40 minutes ago

Using a cellphone compass to measure tiny concentrations of compounds important for human health
2 hours ago

Stingray sand 'sculpture' in South Africa may be oldest example of humans creating an image of another creature

Researchers observe anomalously bright single-molecule upconversion electroluminescence phenomenon
3 hours ago

Acids enable adhesive electrodes for thin, flexible supercapacitors

Researchers reveal evidence of transition from ergodic toward ergodic breaking dynamics

Ancient Adélie penguin DNA reveals that small repeats persist for hundreds of millions of years

Machine learning provides a new picture of the great gray owl
4 hours ago
Relevant PhysicsForums posts
Tv series: 3 body problem - affects gravitational force.
8 hours ago
U.S. Solar Eclipses - Oct. 14, 2023 (Annular) & Apr. 08, 2024 (Total)
21 hours ago
Our Beautiful Universe - Photos and Videos
Mar 31, 2024
Where are the black holes?
Mar 30, 2024
Terminology for motion in the solar system, ecliptic maybe?
Eye protection while watching a total solar eclipse.
Mar 29, 2024
More from Astronomy and Astrophysics
Related Stories

NASA solar sail technology passes crucial deployment test
Feb 13, 2024

Images show Lightsail 2 spacecraft's solar sail has deployed
Jul 26, 2019

LightSail 2 has been flying for 30 months now, paving the way for future solar sail missions
Nov 19, 2021

Flight by Light: Mission accomplished for LightSail 2
Aug 1, 2019

A new kind of solar sail could let us explore difficult places to reach in the solar system
May 31, 2022

Solar sails could reach Mars in just 26 days
Sep 22, 2023
Recommended for you

Curiosity rover searches for new clues about Mars' ancient water

Mapping the best route for a spacecraft traveling beyond the sun's sphere of influence

Blind people can hear and feel April's total solar eclipse with new technology

Japan moon probe survives second lunar night
Mar 28, 2024

Imaging turbulence within solar transients for the first time
Mar 27, 2024

Europe space telescope's sight restored after de-icing procedure
Mar 26, 2024
Let us know if there is a problem with our content
Use this form if you have come across a typo, inaccuracy or would like to send an edit request for the content on this page. For general inquiries, please use our contact form . For general feedback, use the public comments section below (please adhere to guidelines ).
Please select the most appropriate category to facilitate processing of your request
Thank you for taking time to provide your feedback to the editors.
Your feedback is important to us. However, we do not guarantee individual replies due to the high volume of messages.
E-mail the story
Your email address is used only to let the recipient know who sent the email. Neither your address nor the recipient's address will be used for any other purpose. The information you enter will appear in your e-mail message and is not retained by Phys.org in any form.
Newsletter sign up
Get weekly and/or daily updates delivered to your inbox. You can unsubscribe at any time and we'll never share your details to third parties.
More information Privacy policy
Donate and enjoy an ad-free experience
We keep our content available to everyone. Consider supporting Science X's mission by getting a premium account.
E-mail newsletter
Advertisement
Engineers Raise Questions About Bridge’s Construction as Inquiry Begins
In reviewing images of the Francis Scott Key Bridge, some structural engineers said that its piers, which are essential to the structure’s integrity, appeared to lack protective barriers.
- Share full article

By James Glanz and Annie Correal
- March 26, 2024
The large container ship that collided with the Key Bridge in Baltimore, leading to its near-total collapse, appeared to strike a critical component, known as a pylon or pier, according to several engineers who have reviewed footage of the incident.
Without the pier, they said, it was impossible for other components of the bridge to assume the load and keep the bridge standing.
The piers on a bridge act as a kind of leg and are what is known as “nonredundant” parts of a bridge’s structure. If a pier is somehow taken out, there is nothing to compensate for the missing structural support, and a collapse of the bridge is all but inevitable, most of the analysts said.

How Fenders Might Have Protected Against Bridge Collapse
The Francis Scott Key Bridge did not have an obvious fender system, or protective barriers, to redirect or prevent a ship from crashing into the bridge piers.
Yet the collapse in Baltimore on Tuesday might have been avoided, some of the engineers said, if the piers had been better able to block, deflect or withstand such a collision. And some of the engineers questioned whether the bridge’s piers had adequate blocking devices that are known with a self-explanatory name: fenders.
In bridge engineering, fenders can be anything from simple pyramids of rocks piled around the pylons to major concrete rings padded with slats of wood, designed to shield the bridge’s supports from damage by water or collisions.
It was not clear whether any such protection built around the bridge’s piers was sufficient to guard against even a glancing hit from a 95,000-gross-ton container vessel.
And the U.S. secretary of transportation, Pete Buttigieg, expressed doubt on Tuesday that any bridge could have withstood such a serious collision.
“This is a unique circumstance. I do not know of a bridge that has been constructed to withstand a direct impact from a vessel of this size,” he told reporters.
Yet a different perspective emerged in initial comments by the investigators who will be sorting out what happened in the collapse.
Jennifer Homendy, the chair of the National Transportation Safety Board, said protective structures would be a part of the investigation into the collapse. “There’s some questions about the structure of the bridge — protective structure around the bridge or around the piers to make sure there isn’t a collapse,” she said, responding to a reporter’s question.
“We are aware of what a structure should have. Part of our investigation will be how was this bridge constructed? It will look at the structure itself. Should there be any sort of safety improvements? All of that will be part of our investigation.”
The Maryland Transportation Authority did not immediately respond to a request for comment on the design of the piers in Baltimore, and did not say whether any fenders were installed to protect them.
Between 1960 and 2015, there were 35 major bridge collapses worldwide because of ship or barge collisions, resulting in the deaths of 342 people, according to a 2018 report from the World Association for Waterborne Transport Infrastructure, a scientific and technical organization.
The deadliest crash took place in 1983, when a passenger ship collided with a railroad bridge on the Volga River in Russia, killing 176 people, according to the report.
It was only after “a marked increase in the frequency and severity of vessel collisions with bridges” that attempts to study and address the risks were initiated in the 1980s, said the report’s authors, Michael Knott and Mikele Winters.
A widely circulated video of the Key Bridge failure drew attention to the disastrous collapse of the upper bridge structure. But engineers who reviewed the footage said that did not appear to be the culprit in the disaster. Instead, they said, the superstructure failure was most likely a secondary effect of the pier crumbling beneath it after the collision.
Engineers who reviewed images of the bridge both before and after the collapse said no significant fender structures were visible. Only fairly small structures were visible in photos taken at the foot of the pier, and they did not appear to be substantial enough to be able to stop a large ship, some of them said. They said the structures may have served another purpose entirely — like preventing water from scouring and undermining the pier’s foundation.
Benjamin W. Schafer, a professor of engineering at Johns Hopkins University, said, after looking at images of the bridge taken before the disaster, “If you zoom further out, you can see these large cylinders that sort of define the shipping channel. They are to direct the ships and they are part of the bridge structure. Some would say those are protective structures. But I haven’t seen any evidence of fenders myself.”
In some bridges, engineers may elect, instead of fendering, “the alternative of making the pier exceptionally strong,” said Shankar Nair, a structural engineer with over half a century of experience who is a member of the National Academy of Engineering. But the visual evidence so far, he and others said, suggested that the pier was simply not strong enough to survive the collision.
The structure’s apparent vulnerability left some engineers dumbfounded.
“This is a huge shock,” Dr. Nair said. “A bridge of that size and importance should not collapse when hit by an errant vessel.”
The importance of sturdy fenders on bridge piers was backed up by a similar accident that occurred in 2013 when a 752-foot-long tanker collided with a support of the San Francisco-Oakland Bay Bridge. According to a National Transportation Safety Board report on the incident, the support stood — although $1.4 million in damage was done to the fendering system, which cushioned the impact.
In other cases when collisions lead to full or partial collapses, shortcomings in the fendering system are usually involved, said Matthys Levy, a longtime structural engineer and co-author of “Why Buildings Fall Down.”
“It’s usually an issue of fendering,” Mr. Levy said. “The fendering is not strong enough.”
According to a description of the Key Bridge by an American Society of Civil Engineers manual, the 8,636-foot-long structure in Baltimore was opened to traffic in 1977. The steel span above it, a design known as a truss, can be vulnerable to failure itself — damage to individual elements of the truss can theoretically cascade into a wider collapse. But that did not appear to be the case in Baltimore, engineers who reviewed the footage said: The truss, they said, was simply unable to remain intact when the pier was taken out beneath it.
Tuesday’s collapse raises the question “of how vulnerable are the piers and what is done or should have been done to protect them in the event of something like this,” said Donald O. Dusenberry, a consulting engineer who has investigated many bridge failures.
Mr. Dusenberry, in pointing to the issue of fender protection, said that it was impossible to make a full determination of what was installed without reviewing structural drawings of the bridge.
But images taken before the disaster, he said, suggested that small barriers that could be seen rising around the bridge’s piers, roughly at water level, would be unlikely to be able to stop a large ship. Effective fenders, he said, had to be far enough from the pier to keep the bow of a large ship from striking the pier, and large enough to absorb the energy of a collision. Assuming nothing had changed since the prior pictures were taken, he said, the visible structures did not seem up to that task.
“Maybe it would stop a ferry or something like that,” he said. “Not a massive, oceangoing cargo ship.”
One of the catastrophes prompting scrutiny of the issue of bridge collisions was the collapse of the Sunshine Skyway Bridge in Tampa, Fla., in 1980.
The structure collapsed when a cargo ship hit a pier, bringing down part of the main span and killing 35 people. Seven years later, a shrimp boat hit a bumper erected on the bridge built to replace it.
While catastrophic collisions garner the most attention, vessel collision accidents with bridges are not uncommon and regularly cause damage that, according to the 2018 report, “varies from minor to significant but does not necessarily result in collapse of the structure or loss of life.”
Mr. Schafer, the professor of engineering at Johns Hopkins, said fenders were undeniably important to preventing catastrophic collisions but that the size of the vessel that hits a bridge plays a critical role.
“When people think about fenders, they’re thinking about something that is similar in scale, in size, to the supporting concrete structure itself,” Mr. Schafer said. “So, you know, if that is 30-feet across, you might think of a fender which is like 30 feet as well. Right?”
The problem, he said, comes with trying to design protection against something so large as a container ship. “Could we design something that’s big enough to divert a runaway cargo ship? Yes. Would it be of a scale that’s practical? Probably not.”
Rather than build bigger fenders, Mr. Schafer said, the key is to divert ships before they get dangerously close to the piers and fenders. “That would be the physical answer,” he said. “The better answer is to have the people and the processes in place, so it never happens .”
James Glanz is a Times international and investigative reporter covering major disasters, conflict and deadly failures of technology. More about James Glanz
Annie Correal reports from the U.S. and Latin America for The Times. More about Annie Correal
What we know about Baltimore’s Francis Scott Key Bridge collapse
The Francis Scott Key Bridge in Baltimore collapsed early Tuesday after being hit by a cargo ship, with large parts of the bridge falling into the Patapsco River.
At least eight people fell into the water, members of a construction crew working on the bridge at the time, officials said. Two were rescued, one uninjured and one in serious condition, and two bodies were recovered on Wednesday. The remaining four are presumed dead. The workers are believed to be the only victims in the disaster.
Here’s what we know so far.
Baltimore bridge collapse
How it happened: Baltimore’s Francis Scott Key Bridge collapsed after being hit by a cargo ship . The container ship lost power shortly before hitting the bridge, Maryland Gov. Wes Moore (D) said. Video shows the bridge collapse in under 40 seconds.
Victims: Divers have recovered the bodies of two construction workers , officials said. They were fathers, husbands and hard workers . A mayday call from the ship prompted first responders to shut down traffic on the four-lane bridge, saving lives.
Economic impact: The collapse of the bridge severed ocean links to the Port of Baltimore, which provides about 20,000 jobs to the area . See how the collapse will disrupt the supply of cars, coal and other goods .
Rebuilding: The bridge, built in the 1970s , will probably take years and cost hundreds of millions of dollars to rebuild , experts said.
- Baltimore bridge collapse: Crane arrives at crash site to aid cleanup March 29, 2024 Baltimore bridge collapse: Crane arrives at crash site to aid cleanup March 29, 2024
- Officials studied Baltimore bridge risks but didn’t prepare for ship strike March 29, 2024 Officials studied Baltimore bridge risks but didn’t prepare for ship strike March 29, 2024
- Baltimore begins massive and dangerous cleanup after bridge collapse March 28, 2024 Baltimore begins massive and dangerous cleanup after bridge collapse March 28, 2024

Watch CBS News
USNS Harvey Milk arrives in San Francisco Bay on historic maiden voyage visit
By Dave Pehling
Updated on: March 29, 2024 / 3:23 PM PDT / CBS San Francisco
The US Naval ship named after the late civil rights icon Harvey Milk arrived in San Francisco Bay Thursday afternoon, making its historic first visit to the Port of San Francisco.
CBS News Bay Area livestreamed the arrival of the ship as it passed under the Golden Gate Bridge on the CBSSF.com home page as well as on the station's YouTube channel .
In July 2016, then United States Secretary of the Navy Ray Mabus advised Congress of his plan to name the John Lewis-class oilers after prominent civil rights leaders, with this particular ship being named in honor of gay rights activist Milk. He served in the US Navy during the Korean War aboard USS Kittiwake (ASR-13), a submarine rescue ship, and held the rank of lieutenant (junior grade).
Milk's career as a Navy officer ended with an "other than honorable" discharge, due to allegations of fraternization with enlisted personnel. He went on to become one of the first openly gay candidates elected to public office in the nation. He was serving on the San Francisco Board of Supervisors on November 27, 1978, when a former political colleague, Dan White, assassinated him and Mayor George Moscone at City Hall.
The ship was officially named at a ceremony in San Francisco on August 16, 2016 , and was christened and launched from San Diego Bay in November of 2021 . The USNS Harvey Milk (T-AO 206) is an oiler ship that provides diesel fuel, lubricating oil and jet fuel as well as small quantities of fresh and frozen provisions, dry stores and potable water to Navy ships at sea.
"So to have this second ship of that class be named after Harvey Milk is incredible," said U.S. Navy Media Officer Brian O'Rourke. "To have that ship visit San Francisco on its very first port visit -- not only its first port visit to San Francisco, but its first port visit ever to be San Francisco, is so significant. This was Harvey's chosen city; very important to him. To have this ship come to San Francisco is a testament to his legacy."
On Friday, officials will hold a ceremony to honor the ship and its namesake as well as a salute to veterans at Pier 30/32. The vessel is not open to the public and will be departing San Francisco later that afternoon to head off for its first mission in the Middle East.
- San Francisco
Featured Local Savings
More from cbs news.

Bay Area Vietnam War veterans get long overdue moment with SF arrival of USNS Harvey Milk

Pro-Palestinian demonstrators chain selves to gangway of USNS Harvey Milk in San Francisco

Oakland International Airport may add "San Francisco Bay" to name as it seeks more flights

Bay Area veteran talks about redemption decades after his painful involuntary exit from Army
IMAGES
VIDEO
COMMENTS
New to sailing? We created this comprehensive basic sailing video series just for you! We know how difficult it is to find solid answers to your questions re...
Steps to Raising the Mainsail. On a small sailboat on a dock or mooring, the mainsail is typically raised before the boat is underway, following these steps: Attach the shackle to the clew in the head of the mainsail. Use pliers or a shackle knife to ensure it is tight, or vibration could release the shackle while sailing.
Proceed to take the sailboat away from the dock and steer the sailboat in the direction of the wind. Unless there is a strong counter-current, the bow should obviously point towards the direction of the wind. The use of a small sailboat on a dock or on a mooring, requires that you do the same prior to the sailboat being underway. 2.
Welcome to Episode 20 of Carpe Diem Sailing and Part 9 of our Learn to Sail Series. In this video I go over the steps for raising the mainsail, with an emph...
This video explains how to raise the mainsail on a cruising sailboat.
Tidy the cockpit, removing any obstacles and ensuring all lines are free from entanglement. Lay the mainsail out on the deck and inspect it for any damages, such as rips or worn areas. Make sure all battens are securely in place. Connect the main halyard (the rope used to raise the sail) to the head of the mainsail.
5. Plan Ahead. The best tip to help your sail handling is to plan well and do as much as you can dockside to make your life easier when you're out on the water. Anything you do solo is more work, and everything you do on a pitching boat away from the dock takes longer than when you're tied up.
This is how we raise the headsail: Select the appropriate size headsail (high winds = smaller sail needed): #1 is the largest (the genoa), #2 is for midrange, #3 is the smallest for high winds. Prepare the headsail for deployment before leaving the marina:- Lay the headsail out on the foredeck. - Attach the headsail halyard to the head (the ...
Mainsail furling has had a bad reputation in the past, but used properly and with a little care, there's no reason why it shouldn't give you trouble-free sailing for years to come. In-boom furling To raise the sail. Release the backstay tension; Make sure the boom is at the correct angle - use a strop or mark the vang if necessary
Your goal is raise the mainsail without snagging the battens on the lazy jacks. The trick is for the helmsman to watch the sail as it goes up, steer carefully, and use the breeze to help keep the mainsail in the pocket between the lazy jacks. Steer the boat to head the bow into the wind. Keep the boat pointed as straight into the wind as possible.
Raising the Main. The mainsail is raised first, and this can be done with the motor idling. The boat should be pointed with the bow facing into the wind. This alignment means the sail will be luffing when raised, making it easier to bring in the halyard and less likely that the sail will fill unexpectedly and knock the boat around.
Before you get started, you have to put them back on (called "bending on" the sails). The halyards are used to raise both the jib and mainsail. At the sail's end of a halyard is a shackle that attaches the grommet at the head of the sail to the halyard. First, spread out the sail and identify each of its corners.
Head upwind to take load off the sail. Ease the jib halyard so the cringle in the reef point is near the deck. Attach the luff cringle to the reef hook or tie it to the base of the forestay. Move the sheets from the normal clew and tie them to the leech cringle, or use a second set of sheets if you have them.
the propper way to raise a mainsail is to tention the topping lift to keep any tension off of the leach of the mainsail, turn into the wind and pull on the halyard like crazy until the sail is properly tensioned, after tensioned the topping lift should be slacked or removed to allow the weight of the boom to pull tight on the leach, only then ...
The sails should be trimmed by either tightening or loosening the attached sheets (lines). 2. Points of Sail: It is essential to sail at different angles relative to the wind. These angles include close-hauled (which is the closest to the wind), reaching (at an angle to the wind), and running (downwind). 3.
Reefing your mainsail. Ease the main-sheet. This will cause the mainsail to luff, stabilizing the boat by reducing heel and easing the tension on the mainsail making it easier to drop. Reduce Tension on the boom vang. This will allow the boom to move up or down dependent on where the reefing points are located on the mainsail.
Here is how to hoist the mainsail on a Lagoon and similar catamarans. We walk you through what you need to do from leaving the dock to setting sail. NOTE: Pa...
Step 1: Gauging the Need for Reefing. The first step towards effectively reefing the mainsail requires assessing whether it is necessary depending on current wind conditions. As a rule of thumb, consider reefing when winds reach around 15 to 20 knots or if your boat feels overpowered and challenging to control.
May 3, 2005. #3. single line reefing. The rigging for the single line reefing causes a lot of friction when raising the mainsail. On my 1995 35.5 I can raise the main by hand until I reach the first reef point - then must use the winch the rest of the way. To me this is not really a big issue but if you are concerned about it there is a lot of ...
Get the sail ready to go with cover off, halyard attached, etc. and when out in a clear area, head into the wind and raise the mainsail. S/V First Tracks 1985 Cal 33-2. Reactions: Dfok, flyingriki, travlin-easy and 3 others. ... Solo sailing and raising the mainsail works best with an electric autopilot (remote controller in your pocket ...
Off the wind: Sailing away from the wind; also downwind, reaching or running Plane: A boat planes when it sails over her own bow wave so only a small section of the hull is in the water. This allows the boat to go faster than the theoretical maximum hull speed. Pointing: Sailing at an angle into the wind or upwind. Depending on a boat's design ...
The Francis Scott Key Bridge in Baltimore collapsed on Tuesday after a large container ship ran into it, leading to six presumed deaths and millions of dollars in possible damage. It's still too ...
For sailing beginners, how to prepare a fully battened mainsail for hoisting
Solar sails rely upon pressure exerted by sunlight on large surfaces. Get the sail closer to the sun and, not surprisingly, efficiency increases. A proposed new mission called Mercury Scout aims ...
The structure collapsed when a cargo ship hit a pier, bringing down part of the main span and killing 35 people. Seven years later, a shrimp boat hit a bumper erected on the bridge built to ...
The bodies of two victims have been recovered from the waters of the Patapsco River. The bridge collapsed after being hit by a cargo ship.
Learn how to raise the main sail on a sailboat in this free online video lesson on sailing.Expert: Tyler PierceContact: offshoresailing.comBio: Tyler Pierce ...
The US Naval ship named after the late San Francisco civil rights icon Harvey Milk will arrive at the Port of San Francisco Thursday afternoon, and CBS News Bay Area will cover the historic event.
Captain John with 25+ years of experience shows you the no-nonsense cruising skills you need for safer sailing worldwide. Visit his website at https://www.sk...