

A Guide to the Different Parts of a Sailboat

Table of Contents
When you use Boatsetter, you have the opportunity to choose from a myriad of different sailboat rentals from all over the United States and beyond . A sailboat is a perfect way to relax on the water, either on a solo adventure or on an excursion with friends and family.
When you rent a sailboat with Boatsetter, you will have the option to book a captained sailboat to enjoy your day out on the water or book bareboat to hone your sailing skills. Either way, you may be interested in the intricacies of a sailboat and its different parts. If this sounds like you, you have come to the right place. In this article, we go in-depth about the different parts of a sailboat so that you can be more knowledgeable about whatever boat you may choose and come away from reading this feeling more confident about the whole sailing experience.
A basic sailboat is composed of at least 12 parts: the hull , the keel , the rudder , the mast, the mainsail, the boom, the kicking strap (boom vang), the topping lift, the jib, the spinnaker, the genoa, the backstay, and the forestay. Read all the way through for the definition of each sailboat part and to know how they work.
Explore sailboats for rent near you or wherever you want to go

In short, the hull is the watertight body of the ship or boat. There are different types of hulls that a sailboat may have, and these different hulls will often affect the speed and stability of the boat.
Displacement Hulls
Most sailboats have displacement hulls , like round bottom hulls, which move through the water by pushing water aside and are designed to cut through the water with very little propulsion. The reason these are called displacement hulls is that if you lower the boat into the water, some of the water moves out of the way to adjust for the boat, and if you could weigh the displayed water, you would find that it equals the weight of the boat, and that weight is the boat’s displacement. One thing to know about displacement hulls is that boats with these hulls are usually limited to slower speeds.
Planing Hull
Another type of hull is a planing hull. These hulls are designed to rise and glide on top of the water when enough power is supplied. When there is not enough power behind the boat, these boats often act as displacement hulls, such as when a boat is at rest. However, they climb to the surface of the water as they begin to move faster. Unlike the round bottom displacement hulls, these planing hulls will often have flat or v-shaped bottoms. These are very common with motor-driven water vessels, such as pontoon boats, but they can also be found on smaller sailboats which allow them to glide quickly over the water.
Finally, sailboats can differ depending on the number of hulls that they have. There are three options: monohulls (one hull), catamarans (two hulls), and trimarans (three hulls).
Monohulls , which have only a single hull, will usually be the typical round bottom displacement hull or occasionally the flat bottomed or v-shaped planning hull. Catamarans have two hulls with a deck or a trampoline in between, with the extra hulls providing increased stability. Finally, trimarans have three hulls — a main hull in the middle and two side hulls used for stability. These trimarans have gained popularity because of their excellent stability and ability to go at high speeds.
When evaluating a sailboat , it is important to pay attention to the type of hull that the boat has because the type of hull a sailboat has can drastically change the sailing experience, especially when it comes to stability and speed.

All sailboats have a keel, a flat blade sticking down into the water from the sailboat’s hull bottom. It has several functions: it provides counterbalance, life, controls sideways movement, holds the boat’s ballast , and helps prevent the boat from capsizing. When a boat leans from one side to the other, the keel and its ballast counteract the movement and prevent the boat from completely tipping over.
As with hulls, there are a number of different types of keels, though the two most common types of keels on recreational sailboats are the full keel or the fin keel. A full keel is larger than a fin keel and is much more stable. The full keel is generally half or more of the length of the sailboat. However, it is much slower than the fin keel. A fin keel, which is smaller than the full keel, offers less water resistance and therefore affords higher speeds.
A more recent feature on sailboats is the “winged keel,” which is short and shallow but carries a lot of weight in two “wings” that run sideways from the keel’s main part. Another more recent invention in sailing is the concept of the canting keels, which are designed to move the weight at the bottom of the sailboat to the upwind side. This invention allows the boat to carry more sails.
The Rudder

A rudder is the primary control surface used to steer a sailboat. A rudder is a vertical blade that is either attached to the flat surface of the boat’s stern (the back of the boat) or under the boat. The rudder works by deflecting water flow. When the person steering the boat turns the rudder, the water strikes it with increased force on one side and decreased force on the other, turning the boat in the direction of lower pressure.
On most smaller sailboats, the helmsman — the person steering the boat — uses a “ tiller ” to turn the rudder. The “tiller” is a stick made of wood or some type of metal attached to the top of the rudder. However, larger boats will generally use a wheel to steer the rudder since it provides greater leverage for turning the rudder, necessary for larger boats’ weight and water resistance.

The mast of a sailboat is a tall vertical pole that supports the sails. Larger ships often have multiple masts. The different types of masts are as follows:
(1) The Foremast — This is the first mast near the bow (front) of the boat, and it is the mast that is before the mainmast.
(2) The Mainmast — This is the tallest mast, usually located near the ship’s center.
(3) The Mizzen mast — This is the third mast closest to the stern (back), immediately in the back of the mainmast. It is always shorter than the mainmast and is typically shorter than the foremast.
The Main Sail

The mainsail is the principal sail on a sailboat, and it is set on the backside of the mainmast. It is the main source that propels the boat windward.

A boom is a spar (a pole made of wood or some other type of lightweight metal) along the bottom of a fore-and-aft rigged sail, which greatly improves the control of the angle and the shape of the sail, making it an indispensable tool for the navigation of the boat by controlling the sailes. The boom’s primary action is to keep the foot (bottom) of the sail flatter when the sail angle is away from the centerline of the sailboat.
The Kicking Strap (Boom Vang)
The boom vang is the line or piston system on a sailboat used to exert a downward force on the boom, enabling one to control the sail’s shape. The vang typically runs from the base of the mast to a point about a third of the way out the boom. It holds the boom down, enabling it to flatten the mainsail.
The Topping Lift
The topping lift is a line that is a part of the rigging on a sailboat, which applies an upward force on a spar (a pole) or a boom. Topping lifts are also used to hold a boom up when it’s sail is lowered. This line runs from the free end of the boom forward to the top of the mast. The line may run over a block at the top of the mast and down the deck to allow it to be adjusted.

A jib is a triangular staysail set ahead of the foremost mast of a sailboat. Its tack is fixed to the bowsprit, the bow, or the deck between the bowsprit and the foremost mast. Jibs and spinnakers are the two main types of headsails on modern boats.
The Spinnaker

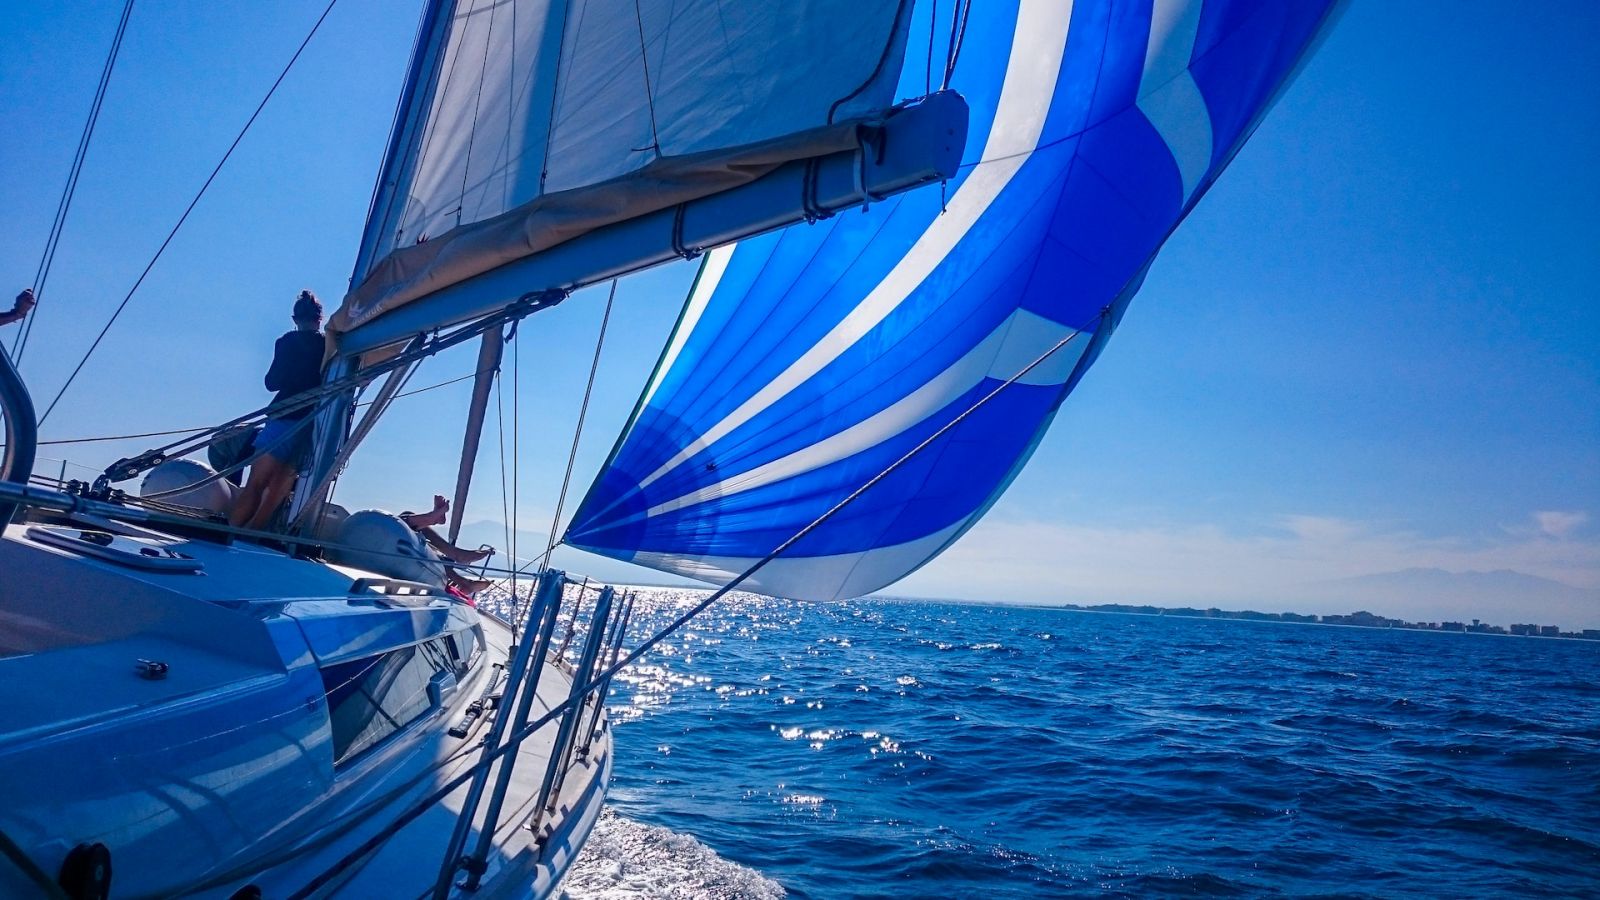
A spinnaker is a type of sail designed specifically for sailing off the wind from a reaching downwind course. The spinnaker fills up with wind and balloons out in front of the sailboat when it is deployed. This maneuver is called “flying.” The spinnaker is constructed of very lightweight material, such a nylon fabric and on many sailing vessels, it is very brightly colored.
Another name for the spinnaker is the “chute” because it often resembles a parachute, both in the material it is constructed from and its appearance when it is full of wind.
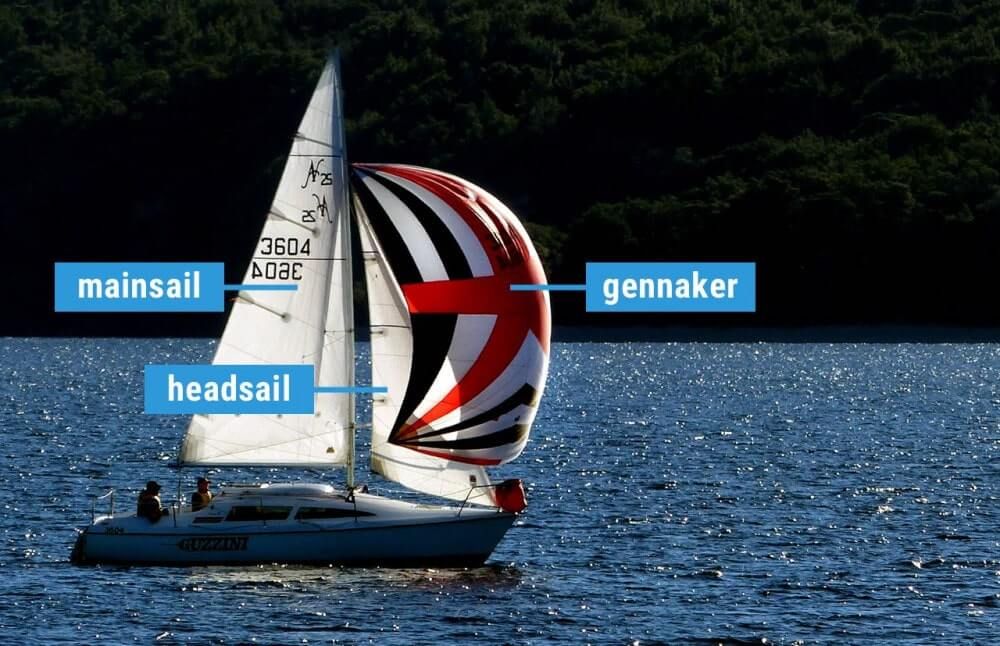
People often use the term genoa and jib as if they were the same thing, but there is a marked difference between these two types of sails. A job is no larger than a foretriangle, the triangular area formed by the mast, the deck or bowsprit, and the forestay. On the other hand, a genoa is larger than the jib, with part of the sail going past the mast and overlapping the mainsail. These two sails, however, serve very similar purposes.
The Backstay

The backstay is a standing rigging that runs from the mast to the transom (the vertical section at the back of the boat), counteracting the forestay and the jib. The backstay is an important sail trip, control and directly affects the mainsail’s shape and the headsail.
There are two general categories of backstays:
1) A permanent backstay is attached to the top of the mast and may or may not be readily adjustable.
2) A running backstay is attached about two-thirds up the mast and sometimes at multiple locations along the mast. Most modern sailboats will have a permanent backstay, and some will have permanent backstays combined with a running backstay.
The Forestay

A forestay is a piece of standing rigging that keeps the mast from falling backward. It is attached at the very top of the mast, or at certain points near the top of the mast, with the other end of the forestay being attached to the bow (the front of the boat). Often a sail, such as a jib or a genoa, is attached to the forestay.
A forestay might be made from stainless steel wire, stainless steel rod or carbon rod, or galvanized wire or natural fibers.
Parts of a sail
Sails are vital for sailboats, made up of complex parts that improve performance and maneuverability. In this section, we’ll take a closer look at the different parts of that make up the sails.
Luff – The luff is a vertical sail part that maintains its shape and generates lift by interacting with the wind. It attaches securely with a bolt rope or luff tape for easy hoisting.
Leech – The leech controls air flow and reduces turbulence. Battens or leech lines are used to maintain shape and prevent fluttering.
Foot – The foot of a sail connects the luff and leech at the bottom edge. It helps define the sail’s shape and area. The outhaul is used to adjust its tension and shape.
Head – The sail’s head is where the luff and leech meet. It has a reinforced section for attaching the halyard to raise the sail.
Battens -The b attens are placed horizontally in sail pockets to maintain shape and optimize performance in varying wind conditions. They provide structural support from luff to leech.
Telltales – Sailors use telltales to adjust sail trim and ensure optimal performance.
Clew – The clew is important for shaping the sail and connecting the sheet, which regulates the angle and tension, producing energy. It’s located at the lower back corner of the sail.
Sailing is a favorite pastime for millions of Americans across the country. For some, there is nothing better than gliding across the water propelled by nothing more than the natural force of the wind alone. For both experienced and non-experienced sailors alike, Boatsetter is the perfect place to get your ideal sailboat rental from the mouthwatering Florida keys to the crystal blue waters of the Caribbean .
Smaller sailing boats are perfect for a single day out on the water, either by yourself or with friends and family. In comparison, larger sailing boats and sailing yachts can allow you days of luxury on longer excursions full of adventure and luxury.
Whatever your sailing dreams are, it is always good to know, for both the experienced sailor and the novice, all about the sailboat’s different parts. In this article, we learned all about the boat’s hull, the keel, the rudder, the mast, the mainsail, the boom, the kicking strap (boom vang), the topping lift, the jib, the spinnaker, the genoa, the backstay, and the forestay, which make up the basic parts of any sailboat you might find yourself on.
About us
Boatsetter is the go-to app for boat rentals and on-water experiences. Whatever the adventure, we’ve got a boat for that—Set sail , start the party , go yachting , make your trophy catch , and hone your watersports skills! Download the Boatsetter app ( App Store | Google Play ). Make sure to follow @boatsetter on Instagram, and tag us in all your boat day pictures for the chance to be featured.
Rent. List. Share—Only at Boatsetter
Boatsetter empowers people to explore with confidence by showing them a world of possibility on the water. Rent a boat, list your boat, or become a Boatsetter captain today.
Browse by experience

Explore articles

Jet Boat Basics - What Is a Jet Boat?

5 Best Lakes in Kentucky for Boating

7 Tips for Boating With Cats

Top 10 South Florida 4th of July Beach Celebrations 2015
Parts Of a Sail Explained (Illustrated Beginners Guide)
Are you curious about sail mechanics and how they engage the wind? In this illustrated guide, we'll explain the various sail components and how they work together to propel a sailboat. From the head to the foot, the tack to the clew, we'll break down each part and give you a solid foundation to build on as you learn to trim sails and navigate the open sea.
A sail, which is a large piece of fabric that is attached to a long pole called the mast, uses the wind to pull a sailboat across the water. It has various parts, such as the head, tack, clew, luff, leech, foot, mainsail, jib, and batten. These components determine the shape and efficiency of the sail.
Let's break down all these terms and descriptions to understand how each component interacts with each other. So, whether you're a seasoned sailor or a beginner, you'll have a better grasp of sail trim and optimal performance on the water.
- The primary parts of a mainsail include the head, tack, clew, luff, leech, and foot.
- Some critical elements of the jib include the sheet, genoa, and headstay.
- Asymmetrical spinnakers are designed for off-wind sailing and have a more rounded shape, while symmetrical spinnakers are used for downwind sailing and have a more traditional, triangular shape.
- The most common fabrics used for making sails are traditional fabrics like cotton and flax, and modern fabrics such as polyester and nylon, Dacron, Mylar, and laminates.
- Be sure to learn how to properly trim, reef, clean, flake, and store your sails for durability and optimal performance.

On this page:
Parts of a sail and their functions, mainsail components, jib components of a sailboat, components of spinnakers, sail controls and settings, sail care and maintenance, sail materials and construction.
In this guide, we'll focus on the three main types of sails : Mainsail, Jib, and Spinnaker.
Mainsail is the primary sail on your boat
The mainsail is the largest sail on a sailboat and is typically attached to the mast and boom. It is found aft (rear) of the mast. It's attached to the boat through a track or sail slide, which allows it to move up and down.
Jib is a triangular sail placed in front of the boat
The jib is a smaller sail that is attached to the bow of the boat and works in conjunction with the mainsail to control the direction and speed of the boat. It helps to improve the boat's handling and increase speed, working in tandem with the mainsail.
In some cases, larger jibs called genoas are used to capture more wind, thus increasing the boat's speed.
Spinnaker is designed for sailing downwind
The spinnaker is a large, colorful, and lightweight balloon-shaped sail designed for sailing downwind. It captures the wind from the rear, pushing the boat forward with added speed and stability.
In this section, you'll find a comprehensive explanation of the primary components of a sail and their functions:
Head is the uppermost corner of a sail
The head of the sail refers to the uppermost corner where it connects to the top of the mast. Knowing the location of the head is essential, as it helps you identify the top of the sail and allows you to properly hoist and secure it in place.
Tack is the lower front corner of a sail
The tack is where the lower front corner connects to the base of the mast, or the boom. This important point helps you determine the sail's orientation and affects its overall shape and efficiency. By adjusting the tension at the tack, you can control your sail's performance and handling in various wind conditions.
Clew is the lower rear corner of a saisl
The clew is where the sheets attach to control the sail's angle to the wind. Adjusting the tension on the sheets can change the sail's shape and ultimately influence the boat's speed and direction. Becoming familiar with the clew will help improve your sailing skills and ensure smooth maneuvers on the water.
Luff is the front edge of the sail
The luff is the forward edge of the sail that runs along the mast. It's crucial to maintaining a tight and efficient sail shape. When sailing upwind, pay close attention to the luff, as it can provide valuable information about your sail's trim. A properly trimmed sail will have a smooth luff, allowing the boat to move efficiently against the wind.
Leech is the rear edge of the sail
The leech is opposite the luff. It plays a critical role in controlling the overall shape and efficiency of your sail. Watch the leech carefully while sailing, as excessive tension or looseness can negatively affect your sail's performance. Adjusting your sail's trim or using a device called a "boom vang" can help control the shape and tension of the leech.
Foot is the bottom edge of the sail
The foot is running between the tack and the clew. It helps control the shape and power of the sail by adjusting the tension along the boom. Ensure the foot is properly trimmed, as this can impact your boat's performance and speed. A well-adjusted foot helps your sail maintain its proper shape and operate at optimal efficiency while out on the water.
In this section, we'll look at some critical elements of the jib: the sheet, genoa, and headstay.
Sheet is the line used to control the position and trim of the sail
The jib sheet is the line used to control the jib's angle in relation to the wind. You adjust the sheet to get the best possible sail trim, which greatly affects your boat's performance. The jib sheet typically runs from the jib's clew (the lower rear corner of the sail) through a block on the boat's deck, and back to the cockpit, where you can easily control it.
When adjusting the jib sheet, you want to find the perfect balance between letting the sail out too far, causing it to luff (flutter), and pulling it in too tightly, which can cause heeling or poor sail shape. Make small adjustments and observe how your boat responds to find the sweet spot.
Genoa is a larger jib used to capture more wind
A genoa is a larger version of a standard jib. It overlaps the mainsail, extending further aft, and provides a greater sail area for improved upwind performance. Genoas are categorized by the percentage of overlap with the mainsail. For example, a 130% genoa means that the sail's area is 30% larger than the area of a jib that would end at the mast.
Genoas are useful in light wind conditions, as their larger surface area helps your boat move faster. However, they can become difficult to manage in strong winds. You might need to reef (reduce the size) or swap to a smaller jib to maintain control.
Headstay provides a support structure for the jib
The headstay is a crucial part of your boat's standing rigging system. It is the cable or rod that connects the top of the mast (the masthead) to the bow of the boat. The headstay helps maintain the mast's stability and provides a support structure for the jib.
The tension in your headstay plays a significant role in the jib's sail shape. Proper headstay tension will create a smooth, even curve, allowing your jib to perform optimally. If the headstay is too tight, the sail may be too flat, reducing its power, whereas a loose headstay can result in a sagging, inefficient sail shape.
A spinnaker is a sail designed specifically for sailing off the wind , on courses between a reach and downwind. They are made of lightweight fabric, often brightly colored, and help maximize your sailing speed and performance.
Asymmetrical spinnakers are designed for off-wind sailing
Asymmetrical spinnakers are usually found on modern cruising and racing boats. They're designed for a broader range of wind angles and have a more forgiving shape, making them easier for you to handle. Key components of an asymmetrical spinnaker include:
- Tack : This is the front, lower corner where the sail connects to the boat. A tack line is used to adjust the sail's position relative to the bow.
- Head : The top corner of the sail, where it connects to the halyard to be hoisted up the mast.
- Clew : The aft corner of the sail, connected to the sheet, allowing you to control the angle of the sail to catch the wind effectively.
You can find a step-by-step guide on how to rig and hoist an asymmetrical spinnaker here .
Symmetrical spinnakers are used for downwind sailing
Symmetrical spinnakers are more traditional and usually found on racing boats, where downwind performance is critical. These sails are shaped like a large parachute and are split into two identical halves. Key components of a symmetrical spinnaker include:
- Head : Similar to the asymmetrical spinnaker, the head is the top corner connected to the halyard.
- Clews : Unlike an asymmetrical spinnaker, a symmetrical spinnaker has two clews. Both are connected to sheets and guys, which help control the sail's shape and movement.
- Spinnaker Pole : This is a horizontal pole that extends from the mast and is used to project the windward clew outwards and hold the sail open.
Handling a symmetrical spinnaker can be more challenging, as it requires precise teamwork and coordination. If you're new to sailing with this type of sail, don't hesitate to seek guidance from experienced sailors to improve your technique.
In this section, we'll explore sail controls and settings, which are essential for beginners to understand for efficient sailing. We'll discuss trimming, and reefing, as sub-sections.
Trimming your sails for speed and stability
Trimming is the process of adjusting your sails to optimize them for the current wind conditions and desired direction. Proper sail trim is crucial for maximizing your boat's speed and stability. Here are some basic tips for sail trimming:
- Pay attention to the telltales, which are small ribbons or yarn attached to the sails. They help you understand the airflow over your sails and indicate whether they're properly trimmed.
- Use the sheets, which are lines attached to the clew of your sails, to adjust the angle of your sails relative to the wind.
- In light winds, ease the sails slightly to create a more rounded shape for better lift. In stronger winds, flatten the sails to reduce drag and prevent excessive heeling.
Reefing your sails for control and balance
Reefing is the process of reducing the sail area to help maintain control and balance in stronger wind conditions. It's an essential skill to learn for your safety and the longevity of your sails. Follow these steps to reef your sails:
- Head into the wind to reduce pressure on the sails.
- Lower the halyard (the line that raises the sail) until the sail reaches the desired reefing point.
- Attach the sail's reefing cringle (reinforced eyelet) to the reefing hook or tack line.
- Tighten the new, lower clew (bottom corner) of the sail to the boom with the reef line.
- Raise the halyard back up to tension the reduced sail.
Take proper care of your sailboat to ensure that it remains in top condition. In this section, we will discuss the key aspects of sail care and maintenance, focusing on cleaning and storage.
Steps to clean your sails
Keeping your sail clean is crucial for its longevity and performance. Follow these simple steps to maintain a spotless sail:
- Rinse with fresh water after each use, paying extra attention to areas affected by saltwater, debris, and bird droppings.
- Use a soft-bristled brush and a mild detergent to gently scrub away dirt and stains. Avoid harsh chemicals or abrasive materials, as they may damage the fabric.
- Rinse again thoroughly, ensuring all soap is washed away.
- Spread your sail out to air-dry, avoiding direct sunlight, which may harm the fabric's UV protection.
Ways to store your sails
Sail storage is equally important for preserving the lifespan of your sail. Here are some tips for proper sail storage:
- Fold or roll your sail : Avoid stuffing or crumpling your sail; instead, gently fold or roll it to minimize creases and wear on the fabric.
- Protect from UV rays : UV exposure can significantly reduce the life of your sail. Store it in a cool, shaded area or use a UV-resistant sail cover when not in use.
- Ventilation : Ensure your sail is stored in a well-ventilated area to prevent mildew and stale odors.
- Lay flat or hang : If space allows, store your sail laid out flat or hanging vertically to reduce the risk of creasing and fabric damage.
Flaking your sails when not in use
Flaking is the process of neatly folding your sails when they're not in use, either on the boom or deck. This helps protect your sails from damage and prolongs their lifespan. Here's how to flake your sails:
- Lower the sail slowly, using the halyard while keeping some tension on it.
- As the sail comes down, gather and fold the sail material in an accordion-like pattern on top of the boom or deck.
- Secure the flaked sail with sail ties or a sail cover to prevent it from coming undone.
Traditional fabrics used to make sails
In the early days of sailing, natural materials like cotton and flax were used to make sails. These fabrics were durable, breathable, and held up well in various weather conditions. However, they would eventually wear out and lose their shape due to the constant exposure to UV rays and seawater.
While traditional fabrics like cotton and flax were once commonly used for sailmaking, they have largely been replaced by synthetic materials like polyester and nylon due to their superior strength, durability, and resistance to mildew and rot. However, some sailors and sailmakers still use cotton and other natural fibers for certain applications, such as traditional sailmaking or historical recreations.
Modern fabrics used to make sails
Modern sail materials, such as Dacron, Mylar, and laminates, are more resilient and longer-lasting than traditional fabrics. These materials are lightweight, strong, and resistant to UV rays and water damage.
Dacron : Dacron is a popular material for sails because of its durability, UV resistance, and ease of maintenance. It's a type of polyester fabric that is often used for making cruising sails. Dacron offers excellent shape retention and resistance to stretch, making it ideal for both beginners and experienced sailors.
Laminate materials : Laminate sails are made by bonding multiple layers of materials like Mylar, polyester, and Kevlar. These sails offer better shape and performance compared to their fabric counterparts, making them popular among racers. However, they tend to be more delicate and may not be suitable for long-term cruising.
Mylar films : Mylar films are used in laminate sails for their excellent strength-to-weight ratio and shape retention. These films are often sandwiched between other materials, such as polyester or Kevlar, to enhance the sail's resistance to stretch and load handling. However, Mylar sails can be susceptible to delamination and abrasion, requiring extra care and regular inspection.
Sail stitching for shape and durability
Sail stitching is an essential aspect of sail construction, helping to maintain the sail's shape and durability. Various stitching techniques can be used, such as zigzag, straight, and triple-step sewing. The choice of stitching type depends on the sail's purpose and expected loads. In addition, using UV-resistant thread ensures that the stitching lasts longer under harsh sun exposure.
Leave a comment
You may also like, how do sails actually work: full beginners guide.
The sails are your boat's primary driving force. Your boat is designed to sail , and with good wind it will be faster and more comfortable than using the engine. …

Sail Names: Explained for Beginners (With 15 Examples)

How To Trim Sails: The Ultimate Guide (with Cheat Sheet)

How To Reef Your Sails (Mainsail, Jib, Furling, Loose)

How Much Do New Sails Cost?
Own your first boat within a year on any budget.
A sailboat doesn't have to be expensive if you know what you're doing. If you want to learn how to make your sailing dream reality within a year, leave your email and I'll send you free updates . I don't like spam - I will only send helpful content.
Ready to Own Your First Boat?
Just tell us the best email address to send your tips to:
Standing Rigging (or ‘Name That Stay’)
Published by rigworks on november 19, 2019.
Question: When your riggers talk about standing rigging, they often use terms I don’t recognize. Can you break it down for me?
From the Rigger: Let’s play ‘Name that Stay’…

Forestay (1 or HS) – The forestay, or headstay, connects the mast to the front (bow) of the boat and keeps your mast from falling aft.
- Your forestay can be full length (masthead to deck) or fractional (1/8 to 1/4 from the top of the mast to the deck).
- Inner forestays, including staysail stays, solent stays and baby stays, connect to the mast below the main forestay and to the deck aft of the main forestay. Inner forestays allow you to hoist small inner headsails and/or provide additional stability to your rig.
Backstay (2 or BS) – The backstay runs from the mast to the back of the boat (transom) and is often adjustable to control forestay tension and the shape of the sails.
- A backstay can be either continuous (direct from mast to transom) or it may split in the lower section (7) with “legs” that ‘V’ out to the edges of the transom.
- Backstays often have hydraulic or manual tensioners built into them to increase forestay tension and bend the mast, which flattens your mainsail.
- Running backstays can be removable, adjustable, and provide additional support and tuning usually on fractional rigs. They run to the outer edges of the transom and are adjusted with each tack. The windward running back is in tension and the leeward is eased so as not to interfere with the boom and sails.
- Checkstays, useful on fractional rigs with bendy masts, are attached well below the backstay and provide aft tension to the mid panels of the mast to reduce mast bend and provide stabilization to reduce the mast from pumping.
Shrouds – Shrouds support the mast from side to side. Shrouds are either continuous or discontinuous .
Continuous rigging, common in production sailboats, means that each shroud (except the lowers) is a continuous piece of material that connects to the mast at some point, passes through the spreaders without terminating, and continues to the deck. There may be a number of continuous shrouds on your boat ( see Figure 1 ).
- Cap shrouds (3) , sometimes called uppers, extend from masthead to the chainplates at the deck.
- Intermediate shrouds (4) extend from mid-mast panel to deck.
- Lower shrouds extend from below the spreader-base to the chainplates. Fore- (5) and Aft-Lowers (6) connect to the deck either forward or aft of the cap shroud.
Discontinuous rigging, common on high performance sailboats, is a series of shorter lengths that terminate in tip cups at each spreader. The diameter of the wire/rod can be reduced in the upper sections where loads are lighter, reducing overall weight. These independent sections are referred to as V# and D# ( see Figure 2 ). For example, V1 is the lowest vertical shroud that extends from the deck to the outer tip of the first spreader. D1 is the lowest diagonal shroud that extends from the deck to the mast at the base of the first spreader. The highest section that extends from the upper spreader to the mast head may be labeled either V# or D#.
A sailboat’s standing rigging is generally built from wire rope, rod, or occasionally a super-strong synthetic fibered rope such as Dyneema ® , carbon fiber, kevlar or PBO.
- 1×19 316 grade stainless steel Wire Rope (1 group of 19 wires, very stiff with low stretch) is standard on most sailboats. Wire rope is sized/priced by its diameter which varies from boat to boat, 3/16” through 1/2″ being the most common range.
- 1×19 Compact Strand or Dyform wire, a more expensive alternative, is used to increase strength, reduce stretch, and minimize diameter on high performance boats such as catamarans. It is also the best alternative when replacing rod with wire.
- Rod rigging offers lower stretch, longer life expectancy, and higher breaking strength than wire. Unlike wire rope, rod is defined by its breaking strength, usually ranging from -10 to -40 (approx. 10k to 40k breaking strength), rather than diameter. So, for example, we refer to 7/16” wire (diameter) vs. -10 Rod (breaking strength).
- Composite Rigging is a popular option for racing boats. It offers comparable breaking strengths to wire and rod with a significant reduction in weight and often lower stretch.
Are your eyes crossing yet? This is probably enough for now, but stay tuned for our next ‘Ask the Rigger’. We will continue this discussion with some of the fittings/connections/hardware associated with your standing rigging.
Related Posts
Ask the Rigger
Do your masthead sheaves need replacing.
Question: My halyard is binding. What’s up? From the Rigger: Most boat owners do not climb their masts regularly, but our riggers spend a lot of time up there. And they often find badly damaged Read more…
Selecting Rope – Length, Diameter, Type
Question: Do you have guidelines for selecting halyards, sheets, etc. for my sailboat? From the Rigger: First, if your old rope served its purpose but needs replacing, we recommend duplicating it as closely as possible Read more…
Spinlock Deckvest Maintenance
Question: What can I do to ensure that my Spinlock Deckvest is well-maintained and ready for the upcoming season? From the Rigger: We are so glad you asked! Deckvests need to be maintained so that Read more…
What is a Sailboat Stay?

Last Updated by
Daniel Wade
June 15, 2022
A sailboat stay is a cable or line that supports the mast. Stays bear a significant portion of the mast load.
Stays are a significant part of a sailboat's standing rigging, and they're essential for safe sailing. Stays support the mast and bear the stress of the wind and the sails. Losing a stay is a serious problem at sea, which is why it's essential to keep your stays in good condition.
Table of contents
How to Identify Sailboat Stays
Sailboat stays connected to the top of the mast to the deck of the sailboat. Stays stabilize the mast in the forward and aft directions. Stays are typically mounted to the very front of the bow and the rearmost part of the stern.
Sailboat Forestay
The forestay connects the top of the mast to the bow of the boat. The forestay also serves an additional purpose—the jib sail luff mounts to the forestay. In fact, the jib is hoisted up and down the forestay as if it were a mast.
Boats equipped with roller furlings utilize spindles at the top and base of the forestay. The spindles rotate to furl and unfurl the jib. Roller furlings maintain the structural integrity of a standard forestay.
Sailboat Backstay
Backstays aren't as multifunctional as forestays. The backstay runs from the top of the mast (opposite the forestay) to the stern of the sailing vessel, and it balances the force exerted by the forestay. Together, the forestay and the backstay keep the mast upright under load.
Sailboat Stay vs. Shroud
Stays and shrouds are often confused, as they essentially do the same thing (just in different places). Stays are only located on the bow and stern of the vessel—that's fore and aft. Shrouds run from the port and starboard side of the hull or deck to the top of the mast.
Best Sailboat Stay Materials
Traditional sailboat stays were made of rope and organic line. These materials worked fine for thousands of years, and they still do today. However, rope has limitations that modern sailboat stays don't.
For one, traditional rope is organic and prone to decay. It also stretches, which can throw off the balance of the mast and cause serious problems. Other materials, such as stainless steel, are more ideal for the modern world.
Most modern fiberglass sailboats use stainless steel stays. Stainless stays are made of strong woven stainless steel cable, which resists corrosion and stress. Stainless cables are also easy to adjust.
Why are Stays Important?
Stays keep the mast from collapsing. Typical sailboats have lightweight hollow aluminum masts. Alone, these thin towering poles could never hope to withstand the stress of a fully-deployed sail plan. More often than not, unstayed masts of any material fail rapidly under sail.
When properly adjusted, stays transfer the force of the wind from the thin and fragile mast to the deck or the hull. They distribute the power of the wind over a wider area and onto materials that can handle it. The mast alone simply provides a tall place to attach the head of the sail, along with a bit of structural support.
Sailboat Chain Plates
Sailboat stays need a strong mounting point to handle the immense forces they endure. Stays mount to the deck on chainplates, which further distribute force to support the load.
Chainplates are heavy steel mounting brackets that typically come with two pieces. One plate mounts on top of the deck and connects to the stay. The other plate mounts on the underside of the deck directly beneath the top plate, and the two-bolt together.
Mast Stay Mounting
Stays mount to the mast in several ways depending on the vessel and the mast material. On aluminum masts, stays often mount to a type of chain plate called a "tang." A tang consists of a bracket and a hole for a connecting link. Aluminum masts also use simple U-bolts for mounting stays.
Wooden masts don't hold up to traditional brackets as well as aluminum. A simple u-bolt or flat bolt-on bracket might tear right out. As a result, wooden masts often use special collars with mounting rings on each side. These collars are typically made of brass or stainless steel.
Sailboat Stays on Common Rigs
Stays on a Bermuda-rigged sailboat are critical. Bermuda rigs use a triangular mainsail . Triangular sails spread their sail area vertically, which necessitates a tall mast.
Bermuda rig masts are often thin, hollow, and made of lightweight material like aluminum to avoid making the boat top-heavy. As a result, stays, and shrouds are of critical importance on a Bermuda rig.
Traditional gaff-rigged sail plans don't suffer as much from this issue. Gaff rigs use a four-pointed mainsail. This sail has a peak that's taller than the head and sometimes taller than the mast.
Gaff-rigged cutters, sloops, schooners, and other vessels use comparatively shorter and heavier masts, which are less likely to collapse under stress. These vessels still need stays and shrouds, but their stronger masts tend to be more forgiving in unlucky situations.
How to Adjust Sailboat Stays
Sailboat stays and shrouds must be checked and adjusted from time to time, as even the strongest stainless steel cable stretches out of spec. Sailboats must be in the water when adjusting stays. Here's the best way to keep the proper tension on your stays.
Loosen the Stays
Start by loosening the forestay and backstay. Try to do this evenly, as it'll reduce the stress on the mast. Locate the turnbuckles and loosen them carefully.
Match the Turnbuckle Threads
Before tightening the turnbuckle again, make sure the top and bottom threads protrude the same amount. This reduces the chance of failure and allows you to equally adjust the stay in both directions.
Center the Mast
Make sure the mast is centered on its own. If it's not, carefully take up the slack in the direction you want it to go. Once the mast is lined up properly, it's time to tighten both turnbuckles again.
Tighten the Turnbuckles
Tighten the turnbuckles as evenly as possible. Periodically monitor the direction of the mast and make sure you aren't pulling it too far in a single direction.
Determine the Proper Stay Pressure
This step is particularly important, as stays must be tightened within a specific pressure range to work properly. The tension on a sailboat stay ranges from a few hundred pounds to several tons, so it's essential to determine the correct number ahead of time. Use an adjuster to monitor the tension.
What to Do if you Lose a Stay
Thankfully, catastrophic stay and shroud failures are relatively rare at sea. Losing a mast stay is among the worst things that can happen on a sailboat, especially when far from shore.
The stay itself can snap with tremendous force and cause injury or damage. If it doesn't hurt anyone, it'll certainly put the mast at risk of collapsing. In fact, if you lose a stay, your mast will probably collapse if stressed.
However, many sailors who lost a forestay or backstay managed to keep their mast in one piece using a halyard. In the absence of a replacement stay, any strong rope can offer some level of protection against dismasting .
How to Prevent a Stay Failure
Maintenance and prevention is the best way to avoid a catastrophic stay failure. Generally speaking, the complete failure of a stay usually happens in hazardous weather conditions or when there's something seriously wrong with the boat.
Stays sometimes fail because of manufacturing defects, but it's often due to improper tension, stripped threads, or aging cable that hasn't been replaced. Regular maintenance can prevent most of these issues.
Check the chainplates regularly, as they can corrode quietly with little warning. The deck below the chainplates should also be inspected for signs of rot or water leakage.
When to Replace Standing Rigging
Replace your stays and shrouds at least once every ten years, and don't hesitate to do it sooner if you see any signs of corrosion or fraying. Having reliable standing rigging is always worth the added expense.
Choosing a high-quality stay cable is essential, as installing substandard stays is akin to playing with fire. Your boat will thank you for it, and it'll be easier to tune your stays for maximum performance.
Related Articles
I've personally had thousands of questions about sailing and sailboats over the years. As I learn and experience sailing, and the community, I share the answers that work and make sense to me, here on Life of Sailing.
by this author
Sailboat Parts
Learn About Sailboats
Most Recent

What Does "Sailing By The Lee" Mean?
October 3, 2023

The Best Sailing Schools And Programs: Reviews & Ratings
September 26, 2023
Important Legal Info
Lifeofsailing.com is a participant in the Amazon Services LLC Associates Program, an affiliate advertising program designed to provide a means for sites to earn advertising fees by advertising and linking to Amazon. This site also participates in other affiliate programs and is compensated for referring traffic and business to these companies.
Similar Posts

Affordable Sailboats You Can Build at Home
September 13, 2023

Best Small Sailboat Ornaments
September 12, 2023

Discover the Magic of Hydrofoil Sailboats
December 11, 2023
Popular Posts

Best Liveaboard Catamaran Sailboats
December 28, 2023

Can a Novice Sail Around the World?
Elizabeth O'Malley

4 Best Electric Outboard Motors

How Long Did It Take The Vikings To Sail To England?

10 Best Sailboat Brands (And Why)
December 20, 2023

7 Best Places To Liveaboard A Sailboat
Get the best sailing content.
Top Rated Posts
Lifeofsailing.com is a participant in the Amazon Services LLC Associates Program, an affiliate advertising program designed to provide a means for sites to earn advertising fees by advertising and linking to Amazon. This site also participates in other affiliate programs and is compensated for referring traffic and business to these companies. (866) 342-SAIL
© 2024 Life of Sailing Email: [email protected] Address: 11816 Inwood Rd #3024 Dallas, TX 75244 Disclaimer Privacy Policy
- BOAT OF THE YEAR
- Newsletters
- Sailboat Reviews
- Boating Safety
- Sailing Totem
- Charter Resources
- Destinations
- Galley Recipes
- Living Aboard
- Sails and Rigging
- Maintenance
- Best Marine Electronics & Technology
Replacing a Sailboat Headstay
- By Green Brett
- Updated: September 10, 2020
Keep the rig up. These four words mean everything to a sailor. Over Lyra ’s winter layup, I spent many hours working on her rig to ensure that we do just that. A big part of that came in the form of replacing the forestay, as well as a comprehensive overhaul and inspection of the ProFurl furling system.
Lyra is our 1980 Reliance 44, and has a nine-year circumnavigation and several trans-Atlantic crossings under her belt. Additionally, we’ve been racking up an average of 2,000 nautical miles annually for the past 10 years on a rig that was last seriously serviced in the early 1990s while the boat was in New Zealand. It is a testament to her overbuilt design and uncompromising owners that it has held up well. With the rig out for the first time since we put the boat together after purchasing her 10 years ago, I wanted to address any issues before they occurred.
The furler’s aluminum-foil extrusion had to be removed from the headstay in order to inspect the actual wire; and in order to remove it, the Sta-Lok fitting on the bottom of the stay needed to be disassembled. Even though the existing stay passed a visual inspection perfectly, it proved to be a relatively simple and inexpensive process to simply replace the wire for future peace of mind.
Headstay and Foil Removal

Removing the furling assembly and turnbuckle allowed me to see the Sta-Lok terminator on the bottom of the stay. The two tangs on the outside of the fittings slid down after removing the two Allen bolts in the bottom of the titanium furler base (photo 1) . Now the turnbuckle could be spun off.
I next removed the two large Allen set screws that keep the drum assembly attached to the foil and slid it off as well (photo 2) .
Using two wrenches to take apart the Sta-Lok fitting, the lower terminator could now be removed. I had to use some heat in the form of a propane torch to break the Loctite in the threads, which was fine because all of the parts that will be reused needed to be cleaned before reassembly.
The foils were now ready to be disassembled. Four Allen set screws kept each connector insert in place inside the foil (photo 3) . Mine were sealed with silicone sealant, which popped right out when a sharp screw was turned into it. Once removed, the sections slid apart and off the end of the stay where I had removed the Sta-Lok. Be careful using heat to free the set screws, so as not to melt the plastic bearings that allow the foil to rotate around the wire. I had to drill out a few.
Replacing the Headstay
With some attention to detail and the following items, I found that replacing the wire using the existing Sta-Lok fittings was well within the skill set of the average DIY sailor. The tools needed are a tape measure, hacksaw, masking tape, drill, Scotch Brite pad, wire coat hanger, a couple of wrenches, Loctite, silicone sealant, and new cones for the Sta-Lok fitting.
I sourced 54 feet of 10 mm high-end Loos wire rope from RigPro in Portsmouth, Rhode Island. With the replacement set screws for the foil, the bill came to $545.46. I was fortunate enough to have a spare Sta-Lok terminal, which I installed on the new wire. By anchoring the terminals in the ground with a screwdriver, I could pull the old and new wire side by side to get an accurate measurement of length (photo 4) .

I wrapped the new wire in masking tape for ease of marking and to keep the strands together as I cut them (photo 5) . The old stay was a half-inch too long, so I cut the new one a half-inch shorter. Using a sharp hacksaw blade to cut the new wire saves time; any burrs need to be filed smooth.
A wire coat hanger doubled around a piece of brown Scotch Brite pad and twisted back to the drill’s chuck is an easy way to clean out the inside of the old Sta-Lok fittings without damaging the threads (photo 6) .
There is an insert buried in the fitting that should be removed for inspection and replaced if it is scored. I replaced the cones that slide over the wire and are captured in the Sta-Lok fitting. I had to keep in mind that the lower terminal installation would need to wait until the wire was back on the mast and the foil was reinstalled.
I had to pre-fit the lower terminal (photo 7) . On the wire rope, I slid the top nut onto the wire. Then, I gently unlaid the outside layer of wire strands until the new cone would go in, leaving about an eighth-inch of the core strands sticking out the bottom.
Photo 8 shows the top terminal all gooped up and ready to thread together. The fitting was gently dry-fitted first, so the cone has moved down to its home and the outer strands are bent into place. Last, I added blue Loctite to the threads and put it together (photo 9) . Sta-Lok says not to use too much force when tightening, so I went with a very firm feel. Sealant should (and did) ooze out the top. Wipe it clean (photo 10) , and it’s all done!

Servicing the ProFurl
The ProFurl furler was in decent shape. There are bearings in the furler unit and top swivel that moved freely and had no play, so I opted to leave them as they were. There was some wear on some of the connector’s plastic bearing inserts, so I bought four sets of them and replaced as needed. The biggest job was to replace all of the original set screws with longer set screws with a post below the threads, an upgrade recommended by RigPro. The idea is that the stud would keep the connectors in place more effectively than the original friction-reliant, cupped set screws did (photo 11) .
In order to accurately drill a hole in the connector to receive the stud on the new set screws, I had to make a guide. This was done by drilling out the center of an original set screw with a bit sized to the post on the new set screws. This allowed me to screw in the guide using an Allen wrench, perfectly centering the bit without damaging the foil’s existing set screw threads. The center measurements between holes drilled by the factory are not all the same, so it was important to keep each insert in place and oriented—easily done by dry-fitting the new set screws as I drilled. Once the project was completed, the foil was ready for a cleaning and reinstallation.
Before installing the lower Sta-Lok terminal, I slid each section onto the new stay and assembled the foil after screwing in the foil connector’s set screws with some blue Loctite on the threads. A dab of silicon sealant on top of each screw completed the process. Last but not least was installing the new halyard wrap stop on the new wire (photo 12) .
The forestay is one of the most important structural items on your rig, and is subjected to big loads, constant cycling and a corrosive marine environment. Often encased inside a roller furling foil, it is difficult to inspect. While Lyra ’s headstay passed inspection, we wanted to have the peace of mind associated with new wire. Given her Sta-Lok system, the headstay replacement was not a difficult process.
The other piece of the puzzle is the furling system. In our case, we expect our roller furler to work flawlessly, and the ProFurl is robust. By replacing some of the connector bearings and adding set screws with a post inserted into the connector, it should last for many more years.
Lifelong sailor Green Brett is a regular contributor to CW. During summers, he’s at the helm of Lyra and offering daysailing charters in Newport, Rhode Island, through his company, On Watch Sailing .
- More: foils , How To , hydrofoils , print june july 2020 , sailboat design
- More How To

How to Rig Everything in Your Favor

Is There a Doctor Aboard?

3 Clutch Sails For Peak Performance

It’s Time to Rethink Your Ditch Kit

Cruising the Northwest Passage

Balance 442 “Lasai” Set to Debut

A Legendary Sail

10 Best Sailing Movies of All Time
- Digital Edition
- Customer Service
- Privacy Policy
- Email Newsletters
- Cruising World
- Sailing World
- Salt Water Sportsman
- Sport Fishing
- Wakeboarding
- Forums New posts Unanswered threads Register Top Posts Email
- What's new New posts New Posts (legacy) Latest activity New media
- Media New media New comments
- Boat Info Downloads Weekly Quiz Topic FAQ 10000boatnames.com
- Classifieds Sell Your Boat Used Gear for Sale
- Parts General Marine Parts Hunter Beneteau Catalina MacGregor Oday
- Help Terms of Use Monday Mail Subscribe Monday Mail Unsubscribe
Forestay replacement
- Thread starter DJN51
- Start date Aug 11, 2010
- Hunter Owner Forums
- Smaller Boats
On Hunter 23.5,is forestay same length with Cdi furler,as without furler? Plan on replacing after season and would like to have new one on hand before taking furler apart.Any recommondations on riggers would be helpful.

I believe the CDI furler I have utilizes the existing forestay on my 260. The drum fits over the adjuster and the plastic luff extrusion slips over the stay for nearly its full length to the head. If your rigging is dated I'd think seriously about new fittings and stays while you're at it. They do get tired and generally won't warn the casual sailor when they just give up. If you want an added tip that I've found to be a sweet addition for the guys who step their mast often I'd subtract the size a folding closure on the forestay length. A closure/quick release lever works like a charm to pull the rig into tension without having to over tighten the rig with a gin pole just to get a pin in it. Here's a pic of the closure/lever available at JSI and CSJohnson among others. Sorry I can't recommend a rigger in the windy city but I'm sure somebody here can. Good luck, Mike
Attachments

Bob 04 H260
I think on the CDI furlers the forestay must be made up after the wire has passed through the extrusion. So if there are sweged fittings on the ends this must be done by the rigger after the furler comes off the boat. Also he could then make the new forestay exactly the same length as the old one. On my previous boat I used nicopress fittings on the rigging and was very pleased with them. Easy to do, not expensive and allowed me freedom to do it as I wanted. The hyfield-Johnson lever is an excellent idea if you do any trailering at all. I put one on my previous boat and would like one on the 260. Just be sure your sail luff is short enough to have the foil shortened by the 8" or so required for the lever to sit below the drum. Mike it looks like from the picture that you are using the 14-206 model lever, is this correct ? the rating for it is only for a working load of 1000 lbs. The bigger lever 14-210 is rated at 1600 lbs but uses 5/16" pins. So if you have the bigger lever did you have to drill out the holes in the forestay and furler or can you use smaller pins in the bigger holes? The wire on the 260 is rated at 3300 lbs I believe, so these levers would really be the weakest link. I may switch to nicopress when I change the furler/forestay, I think a nicopress fitting is rated at 80% of wire strength, don't know about swagged fittings, look stronger. Bob
DJN51 said: On Hunter 23.5,is forestay same length with Cdi furler,as without furler? Plan on replacing after season and would like to have new one on hand before taking furler apart.Any recommondations on riggers would be helpful. Click to expand
I haven't taken the drum off my CDI for its annual once over yet but will post pics next week. Here's a couple detail pics of the CDI extrusion. Center hole is 3/8". luff line track is about 11/32". Have a great day. Mike

Mike, the 210 lever looks like the best option for the 260, I'll probably go with one of those when I buy the new furler. thanks, Bob
- This site uses cookies to help personalise content, tailor your experience and to keep you logged in if you register. By continuing to use this site, you are consenting to our use of cookies. Accept Learn more…
Parts of a Sailboat Rigging: A Comprehensive Guide
by Emma Sullivan | Aug 6, 2023 | Sailboat Maintenance
Short answer: Parts of a Sailboat Rigging
The sailboat rigging consists of various components essential for controlling and supporting the sails. Key parts include the mast, boom, shrouds, forestay, backstay, halyards, and sheets.
Understanding the Basics: A Comprehensive Overview of the Parts of a Sailboat Rigging
Title: Understanding the Basics: A Comprehensive Overview of the Parts of a Sailboat Rigging
Introduction: Sailboats have been a symbol of freedom and adventure for centuries. Whether you are an avid sailor or an aspiring skipper, understanding the various components that make up a sailboat rigging is essential. In this insightful guide, we will dive into the world of sailboat rigging, unraveling its intricacies while shedding light on its importance and functionality. So tighten your mainsails and let’s set sail on this knowledge-packed journey!
1. Mast: The mast is the vertical spar that supports the sails . It provides structural integrity to the entire rigging system and enables harnessing wind power effectively. Constructed from materials such as aluminum or carbon fiber, modern masts are designed to be lightweight yet robust enough to withstand varying weather conditions .
2. Standing Rigging: The standing rigging refers to all fixed parts that support the mast. This includes stays (fore, back, and jumper) which run between the masthead and various points on the hull or deck, like chainplates or tangs. Shrouds (cap shrouds, intermediate shrouds) help counteract lateral forces by providing lateral support to prevent excessive sideward movement of the mast.
3. Running Rigging: Unlike standing rigging, running rigging comprises lines that control sails’ deployment and trim dynamically during sailing maneuvers . The halyard raises or lowers a sail along its respective track within the mast groove while keeping it securely fastened in place when needed.
4. Sails: Of course, we can’t discuss sailboat rigging without mentioning sails themselves! They are like wings for your boat – converting wind energy into forward motion efficiently . Main sails typically attach through slides onto a mast track using luff cars for easy hoisting and lowering during different conditions.
5. Boom: The boom plays a crucial role in sail control , as it connects the aft end of the mainsail to the mast. By controlling the angle of the boom, sailors can adjust the shape and trim of the main sail for optimum performance against varying wind conditions.
6. Spreader: Spreader arms are horizontal poles extending from some point up the mast’s length. They serve two purposes: keeping shrouds apart to improve sail shape and reducing compressive loads on the rigging by forcing them away from each other.
7. Turnbuckles: Turnbuckles are adjustable devices used to tension standing rigging elements such as shrouds and stays. These fittings allow sailors to fine-tune rigging tensions while maximizing stability and overall performance based on prevailing weather conditions.
8. Winches: Winches are mechanical devices primarily used for easing or trimming running rigging lines under high loads. With a simple rotation, winches convert human effort into mechanical advantage, allowing efficient handling of lines for adjusting sails in different situations.
Conclusion: Understanding your sailboat rigging is not just essential for safe sailing but also for harnessing its maximum potential during every voyage. From deciphering various components like masts, standing and running rigging, booms, spreaders, turnbuckles, and winches – each element plays a crucial role in ensuring a smooth sailing experience. So next time you find yourself out on open waters, take a moment to appreciate these intricate systems that keep you powered by nothing but wind!
Step by Step Guide: How to Properly Assemble and Install the Various Parts of a Sailboat Rigging
Welcome fellow sailors and enthusiasts! Today, we are diving into the intricate world of sailboat rigging. Whether you are an experienced sailor or a newcomer to the sailing community, understanding how to properly assemble and install the various parts of a sailboat rig is essential for smooth and safe sailing. So, grab your tools and let’s get started on this step-by-step guide !
Step 1: Gather Your Tools and Materials Before embarking on this rigging journey, it’s crucial to have all your tools and materials ready. Here is a list of essentials you’ll need:
– Stainless steel wire rigging – Turnbuckles – Fittings and hardware such as clevis pins, shackles, and thimbles – Measuring tape or ruler – Wire cutters – Crimping tool or swaging machine (depending on your preference) – Electric drill (if required) – Lubricant or anti-seize compound
Make sure you have everything organized before starting. A well-prepared sailor is a successful one!
Step 2: Inspect Existing Rigging (If Applicable) If you own a used boat or are replacing old rigging, take some time to inspect the current setup. Look out for any signs of wear, frayed wires, or damaged fittings. It’s crucial to address these issues before proceeding with installation as they can compromise safety at sea.
Step 3: Measure Twice; Cut Once! Now that everything is set up let’s proceed by measuring the length needed for each piece of wire rigging carefully. Tinier inaccuracies in measurement during this step can lead to major inconveniences later.
Ensure you give yourself ample space for adjusting tension using turnbuckles. Pro-tip: It’s better to cut the wire slightly longer than needed rather than cutting it too short!
Step 4: Attach Fittings – The Devil Lies in Details Once you have measured and cut the rigging wire, let’s start attaching the fittings. This is where precision comes into play. Begin with inserting thimbles onto each end of the wires to avoid kinks or fraying. Next, connect the turnbuckles and fittings according to your sailboat’s specific rigging plan.
Step 5: Tension Matters Now that you have installed all the necessary fittings, it’s time to tension the rigging. This step requires a bit of finesse as over-tightening can damage equipment, while under-tightening can compromise performance.
Using a tension gauge, ensure that you achieve optimal tension on all parts of your sailboat’s rigging. It might take some trial and error, but finding that sweet spot is worth it!
Step 6: Inspect and Lubricate Before setting sail , always double-check everything! Look for any loose fittings or signs of wear once again. You wouldn’t want to go through these steps all over again out in the middle of nowhere!
Additionally, apply lubricant or anti-seize compound to prevent corrosion and ensure smooth operation of turnbuckles and other moving parts.
And there you have it – a professionally and properly assembled sailboat rigging! Sit back for a minute or two to appreciate your workmanship before feeling that excitement rush through as you’ll soon set sail smoothly onto those horizon-stretching waters.
Remember, practice makes perfect when it comes to mastering this skill. Over time, you’ll develop your own techniques and become a maestro at sailboat rigging assembly. Happy sailing!
Top Frequently Asked Questions about Sailboat Rigging Components Answered
Are you new to sailing or considering purchasing a sailboat? No matter your experience level, understanding the rigging components of a sailboat is crucial for safe and successful navigation on the water. In this blog post, we aim to answer some of the top frequently asked questions about sailboat rigging components. So, let’s dive in!
1. What are sailboat rigging components? Sailboat rigging components refer to the various parts and systems that help support and control the sails on a sailboat. These components include standing rigging (the fixed parts) and running rigging (lines that can be adjusted). Some common examples of rigging components are the mast, boom, shrouds, stays, halyards, sheets, and blocks.
2. What is the purpose of each rigging component? Each component serves a specific purpose in sailing . The mast supports the sails and provides leverage for controlling their shape. The boom holds down the bottom of the mainsail and allows adjustment for different points of sail . Shrouds provide lateral support to prevent excessive side-to-side movement of the mast. Stays offer fore-and-aft support to keep the mast from leaning too far forward or backward. Halyards raise and lower sails while sheets control their angle in relation to wind direction.
3. How often should I inspect my sailboat’s rigging ? Regular inspection is crucial for ensuring your safety on the water . We recommend conducting visual inspections before every sailing trip and more thorough inspections at least once a year or per manufacturer recommendations. Look out for any signs of wear, corrosion, loose fittings, or frayed lines that may indicate potential issues.
4. Can I replace my own rigging components? While minor repairs or adjustments can typically be done by boat owners with some knowledge and experience, replacing major rigging components should ideally be done by professionals who specialize in sailboat rigging services. They have the expertise and equipment necessary to properly install and tension components, ensuring your safety.
5. How long do sailboat rigging components typically last? The lifespan of rigging components depends on various factors such as usage, maintenance, and exposure to environmental conditions. Stainless steel stays can last for 10-15 years or longer with regular inspections and maintenance, while synthetic running rigging (such as ropes made from high-performance fibers) may have a shorter lifespan of 3-5 years.
6. Are there any safety tips related to sailboat rigging? Absolutely! Always wear appropriate personal protective equipment when working with or near rigging components. Take care not to overload or overstress the rig by correctly tensioning lines within manufacturer specifications . Avoid standing under or in close proximity to the mast while raising or lowering it, as it can be dangerous if it accidentally drops.
7. What are some common signs of rigging failure? Rigging failures can be catastrophic, so being able to identify potential issues is vital. Look out for visible cracks, rust, elongation, broken strands on wires, loose fittings, excessive wear on ropes, or unusual noises while sailing. Any of these signs should prompt an immediate inspection and possible replacement of affected components.
In conclusion, understanding sailboat rigging components is crucial for any sailor looking to navigate safely on the water. By familiarizing yourself with these frequently asked questions and following proper inspection and maintenance practices, you’ll enjoy a smooth sailing experience while prioritizing your safety at all times!
Exploring the Essential Components: An In-Depth Look at Key Parts of a Sailboat Rigging
Sailing is a thrilling and age-old activity that has fascinated adventurers and seafarers for centuries. At the heart of every sailing vessel lies its rigging, which is a complex system of ropes, wires, and equipment that hold the sails in place and allows for precise control over the boat’s movement. In this blog post, we will take an in-depth look at the key components of a sailboat rigging to understand their importance and how they contribute to the overall sailing experience.
Mast: The backbone of any sailboat rigging is its mast. This tall vertical structure supports the sails and provides stability to the vessel . Made from materials such as aluminum or carbon fiber, masts are designed to withstand strong winds and carry considerable loads. They come in various shapes and sizes depending on the type of boat and intended use.
Boom: Attached horizontally towards the bottom of the mast, the boom serves as a critical component in controlling the position of the mainsail – typically the largest sail on board. Acting as an extension of the mast, it allows for adjustments in sail trim by pivoting up or down.
Shrouds: These sturdy wire cables are attached to either side of the mast at multiple levels, forming a crucial part of sailboat rigging’s structural integrity. Shrouds keep the mast upright by counteracting lateral forces created by wind pressure on sails . Adjustable tensioning systems enable sailors to fine-tune shroud tension according to prevailing conditions.
Stay: Similar to shrouds but located further forward on most boats, stays provide additional support for maintaining mast stability. Fore-stay runs from top-to-bow while back-stays run from top-to-aft; together they prevent excessive forward or aft bending movements during intense wind pressures.
Turnbuckles: Within sailboat rigging systems lie turnbuckles – mechanical devices used for adjusting tension in wires or ropes like shrouds or stays. These clever devices simplify the task of tightening or loosening rigging components, enabling sailors to optimize sail shape and boat performance with ease.
Halyards: Essential for hoisting sails up and down, halyards are ropes used to control the vertical movement of the sails . They are typically operated through winches, which increase mechanical advantage and make raising and lowering large sails manageable.
Blocks: Also known as pulleys, these simple yet crucial devices help redirect the path of ropes within a sailboat rigging system. Blocks increase mechanical advantage by changing the direction of applied force, making it easier for sailors to control different aspects such as sail trim or adjusting tension.
Running Rigging vs Standing Rigging: Sailboat rigging can be classified into two main categories – running rigging and standing rigging. Running rigging refers to all movable lines and ropes that control sail position, while standing rigging encompasses all stationary components that give structure to the mast. Both elements work in harmony to ensure efficient maneuverability and safety at sea .
Understanding these key components within a sailboat’s rigging is essential for any aspiring sailor or seasoned mariner alike. It not only allows them to appreciate how these intricately designed systems function together but also helps enhance their sailing skills by leveraging each component’s unique role.
So next time you set foot on a sailboat or watch one glide gracefully across the water, take a moment to admire the finely tuned rigging – a mesmerizing web of interconnected parts that enable humans to harness the power of wind and embark on unforgettable nautical adventures.
The Crucial Role of Each Part: Unveiling the Functionality and Importance of Sailboat Rigging Components
Sailboat rigging components may seem simple and insignificant at first glance, but anyone who has sailed knows just how crucial each part is to the overall functionality and performance of a sailboat. From the mast to the shrouds, every component plays a vital role in ensuring safe navigation, efficient sailing, and maximum performance on the water.
One of the most essential parts of any sailboat rigging system is the mast. Serving as the backbone of the entire structure, the mast provides vertical stability and supports various sails that catch the wind . The mast’s height and shape significantly impact a boat’s performance, affecting not only its speed but also its ability to handle different wind conditions. A sturdy mast ensures that forces are properly distributed throughout the rigging system, preventing excessive strain or potential failure.
Connected to both sides of the mast are what are known as shrouds. These cables or wires act as primary support structures for restraining lateral movement and maintaining balance in heavy winds. Shrouds come in different sizes and tensions depending on factors such as sail size and boat length. Proper tensioning of shrouds is crucial for maintaining structural integrity and minimizing flexing under intense force.
Another integral part is the forestay – a cable or wire running from near or at the top of the mast down to the bow area of a sailboat . The forestay supports forward strength and controls stay sag- an essential factor for optimizing aerodynamics by shaping how sails interact with wind. It helps maintain proper sail geometry while limiting unnecessary heel (leaning) during maneuvers or gusts.
The backstay is another component critical for stability and control. Running from either side of the stern up to near or at the top of the mast, it helps counterbalance fore-aft bending forces created by wind pressure against a boat’s sails pushing it forward. By adjusting backstay tension, sailors can fine-tune their boat’s responsiveness to changes in wind speed or balance.
The boom, a horizontal spar attached to the mast, plays a crucial role in controlling the angle and shape of the mainsail. It acts as a pivot point for adjusting sail trim, allowing sailors to maximize lift and minimize drag based on wind conditions. With its connection to the gooseneck at the foot of the mast, it enables easy raising and lowering of the mainsail for quick adjustments or docking maneuvers .
Moreover, various blocks and pulleys are scattered throughout a sailboat’s rigging system playing essential roles in creating mechanical advantages. These components reduce friction and redirect forces generated by sails and lines during sailing operations, making it easier for sailors to handle heavy loads while preserving their energy. Choosing high-quality blocks with low-friction bearings is crucial for efficient sail handling while maintaining control.
Understanding how each part functions individually is significant; but more importantly, appreciating how they work in harmony is where true seamanship resides. Rigging components must be designed and maintained carefully to ensure safety, performance, and optimal functionality on any sailing adventure.
In conclusion, sailboat rigging components may appear simple to some extent but hold tremendous importance in enhancing a boat’s capabilities on water. From providing vertical stability with masts and dampening lateral movement with shrouds to shaping sails’ interaction with wind using forestays and backstays – every component has a crucial role to play. Understanding how these parts function individually and collectively helps sailors navigate safely while maximizing performance out on the open sea
Troubleshooting Tips: Common Issues and Solutions related to different parts of a sailboat rigging
Introduction: The rigging of a sailboat is an essential component that allows for safe navigation and optimal performance on the water. However, like any mechanical system, it can experience issues from time to time. In this blog post, we will provide detailed professional troubleshooting tips for common problems related to various parts of a sailboat rigging. Whether you’re an experienced sailor or just starting out, these solutions will help keep your rigging in top shape and ensure smooth sailing on every adventure.
1. Mast and Standing Rigging: One common issue sailors face is the presence of squeaking noises coming from the mast or standing rigging while underway. This can be quite bothersome and distracting during a peaceful sail. To resolve this problem, start by checking the connections between different components of the rigging and tighten any loose fittings appropriately. Additionally, using lubricants specifically designed for marine environments can significantly reduce friction between movable parts, eliminating annoying creaks and groans as you ride the waves.
2. Shrouds and Forestay: Another issue frequently encountered involves misaligned shrouds or forestay tension that affects the overall stability of the mast. If you notice your mast leaning slightly to one side or backward, it’s likely due to incorrectly adjusted shrouds or an improperly tensioned forestay. To rectify this, use a tension gauge to ensure consistent tension across all shrouds while avoiding excessive strain on either side of the mast base. By maintaining proper alignment and equal tension distribution, your rigging will provide maximum support when experiencing strong winds or rough conditions.
3. Running Rigging (Lines): Running rigging encompasses all lines used for controlling sails such as halyards, sheets, and control lines – crucial elements for proper sail handling. A typical problem associated with running rigging is line chafing caused by repeated friction against sharp edges or abrasive surfaces onboard. Inspect your lines regularly for signs of wear, paying close attention to areas exposed to constant rubbing. To prevent chafing, secure protective coverings or install specialized guards where necessary. Regularly washing and lubricating your lines will also extend their lifespan and ensure smooth operation.
4. Block and Tackle Systems: Block and tackle systems play a vital role in distributing loads and facilitating the movement of sails, particularly in larger sailboats. A common issue arises when blocks become jammed or fail to rotate freely due to debris buildup or lack of proper maintenance. To address this problem, inspect all blocks systematically, disassembling them if required, and clean out any accumulated dirt or salt crystals thoroughly. After cleaning, applying a liberal amount of marine-grade grease will promote smooth rotation and reduce the likelihood of future blockages.
Conclusion: Effective troubleshooting is essential for maintaining a sailboat rigging system that performs optimally and ensures a safe experience on the water. By following these detailed professional tips, you can address common issues associated with different parts of your sailboat rigging promptly and efficiently. Remember to conduct regular inspections, prioritize preventive maintenance, and seek professional assistance whenever needed. With a well-maintained rigging system at your disposal, you can embark on each sailing journey confidently, knowing that you’re prepared to overcome any challenges that may arise along the way.
Recent Posts

- Sailboat Gear and Equipment
- Sailboat Lifestyle
- Sailboat Maintenance
- Sailboat Racing
- Sailboat Tips and Tricks
- Sailboat Types
- Sailing Adventures
- Sailing Destinations
- Sailing Safety
- Sailing Techniques
No products in the cart.
Sailing Ellidah is supported by our readers. Buying through our links may earn us an affiliate commission at no extra cost to you.
The Standing Rigging On A Sailboat Explained
The standing rigging on a sailboat is a system of stainless steel wires that holds the mast upright and supports the spars.
In this guide, I’ll explain the basics of a sailboat’s hardware and rigging, how it works, and why it is a fundamental and vital part of the vessel. We’ll look at the different parts of the rig, where they are located, and their function.
We will also peek at a couple of different types of rigs and their variations to determine their differences. In the end, I will explain some additional terms and answer some practical questions I often get asked.
But first off, it is essential to understand what standing rigging is and its purpose on a sailboat.
The purpose of the standing rigging
Like I said in the beginning, the standing rigging on a sailboat is a system of stainless steel wires that holds the mast upright and supports the spars. When sailing, the rig helps transfer wind forces from the sails to the boat’s structure. This is critical for maintaining the stability and performance of the vessel.
The rig can also consist of other materials, such as synthetic lines or steel rods, yet its purpose is the same. But more on that later.
Since the rig supports the mast, you’ll need to ensure that it is always in appropriate condition before taking your boat out to sea. Let me give you an example from a recent experience.
Dismasting horrors
I had a company inspect the entire rig on my sailboat while preparing for an Atlantic crossing. The rigger didn’t find any issues, but I decided to replace the rig anyway because of its unknown age. I wanted to do the job myself so I could learn how it is done correctly.
Not long after, we left Gibraltar and sailed through rough weather for eight days before arriving in Las Palmas. We were safe and sound and didn’t experience any issues. Unfortunately, several other boats arriving before us had suffered rig failures. They lost their masts and sails—a sorrowful sight but also a reminder of how vital the rigging is on a sailboat.
The most common types of rigging on a sailboat
The most commonly used rig type on modern sailing boats is the fore-and-aft Bermuda Sloop rig with one mast and just one headsail. Closely follows the Cutter rig and the Ketch rig. They all have a relatively simple rigging layout. Still, there are several variations and differences in how they are set up.
A sloop has a single mast, and the Ketch has one main mast and an additional shorter mizzen mast further aft. A Cutter rig is similar to the Bermuda Sloop with an additional cutter forestay, allowing it to fly two overlapping headsails.
You can learn more about the differences and the different types of sails they use in this guide. For now, we’ll focus on the Bermuda rig.
The difference between standing rigging and running rigging
Sometimes things can get confusing as some of our nautical terms are used for multiple items depending on the context. Let me clarify just briefly:
The rig or rigging on a sailboat is a common term for two parts:
- The standing rigging consists of wires supporting the mast on a sailboat and reinforcing the spars from the force of the sails when sailing.
- The running rigging consists of the halyards, sheets, and lines we use to hoist, lower, operate, and control the sails on a sailboat.
Check out my guide on running rigging here !
The difference between a fractional and a masthead rig
A Bermuda rig is split into two groups. The Masthead rig and the Fractional rig.
The Masthead rig has a forestay running from the bow to the top of the mast, and the spreaders point 90 degrees to the sides. A boat with a masthead rig typically carries a bigger overlapping headsail ( Genoa) and a smaller mainsail. Very typical on the Sloop, Ketch, and Cutter rigs.
A Fractional rig has forestays running from the bow to 1/4 – 1/8 from the top of the mast, and the spreaders are swept backward. A boat with a fractional rig also has the mast farther forward than a masthead rig, a bigger mainsail, and a smaller headsail, usually a Jib. Very typical on more performance-oriented sailboats.
There are exceptions in regards to the type of headsail, though. Many performance cruisers use a Genoa instead of a Jib , making the difference smaller.
Some people also fit an inner forestay, or a babystay, to allow flying a smaller staysail.
Explaining the parts and hardware of the standing rigging
The rigging on a sailing vessel relies on stays and shrouds in addition to many hardware parts to secure the mast properly. And we also have nautical terms for each of them. Since a system relies on every aspect of it to be in equally good condition, we want to familiarize ourselves with each part and understand its function.
Forestay and Backstay
The forestay is a wire that runs from the bow to the top of the mast. Some boats, like the Cutter rig, can have several additional inner forestays in different configurations.
The backstay is the wire that runs from the back of the boat to the top of the mast. Backstays have a tensioner, often hydraulic, to increase the tension when sailing upwind. Some rigs, like the Cutter, have running backstays and sometimes checkstays or runners, to support the rig.
The primary purpose of the forestay and backstay is to prevent the mast from moving fore and aft. The tensioner on the backstay also allows us to trim and tune the rig to get a better shape of the sails.
The shrouds are the wires or lines used on modern sailboats and yachts to support the mast from sideways motion.
There are usually four shrouds on each side of the vessel. They are connected to the side of the mast and run down to turnbuckles attached through toggles to the chainplates bolted on the deck.
- Cap shrouds run from the top of the mast to the deck, passing through the tips of the upper spreaders.
- Intermediate shrouds run from the lower part of the mast to the deck, passing through the lower set of spreaders.
- Lower shrouds are connected to the mast under the first spreader and run down to the deck – one fore and one aft on each side of the boat.
This configuration is called continuous rigging. We won’t go into the discontinuous rigging used on bigger boats in this guide, but if you are interested, you can read more about it here .
Shroud materials
Shrouds are usually made of 1 x 19 stainless steel wire. These wires are strong and relatively easy to install but are prone to stretch and corrosion to a certain degree. Another option is using stainless steel rods.
Rod rigging
Rod rigging has a stretch coefficient lower than wire but is more expensive and can be intricate to install. Alternatively, synthetic rigging is becoming more popular as it weighs less than wire and rods.
Synthetic rigging
Fibers like Dyneema and other aramids are lightweight and provide ultra-high tensile strength. However, they are expensive and much more vulnerable to chafing and UV damage than other options. In my opinion, they are best suited for racing and regatta-oriented sailboats.
Wire rigging
I recommend sticking to the classic 316-graded stainless steel wire rigging for cruising sailboats. It is also the most reasonable of the options. If you find yourself in trouble far from home, you are more likely to find replacement wire than another complex rigging type.
Relevant terms on sailboat rigging and hardware
The spreaders are the fins or wings that space the shrouds away from the mast. Most sailboats have at least one set, but some also have two or three. Once a vessel has more than three pairs of spreaders, we are probably talking about a big sailing yacht.
A turnbuckle is the fitting that connects the shrouds to the toggle and chainplate on the deck. These are adjustable, allowing you to tension the rig.
A chainplate is a metal plate bolted to a strong point on the deck or side of the hull. It is usually reinforced with a backing plate underneath to withstand the tension from the shrouds.
The term mast head should be distinct from the term masthead rigging. Out of context, the mast head is the top of the mast.
A toggle is a hardware fitting to connect the turnbuckles on the shrouds and the chainplate.
How tight should the standing rigging be?
It is essential to periodically check the tension of the standing rigging and make adjustments to ensure it is appropriately set. If the rig is too loose, it allows the mast to sway excessively, making the boat perform poorly.
You also risk applying a snatch load during a tack or a gybe which can damage the rig. On the other hand, if the standing rigging is too tight, it can strain the rig and the hull and lead to structural failure.
The standing rigging should be tightened enough to prevent the mast from bending sideways under any point of sail. If you can move the mast by pulling the cap shrouds by hand, the rigging is too loose and should be tensioned. Once the cap shrouds are tightened, follow up with the intermediates and finish with the lower shrouds. It is critical to tension the rig evenly on both sides.
The next you want to do is to take the boat out for a trip. Ensure that the mast isn’t bending over to the leeward side when you are sailing. A little movement in the leeward shrouds is normal, but they shouldn’t swing around. If the mast bends to the leeward side under load, the windward shrouds need to be tightened. Check the shrouds while sailing on both starboard and port tack.
Once the mast is in a column at any point of sail, your rigging should be tight and ready for action.
If you feel uncomfortable adjusting your rig, get a professional rigger to inspect and reset it.
How often should the standing rigging be replaced on a sailboat?
I asked the rigger who produced my new rig for Ellidah about how long I could expect my new rig to last, and he replied with the following:
The standing rigging should be replaced after 10 – 15 years, depending on how hard and often the boat has sailed. If it is well maintained and the vessel has sailed conservatively, it will probably last more than 20 years. However, corrosion or cracked strands indicate that the rig or parts are due for replacement regardless of age.
If you plan on doing extended offshore sailing and don’t know the age of your rig, I recommend replacing it even if it looks fine. This can be done without removing the mast from the boat while it is still in the water.
How much does it cost to replace the standing rigging?
The cost of replacing the standing rigging will vary greatly depending on the size of your boat and the location you get the job done. For my 41 feet sloop, I did most of the installation myself and paid approximately $4700 for the entire rig replacement.
Can Dyneema be used for standing rigging?
Dyneema is a durable synthetic fiber that can be used for standing rigging. Its low weight, and high tensile strength makes it especially popular amongst racers. Many cruisers also carry Dyneema onboard as spare parts for failing rigging.
How long does dyneema standing rigging last?
Dyneema rigging can outlast wire rigging if it doesn’t chafe on anything sharp. There are reports of Dyneema rigging lasting as long as 15 years, but manufacturers like Colligo claim their PVC shrink-wrapped lines should last 8 to 10 years. You can read more here .
Final words
Congratulations! By now, you should have a much better understanding of standing rigging on a sailboat. We’ve covered its purpose and its importance for performance and safety. While many types of rigs and variations exist, the hardware and concepts are often similar. Now it’s time to put your newfound knowledge into practice and set sail!
Or, if you’re not ready just yet, I recommend heading over to my following guide to learn more about running rigging on a sailboat.
Sharing is caring!
Skipper, Electrician and ROV Pilot
Robin is the founder and owner of Sailing Ellidah and has been living on his sailboat since 2019. He is currently on a journey to sail around the world and is passionate about writing his story and helpful content to inspire others who share his interest in sailing.
Very well written. Common sense layout with just enough photos and sketches. I enjoyed reading this article.
Thank you for the kind words.
Leave a Reply Cancel reply
Your email address will not be published. Required fields are marked *
- New Sailboats
- Sailboats 21-30ft
- Sailboats 31-35ft
- Sailboats 36-40ft
- Sailboats Over 40ft
- Sailboats Under 21feet
- used_sailboats
- Apps and Computer Programs
- Communications
- Fishfinders
- Handheld Electronics
- Plotters MFDS Rradar
- Wind, Speed & Depth Instruments
- Anchoring Mooring
- Running Rigging
- Sails Canvas
- Standing Rigging
- Diesel Engines
- Off Grid Energy
- Cleaning Waxing
- DIY Projects
- Repair, Tools & Materials
- Spare Parts
- Tools & Gadgets
- Cabin Comfort
- Ventilation
- Footwear Apparel
- Foul Weather Gear
- Mailport & PS Advisor
- Inside Practical Sailor Blog
- Activate My Web Access
- Reset Password
- Pay My Bill
- Customer Service

- Free Newsletter
- Give a Gift
How to Sell Your Boat

Cal 2-46: A Venerable Lapworth Design Brought Up to Date

Rhumb Lines: Show Highlights from Annapolis

Open Transom Pros and Cons

Leaping Into Lithium

The Importance of Sea State in Weather Planning

Do-it-yourself Electrical System Survey and Inspection

Install a Standalone Sounder Without Drilling

When Should We Retire Dyneema Stays and Running Rigging?

Rethinking MOB Prevention

Top-notch Wind Indicators

The Everlasting Multihull Trampoline

How Dangerous is Your Shore Power?

DIY survey of boat solar and wind turbine systems

What’s Involved in Setting Up a Lithium Battery System?

The Scraper-only Approach to Bottom Paint Removal

Can You Recoat Dyneema?

Gonytia Hot Knife Proves its Mettle

Where Winches Dare to Go

The Day Sailor’s First-Aid Kit

Choosing and Securing Seat Cushions

Cockpit Drains on Race Boats

Rhumb Lines: Livin’ the Wharf Rat Life

Re-sealing the Seams on Waterproof Fabrics

Safer Sailing: Add Leg Loops to Your Harness

Waxing and Polishing Your Boat

Reducing Engine Room Noise

Tricks and Tips to Forming Do-it-yourself Rigging Terminals

Marine Toilet Maintenance Tips

Learning to Live with Plastic Boat Bits
- Sails, Rigging & Deck Gear
Adding a Solent Stay

Whether you view it from the top down or the bottom up, a Solent rig needs to be carefully thought out, well-engineered, and strategically located. In addition to this overview of the project, our previous report the DIY Solent Stay or Inner Forestay offers more details and resources. Some sailors add a short bow sprit or U-shaped, tubular extension that includes a bobstay and supports the attachment of a new headstay. The old headstay chainplate becomes the new tack point for the Solent stay. Another approach is to retain the existing headstay and simply attach a new tang just a bit below the headstay sheave box. Then add a deck fitting to attach the Solent stay and tack the sail(s). The deck must be reinforced with a transverse member, or a tie rod must be mechanically fastened to the stem so that the tension loads don’t damage the deck.
Either approach can be a win-win solution, but as with all sailboat modifications, the devil is in the details. On the up side, both options offer a double-headsail rig that doesn’t require the addition of running backstays. But when the sprit option is chosen, rig support can be jeopardized due to the placement of the headstay outboard of the stem of the vessel. On a traditional cutter, the same thing occurs, but the original stem-mounted headstay simply becomes the forestay, and the loads are shared. With a removable Solent stay disconnected, this belt-and-suspenders security is lost.
Make sure that the load-bearing capacity of the sprit and its attachment points have been carefully calculated. This structure must account for more than tension in the headstay(s). It includes designing the structure to counteract forces such as those exerted by one or two anchors pounding into short, steep seas on a squally afternoon sail home. Little things can play a major role down the road, like properly sizing bobstay terminals and fittings to account for degradation caused by intermittent or continuous immersion in seawater. Many modern designers prefer to add a little more ballast and a little more height to the mast rather than put the headstay outboard on a 21st-century bowsprit. However, plumb-bowed boats have complicated anchor handling, making short sprits almost a necessity.
In the case of boats with high sail area-displacement ratios, you may want to put a light-air genoa or a drifter/reacher on the headstay and set up another roller-furler with a non-overlapping sail on the Solent stay. The trick is knowing when to switch gears from the lightweight sail on the headstay and unwind or hank on the small jib that sets on the Solent stay. In either case, when the stay becomes a permanent fixture, the rig is better supported, but each tack or jibe of the larger headsail requires rolling it and unrolling it.
RELATED ARTICLES MORE FROM AUTHOR
Leave a reply cancel reply.
Log in to leave a comment
Latest Videos

Island Packet 370: What You Should Know | Boat Review

How To Make Starlink Better On Your Boat | Interview

Catalina 380: What You Should Know | Boat Review
- Privacy Policy
- Do Not Sell My Personal Information
- Online Account Activation
- Privacy Manager
Forestay - Sailing Term
We use technical and analytical cookies to ensure that we give you the best experience on our website.
Terminology
A glossary of sailing terminology
Most commonly a stainless steel wire, the forestay is a piece of standing rigging which helps keep the mast upright. It is attached at the bow of the boat, to the top of the mast
More Terminology
- Bearing Away
- Broad Reach
- Close Hauled
- Close Reach
- Fore (For'ard)
- Head To Wind
- Kicking Strap
- No Sail Zone
- Topping Lift
What Is a Forestay On a Sailboat?
Sailboats are complex pieces of marine engineering, and it takes an experienced sailor to understand the intricacies of operating one safely and efficiently.
One critical element that helps make sailing possible is the forestay, which plays an essential role in keeping the mast upright and providing stability to the boat as it moves through the water.
In this article we will explore what is a forestay, how it works, and why it’s important to know about its anatomy and installation process before you set sail for the open sea!
What Is a Forestay?
A forestay (or headstay) is a cable or wire rope which connects the bow (front) of the boat to the mast, providing both structural integrity and stability while sailing. The forestay prevents the mast from falling aft (backwards), which can be dangerous in strong winds or rough seas. It also provides additional sail area by allowing sails to be attached higher up on the mast than would otherwise be possible without it.
Additionally, when used in combination with other rigging components such as running backstays or jib sheets, the forestay can help shape sails into an efficient configuration that maximizes performance in varying wind conditions.
Types of Forestays
The type of forestays used can vary depending on the size and type of vessel being sailed, as well as personal preferences for performance or aesthetics. The two main types are full-length or fractional stay systems:
- Full-Length : A full-length system runs from the deck to just below the top of the mast, providing maximum support and stability while sailing in high winds or rough seas conditions, however this system requires more maintenance due to its increased complexity compared to fractional systems.
- Fractional : A fractional stay system runs from 1/8th to 1/4th length from top of mast to deck, this system provides less support than full length systems but requires less maintenance due to its simplicity and is often preferred by performance sailors who prioritize speed over stability in certain conditions.
Benefits Of a Forestay
A forestay offers several benefits for sailboats, including:
- Improved stability: The forestay helps keep your mast upright even when sailing in high winds or rough seas, which makes for smoother sailing overall, this increased stability also reduces stress on other rigging components such as stays or shrouds as well as preventing accidental damage caused by excessive movement in heavy weather conditions.
- Increased sail area: By connecting at higher points on your mast than otherwise possible without it, your sails have more room to fill with wind while sailing, this translates into more power when racing or cruising around your favorite lake or ocean destination!
- Reduced fatigue: By eliminating unnecessary movement caused by waves or wind gusts, you’ll spend less time fighting against nature’s forces and more time enjoying your time on the water, this improved comfort while sailing will reduce fatigue over long trips and make them easier to complete successfully!
Anatomy Of a Forestay
The anatomy of a forestay consists primarily of two elements: wire rope and turnbuckles (or tensioners). Wire rope is made up of multiple strands braided together in order to provide strength and flexibility, these strands come in various types such as galvanized steel, stainless steel, etc., depending on personal preferences/budget considerations for your vessel’s rigging needs. Turnbuckles are used to adjust tension on either side of your stay – there are two types available (open body/closed body) – which allow for fine tuning your rigging setup depending on weather conditions encountered during your voyage!
How To Install A Forestay
Installing your own forestays requires knowledge about proper rigging techniques, if you’re not confident with these tasks we recommend consulting an experienced rigger before attempting any work yourself! The basic steps required include:
- Measurement & Cutting: Measure out how much wire rope you need based on where you want your stay to attach (deck/mast), then cut off any excess material using either an angle grinder or bolt cutter according tools available at any local hardware store/marine supply shop! Afterwards lay rope around mast base then attach one end with an eye splice knot – use lacing twine if necessary – then thread turnbuckle through loop created & attach opposite end using same eye splice knot mentioned earlier in order complete connection securely & safely! Finally tighten tensioner until desired level achieved using wrench provided with turnbuckle itself – don’t overtighten however as this can cause damage over time!
Maintaining A Forestays
Maintaining your forestays should be part of regular maintenance routine for any boat owner who wants keep their vessel safe efficient while out at sea, some things look out include inspecting all parts regularly making sure they free corrosion rusting checking tensioning screws are tight enough secure connection not too tight cause unnecessary strain other parts loosening over time causing potential problems down road if not addressed soon enough! Additionally inspect wire ropes themselves making sure none frayed cut off excess material needed keep length consistent throughout entire length stay itself so everything remains balanced same time while sailing!
Importance Of Proper Rigging
Rigging is extremely important part preparing any sailboat properly before setting out onto open waters, improper setup can lead issues like capsize loss control potentially damaging vessel itself putting crew danger especially when dealing extreme weather conditions so always consult experienced rigger confirm everything done correctly first time round save yourself lot hassle later down line if something goes wrong once already far away shoreline!
Safety Considerations With A Forestays
When dealing with any type rigging always consider safety first foremost no matter how experienced sailor may be when comes dealing complex pieces equipment like forestays especially when dealing strong winds rough seas conditions so always take necessary precautions make sure everyone wearing life vests jackets have emergency whistle flare gun hand case anything happens out middle ocean they able call help quickly efficiently possible case emergency situation arises unexpected cause potential harm anyone onboard vessel itself!
Troubleshooting Common Issues With A Forestays
Common troubleshooting issues associated with forestays usually quite simple address involve checking connections ensure none loosening over time looking corrosion rusting excess fraying wear tear places need attention replaced soonest possible ensure everything stays secure efficient during journey ahead, also remember always consult experienced rigger confirm setup done correctly first time round save yourself lot trouble later down line if something goes wrong once already far away shoreline ensuring everyone onboard returns safe sound same way they left port original destination originally planned original journey began!!
In conclusion, understanding what is involved in installing and maintaining your own forestays will go far towards helping you become a better sailor who appreciates all aspects that come with owning and operating their own vessel safely and efficiently when out at sea! Always remember safety first no matter how experienced you may be – having proper equipment installed correctly will help reduce stress levels while allowing you enjoy all that comes with spending time out open waters chasing those perfect sailing days!!
Similar Posts

Boating Equipment Checklist
I’m here to talk to you about the essential items and equipment you need to check before heading out on the water. Whether you’re a seasoned sailor or a beginner, it’s important to make sure you have the right gear and equipment for your boating trip. To help you out, we’ve compiled a comprehensive boating…

Luxury Yacht Terminology
Welcome, sailing enthusiasts! Today we are going to explore the world of luxury yachting, and the unique terminology that is associated with this unique and luxurious activity. If you have ever been curious about what a “hull” is, or what a “mizzenmast” is, then this article is for you. I’ll be walking you through the…

Boat Safety Certificate Online / Can You Get Boat Safety Certificate Online
Hello everyone, I’m here to discuss an important topic – getting a Boat Safety Certificate online. With the summer sailing season here, it’s essential to make sure you have a valid and up-to-date Boat Safety Certificate, and that’s where I come in. In this article, I’m going to discuss how you can get your Boat…

What Is The Stern Of A Ship?
The stern of a ship is the back end. It’s where the rudder is located, and it’s the direction the ship is facing when it’s moving forward. The word “stern” comes from Old English and originally meant “the steering oar of a boat.” Today, the stern is still an important part of a ship. It’s…

Can a Sailboat Go Downwind Faster Than the Wind?
Sailboats have been used for centuries to explore the world’s oceans and waterways, but how fast can they go downwind? The answer is that, in some cases, sailboats can sail faster than the wind itself — if you know how to do it right! In this article, we’ll discuss what downwind sailing is, how to…

9 Best Marine Air Conditioner Reviews
I’m here to share with you the 9 best marine air conditioners on the market. Whether you’re sailing along the coast or offshore, having an air conditioner can make a huge difference in your comfort level. That’s why I’ve put together this comprehensive review of the top 9 marine air conditioners, so that you can…
Leave a Reply Cancel reply
Your email address will not be published. Required fields are marked *
Save my name, email, and website in this browser for the next time I comment.
IMAGES
VIDEO
COMMENTS
The hull is what most people would consider 'the boat'. It's the part that provides buoyancy and carries everything else: sails, masts, rigging, and so on. Without the hull, there would be no boat. The hull can be divided into different parts: deck, keel, cabin, waterline, bilge, bow, stern, rudder, and many more.
A forestay might be made from stainless steel wire, stainless steel rod or carbon rod, or galvanized wire or natural fibers. Parts of a sail. Sails are vital for sailboats, made up of complex parts that improve performance and maneuverability. In this section, we'll take a closer look at the different parts of that make up the sails.
Parts of the Jib Description; Head: the top of the sail that is attached to the forestay: Luff: the leading edge of the sail that runs along the forestay: Foot: the bottom edge of the sail that is attached to the deck or a furling drum: Leech: the trailing edge of the sail that runs from the head to the clew: Clew
Aluminum Forestay/Staysail Stay Tang for weld-on applications has SS Bushed Pin Hole for Forestay or Staysail stay attachment. Tang is (maximum) 4" (102mm) long x 2" wide x 3/8" thick with pressed SS Bushing. Designed for welding to mast surface, Tang is cut from 6061-T6 aluminum plate with mill finish.
A sailboat's standing rigging is generally built from wire rope, rod, or occasionally a super-strong synthetic fibered rope such as Dyneema ®, carbon fiber, kevlar or PBO. 1×19 316 grade stainless steel Wire Rope (1 group of 19 wires, very stiff with low stretch) is standard on most sailboats. Wire rope is sized/priced by its diameter which ...
Forestay. On a sailing vessel, a forestay, sometimes just called a stay, is a piece of standing rigging which keeps a mast from falling backwards. It is attached either at the very top of the mast, or in fractional rigs between about 1/8 and 1/4 from the top of the mast. The other end of the forestay is attached to the bow of the boat.
A Solent stay is a stay that sets between the mast and the forestay. It connects to the mast at a point that is only slightly below the existing backstay, and meets on the deck only slightly abaft of the existing forestay. Under such an arrangement, the mast requires no additional support. The existing backstay provides adequate tension to ...
Sailboat Forestay. The forestay connects the top of the mast to the bow of the boat. The forestay also serves an additional purpose—the jib sail luff mounts to the forestay. In fact, the jib is hoisted up and down the forestay as if it were a mast. Boats equipped with roller furlings utilize spindles at the top and base of the forestay.
A big part of that came in the form of replacing the forestay, as well as a comprehensive overhaul and inspection of the ProFurl furling system. Lyra is our 1980 Reliance 44, and has a nine-year circumnavigation and several trans-Atlantic crossings under her belt. Additionally, we've been racking up an average of 2,000 nautical miles annually ...
825. Hunter 260 Sarasota,FL. Aug 11, 2010. #2. I believe the CDI furler I have utilizes the existing forestay on my 260. The drum fits over the adjuster and the plastic luff extrusion slips over the stay for nearly its full length to the head. If your rigging is dated I'd think seriously about new fittings and stays while you're at it.
Aug 14, 2015. It's one of the most important features on a sailboat, but many owners put standing rigging at the back of their minds when it comes time to do their pre-season safety checks. A prudent sailor should inspect his or her standing rig at least once each season and should know when the time comes to replace most or all of it.
Buffalo, New York. Our method of stowing the inner forestay is simple, elegant and easily operated. There are two teak plates bolted together over a stanchion outboard of the mainmast, and overlapping the lower lifeline to eliminate rotation. The inboard piece of teak has been routed out for the stay to fit into it.
Spars, Rigging, and Hardware for Sailboats. Rig-Rite, Inc. Phone: (001) 401-739-1140 -- FAX: (001) 401-739-1149 www.RigRite.com Ordering/Questions: ... of the boat, to attach the Headstay or Forestay and usually, the Jib Tack. Stemhead Fittings normally bolt through the Bow as well as the Deck, serving to strengthen the Hull/Deck joint. ...
Short answer: Parts of a Sailboat Rigging The sailboat rigging consists of various components essential for controlling and supporting the sails. Key parts include the mast, boom, shrouds, forestay, backstay, halyards, and sheets. Understanding the Basics: A Comprehensive Overview of the Parts of a Sailboat Rigging Title: Understanding the Basics: A Comprehensive Overview of the
Spars, Rigging, and Hardware for Sailboats. Rig-Rite, Inc. Phone: (001) 401-739-1140 -- FAX: (001) 401-739-1149 www.RigRite.com: Sailboat Hardware: Sailboat Hardware Rig-Rite stocks a large selection of Specialty Hardware and hard-to-find parts for a variety of Systems. ... Inner Forestay Stowage Clip - For use stowing an Inner ...
The difference between a fractional and a masthead rig. A Bermuda rig is split into two groups. The Masthead rig and the Fractional rig.. The Masthead rig has a forestay running from the bow to the top of the mast, and the spreaders point 90 degrees to the sides.A boat with a masthead rig typically carries a bigger overlapping headsail (Genoa) and a smaller mainsail.
Sailboat Lazy Jack Systems & Kits. As a trusted name in the marine aftermarket industry, Fisheries Supply is your one-stop shop for a wide array of sailboat parts and accessories. We cater to boaters and mariners, offering an extensive selection of products from renowned manufacturers like Harken, Ronstan, Lewmar, and Schaefer.
288 results. As a premier supplier of quality sailboat rigging hardware, Fisheries Supply stocks every component needed to maintain robust standing and running rigging, which comprises the wires, lines, fittings, and tools supporting mast stability. Discover a comprehensive selection of sailboat rigging ranging from specialty wire rope and ...
Then add a deck fitting to attach the Solent stay and tack the sail (s). The deck must be reinforced with a transverse member, or a tie rod must be mechanically fastened to the stem so that the tension loads don't damage the deck. Either approach can be a win-win solution, but as with all sailboat modifications, the devil is in the details.
Forestay. Most commonly a stainless steel wire, the forestay is a piece of standing rigging which helps keep the mast upright. It is attached at the bow of the boat, to the top of the mast.
Rust Remover and Protectant. #Z5322. $32.50. SeaLube Turnbuckle Lubricant. #Z2057. $10.21. Catalina Direct, publishers of the Catalina 22 and Catalina 25 Owner's Handbooks and the largest supplier of parts and Lewmar winches for Catalina Yachts in the country.
A forestay (or headstay) is a cable or wire rope which connects the bow (front) of the boat to the mast, providing both structural integrity and stability while sailing. The forestay prevents the mast from falling aft (backwards), which can be dangerous in strong winds or rough seas. It also provides additional sail area by allowing sails to be ...
Our people locate our product lines directly from each of the major suppliers on the web so as to provide you the best choice of Forestay Boat Parts along with similar extras at the greatest prices possible. Frequently, you will definitely witness most of our items are generally directly from eBay.