440-255-1500 "No Voice Mail - Just Real People"

CREST ALUMINUM PRODUCTS CO, INC
Marine toe rail & t-track.

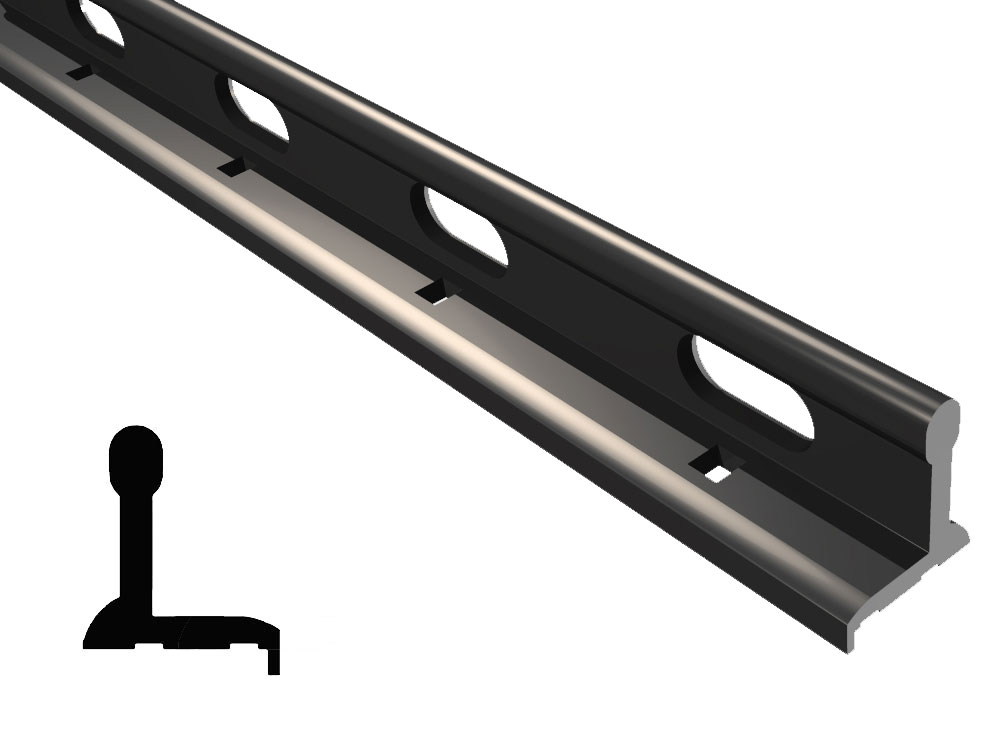
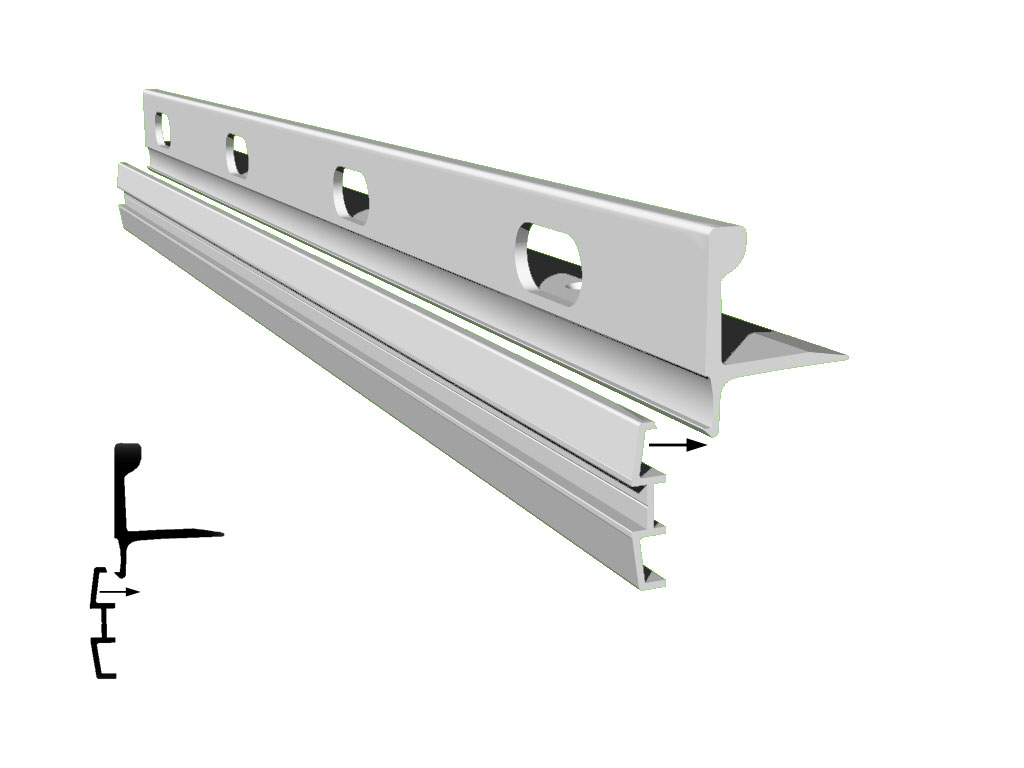
#2807-24 Slotted Toe Rail
Slotted Toe Rail Track is the ideal toe rail configuration with continuous slots along its entire length. This removes unnecessary weight and provides multiple locations for block attachments. This is the exact replacement (Old Merriman® #7440) for many sailboats built during the 70's and 80's and perfect for new production and custom one-offs. Available in Black Hard Coat and 30 minute Velo Anodized finishes to provide a long- lasting finish.
- Fasteners: 5/16" Flat Head
- Hole Spacing: 4" O.C.
- Alloy: 6061-T6
- Slots: 1.25" Long x .625" High
- Weight: .959 lbs/ft
- Length: 24'-0"
- Finish: Clear Velo and Black Hard Coat Anodize
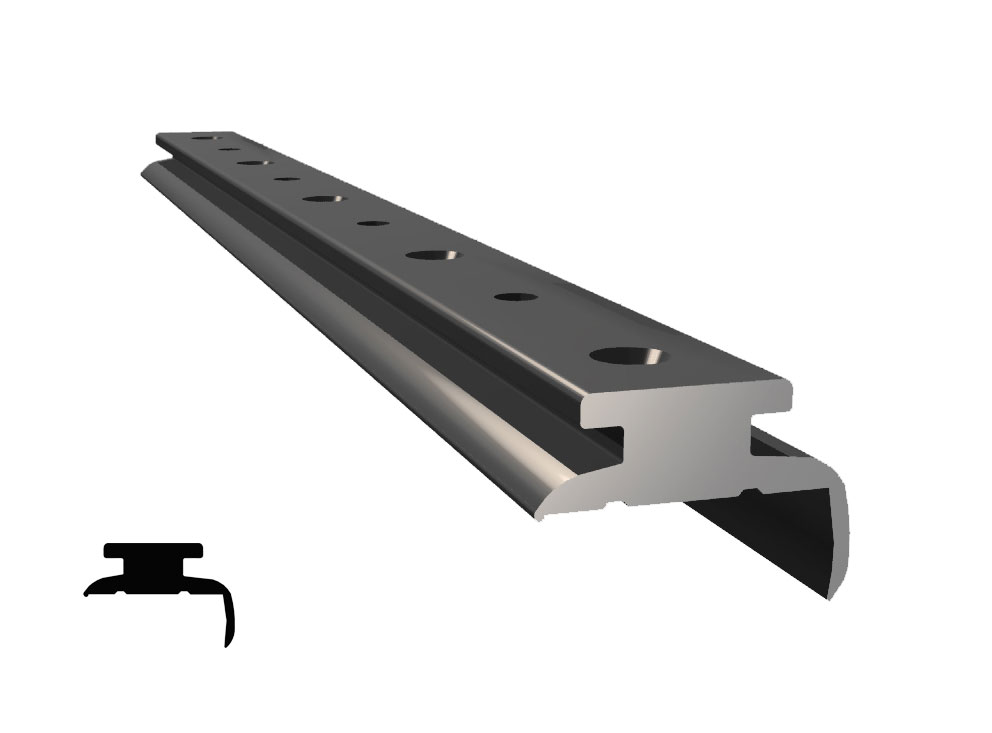
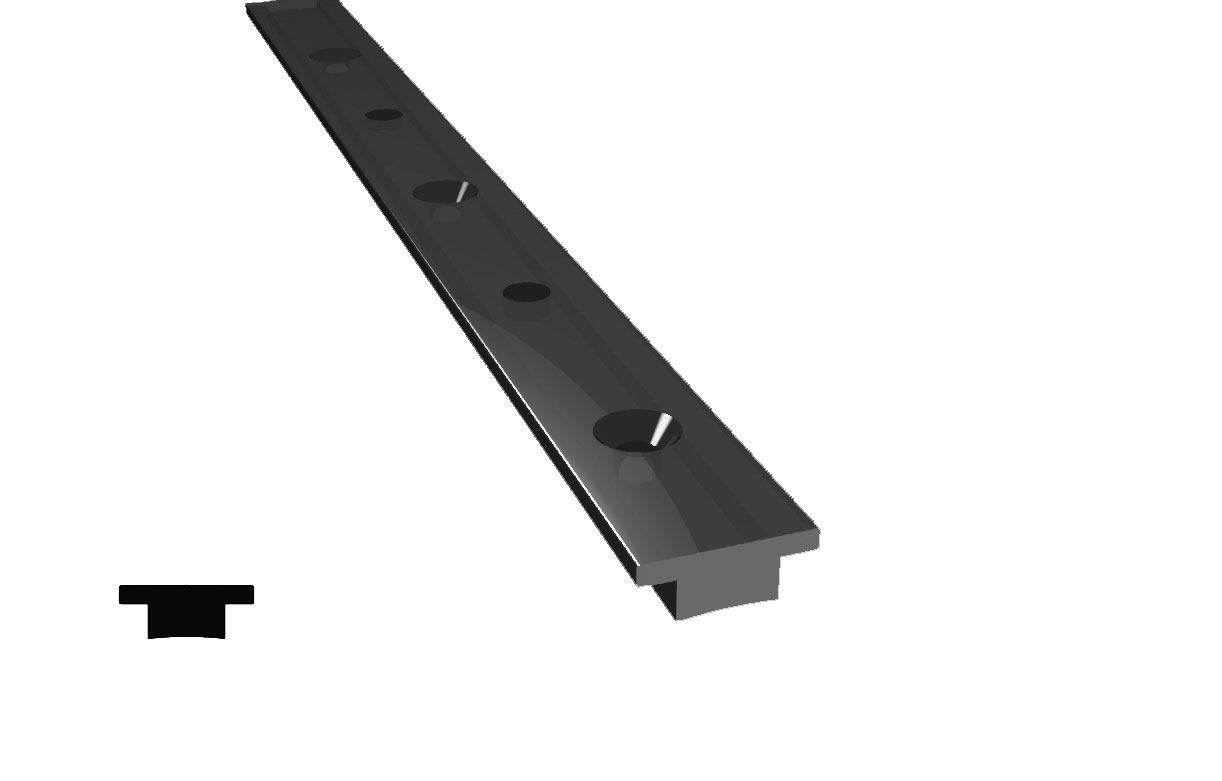
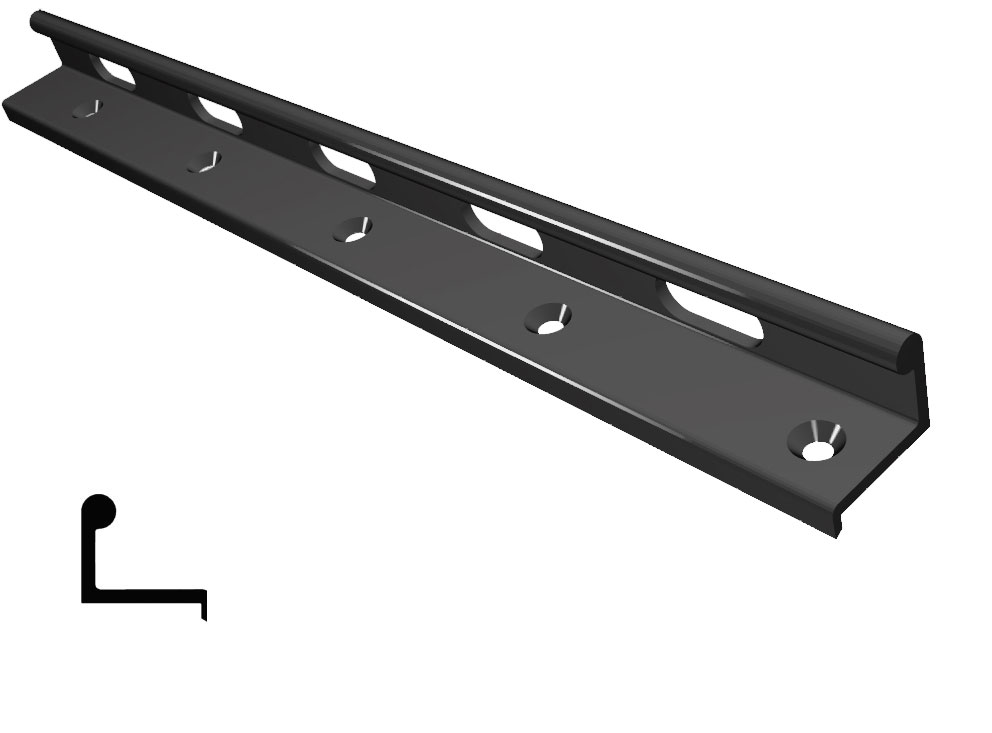
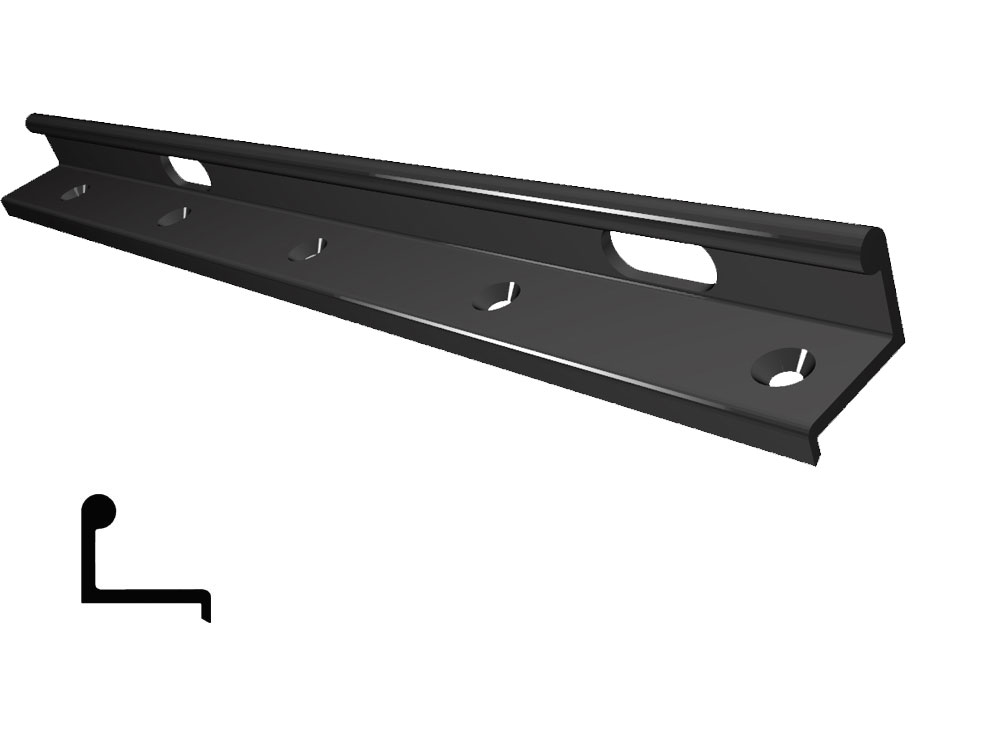
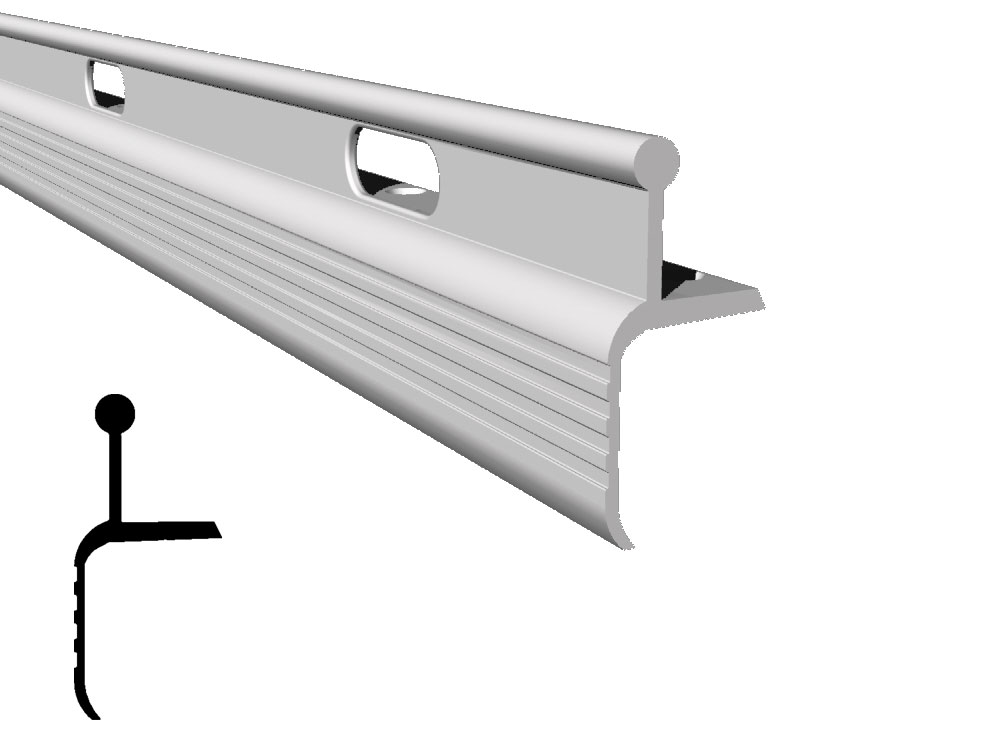
#2817 1 1/4" T Rail track
1¼ T Rail Track was developed by Crest to provide an adjustable location for outboard genoa and spinnaker blocks and to match up with the 2807 Toe Rail . It offers consistent and finished appearance to the shear line. Precise Track adjustment holes are spaced every 4". Available in Black Hard Coat and 30 Minute Velo Clear Anodized to provide a long- lasting durable finish.
- Fasteners: 1/4" Flat Head
- Length: 19'-10"
- Weight: .974 lbs/ft
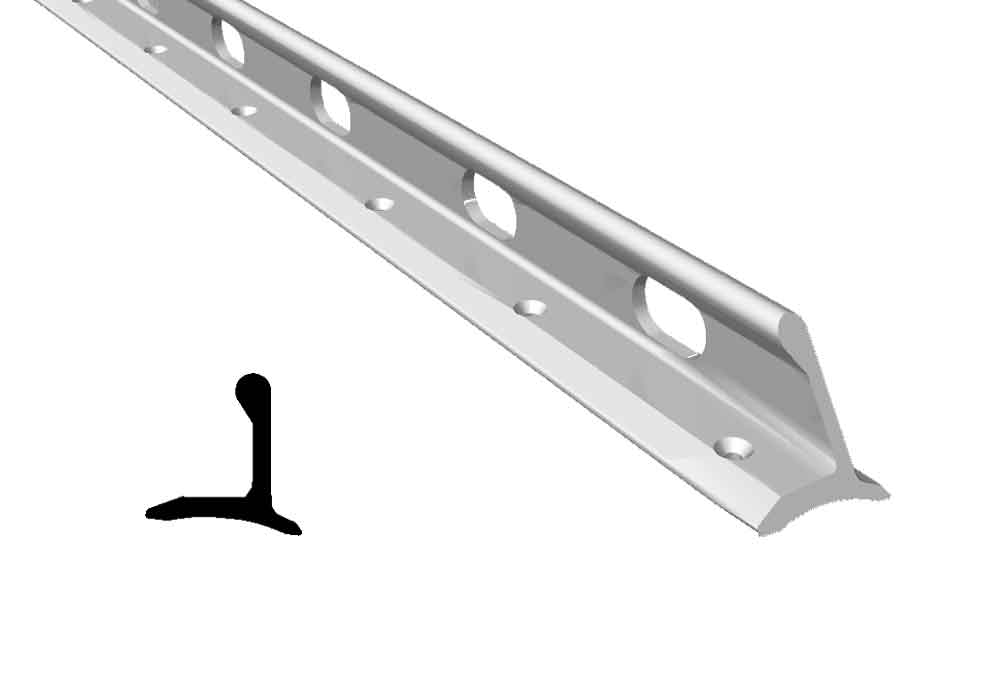
#2815 1" Genoa / T Track
1” Aluminum T Track has a curved base to accomodate mounting on spars and to provide a positive area for sealant. Genoa car adjustment holes are spaced every 4" for maximum control. Available in 30 Minute Clear Velo Anodize and Black Hard Coat Anodize. Stock lengths 2'- 14'. Special Lengths Available
- Length: 2' - 14'
- Weight: .326 lbs/ft
- Finish: 30 Min Clear Velo and Black Hard Coat Anodize
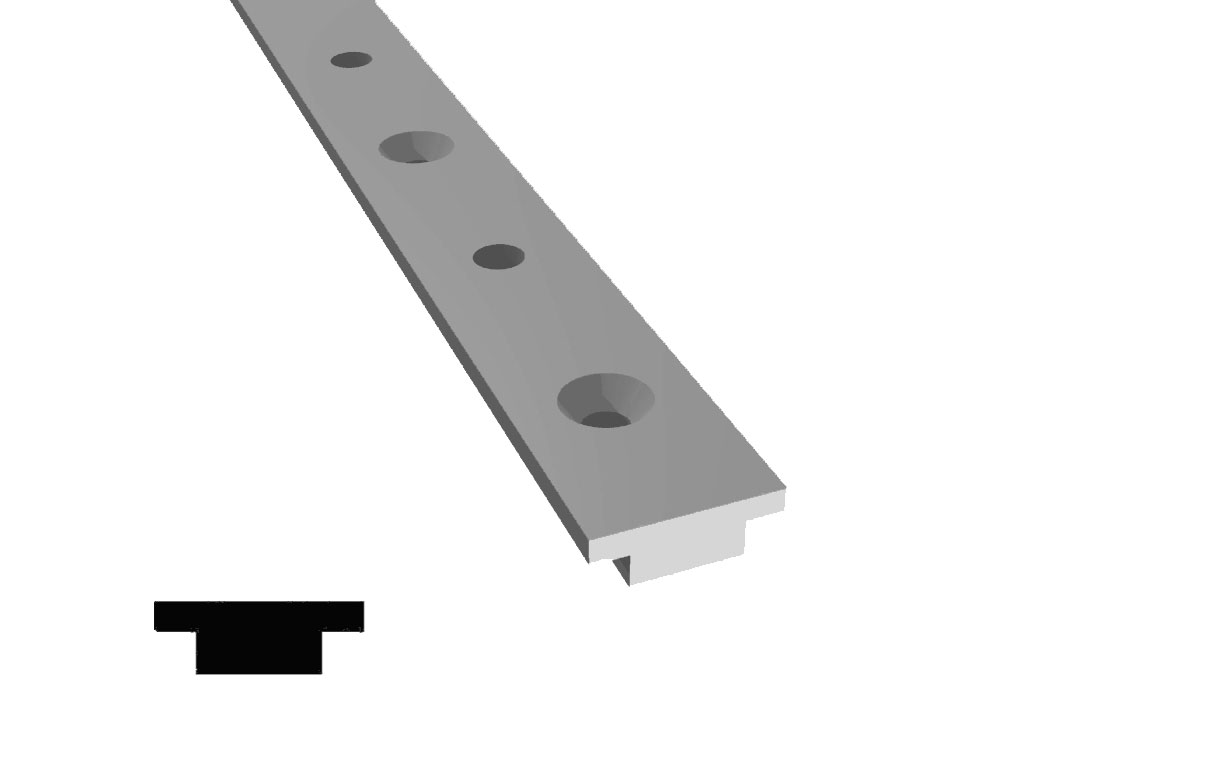
#2814 1.25" Genoa / T Track
1¼” Aluminum T Track has a curved base to accomodate mounting on spars and to provide a positive area for sealant. Genoa car adjustment holes are spaced every 4" for maximum control. Available in 30 Minute Clear Velo Anodize and Black Hard Coat Anodize. Stock lengths 2'- 14'. Special Lengths Available.
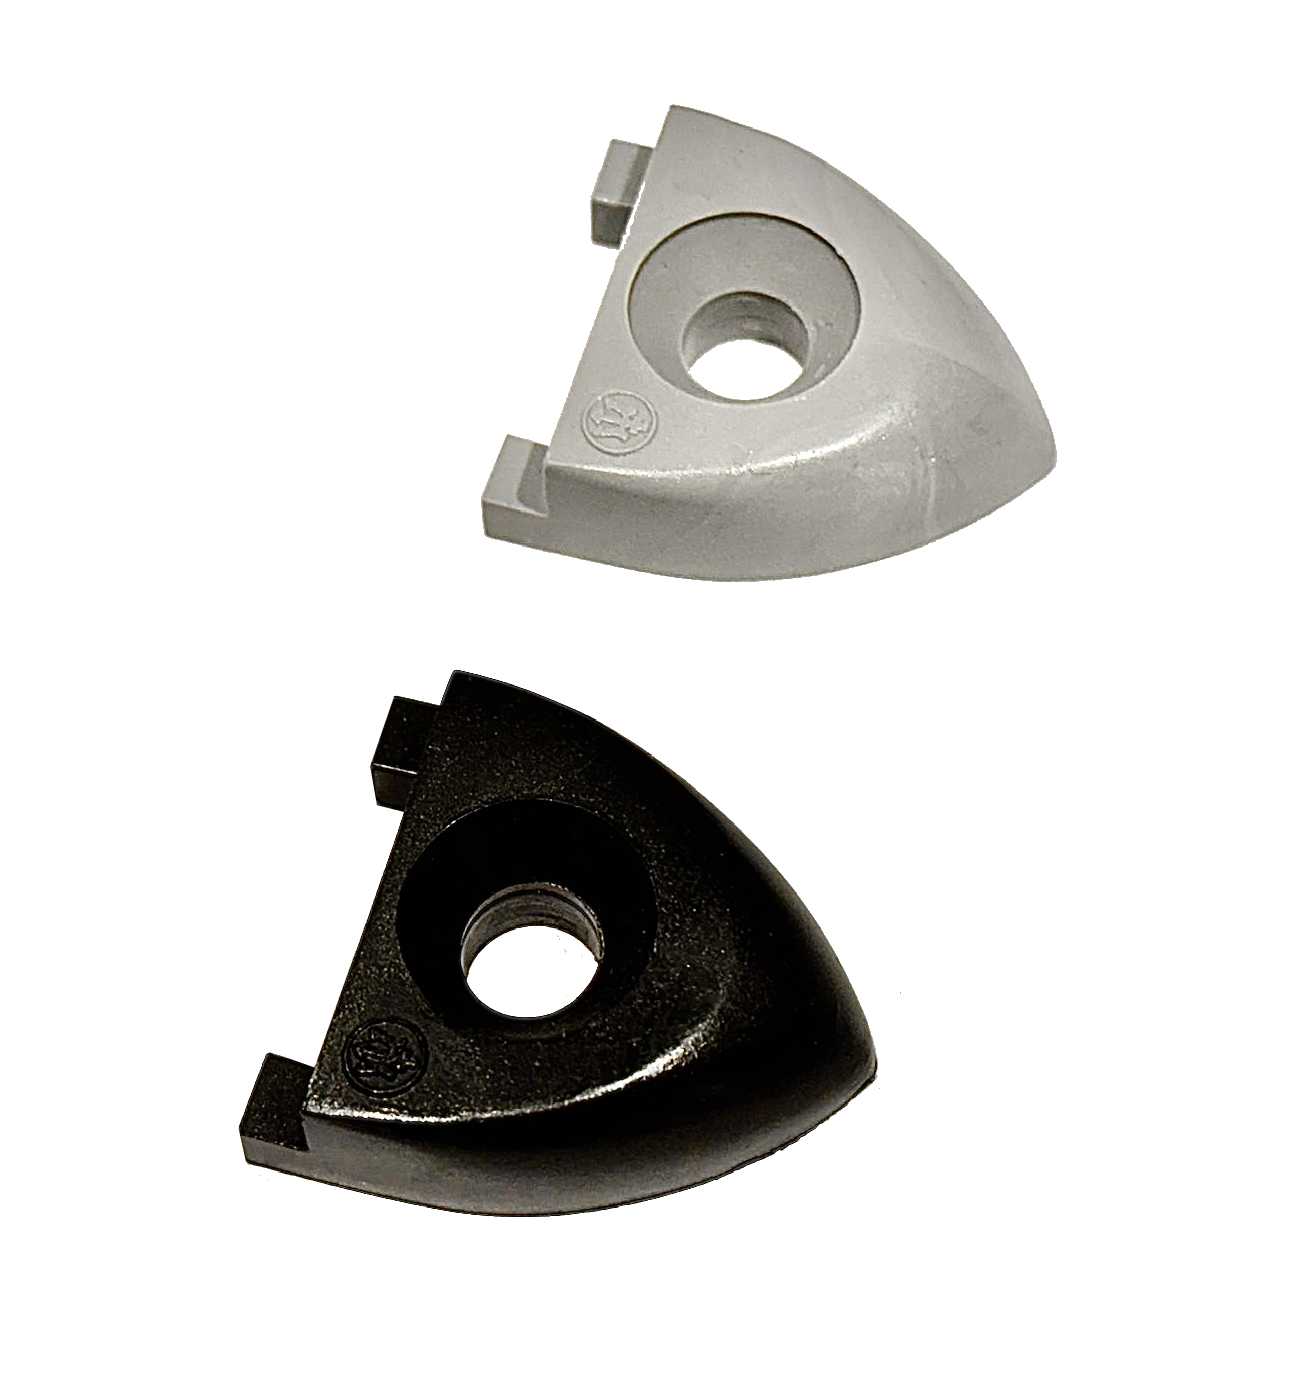
#2814 1" & 1.25" T Track End Stops
1" and 1¼” End Stops are made of Delrin and are available in both Black and Grey. End Caps finish off a track installation and prevent cars from sliding off the track, and fair the end of the track to help prevent line fouling.
- Fasteners: 1/4"- 5/16" Flat Head
- Hole Spacing: -
- Alloy: Delrin Plastic
- Weight: .50 oz
- Finish: Black or Grey
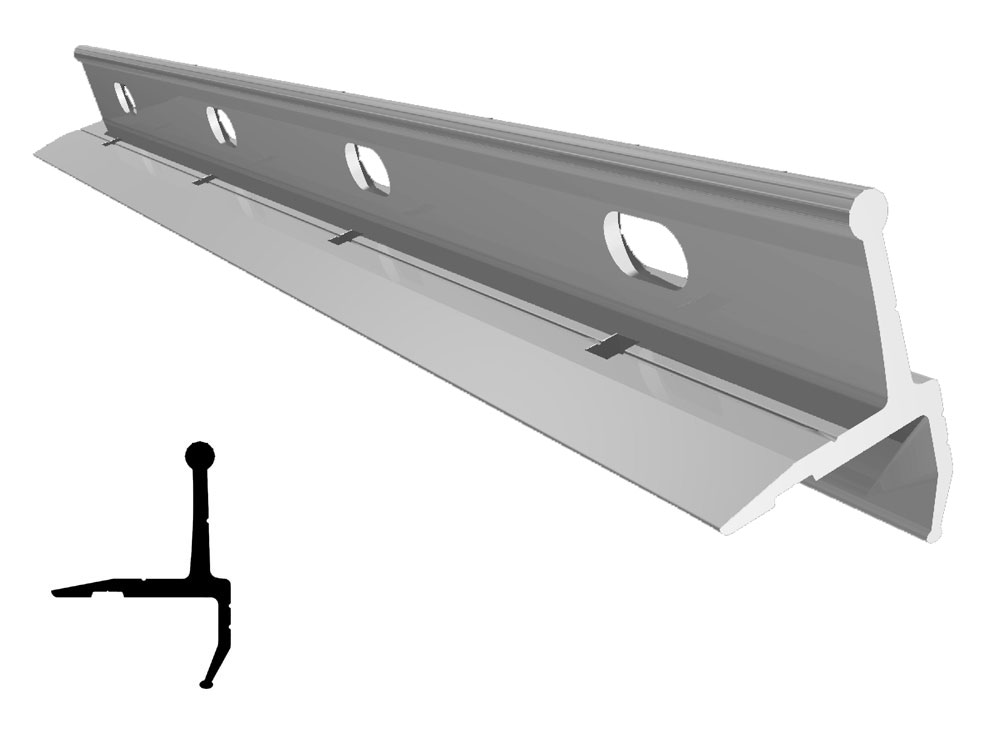
#2837 Tartan 41 Slotted Toe Rail
New-Old Product. A Brand New die to produce the same toe rail used on many older big boats such as the T-41 and others. An exact replacement for the Tartan 41’s produced in the 70s-80’s. .440” Square Mounting holes are spaced 5.0” on center and are .75” OC in from outboard end. Rail has .875” x 2.00” oval slots with a .4375 radius also on 5.0” centers. This is a big rail and measures just over 2” in height from the deck. Black Hard Coat Anodized provides a long- lasting finish.
- Fasteners: .44" Carriage Bolt
- Hole Spacing: 5" O.C.
- Slots: .875 x 2.00" .437" radius
- Length: 20'-0"
- Weight: 28.04 lbs/pc
- Finish: Black Hard Coat Anodize
#2818HC-20 Old Style C&C Aft Toe Rail
An exact replacement for most of the Canadian built C & C's of the 70's and 80's Mounting holes are spaced 4.0” on center. Rail has 6.75” x 1.57” oval slots on 3.50” centers. Lengths are all 20'-0" as per the original design. Black Hard Coat Anodized provides a long- lasting finish.
- Fasteners: .310" Flat Head
- Slots: 3.50" O.C.
- Weight: 14.84 lbs/pc
#2818HC-155 Old Style C&C Fwd Toe Rail
Exactly the same as 2818HC Aft rail with the exception of the slot spacing which is 10½" on center and the lengths are 15'-6" as per the original design.
- Slots: 10.50" O.C.
- Length: 15'-6"
- Weight: 11.50 lbs/pc
#2819CL-24 Hunter Marine Toe Rail
This is a direct replacement for many of the Hunter Marine toerails found on boats produced during the 80's. Available in 24'-0" lengths only at the present time. Hole spacing is 6" on center.
- Hole Spacing: 6" O.C.
- Weight: 27.15 lbs/pc
- Finish: Clear Anodize
#2820CL-24 Hunter Marine "Legend Series" Toe Rail
This is a direct replacement for many of the Hunter Marine Legend Series toe rails found on boats produced during the 80's. Available in 24'-0" lengths only at the present time. Hole spacing is 6" on center.
- Fasteners: ¼" Round Square Neck Bolt
- Slots: 6" O.C.
- Weight: 27.6 lbs/pc

#2821HC-24 Hunter 37 Slotted Toe Rail
Another exact replacement for the earlier Hunter Sailboats. This toe rail was standard on the Hunter 37 and others built during the 70’s and early 80's. Available in 24'-0" lengths with mounting hole spacing 6" on center, and 1.25” x .625” slots on 6” centers.
- Weight: 28.36 lbs/pc
#2816HC-28 Olson 30/ Olson 911 Toe Rail
This is another exact replacement for toe rail used on the George Olson designed Olson 25, 29, 30, 911’s and the Santa Cruz 27. In keeping with the boat’s ultra-light design, this is an extremely light weight rail with 3/8” x 1¼” slots spaced on 2” centers. Unlike the original slots, which were punched out and rough, all of our slots are milled with a smooth radius at the edges to prevent chafe. Just as the original; mounting holes are not pre-drilled, allowing an exact match to existing holes on the boat, or off-setting the holes and starting fresh. A small groove located along the top inboard area serves as a “locator” when drilling into the section.
- Fasteners: N/A
- Hole Spacing: None
- Slots: 2" O.C.
- Length: 28'-4"
- Weight: 13.0 lbs/pc
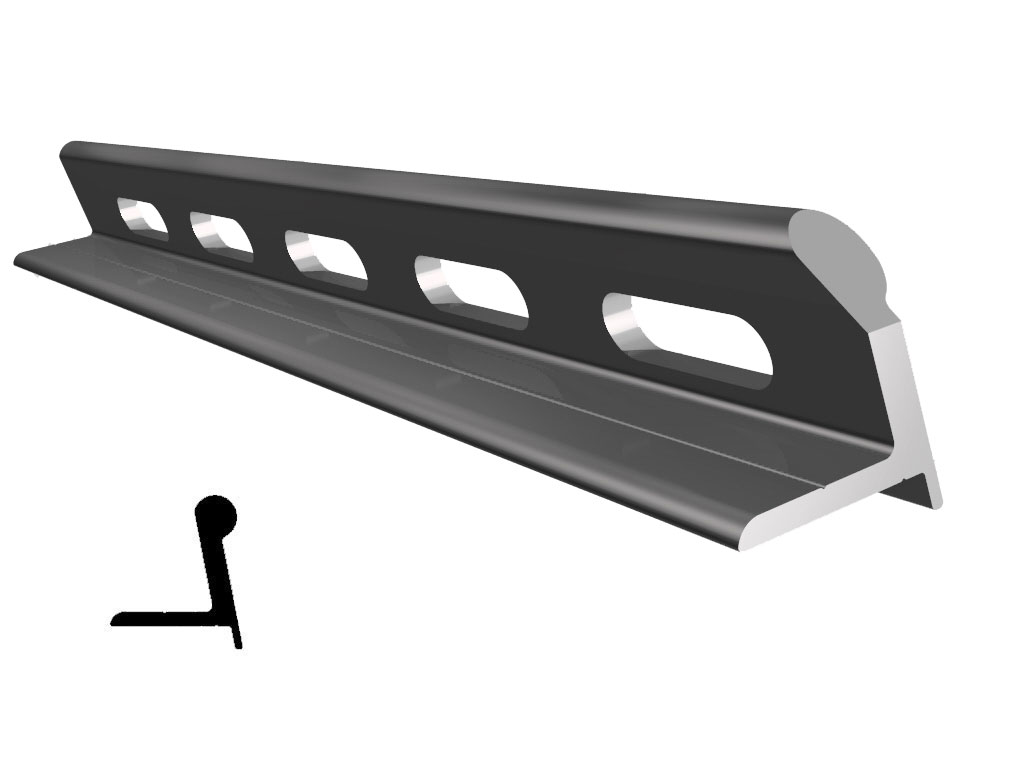
#2822HC-24 Cape North Slotted Toe Rail
Exact replacement for toe rail installed on the Ted Brewer designed Cape North 43’s built in the 1970’s and other yachts from that time period. This rail is designed for a deck camber of approx 10° and measures 2½” above the deck. This is a heavy toe rail with .250” vertical wall thickness and a .515” “bulb” at the top.
- Fasteners: 5/16" Flat Head
- Hole Spacing: 3" O.C.
- Slots: 5" O.C.
- Weight: 36.0 lbs/pc
- Finish: Class I Black Hardcoat Anodize
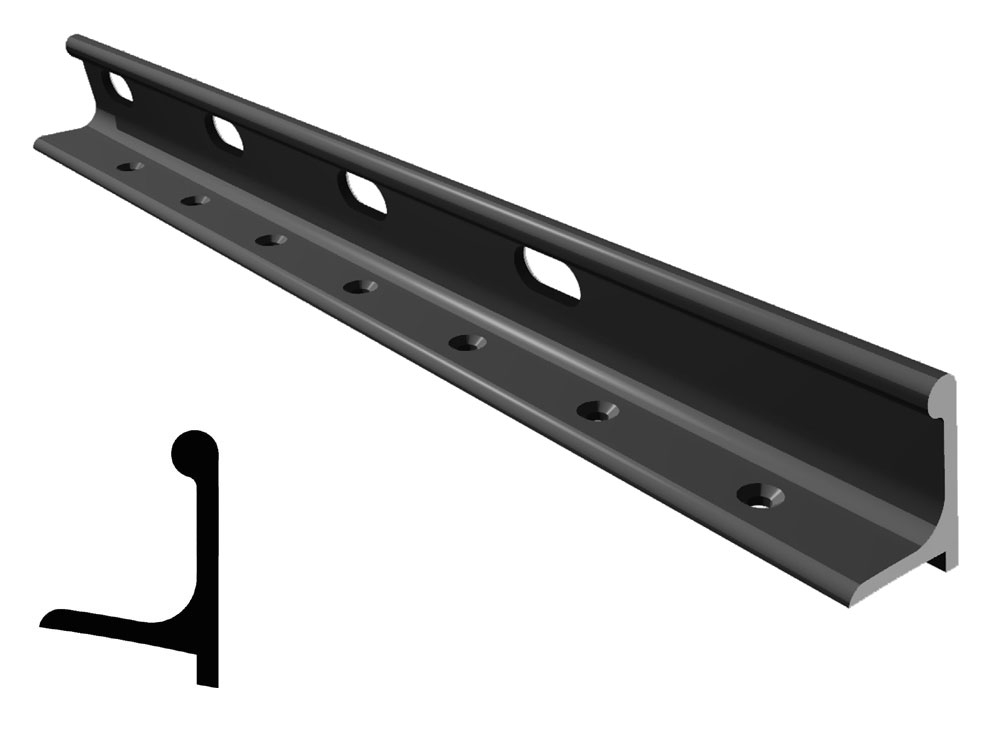
#2823CL-19 Wauquiez Pretorien 35
An exact replacement for toe rail installed on the Wauquiez Pretorien line of sailboats. This rail is designed with a 2.519” concave radius under the base and measures 2.122” above the deck, but has no outer flange as many of the other toe rails do. This is also a heavy toe rail with .229” vertical wall thickness and a substantial “bulb” at the top. Available in Clear Anodize Finish only.
- Hole Spacing: 112mm O.C.
- Slots: 4.409" O.C.
- Length: 6m
- Weight: 30 lbs/pc
- Finish: 60 Min Velo Clear Anodize
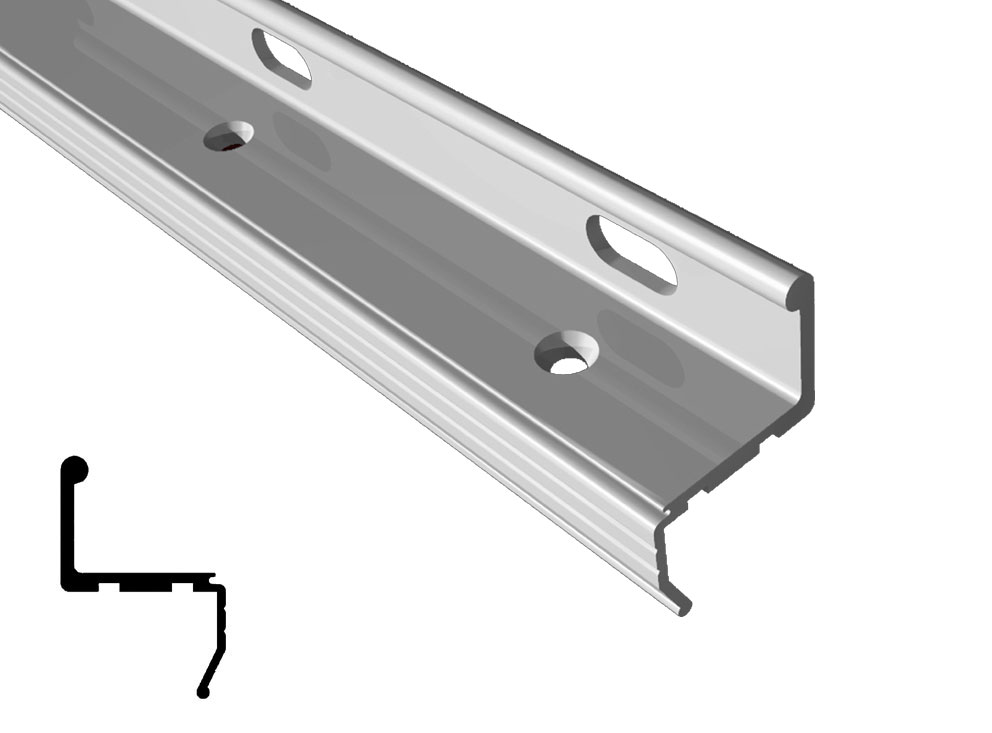
#2828CL-24 O'Day 40 Toe Rail
An exact replacement for the combination toe rail/ rub rail installed on the O'Day 40 as well as the O'Day 39. The toe rail features a base that is 1.55" wide with a vertical leg measuring 1.367" above the deck. Slots are spaced 7.875" on center with mounting holes spaced 3.9375" on center. The outside flange overlaps the hull .606" and mates with the lower rub rail portion. The lower rub rail measures 1.77" in overall height and is not pre-drilled allowing for an exact match to existing holes or allowing you to offset existing holes and start fresh. This toe rail is available in clear anodize only.
- Hole Spacing: 3.9375" O.C.
- Slots: 7.892" O.C.
- Weight: 17.68 lbs/pc
- Finish: 30 Min Velo Clear Anodize
#2829CL-30 Bavaria 51 Toe Rail
An exact replacement for toe rail installed on the Bavaria 51 line of sailboats. Available in 29'-6" lengths with mounting hole spacing 2.905" on center, and 2.43” x .786” slots on 11.62” centers.
- Hole Spacing: 2.905" O.C.
- Slots: 11.62" O.C.
- Length: 29'-6"
- Weight: 31.92 lbs/pc

INTEGRITY MARINE CORPORATION
REPRESENTING BARBOUR PLASTICS - OEM RUB RAIL MANUFACTURER SINCE 1983
BOAT TOE & SPRAY RAILS
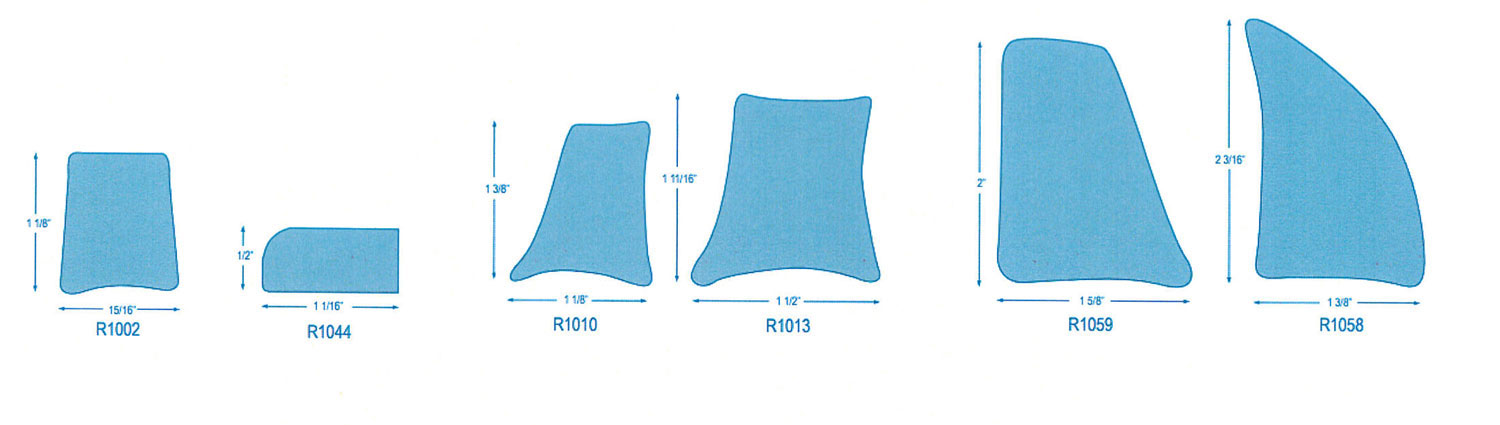
Toe Rail Sailboat and boat spray rails are most often used on commercial boats and are produced in a rigid material. Toe Rails are installed on the deck of the boat adjacent to the rub rail. Spray rails for boats are mounted on the side of the hull to not only keep the boat dry but also can act as a lifting strake in promoting quicker planing and fuel savings.
These products must ship via truck . Prices below are listed per foot.
For further help identifying your profile, view or print our catalog for true-to-size dimensions.
Here you can compare a piece of your rub rail to our life size image.

R1002 Rigid Toe Rail
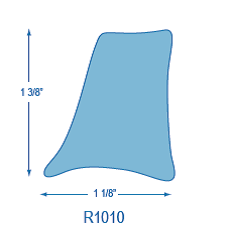
R1010 Rigid Toe Rail

R1013 Rigid Toe Rail

R1058 Rigid Spray Rail

R1059 Rigid Spray Rail
Description for Third Slide, this is Third Slide.
Third Slide Title
Toe rails and spray rails.
CONTACT US TODAY
Made to cover the joint between the deck and the hull, Goiot Systems toe rails are suitable for the steel and wood constructions. Suppleness of the rails permits to bend them during the installation, without any aditional machining.
- Colourless anodized aluminium
- Supplied in length of 6 m, with 6.5 mm diameter mouting holes every 112.5 mm
CAUTION – THE WHOLE TOE RAILS RANGE WILL BE DISCONTINUED AFTER STOCK FLOW

- Sails & Canvas
- Hull & Structure
- Maintenance
- Sailing Stories
- Sailing Tips
- Boat Reviews
- Book Reviews
- Boats for Sale
- Post a Boat for Sale
- The Dogwatch
- Subscriptions
- Back Issues
- Article Collections
- Free for Sailors
Select Page
A New Toe Rail For an Old Warhorse
Posted by Hugh Owens | Hull & Structure , Projects

Beefing up a retired racer with aluminum
My mate, Karlene, and I looked long and hard for a sailboat suitable for world cruising that we could afford. I’ve become convinced that boat speed is an important component of voyaging safety, so a major goal in our search was to find a good old fast boat! In Tampa, Fla., we found a neglected Cal 48 yawl.
This boat had been raced hard and put away wet for too many years, and Karlene and I had our doubts as we motored out into Tampa Bay for our sea trials. We hoisted the baggy, tattered, but fully battened, main in a warm, 13-knot breeze, and off she skipped at 7 knots. We unfurled the jib and were stunned as she heeled gently and roared off at more than 9 knots. What fun! Concealing our excitement, we made an appropriate offer that eventually was accepted. In time, our Cal 48, renamed Koho, landed in Pocatello, Idaho, where we started the refit.
If you examine enough old classic plastic, you will find recurrent flaws and problems that span a range of manufacturers. Our Cal 48 was no different. She was plagued with stanchion and hull-to-deck leaks, as well as untabbed and broken bulkheads, which are especially prevalent in older racers like Koho. Nevertheless, we felt that our time and money would be better spent restoring a swift, old, racing sailboat than a slower, more traditional, cruiser. We hoped the payoff would be in sparkling noon-to-noon runs. The refit of Koho has been total, but I’d like to focus on the structural solutions changes that we made to the toerail and hull-to-deck joint.
Sealed holes
We stripped every piece of hardware off the hull and deck and sealed all the holes with epoxy. Nevertheless, steady rains revealed persistent leaks from one end of the boat to the other that were coming from the toerail. Our toerail was an attractive piece of teak, 1 1/4 inches by 2 1/2 inches, laid on edge and secured every 4 to 6 inches with 5/16-inch stainless steel machine screws covered with teak bungs. The teak toerail also covered the hull-to-deck lap joint. A first-generation mystery sealant bedded the joint.
Near the cockpit, a genoa track was bolted to the top of the toerail and secured by nuts and washers below deck. Under the genoa track, virtually every bolt leaked because of the substantial loads on the track from the huge sail. Reluctantly we took the Sawzall to our beautiful toerail. We made attempts to save the 4-inch stainless steel bolts, but most of them were severely corroded in the anoxic environment of the leaky toerail. We then lifted the deck off the hull, using dozens of wedges. Most of the bulkheads released the deck with minimal fuss.
Once the joint was free and the deck was lifted up a few inches, we could clean and blow out the gap and apply 3M 5200 marine adhesive sealant, rebolt the hull to the deck, and reattach the bulkheads with multiple layers of biaxial cloth and epoxy resin on both sides of the bulkhead. Critical, highly stressed bulkheads – such as the main bulkhead near the cap shrouds and the ones under the lowers – were given additional layers of fiberglass and epoxy.

Some of the brackets used
Overkill, perhaps
On the main bulkhead, a laminated deckbeam was epoxied and bolted to the upper face of the bulkhead and epoxied to the underside of the deck. Stainless steel carriage bolts from the top of the deck were then fastened through this laminated beam. Strong? You betcha! Overkill? Perhaps, but I used this technique on a 39-foot boat I built some years ago. During a bad blow that boat was thrown sideways off a large wave and landed with a shattering crash on her port side and sustained no structural damage. The only downside to this technique is the time it takes.

Clamping up prior to final mounting
The critical bulkheads also received additional aluminum angle reinforcement where they contacted the hull/deck joint, and bolts with backing plates and/or washers were placed around the perimeter of the bulkhead to mechanically reinforce the joint.
We next turned our attention to strengthening and sealing the hull-to-deck joint. The upper hull and decks on these Cals are thinly constructed, in keeping with their racing heritage. We concluded that the only feasible fix was to fiberglass the joint from the outside. To do this, the watertight but rough-appearing hull/deck joint was faired with filled epoxy and sanded, then multiple overlapping layers of biaxial cloth and mat were laid over the hull and deck joint to a thickness of nearly a quarter-inch. More fairing, compounding, and sanding was done to ease the transition between old and new glass.
Prohibitive cost
The next task was to design and build a new toerail. We looked at many options. Commercial aluminum toerail was feasible but the cost was prohibitive and what about all those holes every few inches in our now watertight deck? Hal and Margaret Roth, on Whisper, used a clever method detailed in their book After 50,000 Miles. They brazed Everdur (silicon bronze) plates to the outside of the stanchion bases and then attached a 1-inch by 4-inch teak toerail outside the stanchions to the Everdur plates. They raised the teak 3/4 inch off the deck for water drainage. This seemed like a good idea. Reapplying a wood toerail or bulwark remained an option, but I wanted to avoid the leaks and maintenance associated with wood.
Years ago I worked on commercial salmon boats in Alaska. I remembered how the aluminum gillnetters used 1/2-inch by 2-inch flat bar stock as a toerail. It was welded edge-up to an angle extrusion at the deck edge to stiffen that vulnerable area from impacts with tenders and rough docks. I have long believed that aluminum is the best material for cruising boats, but we were unable to find a suitable aluminum boat that we could afford, and I began to wonder if aluminum and fiberglass could be married during Koho’s refit, thereby gaining the advantages of both materials.
We considered having aluminum angle bent to match the outside curve of our hull and deck. We had different angle extrusions bent at a local fabrication shop, but the differing and constantly changing angles of the hull and deck made this idea unworkable. We rejected welding as well.

Screwed and bolted
Eventually we settled on overlapping flat bar stock screwed and bolted together. In some areas, the aluminum was prepped and epoxied together, but the bulk of the construction used 3M 5200, 1/4-inch screws, and stainless steel bolts attaching the plates to each other and to the hull. The most useful and crucial part of the design is the 1/2-inch by 2-inch flat bar stock that becomes the toerail. The sections are 12 feet long with 1/8-inch gaps on the ends for expansion in the severe climatic changes we experience in the Rockies. The toerail is stiffened at the joints where these flat bar sections meet with brackets made from 1/4-inch aluminum angle, bandsawed and sanded to a pleasing shape, and bolted to the toerail and deck using oversized holes.
Holes are drilled in this flatbar in key areas in a manner similar to the commercially available perforated aluminum toerail. The toerail is supported at about 3-foot intervals by the support brackets. Every other support bracket has a stanchion base. Bolts fasten through the stanchion base, toerail bracket, and the deck to aluminum backing plates beneath. Once bolted or tapped and fastened together with machine screws and 5200, the whole assembly is astonishingly stiff and robust.
After installing the toerail, we attached a 1/4-inch by 4-inch aluminum plate to the hull so that it fit directly under the toerail and in contact with it. This served to cover the fiberglass overlap and strengthen the joint. We called this piece the “hull plate.”
Rigid structure
A final 1/4-inch by 2-inch flat plate was tapped and screwed to the toerail above and the 1/4-inch by 4-inch hull plate below. This effectively joined the toerail to the hull plate, making a very rigid structure that could not have been cold formed in place if it had been a single piece.
A 3/4-inch by 2-inch section of white UHMW (ultra-high molecular weight) polyethylene was fastened with flat-head machine screws into tapped holes in this bar to form a rubbing strake.
Tapping the aluminum allows replacement or repair of the UHMW in the future. I considered wood, aluminum, and PVC. We felt that UHMW offered a durable material that was a more friendly surface against the tender topsides of fellow yachties. I have high regard for UHMW. I’ve used it wherever friction needs to be reduced. For example, I lined a chute with UHMW to feed our anchor chain into the chain locker. The anchor chain glides into the locker as if sliding on Teflon. We also used it in front of our deck cleats in lieu of deck chocks to reduce chafe on the lines.
The aluminum bar stock and extruded angles that I used were alloy 6061, which is the normally available alloy for extrusions. This 6061 is commonly used in aluminum yacht and workboat construction, but it is best used in above-water applications. It has less corrosion resistance than the true saltwater alloys such as the 5000 series. We plan to paint the aluminum for the sake of an improved appearance.

Plastic spacers
We took great care to make sure no copper containing alloys came in contact with the aluminum. Our stanchion bases are made of either bronze or 316 stainless steel. They were made locally and they have a thin plastic (UHMW) spacer isolating the stanchion bases from the aluminum bracket beneath. The aluminum was painted with epoxy and linear polyurethane paint, and while that is probably sufficient isolation from stainless, it’s not that much more work to put in a little polyethylene spacer. We attached the genoa track to a 2-inch by 2-inch by 1/4-inch length of aluminum angle bolted to the inside of our aluminum toerail. This tactic alone saved almost 100 holes through the deck. The aluminum angle was bent using a plywood template by a local steel shop to conform exactly to the curvature of the deck. The track angle is braced additionally every 4 feet with aluminum angle bolted to the deck and glued with 5200. The finished track seems sturdy and superior to what it replaced.
In our most heavily loaded bulkheads I placed the toerail aluminum angle brackets over the interior structural bulkheads. Additional aluminum angle pieces were bolted to the bulkheads and fastened to the angle toerail brackets above to tie all these components together. The oversized deck cleats were bolted over the bulkheads to the aluminum angles below. This is considerably stronger than just using conventional backing plates.
The majority of vessels I’d examined weren’t husky enough to cope with the boisterous high-latitude offshore sailing conditions we expect Koho to encounter. I think that aluminum construction is superior to all other boatbuilding methods if you want to wed lightness and strength. My concept during this refit was to use this superb material to strengthen and stiffen an older fiberglass sailboat, utilizing one of the most abundant elements in the earth’s crust.
Article from Good Old Boat magazine, May/June 2001.
About The Author

Hugh, an anesthesiologist in Idaho, is completing a total refit of Koho, a 1966 Cal 48. He and his wife, Karlene, formerly lived and sailed in Alaska on their 40-foot home-built sailboat, Endurance. They are preparing Koho for a voyage to Antarctica and New Zealand.
Related Posts

The Case for Bondo
May 10, 2023

Dodger Repair with “Git”-Rot
January 15, 2022
A New Stern Tube
January 1, 2003

Cockpit Umbrella
September 15, 2020
Now on Newsstands
Join Our Mailing List
Get the best sailing news, boat project how-tos and more delivered to your inbox.
You have Successfully Subscribed!
- MarketPlace
- Digital Archives
- Order A Copy
Voyage prep. replacing deck fixtures
Whenever you own a yacht, compromise becomes an essential element in any long-term upgrade plan. Balancing aesthetics, ease of maintenance, strength and offshore readiness is part science, part personal preference and part emotion. Such was the case when making two modifications to my 22-year-old Pearson 40.
Teak is beautiful. No one will argue with that. There is nothing quite as breathtaking as teak trim with eight perfectly applied coats of gloss spar varnish reflecting the sun from its mirror-like finish. With that beauty comes compromise, since varnished teak also requires a significant investment in time. My desire to sail more and varnish less led me to consider the possibility of replacing my original teak toe rails with perforated aluminum toe rails, and to replace the original teak handrails with stainless. After seeing several boats outfitted this way at a boat show, I decided it was time to trade in my teak.
In addition to the prospect of reduced maintenance, installing new toe rails and handrails gave me the opportunity to fix a number of annoying leaks that had developed over the years. A quick discussion with my local naval architect, Jack Corey at JSI, added a third positive dimension to the decision. Jack explained that bolting a proper aluminum toe rail at the hull-to-deck joint was akin to attaching an I-beam to the joint, providing significant strengthening to the hull. Attaching welded stainless handrails to the deck, just aft of the mast, would have a similar strengthening effect on the deck. On top of that, older wooden handrails are notoriously weak, particularly after sitting in the sun for many years and from the normal erosion of material due to cleaning and sanding. Replacing the handrails would provide the additional benefit of strong and safe grab-rails for the crew on deck.
New toe rail
The hull-to-deck joint on the Pearson 40 is typical of production boats from that era. There is an inward-facing flange on the hull, with the deck sitting on and overlapping the hull flange. Sheet-metal screws hold the deck and hull together, and there is bonding/sealing filler between the two. A teak cap rail that is bolted and/or screwed down covers the joint.
To replace the teak rail, I selected an aluminum extrusion manufactured by Goiot in France, and distributed in the United States by Welmax Marine. I selected the Goiot toe rails for their looks, quality and because they offer a complete integrated system with rails, cast ends and midships chocks, allowing for a custom, professional look.
The toe-rail replacement process was quite simple:
Removing the old toe rail
The first step is to get access to as much of the underside of the rail as possible. Removing significant portions of the interior trim turned out to be the most time-consuming part of our project, but it is essential to the success of the effort. Once you have unfettered access to the underside of the rail, remove the old toe rail by removing any screws and/or bolts holding the teak rail down. Once the screws and bolts are removed, the teak rail should pop off.
Clean and seal the joint
Underneath the old toe rail will be a layer of bedding compound, dirt, salt and varnish. This can be removed with a putty knife, fiberglass-safe paint and varnish remover. Once cleaned, the entire hull-to-deck joint is exposed. At this point, you have the opportunity to permanently seal the joint if you choose. By placing a fillet of thickened epoxy along the ridge where the deck overlaps the hull and then covering the fillet with a layer of epoxy-soaked fiberglass tape, the hull-to-deck joint can be made watertight. This may be overkill, but you can be sure that the hull-to-deck joint will never leak. Considering the overall effort to install new toe rails, the extra four or five hours it takes to do the glass work here is well worth the investment in my mind. Once this process is complete, the finished joint should be inspected for any lumps or protrusions, which might prevent the new rail from sitting flush. A small grinder or Dremel tool will quickly level them.
Dry-fitting the new toe rails
This task requires no special skills other than patience and care. The key is to completely dry-fit the entire toe-rail system, using only bolts. No bedding compound or epoxy at this point. Once the dry-fit is complete, the toe-rail system is removed and then reinstalled with bedding compound and epoxy.
The rail extrusions are approximately 20 feet long. This length requires a joint approximately at midships. The standard Goiot-cast mid-ships chock makes for a smooth and professional joint. Once the position of the chock is determined, bolt it in place. This becomes the starting point for both the forward and aft sections of the rail. The opposite end of the rail must be temporarily suspended over the side as you start the bending process.
Starting at the chock, bend each rail section progressively to conform to the curve of the hull as you work toward the other end, installing a bolt and nut in each hole as you go. Exercise great care in areas where there is a severe curve to the rail, particularly at the midships chock. This is where aesthetics takes over. “Sighting” the shape of the curve from above is essential so that the bend in the finished rail installation is smooth with no kinks or angles. Continue the bolting-bending steps until you reach the end of the hull. Cut the extrusion to fit; add an end fitting; and you are ready to do the same series of steps on the other three pieces of rail extrusion. Once all four sections of rail are completed, remove the bolts, fittings and extrusions, and mark them so that they can be reinstalled in the same locations.
Final fitting and installation
Once all the new parts are removed, both the joint area to be covered by the new rail and all of the aluminum parts must be cleaned. Isopropyl alcohol is an excellent, fast-drying, environmentally friendly solvent for this. Once cleaned, final installation of the first section of the new rail can begin. Have three people for this task, two doing the installation and one doing cleanup. All necessary tools should be set out on deck along with the bolts, washers and nuts to be used during the installation. Once any section is started, it must be completed quickly before the bedding compound or epoxy begins to set up.
The first step is to mount the midships chock permanently using bedding compound. The bolts can be set in bedding compound or thickened epoxy. My personal preference for sealing through-deck bolts is a product called Superbond Epoxy Adhesive from Fiberglass Coatings in St. Petersburg, Fla. (www.fgci.com). The installation of all toe-rail sections starts at the midships chock and then works aft or forward. The selected rail is turned upside down and bedding compound is applied to the bottom of the entire rail section. It is best to use two beads of bedding, one inboard and one outboard. Once the bedding compound is applied, the rail is turned right-side up. The end that is away from the starting point at the chock is hung on its temporary support. Starting with the first bolt next to the chock, bed and tighten the bolts progressively along the rail, one at a time, until you reach the end. Once the track is finished, bed and bolt down the end fitting. When the cleanup is completed, that section is finished, and the same process can be repeated for the other three sections.
In my case, the entire process took a total of about 80 person-hours (two people over two full weekends) and cost less than $2,000. The work is technically fairly simple, but the physical effort to perform those simple tasks can be quite taxing. In particular, the effort required to contort your body and reach into the recesses under the rail for attaching nuts and washers can test your relationship with your crew. Youth and flexibility are real benefits, as are long arms. Manual dexterity is challenged when you are reaching up behind a bulkhead, attempting to get a nut and washer on a bolt that you can only feel and not see. Still, this is one of the most rewarding projects I have ever done on a boat. It dramatically reduced maintenance. The new toe rail makes the boat look far more modern. The hull-to-deck joint is 100 percent waterproof and to that I can determine, the boat is significantly stiffer structurally.
Installing new handrails
Replacing the old teak handrails with stainless-steel rails turned out to be a relatively simple and quick project. We started by removing the fasteners below the bungs (plugs) on top of the rails. Once removed, I took the original rails to a local marine stainless fabricator who built replacement rails that aligned the new rail fasteners with the originals, allowing me to use the existing holes in the deck. The only modification required was a new way to attach the handrails to the deck. The original handrails were fastened from above, with the fasteners passing through the handrail from below. The new stainless handrails were built with 5/16-inch studs welded to the bottom of each leg. These protruded through the cabin ceiling, allowing for nuts and backing plates to be installed. Partial removal of the headliner was required to access the studs and install the nuts and backing plates. Once this was accomplished, the handrail legs were set in epoxy and the fasteners tightened. The new handrails are watertight and extremely strong. Once again, maintenance time is reduced.
Was the toe-rail and handrail refit worth the time and effort? Without a doubt! The boat is stronger, drier, safer and easier to maintain. As much as I love teak, I must say that in today’s time-restricted lifestyle, I prefer stainless and aluminum.
Chip Lawson currently lives in Melbourne, Fla., and keeps his Pearson 40 on the Atlantic Intracoastal Waterway. His sailing experience has included sailmaking, boatbuilding, professional crew and rigger. He is the head of the Pearson 40 Owners Association (www.pearson40.org).

By Ocean Navigator

- Forum Listing
- Marketplace
- Advanced Search
- About The Boat
- Gear & Maintenance
- SailNet is a forum community dedicated to Sailing enthusiasts. Come join the discussion about sailing, modifications, classifieds, troubleshooting, repairs, reviews, maintenance, and more!
Repair or Replace Aluminum Toe Rail
- Add to quote
The toe rail of my Aphrodite 34 was damaged during Hurricane Irene. Toe rail is single piece of aluminum on each side. I have searched for a matching rail everywhere and can't find one. One option is replacing the rails on both sides - a major expense that I am considering. Another option is simply bending the rail back. While the rail will remain scuffed and scarred, I might be willing to live with it. Does anyone have a suggestion on how to bend the rail? I am attaching a picture of the damage. I would appreciate any other suggestions. Thanks.
Attachments

Use an adjustable wrench and brute force. The torail is already damaged. If you insert a piece of thick cloth between the wrench and the rail,you will overcome further damage.

Bake81 said: The toe rail of my Aphrodite 34 was damaged during Hurricane Irene. Toe rail is single piece of aluminum on each side. I have searched for a matching rail everywhere and can't find one. One option is replacing the rails on both sides - a major expense that I am considering. Another option is simply bending the rail back. While the rail will remain scuffed and scarred, I might be willing to live with it. Does anyone have a suggestion on how to bend the rail? I am attaching a picture of the damage. I would appreciate any other suggestions. Thanks. Click to expand...
You can try to 'C' clamp ~3/8" plywood strips on each side of the rail and use a pipe wrench tightened over the plywood to encourage the rail back into shape.

Or you can use two pair of "linesman" pliers and bend it a little at a time. However you do it, I'd definitely say repair vs. the cost in time and material to replace. From the picture, doesn't look "that" bad.
I strongly disagree with this option. Linesmans pliers have "teeth" that will mar aluminium and are not nearly long enough to get the leverage you require - holy rail is strong stuff, much harder than the aluminium most people are used to. The first time I installed it, hacksawing through it was not a lot easier than steel. You need the biggest, or rather, the longest Crescent wrenches you can find, cover the jaws thickly with tape and "nibble" your way along - one behind the area you want to bend to keep the bending stress localized and one on the area to be bent. Remember, you want to TWIST the rail. Putting a thin strip of something on the outside to fill in the area under the rolled lip will help to keep everything aligned. If the wrenches don't give you enough leverage to twist the rail, try using long pipe clamps - you can get as much leverage as you want that way. Do everything the same as with the wrenches - just tighten the (padded) jaws on the area you want to work and pull on the end of the pipe while a helper watches the work area closely so you don't over bend it. I can see one crease alongside the turning block - the only possible way I know to get that out is to hammer and dolly it like an auto body - you'll need a heavy hammer though.

What if you cut out the damaged piece and took it to a machine shop to have a new piece milled. Even if it was 500 it would be a cheep repair.
Or how about removing rail from both sides a few feet back and replacing with something very different. That way it would look like an upgrade.
How "perfect" do you want your boat to be and how much are you willing to spend to get there? - that is the question.
Well, the "proper" way to repair it is either to cut a section out and splice in a new one, welding the joints and drilling/machining to match the pattern. That might not be impossible even if the rail is no longer made, because sometimes you can steal a few feet from one end (and match the other side) or sometimes you can have a machine shop slice off three (six?)feet of aluminum angle iron, and match it up. Onceuponatime this was something any village blacksmith could do everyday. These days--you can also do some of it online with CAD/CAM tools. Take a look at CNC Machine Shop | Custom Waterjet, Plasma, Laser Cutting | eMachineShop.com for one place that will give you free CAD software, let you work out the plans, and then they'll machine the stock for you. If your local machine shop wants big rent money to do work... There are online resources. Of course if you've got a generous insurer or the damage in someone else's problem, you just say "Pull both rails and replace with something very similar" and that's REALLY the right way to do it, if you can't fabricate in a new piece. Old boat? Beater? Lots of wrinkles? OK, then you just bang it back into shape as best you can. Body shops used to repair Rolls Royce the same way, a good tinsmith can work that metal back to damn near new. In fact, if you go to a local auto body shop with some photos, you might be able to get a pro to come do the work on his own time. They have an array of special hammers, anvils, wheels, designed to reshape the metal without distorting it. Getting rid of the distortions, or preventing them, takes skill and practice. The main thing is, "make haste slowly". Check out your options, you may find pleasant surprises.
Worst case? Extruded aluminum can be annealed with an acetylene torch Coat the damaged area with carbon smoke,adjust flame to neutral and gently heat until the black burns off. Don't get the flame too close and don't overheat.Big gentle flame. It melts easily when hotter than burnoff temp with no warning. Let cool. It will be malleable for a day or so until the copper content reforms its normal crystalline structure Downside --- you have remove the damaged part and you lose the anodize. That can be redone but it's not easy and another story
Not so bad case. Hard to think that 5 foot extension on a big wrench wouldn't have a favorable result. Jaws padded with lead or copper sheet and little bites at a time.

My previous boat was hit while on its mooring by a boat that lost control during a squall. The aluminum toe rail on one side was damaged - much worse than yours. Yard couldn't locate a replacement. Instead they cut and removed the damaged section, straightened it, fill welded the gouges, and had it re-anodized. Still looked good years later when I sold the boat.
Successful toe rail repair Hurricane Ike rolled over my SAGA 43 and damaged the toe rail in a half dozen places. After the agony of finding replacement rail and two weeks replacing one area, there had to be a better way to fix the other places. I did not want to pound or pry the rail back into place because of potential damage to the hull-deck connection. I designed a device that easily pried the flanges back apart, not only for my boat but for other damaged boats on the dock as well. The machine shop that built mine has built them since for other boaters. http://i44.tinypic.com/i1lklj.gif shows a picture. RexMaugans
RexMaugans said: Hurricane Ike rolled over my SAGA 43 and damaged the toe rail in a half dozen places. After the agony of finding replacement rail and two weeks replacing one area, there had to be a better way to fix the other places. I did not want to pound or pry the rail back into place because of potential damage to the hull-deck connection. I designed a device that easily pried the flanges back apart, not only for my boat but for other damaged boats on the dock as well. The machine shop that built mine has built them since for other boaters. http://i44.tinypic.com/i1lklj.gif shows a picture. RexMaugans Click to expand...
My Plan After hours / days of searching the internet for "aluminum toe rail" repair, I found Rex's device in the US Patent office. Was able to track him down and purchased his first production device. The initial result is promising and I will finish straightening the rail in the spring. Will let you know how I make out. Thanks for everyone's advice.
Bake81: Since you are not the mfr of the device you can post the contact information you found without running afoul of the forum rules. Rex may want to take out an add to sell a bunch and support sailnet.
- ?
- 174.1K members
Top Contributors this Month

- Forums New posts Unanswered threads Register Top Posts Email
- What's new New posts New Posts (legacy) Latest activity New media
- Media New media New comments
- Boat Info Downloads Weekly Quiz Topic FAQ 10000boatnames.com
- Classifieds Sell Your Boat Used Gear for Sale
- Parts General Marine Parts Hunter Beneteau Catalina MacGregor Oday
- Help Terms of Use Monday Mail Subscribe Monday Mail Unsubscribe
Painting? anodized aluminum toerail
- Thread starter Bob Tucker
- Start date May 16, 2004
- Hunter Owner Forums
- Smaller Boats
I have recently removed the toe rails on my 1974 H25 in order to rebed them. They got a little beat up in the process of removing the bolts, and so we ground down around the holes. Now I have bare aluminum showing in spots. Is there a product that will match the anodized finish that i can use to touch up? If not, what kind of paint would work? Tried painting all with Interlux Brightside, but it didn't take at all. Bob Tucker Ta
Traveler track anodized Just had my 4ft traveler anodized at local shop. Cost $10. Looks great and holding up well. May do toe rails if I ever get them off, but as an experiment I did spray paint a 6 ft section of toe rail with Krylon exterior matte black paint last year. With just a light hosing after every sail, seems to be holding up well. It's not a long term solution, but it jazzed up the 23 yr old rails. Consider it a duct tape in a can solution. Good luck
- This site uses cookies to help personalise content, tailor your experience and to keep you logged in if you register. By continuing to use this site, you are consenting to our use of cookies. Accept Learn more…
~ Back to Stanchion Bases Main Page ~
~ Back to Hardware Main Page ~
Yachts Guardrails
Yachts stainless wire and guardrail fittings. stanchions gates, deck socket, guardrail cable and more usually out for delivery the same working day, uk only..
Sea Screw Ltd. 4 Churchdale Road Eastbourne East Sussex England BN22 8PS
- Help & History
- Delivery Costs
- Conversion Chart
- Abbreviations Used
- Product Enquiries
- Sale Enquiries
- Terms, Conditions & Refund Policy
©2024 Sea Screw LTD.
IMAGES
VIDEO
COMMENTS
#2837 Tartan 41 Slotted Toe Rail. New-Old Product. A Brand New die to produce the same toe rail used on many older big boats such as the T-41 and others. An exact replacement for the Tartan 41's produced in the 70s-80's. .440" Square Mounting holes are spaced 5.0" on center and are .75" OC in from outboard end.
R1058 Rigid Spray Rail. $11.00. Sales Tax Included. R1059 Rigid Spray Rail. $11.00. Sales Tax Included. Elevate your boat with Toe Rail and Boat Spray Rails at Integrity Marine. Your trusted source for premium aftermarket marine solutions.
Mid-rail Closed Chock: Mer 7403-04CCA: Mid-Toerail Chocks allow Chock placement wherever necessary as well as providing a means of covering Toerail joints. Developed by Cape Dory Yachts for use with Merriman 7400 Toerail, unit is also compatible with some other Toerails. Closed Chock has large 4 3/4" x 1 1/8" opening.
Yachts Aluminium Toe Rail. 2.98 Metres. Made of natural anodized light marine alloy. Made by Osculati. For Technical Drawing. Click More Info or Camera Image. Delivery Mainland UK Only. Not a Regular Stock Item Please Allow 14 - 18 Working Days. (Reference 6241001-3.0M) More Information.
Toe Rails and Spray Rails. OEM BOAT BUILDERS. Contact our Marine Sales department for further profile selections or for a quotation on a specific design: Kathy Foley 508-897-8371 or Michael Casey 508-897-8370. AFTERMARKET CUSTOMERS. If you are a boat repair shop or a boat owner looking to replace rub rails, please click on the retail orders ...
The quicker, tried-and-true approach was to construct a toerail and through-bolt it on top of the joint; on Avocet, the 41-foot-long, 1¼-inch by 4-inch toerail was bent into place and drilled every 12 inches down through the wood, the deck, and the hull shelf before finally being bolted in place. And in that final step—bolting—lay the rub.
Goiot 822 Toerail is a clear anodized, slotted Aluminum Toerail designed for boats 45 feet (13M) and larger. Rectangular slots are 70mm long x 27mm high (2 3/4" x 1 1/16") and 225mm (8 7/8") apart. Track is drilled for 6mm FH screws on 112.5mm (4 7/16") centers, and weighs 1.472 Kg. per meter (.99 lbs. per foot).
Yachts Aluminium Toe Rail. 980mm Yachts Aluminium Toe Rail. 980mm Made of natural anodized light marine alloy. Made by Osculati. For Technical Drawing. Click More Info or Camera Image. Not a Regular Stock Item Please Allow 14 - 18 Working Days (Reference 6241001-1.0M) See all Yachts Aluminium Toe Rail. ...
Guardrail on a boat or Yacht, some inches high located at the outboard edge of the deck to prevent slipping off the deck. ... Designed to cover the deck-to-hull assembly, toe rails can be used for wood or metal contruction. They are aluminium anodised and supplied in 6 metre sections. We recommend not to proceed with additional tooling since ...
Installing aluminum toe rails on a 1968 Alberg 30. We used clear anodized slotted toe rails supplied by Crest Aluminum, item #2807CL. They have holes for 1/4...
Colourless anodized aluminium; Supplied in length of 6 m, with 6.5 mm diameter mouting holes every 112.5 mm . CAUTION - THE WHOLE TOE RAILS RANGE WILL BE DISCONTINUED AFTER STOCK FLOW . TOE RAIL 808. TOE RAIL 811. TOE RAIL 823 . Fairleads Back to deck fitting Stainless steel handrails.
The aluminum bar stock and extruded angles that I used were alloy 6061, which is the normally available alloy for extrusions. This 6061 is commonly used in aluminum yacht and workboat construction, but it is best used in above-water applications. It has less corrosion resistance than the true saltwater alloys such as the 5000 series.
My desire to sail more and varnish less led me to consider the possibility of replacing my original teak toe rails with perforated aluminum toe rails, and to replace the original teak handrails with stainless. ... The new toe rail makes the boat look far more modern. The hull-to-deck joint is 100 percent waterproof and to that I can determine ...
The toe rail of my Aphrodite 34 was damaged during Hurricane Irene. Toe rail is single piece of aluminum on each side. I have searched for a matching rail everywhere and can't find one. One option is replacing the rails on both sides - a major expense that I am considering. Another option is simply bending the rail back.
Screws, when used, were intended only as a temporary hull to deck fastening during assembly. Typically, the hull is flanged inboard for an inch or two, capped with a strip of compressible butyl compound, fitted with a d-shaped vinyl rub rail, more butyl tape, the deck fitted in place, and fastened with screws, another butyl tape applied followed by an extruded aluminum toerail track, and the ...
Yachts Aluminium Toe Rail. 1.48 Metres. Yachts Aluminium Toe Rail. 1.48 Metres. Made of natural anodized light marine alloy. Made by Osculati. For Technical Drawing. Click More Info or Camera Image. Not a Regular Stock Item Please Allow 14 - 18 Working Days (Reference 6241001-1.5M) More Information ...
Of course on my boat it is just welded to the deck but should be possible using angle material and bolting it on. Attached Thumbnails 27-10-2015, 16:04 ... 30-1. The team on the gunwale is toast, like gone. Aluminum toe rail seems like an expensive item to add. Most websites don't even show pricing, I found one place that said $700 for 8' of it
Jan 15, 2012. #12. Toe rails are called that because they do allow crew, sliding overboard, one last chance. The vast majority of toe rails are part of the hull/deck joint which makes them very strong attachment points.
Ed. May 17, 2004. #2. Traveler track anodized. Just had my 4ft traveler anodized at local shop. Cost $10. Looks great and holding up well. May do toe rails if I ever get them off, but as an experiment I did spray paint a 6 ft section of toe rail with Krylon exterior matte black paint last year. With just a light hosing after every sail, seems ...
Special for C&C Yachts. Stanchion Base fits over Toerail and attaches to Deck (through Toerail) with (2) 1/4" FH screws on 2 3/8" centers, a third 1/4" FH screw (included) goes through Stanchion and Toerail.Small lip on outboard side touches deck. Cast aluminum Base is (maximum) 3 1/2" long x 2 5/8" wide with black epoxy finish.
Yachts Aluminium Toe Rail. Yacht Deck Aluminium Toe Rail And 316 Stainless Steel Roller Fairleads & Stanchion Base Sockets. From Italy Delivery can take 6-8 Weeks. Please Try Sample. Yachts Stainless Wire and Guardrail Fittings. Stanchions Gates, Deck Socket, Guardrail Cable and More Usually Out for Delivery the Same Working Day, UK Only.