The Cal 20 is a 20.0ft fractional sloop designed by C. William Lapworth and built in fiberglass by Jensen Marine/Cal Boats between 1961 and 1975.
1945 units have been built..
The Cal 20 is a light sailboat which is a high performer. It is very stable / stiff and has a low righting capability if capsized. It is best suited as a racing boat.


Cal 20 for sale elsewhere on the web:
Main features
Login or register to personnalize this screen.
You will be able to pin external links of your choice.

See how Sailboatlab works in video

We help you build your own hydraulic steering system - Lecomble & Schmitt
Accommodations
Builder data, other photos.

Modal Title
The content of your modal.
Personalize your sailboat data sheet
Great choice! Your favorites are temporarily saved for this session. Sign in to save them permanently, access them on any device, and receive relevant alerts.
- Sailboat Guide
Cal 20 is a 20 ′ 0 ″ / 6.1 m monohull sailboat designed by C. William Lapworth and built by Jensen Marine/Cal Boats and Calgan Marine Ltd. between 1961 and 1975.

Rig and Sails
Auxilary power, accomodations, calculations.
The theoretical maximum speed that a displacement hull can move efficiently through the water is determined by it's waterline length and displacement. It may be unable to reach this speed if the boat is underpowered or heavily loaded, though it may exceed this speed given enough power. Read more.
Classic hull speed formula:
Hull Speed = 1.34 x √LWL
Max Speed/Length ratio = 8.26 ÷ Displacement/Length ratio .311 Hull Speed = Max Speed/Length ratio x √LWL
Sail Area / Displacement Ratio
A measure of the power of the sails relative to the weight of the boat. The higher the number, the higher the performance, but the harder the boat will be to handle. This ratio is a "non-dimensional" value that facilitates comparisons between boats of different types and sizes. Read more.
SA/D = SA ÷ (D ÷ 64) 2/3
- SA : Sail area in square feet, derived by adding the mainsail area to 100% of the foretriangle area (the lateral area above the deck between the mast and the forestay).
- D : Displacement in pounds.
Ballast / Displacement Ratio
A measure of the stability of a boat's hull that suggests how well a monohull will stand up to its sails. The ballast displacement ratio indicates how much of the weight of a boat is placed for maximum stability against capsizing and is an indicator of stiffness and resistance to capsize.
Ballast / Displacement * 100
Displacement / Length Ratio
A measure of the weight of the boat relative to it's length at the waterline. The higher a boat’s D/L ratio, the more easily it will carry a load and the more comfortable its motion will be. The lower a boat's ratio is, the less power it takes to drive the boat to its nominal hull speed or beyond. Read more.
D/L = (D ÷ 2240) ÷ (0.01 x LWL)³
- D: Displacement of the boat in pounds.
- LWL: Waterline length in feet
Comfort Ratio
This ratio assess how quickly and abruptly a boat’s hull reacts to waves in a significant seaway, these being the elements of a boat’s motion most likely to cause seasickness. Read more.
Comfort ratio = D ÷ (.65 x (.7 LWL + .3 LOA) x Beam 1.33 )
- D: Displacement of the boat in pounds
- LOA: Length overall in feet
- Beam: Width of boat at the widest point in feet
Capsize Screening Formula
This formula attempts to indicate whether a given boat might be too wide and light to readily right itself after being overturned in extreme conditions. Read more.
CSV = Beam ÷ ³√(D / 64)
Embed this page on your own website by copying and pasting this code.
Discover Related Sailboats

Twenty Small Sailboats to Take You Anywhere
John Vigor turns the spotlight on twenty seaworthy sailboats that are at home on the ocean in all weather. These are old fiberglass boats...
- About Sailboat Guide
©2024 Sea Time Tech, LLC
This site is protected by reCAPTCHA and the Google Privacy Policy and Terms of Service apply.
Cal20PDX.NET
Rockin' good boats since 1961
Steve Rander’s Cal 20 Guide
Boat maintenance and everything you always wanted to know about your cal 20.
(Text below is work in progress to adapt the original to web content – click here for a PDF of the original book)
Your Cal’s Seaworthy Condition
- Structure of a Cal 20
- Fore and aft lower shroud attachments
- Upper shroud attachments
- Headstay attachment
- Backstay attachment
- Rudder attachments
- Backing plates
Your Cal’s mast and rigging
- Identifying your mast section
- Rocking masts
- Rigging wire inspection
- Turnbuckles and clevis pins
- Split rings and cotter pins
- Single lower shrouds
- Rigging a split backstay
- Controlling mast travel
- Your rig at the dock
- Boom vangs and out hauls
- How loose or tight should the rig be?
- Rig adjustment at the dock
Going faster
- Bottom preparation and paints
- Keel fairing (what is allowed)
- All those control lines
- Installing KT meters or depth sounders
- Fitting your engine plate (speed trap)
Going Racing
- Required on board Gear
- Cal-20 Bylaws
- Fleet 7 Bylaws
- PIYA Regulations,
- USCG Requirements
Maintenance
My cal has water inside.
- Companionway Hatch
- Cockpit Drain
- Gel coat, what is it?
- Cracks in my deck serious or not?
- Bottom blisters
- Fiber glass repair
Painting My Cal-20
Photos of Cal-20 Details
Internet Links and U-Tube Demonstrations
North Tuning Guide
A Classy Twenty-Footer
Cal-20 A Pocket Cruiser
Cal-20 Owners Manual
Preparing a Cal-20 for Racing
Structure of a Cal-20
The Cal-20 is made up of basically three fiberglass parts bonded together with multiple pieces of plywood bonded or mechanically fastened to support the fiberglass parts and keep the whole box section from twisting.
The hull liner is bonded in place and has flanges to take the plywood bunk tops and bulkheads which in turn are tabbed to the hull.
There are additional transverse bulkheads forward forming a chain locker and forward bunk support. There have been three different interior arrangements over the years the most notable difference is that the early Cal-20’s had a full main bulkhead and later boats had posts to support the deck beam.
This structure is more complex then it first appears and relies on the sum of its parts to properly carry and transfer the dynamic sailing loads. Failure of any of the components may not appear to make any difference but it does.
Loose bunk tops or bulkheads allow the box like structure to twist while sailing. This twisting may mean that your hull shape may not be optimal or the rig may be sagging and not developing the power it should.
Checking the structure:
Look for rotten plywood throughout the boat and replace it as soon as time and money will allow.
Look for loose tabbing on bunks and bulkheads where they meet the hull (even the one under the bunk) repair loose tabbing by removing the old, sanding both the plywood and hull surface with 80 grit and the bonding new tabbing ( usually 3 laminates of 6oz fiberglass cloth) back in place with epoxy. Don’t forget to look on the back side to see if the object you are bonding wasn’t bonded on both sides.
Look for cracks in the liner and if found grind back and repair the laminate. Look to see if the cracked liner doesn’t need some additional reinforcement.
Check the deck in way of hardware and especially chain plate areas for rotten wood in both the deck and hardware backing blocks.
If things are really shot plan for a big winter project but in the mean time do an area repair in the high load areas.
Check the rudder attachments to the hull to be sure that their backing blocks are good and the bolts are not loose (Mine have a tendency to work loose).
Check for cracks in the deck along side the main hatch runners. These cracks often are structural and allow water to migrate to the 1X2 that the hatch track screws into causing it to rot out.
See diagram pg.40
Look and see if there is a piece of plywood under the cockpit (between it and the hull or liner) giving it support. If not you run the risk of having cracks form in the corners of the companionway cutout. This missing piece of plywood will also allow the deck to flex when sailing meaning the Headstay tension will constantly change.
The Cal-20 came from the builder with two lower shrouds and what was thought to be a robust rig. We have over the years worked to get more performance from our boats and have changed things from what the original builder had in mind.
The first thing we did was remove the forward lower shrouds so the jib would move easier across the deck as we tacked.
The next thing we did was to add a split backstay and an adjustment tackle
And now we have loosened up the rig so we can move the center of effort forward and aft as we change directions from up wind to down wind.
All of these changes have come at a price and the price is that we are loading parts of the boat beyond what they were designed for.
To keep our boats together in one piece we have to upgrade the strength of the attachment points that hold our rig up.
The first is the aft lower shroud attachment point. This can be done by removing the bronze casting from the deck that the forward lower use to attach to and bolting it on the underside of the deck to the aft lower shroud attachment point. Next get a ¼” turnbuckle and a small chain plate and attach them to the underside and bolt the chain plate through the hull side.
See diagram for chain plate pg.4
The next is the Headstay. It turns out that we can put so much tension on the Headstay with the backstay adjuster that it is possible to literally pull the deck off the hull.
The fix is easy, just attach a chain plate to the bow so that some of the bolts go through the hull and attach the Headstay to that chain plate instead of the bronze deck fitting.
See diagram pg. 5
Keel Bolts and Keel Fairing
Let’s start with the bolts, if the keel is in good condition or you don’t want to deal with it at this time the bolts can be removed one at a time while the boat is on the hard.
If the nuts are very rusty (probably why you want to replace them) it is unlikely they will come off and it will take a die grinder and cut off wheel to make a slice down one side. You can then place a cold chisel in the slit and break the nut into two halves. If you are unsuccessful have fun cutting the other side of the nut.
Once the nut is off you can pound the bolt down and out the bottom. Some fairing putty will most likely come with it.
If I am just replacing the bolts and not taking the keel loose for some reason you can take a little caulking cotton and wrap it around the shank of the new 5/8” 316 stainless steel flathead bolt and smear Life caulk around it and the hole before tightening the nut.
When you have done them all check to see that they are all close to the same tightness, how tight? 150 foot pounds should be enough (a 50 pound pull on a 3’ breaker bar).
If this is all you are doing check the fairing around the keel and repair as needed remembering it is ok to fair it into the hull both fore and aft but not side to side. You may only put a ¼” radius at the sides.
Keel Fairing
Keel fairing can be nothing more then chipping a few spots and puttying in a few divots. For this epoxy putty is the best. If you are only dealing with a little rust try Pettit Rust Loc Primer. Remove any flaking rust and apply three or more coats following the directions on the can.
Major keel work is an undertaking and ask around before you start it. It is best saved for a winter project if you wish to sail in the summer.
Remove the keel and take it to a sand blaster. Have it blasted to bare metal (I am reluctant to say grey metal as some of our keels will have holes blown through them before they get to that point. Once blasted take it your work place immediately and epoxy coat the whole thing. Once the epoxy “B” stages lay it down on one side and smear epoxy putty on one side making it a pretty as you can. Grind down the surface when cured and finish the rough fairing. Sand again and roll the keel over. This side will need a sanding before coating then smear your putty on this side. Let cure, sand and putty again. Sand it again then stand it up and finish and fairing before you bolt it back on the boat.
Bolting the keel back on
Check that the keel is straight front to back (some aren’t) Adjust the bolt holes if needed. Check to see that the keel is not angled to the port or starboard side when it is bolted up and the boat is supported level side to side (may require washers placed under the flange between the hull and keel. If this is the case there is only one way to put the keel back on and that is with epoxy). If you need to epoxy it on come see me first and let’s talk.
If the keel is going back on with Life Caulk just be sure and use enough, I still like a little cotton on the bolt shanks. Clean up all the extra caulk and then putty in the fairing remembering not to fair the sides.
Cal-20 Mast and Rigging
What mast and boom are on my boat?
A good rule of thumb is that hulls 70-340 had Spar Craft masts and booms and all others had Jensen masts and booms. The Jensen mast is 2 5/8”x 4” and the booms were 2 3/8”x 3 ½”. Some early boats had tapered masts, those which came with them could use them until they failed but could not replace them. No other boats are allowed to use tapered masts.
The original mast basses were two piece cast aluminum with an aft hinge pin. The failure of these basses when mast rocking became popular lead to the rocking mast basses.
All rigging wire should be inspected often it is 1/8” stainless 1×19 wire with swaged end terminals. Great care should be exercised when stepping masts to be sure that the turn buckles are faced aft before raising the mast. Be carful about snagging wires while stepping.
If any wire end should look corroded or have a broken strand at the swag
Or a kink in the wire it must be replaced before sailing again.
The same goes for bent turnbuckles. DO NOT STRIGHTEN A BENT TURNBUCKLE. Bent turnbuckles must be replaced.
All split rings or cotter pins should be tapped to prevent being snagged and pulled out by some sheet line.
Most everyone has eliminated the forward lower shrouds to make tacking easier. Due to this change the aft lower shroud attachment to the deck must be reinforced (see sketches).
The addition of a split backstay will give the racer much better control of the Headstay tension but it also means that the Headstay attachment to the bow must be reinforced (see sketches).
Putting a split backstay on is a simple matter of installing an extra chainplate on the stern and having the backstay cut and re-swaged by your local rigger.
How high to cut it and what to use as a tackle is subjective (note not higher the 10’ above the deck) so look around at other boats.
The whole mast rocking, loose rig thing started in California where the Cal-20’s race without spinnakers. It improves both up and down wind performance and has been adopted here in Portland as the thing to do.
With that said be aware that it does increase the load in every part of the standing rigging when it shock loads. Take care to secure your rig when you leave the dock so it is not banging around. It is also a good idea to try and reduce the shocks when sailing and crossing a motor boat wake.
Boom vangs can be of any configuration as long as they don’t hold the boom up (No Kicker style vangs). The Cal-20 boom has so little extension beyond the measurement band the one needs to either rig an internal multi part purchases or side blocks at the end of the boom.
We find ourselves utilizing the Cunningham, outhaul, Vang, sheet and backstay to shape main as well as the backstay, halyard and sheets to control the jib so take the time to be sure all is in good working order and easy to reach.
How loose should the rig be? See rig adjustment at the dock for a starting place.
Most important and most overlooked is to PRE FLIGHT your boat before going sailing each time. Look at or touch every cotter pin, clevis pin, and shackle. Trace the standing and running rigging with your eyes to be sure that all is in order. By taking the time to do this you will be assured of having a great sail without fire drills or failures.
Rig Adjustment at the dock
Most Cal-20’s are setting up their rigs so that they can rake aft up wind and rock forward down wind.
Start with the rig loose enough and with enough toggles in the Headstay to allow the measurements in the drawing to be reached 28’ +/- 1” from the upper black band to the top of the transom.
Allow enough slack in the adjustable backstay to allow 29” 5” +/- 1” when the rig is shoved forward.
Now adjust the uppers and aft lowers evenly on both sides of the boat so that when measured out from the mast parallel with the water 5’ above the deck you can deflect the uppers out to 18” and the lowers out to 21”. The jumpers should be adjusted to be slack (IE no load on them).
Please note: While this allows the rig to move forward and aft when it is sighted up from the bottom and the boat is under sail it should still be straight side to side but have a slight curve fore and aft.
Sailing a Cal with this rig configuration may place higher stress loads on the rigging then would a normally snug rig so take extra care to inspect wire ends, turnbuckles, clevis and cotter pins. Tape things to prevent snags or items coming loose. Don’t fail to inspect under tape for wire failures.
When sailing in light air with motor boat chop it may be prudent to tighten things up to prevent the rig from slamming.
Shock cords or line can be used to prevent the rig from slamming while the boat is tied to the dock.
It also may be prudent to sail with the rig tightened up in heavy conditions.
These instructions are not an endorsement of the loose rig they are only given as an approximation of what other Cal -20 sailors are doing.
As skipper you are responsible for the safety and security of your crew and vessel.
Going Faster
Bottom preparation is one of the major ways you can make your boat go faster right after learning to sail better, owning new sails and being first over the start line.
Bottom preparation can take as little or as much time as you can put into it but trust me every hour you put into your bottom will pay off on the race course.
I will start with the idea that you are a top notch sailor and are going out to win the nationals.
Take the rig out of the boat, take the keel off and roll the boat over so you can work on the bottom by pushing down not up.
Take all the paint off and fix any and all blisters by grinding them out and epoxy/glass repairing them.
Now take a 1×4 about 6 feet long and put some 80 grit sand paper on it (this comes in rolls with sticky on the back) and sand the bottom front to back. You will find that a couple blocks of wood glued to the back so you can hold on easier will help as will knee pads. It is also a good idea to lightly spray a little black lacquer on before you start to sand.
What you should see if the bottom was perfect is all the black gets sanded off and the bottom is smooth with no bumps or dips. Trust me this won’t be the case. So mark the dips with a felt pen by outlining them sand the black out of the dips and mix up some epoxy and micro spheres into putty and fill all the hollows. Use a wide sheet rock knife or a piece of metal if you need something longer. Go home and have a beer then come back the next morning and spray a little black tracer again and sand. When you have come back about six days or so things might be getting close so you will move to an acceptable under water primer and apply a few coats. Now you get to sand with 120 grit paper. When things have gotten to the point that you can come out in the dark and shine one light on the bottom and move it here and there and like what you see you are ready to turn it right side up and put it back together.
The keel was touched on lightly under Keel bolts pg 6 but it will need a similar treatment as the bottom of the hull. Keep in mind that there are limits under the rules as to how thick you can make the keel so when you are all done be sure that at no point is it thicker then 1 ½”.
The Rudder is the only thing left in contact with the water so if you are not using one of the fiberglass rudders but a wood one you must be sure that your rudder profile will fit the Cal-20 shape. There is some variation allowed and you will need to cut your blank out to the profile that you feel is best (I like the one that has the least amount of sweep back as the helm feel is lighter). Now you can proceed to shape the foil you like but again there is a maximum thickness when finished which is 2 ¼” and a minimum weight of 255 lbs. When you get all done be sure you have epoxy and glass coated the rudder so it won’t absorb water and never leave it in the water when not sailing.
All that is left to talk about is the bottom paint. If you are headed to the nationals or are 100% into racing then the answer is NO BOTTOM PAINT.
The bottom should have been worked down with multiple coats of epoxy primer and sanded to ever finer grit until now you are down around 400 or 600 grit and all the scratches follow the flow of the water meaning none go the wrong way.
If you are not that zealous a smooth bottom with no bumps or blisters and a prep sanding of 120 grit in a fore to aft direction and VC17 or SR21 applied will be your fastest bottom.
The next fastest is a smooth bottom with no blisters or ruff spots and what ever paint you are using (if not one of the two above) applied as smoothly as possible and perhaps a light sanding with wet paper.
Now that you have the underwater part of the boat is in perfect shape we need to look at the sails.
If they are old they are slow and that can get to the point that if they are a few hard races old they are slow which is why there are rules as to how often you can buy new sails. So the best answer is to take the very best care of the sails you have. Use the newest ones you have on race day and use the older ones for practice. Remember you can only have one set on board when you race.
I will not go into sail set as there is lots of information around on that subject.
I will mention however that if the controls for adjusting the shape of your sails are not convenient and easy to reach fix the problems and move the controls so you can adjust them easily.
Just imagine that you are trapped to leeward at the start line and need to power up and pull a bit ahead and then alter the shape so that you are now pointing better then the boat above you as you pull ahead (now you get why controls are important).
Most all of us here have adapted the rocking mast and that is covered under Rig Adjustment pg.11
Knot meters and depth sounders. Any thing that you put thru the hull that protrudes into the flow of water will slow you down.
Should you put a knot meter in or not? If you do be sure that the housing does not stick down. Make a recess in the hull bottom so that when the thru hull is installed it can be faired in completely and only the impeller sticks down.
While a knot meter may be a great tool to help tune your speed another boat beside you is a better tool. So get your head out of the knot meter and look at the boats around you.
Depth sounders in Cal-20’s should never be put thru the hull but glued to the inside with silicone. They will read just fine as long as you didn’t glue it on top of a void in your laminate.
The only time I have found one of value racing a Cal is on the long distance races and then only of marginal help. It was better to look at the beach I was sailing next to and judge the slope and if the beach was curving out into the water ahead.
Now that you have the underwater part of the boat in perfect shape we need to look at the sails. If they are old they are slow and that can get to the point that if they are a few hard races old they are slow which is why there are rules as to how often you can buy new sails. So the best answer is to take the very best care of the sails you have. Use the newest ones you have on race day and use the older ones for practice. Remember you can only have one set on board when you race.
Most all of us here have adapted the rocking mast and that is covered under Rig Adjustment pg .
Knot meters and depth sounders. Any thing that you put thru the hull that protrudes into the flow of water will slow you down. So should you put a knot meter in or not? If you do be sure that the housing does not stick down. Make a recess in the hull bottom so that when the thru hull is installed it can be faired in completely and only the impeller sticks down. While a knot meter may be a great tool to help tune your speed another boat beside you is a better tool. So get your head out of the knot meter and look at the boats around you. Depth sounders in Cal-20’s should never be put thru the hull but glued to the inside with silicone. The will read just fine as long as you didn’t glue it on top of a void in your laminate. The only time I have found one of value racing a Cal is on the long distance races and then only of marginal help. It was better to look at the beach I was sailing next to and judge the slope and if the beach was curving out into the water ahead.
Speed Trap AKA Outboard Well
Here is one of the reasons that some Cal’s go faster then others and why we pull our boats out over the winter so we can work on them a bit.
The photo on the next page shows a poorly fitting bottom plate on my outboard well. The little (no matter how small) lip hanging down catches water and creates drag.
The easiest way to fix this is to first be sure the plate is in with the right end forward (I have an arrow drawn on the inside in felt tip marker).
If it is in right and a bit of lip is hanging down take a hand saw and cut the bond loose between the wooden frame on the inside and the fiberglass bottom plate. It may take a couple cuts to create a bit of a gap. Mix up some epoxy putty and squeeze it into the gap. Clamp the gap closed until the epoxy cures.
Larger problems may take more drastic action like a total rebuild. There are only three things to remember in your zealous quest for the perfect motor well cover.
- The cover must be removable without tools and it must pass water IE water poured in the well must flow out the bottom.
- When you get all done with your creation the bottom plate can not be thicker then 3”.
- You can not caulk the plate in place or putty up all the seams so it can’t be pushed out.
What ever you do to make your plate fit better will improve your performance.
When the perfect the motor plate is done you should not be able to see any difference in the bottom shape, only a thin line around the outer edge perhaps the thickness of a pencil line. This plate must be easily removable and it must drain water because if it doesn’t all your work will be for not as some measurer will not let you pass inspection. By the way I hope you did this work while you had the hull upside down.
The photo below shows a poorly fitting bottom plate on my outboard well. The little (no matter how small) lip hanging down catches water and creates drag.
Required Safety Equipment and Gear On Board
We race Cal-20’s here on the river in OCSA sanctioned races and as such utilize their Sailing Instructions and course charts. Additionally we are required to comply with the Bylaws of the Cal-20 Fleet and Local Fleet 7 bylaws. PIYA regulations and USCG requirements must also be met.
The following is a synapses of all the requirements and spell out what must be on board to legally race. There are a couple conflicts in the regulations which are spelled out at the bottom of the next page and which regulation takes precedence. The pages that follow are the complete rules and regulations.
Cal-20 By-Laws Require:
- Sails for Class racing shall be limited to a mainsail and a class jib. The cloth weight shall not be less than three ounces.
SAFETY EQUIPMENT
- All required government safety equipment must be carried. This includes a Type 1, 2 or 3 life preserver for each person; a bell, whistle or a horn; one throw-able Type 4 life preserver; and one fire extinguisher (if an engine or fuel is carried).
- Suitable ground tackle must be carried on board at all times. The minimum allowable ground tackle is an 8-pound Danforth anchor or its equivalent, with 10 feet of 3/16 inch chain and 100 feet of 3/8 inch nylon line.
Cal-20 Fleet 7 Additional By-Laws Require:
1. Sails, Spinnaker equal to PHRF Standard size and not lighter then 3/4oz nylon
(.05 poly is approved)
2. Spinnaker pole of 7’4” inside jaw to inside jaw
3. Class whisker pole may be used with jib only
4. Outboard engine meeting the requirements of PIYA Cat III.
OCSA Safety Requires:
1. All Boats comply with USCG requirements for recreational boating.
2. All Boats comply with PIYA category IV regulations
3. Sail numbers required on Main Sail and Spinnaker
4. Navigation lights after sunset
PIYA category IV requires:
1. Soft wood plugs for any below water opening attached with short cord.
2. Adequate paddle(s) or oars
3. A commercially manufactured anchor, 150’ of line and ½ the boat length of chain.
4. Yachts name on all float-able safety gear.
5. Navigation lights after sunset
6. A Bailer, bucket or bilge pump.
7. A flotation device with a whistle, reflective tape and the ships or crews name for every person on board.
8. Engine, tanks, vents, batteries, etc. meet USCG requirements.
9. A signed copy of the PIYA regulations on board.
USCG requires:
1. State registration
2. State numbers and sticker
3. Life jacket for all on board
4. Type IV throw-able device
5. Three day/night flares
6. Ventilation for areas which hold fuel tanks
7. One B-1 fire extinguisher
8. A whistle or horn
9. Navigation lights after sunset
10. A type I, II, III MSD if a toilet is installed.
The only conflicting requirements I have found are the old Cal-20 requirement for 100 ft of anchor line and PIYA’s requirement of 150’ (150’ takes precedence)
The PIYA requirement for paddle(s) or oars in Cat IV and the Requirement for outboard in Cat III and Cal-20 Fleet 7 By-Laws (outboard takes precedence)
My Cal Has Water In Side
The sources of water inside a cal just like any other boat are endless.
Some are obvious like water running down the inside of the hull at a window or piece of deck hardware.
Others are less obvious like the bottom rudder bolts or the laminations around the outboard trunk. The keel bolts are a possibility but then so is the main hatch, fore hatch and seat hatch. What about those cracks where the cockpit sides meet the cockpit seats or along the main hatch runners? These are all possibilities.
How do I stop the water from getting in? First you have to identify the source.
You must dry the boat completely and that may take putting your crew on deck next to the starboard shroud and healing the boat over a bit bow down and moping water out from under the forward bunk or out from under the cabin side bunks. Water will also find its way in between the hull liner and the hull so it is not easy to get it dry but you must.
Start at the top and work your way down. Are there any deck fittings that are leaking? If so fix them by removing them and then re-bedding them. See the U-Tube links on page 51.
How about the windows? Seethe comments on page 39.
Now let’s look at the cracks along the main hatch runners and the ones in the cockpit. These two sets of cracks are caused from stress and many do not actually leak but if the stainless hatch slides are loose odds are the fasteners or cracks are leaking. Smearing some caulk on them might help for a day or two but they will need to be ground back about a half inch on each side and a bit of fiberglass and epoxy used to fix them (be neat as these are hard areas to detail. See pg 40
The fore deck hatch if it is original will be leaking where it is screwed to the deck but also in the joints in the corners. Remove it, clean it up and take it apart. Then glue it back together again. Be sure to put some cellophane package tape on the deck in the corners and lay out some protection on the bunk as you will want to re-glue this frame in place so it will fit when you are done. When the glue has cured pop it off and then bed it in Life caulk.
The main hatch might have cracks in the bottom corners (check that there is a support under the cockpit see photos pg 49)
If there are cracks in the corners remove the wood edging, grind a taper in the laminate and put some fiberglass and epoxy to fill up the taper. Now bed the wood trim back in place. Be particular about the bottom piece as water likes to run down the drop board and find its way in the corners.
The cockpit seat hatch has problems of its own. The first is that there is no drip lip on the edges of the hatch lid so water likes to run right around and drip inside. Yes a gasket on the lip of the cutout will help but it really needs a drip lip see pg 41.
We are now inside and you are going to have to crawl (slither) back with your flash light and get all the way back so you can see the rudder bolts. Have someone else stand at the back of the cockpit so they are under water. Give it a few minutes and if they leak you will need to remove the fitting and bolts (either 3 friends on the foredeck while you do this or get it back on the trailer) When you do bed the fitting and bolts be sure there is a backing block on the inside of something like ½” plywood about 3”x6” and fender washers. If you don’t want to crawl back there in a few weeks use nylock nuts.
Now before you slither out of that little hole you are in look at the bottom of the motor well. Look all the way around it as they leak at the base sometimes. If it is leaking mark the area and haul the boat to do a fiberglass / epoxy repair. Look and see if the cockpit drain you put in from the front right corner of the cockpit is leaking. If so fix it. See pg 43
The next things to look for are any old thru hulls. If there are any get rid of them see pg 42. Yes this needs to be done out of the water. If you have a knot meter or depth sounder that goes through the hull check to se if they are leaking.
The only other sources of leaks (as long as you don’t have hull damage) are the keel bolts. While checking the keel bolts don’t jump to the conclusion that they are leaking just because there is water in the bilge. I now you have dried everything and you set there and watch water seems to ooze up around the bolts. That does not mean they are leaking it may only mean that you still have water trapped between the liner and the hull. Heal the boat over and check under the bunks. Do it to both sides and the bow down and then stern down and only then suspect the bolts. If I have fixed everything else so I know no water is coming in I might go away for a day and then mop out the bilge again and recheck.
Window leaks
Cal-20’s have had two different windows from the factory over the years of production.
The first was a metal framed glass window. Window leaks were from two sources on these windows. The first was a failure of the bedding compound. Simply remove the screws on the inside and have someone catch the port as you push it out from the inside. Clean the frame and cabin side up with a putty knife and solvent. Bed the port back in place with widow caulk, Life caulk or foam tape. DO NOT USE 3M 5200 to bed windows or hardware.
The second leak source was a failure of the gasket in the window frame itself. The frame can be taken apart and the gasket replaced with caulk.
The second window used in the Cal’s was a plastic window made by GO Industries. The only leaks associated with these windows is a bedding failure so simply remove the windows, clean them up and bed them again with Lifeseal. Do not use any other sealant on these windows.
If you have broken windows or just want new ones ( they are lighter then glass ones) the Go Industries windows are still made and they will fit in any Cal 20. The windows are made by Mark Plastics in Corona, Ca.
Gel Coat, Crazing Cracks, Blisters and Fiberglass Repair
Gel coat is nothing more then polyester resin with talc and pigments added, it has no reinforcement and tends to be brittle. When the hulls, decks and liners are made they are built in a female mold. The gel coat is sprayed in first and to get good coverage in all the corners it often becomes thicker in spots then it should. This extra thickness is one of the reasons that gel coat cracks. For years these cracks have been called crazing cracks and owners have been told they are non structural. This may not be true in all cases.
The cracks that most concern us are the ones along the sides of the cockpit seats, companionway slider tracks and the bottom corners of the cockpit or companionway.
If any of these cracks are leaking water they should be repaired. Repairs amount to grinding away the surrounding area of the crack and laminating fiberglass across the crack to bridge the weak spot. Once repaired paint or gel coat can be used to replace the color.
Blisters are caused by the fact that the hulls are laminated of polyester resin as is the gel coat. The molecular make up of polyester resin is a loose structure which will allow water vapor transfer.
Here is how it happens, water vapor penetrates the gel coat and laminate until it finds an air bubble or pocket. It may be that it finds a bit of dirt or contaminate, maybe some extra Cobalt or MEKP (used to promote and cause the cure of the resin to take place). When the moisture finds any of these defects it will form a gas pocket due to a reaction with the defect and a blister is formed.
When blisters are small they are nothing more then a nuisance and tend to degrade performance by disturbing the water flow past the hull. When they get big they can start to be structural.
What is small and what is big and how do I fix them? Small is anything from the size of a pencil eraser to the size of a quarter and big is any thing larger.
Repairs can be as simple as taking a small grinder to the bottom and grinding out each blister. This can be tedious work if there are a lot as you must grind a little dish into the hull so that the blister is all gone. In the case of small blisters an epoxy putty can be used to fill the areas back up to smooth. Larger areas may need fiberglass laminated to rebuild the strength of the hull.
In extreme cases the entire gel coat is removed, the hull is allowed to dry out and then a barrier coat is applied after the blisters have been repaired.
Fiberglass repair is not hard if the project is small, repairs to hulls after a port/starboard collision is another matter and best left to the professionals.
Small fiberglass repair consists of analyzing why it is required in the first place. The cracks at the bottom of the companionway opening caused because there was no support under the cockpit will not stay repaired if the cockpit is not supported so analyze the cause before you repair.
The fiberglass must be ground away into a taper on each side of the defect. The rule of thumb is the taper should be 20/1 or 40/1 in high load areas. What this means is the defect in a ¼” thick hull will require a repair area of 5-10” on each side of the defect. Care should be exercised to replace the laminate with a similar laminate to what is being removed. In short you can not expect to replace woven roving with a repair of mat.
All of the flat panels in or Cal-20’s are stiffened with marine plywood.
Long time contamination with moisture will cause it to rot. Take a look at the deck around the lower shroud chain plate attachments as they are often in the worse condition. If the backing block (another piece of plywood) is rotten the deck is probably rotten as well.
Let’s assume this is your only rot problem. It is possible to remove the deck fitting, pry off the backing plate and then tap around the underside of the deck with a small hammer and listen. The areas that are rotten will sound dead (like you have just tapped on a book and opposed to tapping on your desk). Mark the area with a marker pen and cut the plywood out using a chisel and hammer. Do a neat job of it and if when you are done the area is small (less the 4-6 square inches) cut a new piece of plywood to fit the hole and glue it in with epoxy.
At this point you have eliminated the rot and replaced it with a filler block. You need to now replace the backing block which will have to be thicker and bigger then the old one as you are trying to spread the load. I would use a piece of ½” plywood about 8”x12” or bigger if necessary.
If your repair cut out area was larger you will need to grind or cut a taper in the deck plywood and grind a taper on the plywood you are going to put back forming a scarf like you would in fiberglass repair except that it only needs to be a 12/1 taper.
If the deck in your boat is in very bad condition you will need to plan for a winter of it and take the keel off and roll the boat upside down. Strip out all the plywood and glue in new. Come talk with me if you plan on this project as there are some helpful hints.
You now know why it is important to fix leaks and to keep water out of the boat. It is also important to provide ventilation so moisture in the boat will dissipate.
One side note here and that is when storing your boat out of the water in the winter time be sure to not tarp it down tight but provide ventilation. Also the boat will need to be stored slightly bow down so that water will not collect on the cockpit seats and flow into the seat hatch.
Painting Your Cal-20
Painting is all about preparation, the better the preparation the better the job will be.
There was a long discussion earlier on bottom preparation for racing and the bottom paint is applied with a thin foam roller to keep the film thickness thin.
Painting the hull sides of your Cal or new stripes are similar to doing the bottom except that the sand paper used to prepare the surface is 220-320 grit.
If you are going to paint the hull sides take the rub rail off first so you will have a professional looking job. Mask out what you don’t want painted and do the job early in the day before the breeze comes up. We here at Schooner creek paint in a heated indoor spray area with filtered ventilation. We spray the paint to give a perfect finish. DO NOT Spray at home.
There is a nice video of rolling and tipping on U-tube see pg.
To do the nonskid areas of the deck be sure you get all wax or other contaminates cleaned first, then sand or scotch-bright all the surfaces to be painted to break any shine. Then do your final masking and clean up before painting. I have found it best if you are going to add some type of nonskid material to the paint DON’T. Take the can of particles and punch a bunch of holes in the top like a salt shaker, roll your paint on and while it is still wet shake the particles on. Do a good job of getting more on then can absorb into the paint. Come back the next day and vacuum up all the extra and then roll on another coat of paint. It will look great.
I am no expert on outboards but here is what I have learned over the years.
Buy the lightest motor for the power requirements you need.
The Cal-20 can be pushed along nicely with a 3hp short shaft outboard if you are using the well.
If you are mounting the motor on the transom be sure to put a big backing block on the inside and watch where you mount the bracket (check with other owners).
The trick with using the well is getting the motor and motor plate in and out and keeping the water in the well from swamping the cockpit while motoring.
The trick of motor in and out is most of the forward way must be stopped before the change. The same goes for putting in the plate. I have an arrow on the inside of my plate to tell me which way is forward. When I go to put it in I shove it down with the front edge up until the last second when I pull up quickly on the line between the plate and top cover. If you have ever done other you may have had a very exciting moment while the plate was trying to pull you down and through the motor well.
Just remember to slow the boat up when taking the plate in or out.
As for keeping the water from sloshing up into the cockpit the best solution I have found is a piece of 3-4” foam rubber cut just larger then the hole in the well with a “V” notch cut half way into the back of the foam so you can pull it around the motor as you shove it into the hole. The foam does a great job of stopping the water and is easy to deal with when storing the engine.
When ever you are going to put the engine back into the locker be sure that you have shut the fuel off, closed the vent and run the engine to get rid of any fuel still in the carburetor.
Watch your fuel to oil mix carefully if you have an old two stroke and carry spare spark plugs and wrench. Better yet change a plug once before going out this spring just so you know how to do it and have all the tools you need.
When putting the boat away for the winter drain the fuel from the tank and put in new fuel in the spring.
Internet links and U-tube demonstrations
http://www.youtube.com/watch?v=Gjyzc4c9JnE Painting by Rolling and tipping
http://www.sealsspars.com/index.html Steve Seals site for parts
http://www.pbase.com/mainecruising/rebedding_hardware&page=1 Bedding hardware to prevent leaks
http://express27.org/articles/stoppingleaks Stopping leaks
http://www.youtube.com/watch?v=SsoKAHU5xUw Fiberglass repair
http://www.westsystem.com/ss/fast-blister-repair-with-six1/ Blister repair
http://www.cal20.com/ClassAssociation/Bylaws/tabid/63/Default.aspx Cal-20 By-Laws
http://www.bassboatcentral.com/2strokecare.htm 2 stroke outboard care
http://sailingvoyage.com/photos/index.php/Cal-20-Restoration Restoration of a Cal-20
California's Boating & Fishing News

Cal 20: A popular boat still in the race despite not being built
SAN PEDRO ― The California 20 was a boat in demand in the 1960s, but production on the popular sailboat halted in 1975 for reasons unknown. Cal 20s are still popular today despite being out of production and were on full display during a recent sailing event in San Pedro.
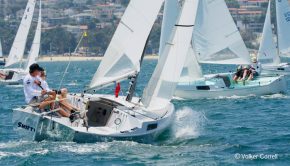
Cabrillo Yacht Club hosted the 56th annual Cal 20 Class Championship in Los Angeles Harbor, Sept. 22-24.
Alamitos Bay Yacht Club Commodore Chuck Clay, who won the championship in the past, hoped to win it all this year but finished in second place; he also placed second in 2016.

Clay said after coming across some waves, Ives took the lead. Ives ended up in first place his second year in a row.
The winds were steady for the first couple days of the race kicking up a bit towards the end of the second day. The winds took the championship up a notch on the final race day.
“Sunday started out at about 10 knots and got up to 13-14 knots,” Clay mentioned. “There was a lot of kelp. We caught kelp, and everybody got kelp which was very frustrating.”
The simple design of the Cal 20 makes this boat easy to rig and a breeze to sail. The boat’s design, which fits a two to three-person crew, provides sailing with comfort and ease.
C. William Lapworth designed the Cal 20 in 1960. The fiberglass sailboats were built at Jensen Marine Factory in Costa Mesa. Jensen Marine was bought out by Bangor Punta in 1965, and the factory relocated to Tampa Florida in 1981 and then relocated again to Massachusetts.
The production of Cal boats ceased all together in 1989.
“The Cal 20 is a great boat for One Design sailing,” Clay stated.
Stephen Ashley also competed in the three-day race and agreed with Clay.
“One great thing about doing a One Design fleet is it’s really easy to figure out how you are doing [during the race],” Ashley said. “With the Cal 20, it’s simple. If a guy is ahead of you, you’re losing. If a guy is behind you, you’re winning. That’s one of the things that make it fun.
“Chuck’s one of the best,” Ashley added. “They’re hard boats to do really well in because you have got to be right on your game to sail against someone of his caliber.”
Clay mentioned the Cal 20 is very affordable compared to other sailboats of this size.
A well maintained Cal 20 can be purchased or sold for around $2,000, according to Clay. A Cal 20 with upgrades can range in price from $6,000 up to $10,000.
One doesn’t necessarily need to own a Cal 20, however, to enjoy the sailboat.
Ashley teaches sailing classes on the Cal 20s in Long Beach. He is a member of Shoreline Yacht Club, trustee of a Cal 20, and treasurer of the SYC Sailing Foundation as well as an instructor.
The SYC Sailing Foundation is a 501(c)3 charitable organization and maintains a fleet of Cal 20s.
The boats are kept at the slips in front of Shoreline Yacht Club. The yacht club offers a place to teach sailing students in a classroom setting for the first day, and the harbor is where the students sail for the rest of the lessons.
Anyone can take the seasonal classes offered May through September even without a yacht club membership. Students can continue to charter the boats on a quarterly basis based on availability at a reasonable cost following the class and after passing a safety and skipper test.
One may not need to own or partially own a Cal 20 to compete in future regattas either.
Currently, the rules and regulations for Cal 20 competitions require the skipper to have at least one third ownership of the boat.
Ashley said the idea behind the ownership rule is to have people racing the boats who have an interest in the boats.
“We want people who are invested in the boats and have a long term investment in the program,” Ashley stated. “The downside [to the ownership rule] is that the group keeps getting older every year, and there are not a lot of new sailors coming into Cal 20s at the ownership level.”
Amending the bylaws to allow for more participation in Cal 20 regattas are currently being considered.
“Times have changed and participation is down,” Clay said. “So we’ve got to go with the changes to keep the class alive.”
Erin Rustigian photos
- ← Next America’s Cup to be sailed in 75-foot monohulls
- Scheduling changes in store for Volvo Ocean Races →
Comments Cancel reply
Your email address will not be published. Required fields are marked *
Your Thoughts are Appreciated
Save my name, email, and website in this browser for the next time I comment.


Published on August 14th, 2022 | by Editor
2022 Cal 20 Championships
Published on August 14th, 2022 by Editor -->
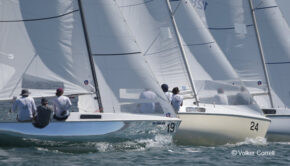
Keith Ives and Chuck Stevens overcame a tight battle to win the 2022 Cal 20 Championships held August 12-14 in Long Beach, CA. After seven races, Ives/ Stevens finished tied alongside Steve Flam with crew Doug McLean and Alli Blecher but won on countback.
Flam was the series leader going into the final day, but the veteran team of Ives/Stevens closed with two deuces compared to Flam’s fourth and first. Both boats finished within a couple of boat lengths of each other on the final downwind finish.
Ives boat (hull #9) had been restored by prior owner Doug McLean in the 1990s and subsequently owned by the Flam family prior to Ives taking ownership interest.
Finishing third was Cal 20 Junior Class Champion Noah Stapleton with crew Justin Zmina and Frankie Dair after going into the final day as contenders but a 1-12 was not enough in the no discard series.

The 60th anniversary of the Cal 20 Championships attracted a strong showing of 48 boats including five in the Junior Champs on August 11, 26 boats racing in the Gold Championship class, 6 boats sailing in the Silver class, and 11 boats sailing in the Bronze class.
The Silver class champion was Liam Haselhorst who had a beautifully restored vintage 1962 boat fully race rigged to current day standard. Marc Mazorow claimed the Bronze class championship winning every race in the series.
The Cal 20 class has seen a strong resurgence in recent years with several boats getting fully refurbished with race finish boat paint, updating rigging, and fresh racing sails.
Details: https://www.abyc.org/regatta/QmayHZcEC6
Source: Todd Smith

Tags: Cal 20 , Cal 20 Class Championship , Chuck Stevens , Keith Ives
Related Posts
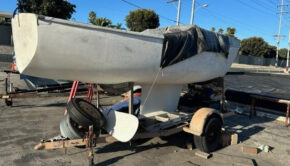
Don’t let them go to the chainsaw →
61st Cal 20 Class Championships →
Reason #1 that racing fleets flourish →
Cal 20 Class Championship 2021 →
© 2024 Scuttlebutt Sailing News. Inbox Communications, Inc. All Rights Reserved. made by VSSL Agency .
- Privacy Statement
- Advertise With Us
Get Your Sailing News Fix!
Your download by email.
- Your Name...
- Your Email... *
- Phone This field is for validation purposes and should be left unchanged.

- Advertising
- Distribution
- Good Jibes Podcast
- Boat In Dining
- Sailboat Charters
- Business News
- Working Waterfront
- Youth Sailing
Last fall Scott Lamson tore a Classy Classified ad out of Latitude 38 and said to Paul Kaplan, "Here’s a Cal 20. You should buy it."
Lamson and Kaplan have been friends for a long time. The 40 Years in Review feature in the April issue of Latitude 38 included a photo of the two of them coming back from the ill-fated, horribly windy 1982 Doublehanded Farallones Race on Paul’s Nordic 44, Nordic Cowboy .
Paul Kaplan, whose name you may recognize from Bay Area businesses KKMI and City Yachts, had a Cal 20 when he was 15. He’d saved up enough money to buy a car but wasn’t old enough to drive, so he bought the Cal instead. His non-sailing parents made him sign a lengthy agreement about how he could use the boat, and off he went.
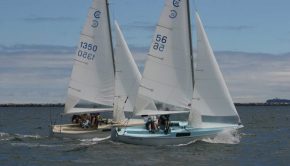
He had it for about five years, until he was 20. "Chrissy and I would sail up to the Delta," he said. "It took us three days to get home one time when it was really windy. There was an active racing fleet, and we made great friends for years. We were under 21 so they all bought us alcohol." Chrissy and Paul are still together and now have a grandson, 2-year-old Will Deuyour. Scott Lamson’s son Scotty and young Will are the new owners of the 1964 Cal 20 #347 Sprite.
"It’s come full circle for Chrissy and me. The Cal 20 was on the same dock as Santana ." ‘Big Boat Row’ stretches between Marina Blvd. and St. Francis Yacht Club, looking out onto a briny little beach. "We bought the boat from two brothers who bought it brand new in 1964. On the Cityfront with an upwind berth we’ll never use the motor."
"There’s an insane transfer fee for the slip, more than the price of the boat. And you can only transfer ownership once. So we created a legacy by endowing our grandkids. Scotty, who’s in his 20s, is the senior partner with Will. He promised that if he had a son he’d name him Scott."
Off went Sprite to Paul’s boat yard for sprucing up. "We painted it the original colors and even had the sign painter trace over the old name. We added a companionway seat and hand holds and made a cork that goes into the plug for the engine well. When you own a boat yard you can do that sort of thing." Kame Richards of Pineapple Sails is building new carbon sails. "Steve Seal and I go way back. I got a new boom and some other parts from him."
Chrissy and daughters Sarah and Erica, son-in-law Nick Deuyour and grandson Will will sail Sprite . "We’ll do a bit of racing," admitted Paul — they’ve kept the boat class-legal. Chuckling, he called former Cal 20 fleet captain and perennial champion Richard vonEhrenkrook "such an enabler."
Look for a feature on more boat yard projects in the June issue of Latitude 38 .
Leave a Comment Cancel Reply
Notify me via e-mail if anyone answers my comment.
Fast Boats, Big Talent at Nacra Clinic On May 13-14, the St. Francis Sailing Foundation hosted a High Performance Nacra 15 Clinic at St.
Matthew Turner Shipyard Sale This Saturday, Call of the Sea is hosting a shipyard sale to benefit the continued construction of the 100-ft brigantine Matthew Turner.

Cal 20 Fleet 8
CAL 20 Detailed Review

If you are a boat enthusiast looking to get more information on specs, built, make, etc. of different boats, then here is a complete review of CAL 20. Built by Jensen Marine/Cal Boats and designed by C. William Lapworth, the boat was first built in 1961. It has a hull type of Fin w/transom hung rudder and LOA is 6.1. Its sail area/displacement ratio 20.03. Its auxiliary power tank, manufactured by undefined, runs on undefined.
CAL 20 has retained its value as a result of superior building, a solid reputation, and a devoted owner base. Read on to find out more about CAL 20 and decide if it is a fit for your boating needs.
Boat Information
Boat specifications, sail boat calculation, rig and sail specs, contributions, who designed the cal 20.
CAL 20 was designed by C. William Lapworth.
Who builds CAL 20?
CAL 20 is built by Jensen Marine/Cal Boats.
When was CAL 20 first built?
CAL 20 was first built in 1961.
How long is CAL 20?
CAL 20 is 5.49 m in length.
What is mast height on CAL 20?
CAL 20 has a mast height of 7.01 m.
Member Boats at HarborMoor

- Forum Listing
- Marketplace
- Advanced Search
- All Topics Sailing
- Skills & Seamanship
- Learning to Sail
- SailNet is a forum community dedicated to Sailing enthusiasts. Come join the discussion about sailing, modifications, classifieds, troubleshooting, repairs, reviews, maintenance, and more!
What about a cal 20? Any exp?
- Add to quote
A couple of questions since my deal with the Lightning fell through. If anyone has had a cal 20 or has been crew on one, where the hell are the life-lines? is the thing entirely sailed from the cockpit? No hiking out? I crew on a J-24 in SF bay. You need life lines, people hydro-plane off decks all the time. I did it a month ago and it was only 15-20 knot winds ( and saw another guy go in on another boat). I got my legs wet; half man overboard, thanks to the life lines. Anyway, I'm looking at a cal 20 tomorrow after the race (Berkeley Mid-winters) and would like some feedback for the community on this boat. This will be my first sailboat.
Check out the Cal page on this site. Jim has some excellent photos of his restoration of a 20. Don't worry about the life-lines, you'll be hanging on to that ride! Surf-boards don't have life-lines either. And, if I'm not mistaken, i believe there is a pretty active Cal 20 racing assoc. on SF bay.
Lifelines and pulpits used to be, and I think still are, options on smaller boats, although most people opt for them. I prefer having lifelines, but people shouldn't be going MOB very frequently, either with or without lifelines. If they are, they might be waiting too long before they re-position themselves after a tack. You always need to situate yourself so that you have solid footing, a low center of gravity, and a strong grip on the boat. When tacking, you shouldn't wait too long before you start moving from the old high side to the new high side of the boat. You should start moving to the other side when the skipper starts the tack, and not wait until he has completed it. If you wait until the tack is completed, you have a steep climb to get to the high side, and might have to do it with wet shoes. For a sailor, the first order of business is to make sure he stays on the boat. Everything else is secondary.

JimDaddy said: Anyway, I'm looking at a cal 20 tomorrow after the race (Berkeley Mid-winters) and would like some feedback for the community on this boat. This will be my first sailboat. Click to expand...
Thanks for the links Thanks for all the info! I looked at a sad cal 20 yesterday after the Berkeley Mid-winters. It needs quite a bit of cosmetics and wood work. I'm going to wait for a nice one to come available locally. I'm also considering the Santana 22; very active class here in the bay area. Thanks again for the links! Great restore job on the linked cal 20!
JimDaddy said: I'm also considering the Santana 22; very active class here in the bay area. Click to expand...
- ?
- 173.9K members
Top Contributors this Month

- New Sailboats
- Sailboats 21-30ft
- Sailboats 31-35ft
- Sailboats 36-40ft
- Sailboats Over 40ft
- Sailboats Under 21feet
- used_sailboats
- Apps and Computer Programs
- Communications
- Fishfinders
- Handheld Electronics
- Plotters MFDS Rradar
- Wind, Speed & Depth Instruments
- Anchoring Mooring
- Running Rigging
- Sails Canvas
- Standing Rigging
- Diesel Engines
- Off Grid Energy
- Cleaning Waxing
- DIY Projects
- Repair, Tools & Materials
- Spare Parts
- Tools & Gadgets
- Cabin Comfort
- Ventilation
- Footwear Apparel
- Foul Weather Gear
- Mailport & PS Advisor
- Inside Practical Sailor Blog
- Activate My Web Access
- Reset Password
- Customer Service

- Free Newsletter
Ericson 34-2 Finds Sweet Spot

How to Sell Your Boat

Cal 2-46: A Venerable Lapworth Design Brought Up to Date

Rhumb Lines: Show Highlights from Annapolis

Solar Panels: Go Rigid If You have the Space…

Leaping Into Lithium

The Importance of Sea State in Weather Planning

Do-it-yourself Electrical System Survey and Inspection

When Should We Retire Dyneema Stays and Running Rigging?

Rethinking MOB Prevention

Top-notch Wind Indicators

The Everlasting Multihull Trampoline

What Your Boat and the Baltimore Super Container Ship May Have…

Check Your Shorepower System for Hidden Dangers

DIY survey of boat solar and wind turbine systems

What’s Involved in Setting Up a Lithium Battery System?

The Scraper-only Approach to Bottom Paint Removal

Can You Recoat Dyneema?

How to Handle the Head

The Day Sailor’s First-Aid Kit

Choosing and Securing Seat Cushions

Cockpit Drains on Race Boats

Re-sealing the Seams on Waterproof Fabrics

Safer Sailing: Add Leg Loops to Your Harness

Waxing and Polishing Your Boat

Reducing Engine Room Noise

Tricks and Tips to Forming Do-it-yourself Rigging Terminals

Marine Toilet Maintenance Tips

Learning to Live with Plastic Boat Bits
- Sailboat Reviews
Ultimate 20
Here's a 20-footer that goes 20 knots. not only that, it's fairly easy to sail, too..
In the late 80’s, the landscape was littered with the remains of boatbuilding companies that couldn’t cut to fit. The conventional wisdom was that starting a new company was guaranteed to convert a large fortune to a small one. In this period, Jeff Canepa conceived the idea of entering the fracas with a pint-sized company based in Santa Cruz, California, that would introduce yet another performance 21-footer.

Canepa is the antithesis of the traditional boatbuilder, staid types who worked their way up the professional ladder by lofting lines, stoking steam boxes and laying planks. Rather, he is an experienced multihull sailor and marketing expert who envisioned catamaran performance in a monohull, identified an existing design that might do it, then assembled a team of experienced designers and builders to develop the final product. The result is the Ultimate 20, a boat finding great acceptance among a group of mid-level sailors seeking new levels of performance, and experienced sailors looking for big kicks on smaller boats. It also appeals to the budget-conscious shopper.
A college dropout with a penchant for water sports, Canepa began sailing in 1968 when he abandoned the classroom during sunny Monterey Bay afternoons and practiced sailing a Hobie Cat. By 1972, he’d captured the Hobie National Championships, followed in 1973 with the first of two World Championships. He then headed for Europe to conduct Hobie clinics until the late 70’s, then expanded his knowledge of the small-boat industry while working to introduce O’Neil Wetsuits to the international sailing community. He furthered his knowledge of the watersports market while setting up an American distribution system for a German sailboard manufacturer.
The first seeds of the U20 project were planted in 1986 when he crossed paths with Doug Hemphill, designer of the Hotfoot 20 and Hotfoot 27, reliable performance sloops built and sailed primarily in Canada. At the time, Hemphill was experimenting with the addition to the 20-footer of a bowsprit, asymmetrical spinnaker, and hiking racks. In 1988, with the sailboat market headed for what the Federal Reserve Board calls a hard landing, he purchased the molds for the Hotfoot 20 at a sheriff’s auction and placed them in a storage container.
“We were way ahead of our time,” he said, “hoping for a recovery. There had been too much money in the marketplace during the 80’s, but we felt that after a few years of cooling it would rebound, and that a niche in the small boat market would be strong.”
By early 1993, he was beginning to look like a soothsayer. J-Boats had successfully introduced a line of “sprit boats,” the Melges 24 was a big spot on the horizon, and trailerable boats were again making their presence felt. With that as a backdrop, Canepa formed Ultimate Sailboats International and began assembling his design and construction team.
For openers, he recruited Ron Moore, the well known Santa Cruz boatbuilder who carved a reputation building the Moore 24 and other ultra-light, ultra-fast boats, giving him responsibility for construction of a prototype, using the Hotfoot molds. Business associate John McWaid was enlisted to hitch the prototype to his car and head into the American hinterland.
Upon McWaid’s return, armed with input from sailors and sailmakers at all levels of the sport, a year long tweaking process began when naval architect Jim Antrim was commissioned to begin a massive overhaul of the design. Antrim’s recent successes include work as a member of the structural design team for Bill Koch’s America’s Cup winner, and the design of Aotea, a trimaran that recently set a record in the San Francisco-Hawaii single-handed race.
The designer’s first suggestion was to remove the transom and stretch the boat 9″ to 20′ 10″, without making radical changes to the basic hull shape—a fairly flat bottom that tapers out and up to a curved hull-deck flange. Freeboard was increased 2″ and the beam was increased to 8′ 6″, changes that improved the appearance while increasing leg room in the cockpit and sitting room belowdecks.
His next step was to increase the horsepower of the fractional rig by raising the mast height to 30′ above deck level, and eliminating the need for a permanent backstay by adding spreaders swept back 25 degrees. The changes increased the size of the full-roach, loose-footed mainsail to 205 square feet. A working jib carrying 100 square feet of sail is mounted on a Harken roller furler recessed below the deck.
Antrim redesigned the chord of the keel and added a flared bulb that resembles the whale’s tail design seen on many Cup boats. The keel was also moved aft 8″, resulting in an increase in forward buoyancy and improvements in trim and balance, making crew positioning less critical when attempting to maximize performance.
Because of built-in safety features, Antrim is especially pleased with the bowsprit arrangement. Like most, it is launched by pulling lines led aft from the pole tip to the cockpit, which is where similarities end. Most are housed belowdecks and launched through sealed through-hull fittings. By comparison, the U20’s is housed on deck in a molded slot and held in place by a fiberglass cover that is secured to the deck by six screws. So, while operation of the pole is similar to other boats, Antrim feels his design has two safety advantages: In the event of a collision, the sprit or housing will break under 1,700 pounds of pressure, before the hull is fractured; and, in the event the pole breaks the boat won’t be swamped. A deck-mounted pole also increases the amount of interior space, a consideration on any 21-footer. We tend to agree with his assessment, but this arrangement does detract from the overall appearance of the boat. As an alternative, sailors who wish to fly symmetrical chutes can tack the pole to the mast.

The modified design also incorporates the addition of curves and radiuses to the coachroof and cockpit, subtle changes that softened the edges to improve both appearance and ergonomics. The designer then reorganized the deck layout, and the result is a model of efficiency, enhanced by roller furling and the sprit/asymmetrical chute arrangement. Halyards are internal, led to cleats on the coachroof, so the only lines in the cockpit are main, jib and spinnaker sheets, a single roller furler control, and a line connected to the bowsprit.
Increasing the beam and length increased the cockpit width to 4′ and length to 7′ 8″, providing plenty of room for a typical crew of three, or four when sailing in heavy winds. Sailed with a crew of three, the driver steers from the aftermost position and controls the mainsheet, which attaches to Harken track and a swivel block recessed in the cabin sole. This leaves the trimmers with enough room to perform their tasks forward in the cockpit.
The rudder is a lightweight blade constructed of carbon fiber with fiberglass and wood reinforcement at the head, transom-mounted on pintles and gudgeons that appear to be adequate for the loads developed. By the time Antrim completed the remodeling, the rudder was about all that was left of the prototype.
Construction
Since he has 26 years of experience constructing performance boats designed to sail in rugged conditions, the selection of Moore as the builder was a propitious choice. Though found sailing primarily on the West Coast, his Moore 24 is a seasoned MORA winner, a sturdy boat that holds up well under the punishing conditions found in Pacific waters outside the Golden Gate and along the California coast.
The hull lay-up for the U20 is fairly straightforward, consisting of a 3/8″ core of Baltek balsa, to which 12-ounce layers of bi-directional woven roving knitted in 90-degree angles are applied on interior and exterior surfaces. The final exterior layer is .75 ounce mat. Hydrex vinylester resins are used on exterior skins, and Polyester C2849 on other layers. The deck also is constructed with a Baltek core, over which a 10-ounce layer of cloth is laid, followed by a .75-ounce mat. To enhance the structural integrity of the hull and deck at stress points, two 12″-wide panels of carbon fiber are laid under the keel area and across the width of the deck at the mast step and chainplates. The exterior surface of the hull is a smooth gelcoat surface, the interior a polyester enamel.
Composition of the cockpit sole is identical to the deck, except the core is 3/4″ Baltek.
The hull and deck are bonded with a syntactic slurry of polyester putty, mill fibers and microballoons. Since the deck joint overlaps an eggshell-shaped hull flange that is approximately 2″ wide, both the designer and builder are confident of the structural integrity of the bond, and feel that fasteners would be redundant. Unfortunately, because the joint is exposed, it detracts modestly from the appearance of the vessel and would seem to be vulnerable to collisions.
The bulb keel is raised and lowered by a patent- pending winch assembly that is removable. It can be locked in place by hand with six “Scotty” screws. Canepa said he was considering redesigning the locking device because some owners were shortcutting the procedure by only using four screws. The plate and keel box are fit to the foil with clearance allowed for impact.
Though the mast compression post and trunk for the lifting keel reduce space belowdecks, we didn’t find the U20 to be significantly less spacious or comfortable than similarly sized boats with fixed keels or centerboards, though quarters are reduced by the long cockpit. Surfaces are smooth, edges are rounded, and a bright white finish creates the illusion of spaciousness.
The forward V-berth is 94″ long, tapering to a 64″ width at the mid-section of the boat, which is functional as a large stowage space, or sleeping quarters for two average-sized persons. Below the berth, a fiberglass pan extends to the companionway, incorporating longitudinal stringers that provide support for the berth and separate the space into watertight compartments of 1,800 pounds positive buoyancy. Port and starboard quarterberths are 96″ long, 18″ wide.

A stowage area located below the companionway is large enough for two laundry-sized baskets, one functioning as a low-cost alternative to a spinnaker bag, the other for stowing loose gear. The outboard motor, fuel and dock gear can be stored in a 12″-deep compartment below the cockpit.
From a strictly utilitarian standpoint, most average-sized persons will find the space adequate for overnight camping trips or nights spent aboard during regatta weekends, as long as cooking and bathing facilities are available.
Performance
McWaid, a strapping 150-pounder, managed to have the boat rigged and ready to go sailing within 30 minutes of his arrival at a San Francisco Bay hoist on a blustery March afternoon. Following months of rain, temperatures had risen into the 60’s and winds were blowing 12-20 knots from the west, so we had perfect conditions to test the boat.
Rigging the Ultimate 20 is fairly simple. The mast cradle is elevated at the front of the trailer, which increases leverage during the hoist of the 45-pound mast while it is attached to the trailer winch. After that, preparing to sail is simply a matter of pinning the shrouds to the chainplates; lowering the keel by employing a patented gantry system that controls its passage between Delrin slides built into the hull; securing an aluminum cover to protect the keel from sliding upward while heeled; attaching the tiller; and heading for open water.
Sailing away from the dock, the first impression is of speed and lightness. The boat displaces only 1,100 pounds, 450 of which are in the keel, so it responds to any movement by the crew. Once we sorted out crew positions and settled down, the boat moved forward quickly in only 2-3 knots of wind as we were blanketed by buildings surrounding the marina.
The boat told us very quickly when we’d cleared the seawall and found fresh breezes by burying her shoulder into a 2′ chop, heeling 12-15 degrees, and squirting forward. We found the helm to be well balanced, even in heavy gusts when beating to weather. Clearly, this boat is happiest when it’s away from the parking lot.
Because we sailed without instruments, it was difficult to gauge speed or sail angle, but we felt as though we were sailing high and fast. When the breeze increased, we reduced headsail sag by tensioning a line led through a block on the furler. During tacks, the driver moves across the boat between the end of the tiller and the mainsail sheet while the trimmers duck underneath the boom.
We also noticed during a beat to weather that shorter crewmembers hiked out on the rail couldn’t reach the foot rests built into the cockpit, relying on the 2″ deck overhang for a handhold. The boat is not equipped with lifelines or hiking straps, a drawback. The deck overhang does deflect spray away from the boat, helping to keep the crew dry. Daysailors will find that sailing an asymmetrical spinnaker takes some getting used to, but the ease with which it is launched and the increase in speed justify its growing popularity, especially since it eliminates the need for an acrobat on the foredeck.
Hoisting the chute is a matter of snaking the tack forward to the end of the pole, sweating the halyard, footing off and holding on while the boat builds speed. Depending on sailing conditions, the jib may be furled or flown.
The boat is fairly forgiving but you have to think fast. While attempting to see how close we could sail to the wind, we nearly broached. Canepa yelled, “We’re going over,” eased the sheet as we rounded up, then trimmed the chute as it filled on a downwind course. Total time to crash, burn, and recover was less than 15 seconds. The key to jibing, we learned, is the release of large amounts of sheet before the main comes across; this way the chute fills in front of the headstay before being blanketed by the main.
We spent an hour putting her through her paces before heading back to the marina, during which time we were impressed with both upwind and downwind performance, as well as the degree to which she seems to meet Canepa’s objective of producing a boat that is both fast and friendly.
We’d feel comfortable sailing it in 20-knot winds and steep chop, but would think twice before taking the Ultimate 20 into open seas. Canepa related that he filled one boat with freshwater to test buoyancy and it didn’t sink. It can be fully enclosed with hatch boards, and there’s room for additional buoyancy.
Conclusions
We’d recommend shoppers take a careful look at the boat for several reasons, first of which is that we think it has a legitimate appeal to a vast audience of saltwater and freshwater sailors. The large cockpit, ease of handling, and speed will be appreciated by casual daysailors, so the boat won’t sit ignored in the parking lot. Racers will be able to push it hard while competing in a one-design fleet under strict class rules. It is well-constructed. Accommodations are adequate for overnighting, and it is easily trailerable.
Total weight of boat and trailer is 1,500 pounds, the keel is only 9″ deep when retracted, so it presents a low profile on the road.
Compared to other sprit boats, it is very affordable: Cost of the basic boat is $19,500, with sails adding $2,900, and a trailer $1,800. A 3-hp. Outboard provides plenty of auxiliary power.
Finally, the boat has been well-accepted in the marketplace: 40 boats have been ordered for delivery in the US and Europe since its introduction one year ago, so it appears likely that racing fleets will be developing.
RELATED ARTICLES MORE FROM AUTHOR
Hello. I recently purchased a sailboat from a private party. He says its a Schock 20, built in 1972. I am trying to find replacement parts since I am restoring this boat. I was told the WD Schock company was sold by Ruth Schock. They (Ruth Schock) currently make power boats. She did give me the number to the people who bought the sailboat company, but I have left 2 messages and nobody returns my call. Can you be of any assistance in trying to figure this all out? I am going to refurbish regardless, but to actually KNOW this boats origin would be very helpful. Thank you for any assistance you can be
John White (951) 451-0404 Homeland CA
LEAVE A REPLY Cancel reply
Log in to leave a comment
Latest Videos

Safety At Sea For You & Your Family – The Joe...

What’s The Best Vinyl Window Cleaner for Your Boat?

40-Footer Boat Tours – With Some Big Surprises! | Boat Tour

Electrical Do’s and Don’ts
- Privacy Policy
- Do Not Sell My Personal Information
- Online Account Activation
- Privacy Manager
- International
March 26, 2024 - Baltimore Key Bridge collapses after ship collision
By Helen Regan , Kathleen Magramo , Antoinette Radford, Alisha Ebrahimji , Maureen Chowdhury , Rachel Ramirez , Elise Hammond , Aditi Sangal , Tori B. Powell , Piper Hudspeth Blackburn and Kathleen Magramo , CNN
Our live coverage of the Baltimore bridge collapse has moved here .
Crew member on DALI said everyone on board was safe hours after bridge collapse, official says
From CNN’s Amy Simonson
A crew member on the DALI cargo ship sent a message hours after the Francis Scott Key Bridge collapsed Tuesday saying everybody on board was safe, according to Apostleship of the Sea director Andy Middleton.
Middleton, who spent time with the captain of the DALI Monday, told CNN’s Laura Coates he reached out to a crew member after hearing about the incident Tuesday morning.
He said there were 22 members aboard the ship from India who were setting sail earlier Tuesday morning and were heading toward Sri Lanka.
“I was able to reach out to a crew member very early this morning around 5:30 (a.m. ET) or 6 (a.m. ET) and get a message to them asking if they were OK,” he said. “That crew member responded within just a few minutes advising that the crew was safe, and everybody that [was] on board was safe.”
Middleton was told by the ship's captain Monday that the vessel was going to take a longer route to avoid risks along the Yemen coast.
“When I was out with the captain yesterday, we were talking while we were driving, and he advised that they were sailing down and around the tip of South Africa in order to avoid the incidents that are going on off the Yemen coast, and it was a safer way to go,” he said.
Middleton said the Apostleship of the Sea is a ministry to seafarers with members that spend time in the port and on the vessels as a friendly face to the seafarers that visit the Port of Baltimore, “taking care of their needs to make sure that they're reminded of their God-given human dignity when they're here in Baltimore.”
Search operation ends in "heartbreaking conclusion," Maryland governor says. Here's the latest
From CNN staff

Six people, who were believed to be part of a road construction crew, are presumed dead after Baltimore's Francis Scott Key Bridge collapsed early Tuesday morning. The collapse came after a 984-foot cargo ship hit the bridge's pillar.
Maryland Gov. Wes Moore told reporters Tuesday evening it's a "really heartbreaking conclusion to a challenging day."
Late Tuesday, it was discovered that two of the construction workers who went missing after the bridge collapsed were from Guatemala , the country's Ministry of Foreign Affairs said late Tuesday.
Here's what you should know to get up to speed:
- The victims: Eight people were on the bridge when it fell, according to officials. At least two people were rescued — one was taken to the hospital and was later discharged , fire official and the medical center said.
- The incident: Video shows the moment the entire bridge structure falls into the water, as the ship hits one of the bridge's pillars. CNN analysis shows that the ships lights flickered and it veered off course before it hit the bridge. Maryland Gov. Wes Moore said the crew on the ship were able to issue a "mayday" before colliding into the bridge, which allowed the authorities to stop incoming traffic from going onto the bridge.
- Response efforts: Earlier, dive teams from various state and local agencies were brought in to assist in search-and-rescue operations, according to Maryland State Police Secretary Col. Roland L. Butler Jr.. The mission started with 50 personnel and continued to grow before the Coast Guard announced Tuesday evening that it was suspending its active search-and-rescue operation and transitioning to a "different phase."
- The investigation: Authorities are still working to establish exactly how the crash occurred. The National Transportation Safety Board will look into how the bridge was built and investigate the structure itself. It will "take time to dig through" whether the bridge had ever been flagged for any safety deficiencies , NTSB Chair Jennifer Homendy said.
- Rebuilding the bridge: US Sen. Chris Van Hollen said the path to rebuilding the bridge will be "long and expensive." Senior White House adviser Tom Perez told reporters Tuesday “it’s too early” to tell how long it will take to rebuild the bridge. President Joe Biden said Tuesday he wants the federal government to bear the full cost of rebuilding the collapsed bridge, noting that it will not wait for the company who owns the container ship DALI to shoulder the costs. Funding could come from the Federal Highway Administration as well as the Bipartisan Infrastructure Law, but it may require additional funding from Congress.
2 of the missing construction workers from bridge collapse were from Guatemala, foreign ministry says
From CNN’s Allison Gordon, Flora Charner and Amy Simonson
Two of the construction workers missing from the bridge collapse in Baltimore were from Guatemala, the country's Ministry of Foreign Affairs said in a statement late Tuesday.
Those missing included a 26-year-old originally from San Luis, Petén. The other is a 35-year-old from Camotán, Chiquimula, the statement said.
The ministry said both were part of a work team “repairing the asphalt on the bridge at the time of the accident.”
The statement did not name the two people missing, but it said the country’s consul general in Maryland “went to the area where the families of those affected are located,” where he hopes to be able to meet with the brothers of both missing people.
The consulate also issued a statement Tuesday saying its consul general in Maryland "remains in contact with local authorities," and also confirmed that two of those missing "were of Guatemalan origin.”
Six people, who were believed to be part of a road construction crew, are presumed dead after Baltimore's Francis Scott Key Bridge collapsed early Tuesday morning when a cargo ship hit the bridge's pillar.
State and federal officials have not released information about the identities of any of the six missing workers.
Underwater mapping of bridge collapse area to begin Wednesday, Baltimore fire chief says
From CNN's Jennifer Henderson
Search operations near the Key Bridge collapse have shut down for the night due to dangerous conditions, but the process of underwater mapping with many local, state and federal dive teams will begin Wednesday, Baltimore City Fire Chief James Wallace told CNN’s Anderson Cooper Tuesday night.
Wallace said the portion of the Patapsco River is “tidal influenced, so it goes through tide cycles just like the open waters of the Chesapeake Bay does.”
The water depths in the area under the bridge vary from 40 feet to more than 60 feet, Wallace said. The deeper the divers go, the colder the temperatures they encounter, and the visibility is zero, he added.
Wallace said when crews arrived Tuesday morning, the surface water temperatures of the Patapsco River were about 47 degrees with an air temperature of 44-45 degrees.
Here's what you should know about the historic Francis Scott Key Bridge
The Francis Scott Key Bridge collapsed early Tuesday after a massive container ship lost power and crashed into the iconic Baltimore bridge, sending people and vehicles into the frigid Patapsco River.
Six people, believed to be part of a road construction crew, are presumed dead and the Coast Guard has ended its active search and rescue mission.
Here's what you should know about the historic bridge:
- How old?: The Francis Scott Key Bridge, also referred to as just the Key Bridge, opened to traffic in March 1977 and is the final link in the Baltimore Beltway, according to the Maryland Transportation Authority (MDTA.) It crosses over the 50-foot-deep Patapsco River, where former US attorney Francis Scott Key found inspiration to write the lyrics to the Star Spangled Banner, the MDTA says.
- How long?: The bridge was 1.6 miles long when standing, MDTA reports.
- Traffic volume: More than 30,000 people commuted daily on the bridge, according to Maryland Gov. Wes Moore.
- How much did it cost?: The bridge cost $60.3 million to build, MDTA says. Since its collapse, President Joe Biden said he’s committed to helping rebuild the bridge as soon as possible.
- About the port: Baltimore ranks as the ninth biggest US port for international cargo. It handled a record 52.3 million tons, valued at $80.8 billion, in 2023. According to the Maryland state government, the port supports 15,330 direct jobs and 139,180 jobs in related services.
- About the ship: The bridge collapsed after a container vessel called Dali collided with one of its supports. Dali is operated by Singapore-based Synergy Group but had been chartered to carry cargo by Danish shipping giant Maersk . The ship is about 984 feet long , according to MarineTraffic data. That’s the length of almost three football fields.
Baltimore woman says bridge collapse was "like a piece of family dissolved"
From CNN's Kit Maher
For longtime Baltimore resident, Ceely, who opted not to share her last name, seeing footage of the Francis Scott Key Bridge collapse Tuesday was deeply personal.
“I was very heavy-hearted,” Ceely told CNN. “Very tearful, thinking about the families whose loved ones may be in the water and just remembering when the bridge was constructed, and it was just like a piece of family dissolved.”
Ceely was at a prayer group Tuesday morning when she saw the news. She recalled being afraid when she first crossed the bridge while in Ford Maverick in 1975, but grew to like it because it saved time on the road.
“It was a main artery just like a blood line. It was a main artery to the other side of town. It was awesome. It beat going through the city all the time,” she said.
Elder Rashad A. Singletary , a senior pastor who led Tuesday night’s vigil at Mt. Olive Baptist Church told CNN that many church members watched the bridge's construction.
"It’s a part of the community. A lot of our individuals in our congregation drive that bridge to go to work, and so now it’s really a life changing moment,” he said.
"Heartbreaking conclusion to a challenging day," Maryland governor says as Coast Guard ended search operation
From CNN's Aditi Sangal

More than 18 hours after the collapse of the Baltimore bridge, Maryland Gov. Wes Moore said it was a heartbreaking conclusion after the Coast Guard ended the search-and-rescue operation for the six people who were on the bridge when it collapsed.
It's a "really heartbreaking conclusion to a challenging day," he said.
"We put every single asset possible — air, land and sea" to find the missing people, he told reporters on Tuesday evening. "While even though we're moving on now to a recovery mission, we're still fully committed to making sure that we're going to use every single asset to now bring a sense of closure to the families," the governor added.
6 people presumed dead after Baltimore bridge collapse, Coast Guard says. Here's what we know
As the sun sets in Baltimore, six people are presumed dead after a major bridge collapsed overnight Tuesday, according to the Coast Guard. The Francis Scott Key Bridge came down around 1:30 a.m. ET after a cargo ship collided with it.
The Coast Guard said it has ended its active search-and-rescue operation for the missing construction workers who were on the bridge when it collapsed.
- What we know: Eight people were on the bridge when it fell, according to officials. At least two people were rescued — one was taken to the hospital and has been discharged . The Coast Guard has been searching for six other people. But, around 7:30 p.m. ET, the Coast Guard said it has transitioned to a “different phase” of operation, now it did “not believe we are going to find any of these individuals alive,” Rear Adm. Shannon Gilreath said.
- About the ship: The bridge collapsed after a container vessel called Dali collided with one of its supports. The vessel is operated by Singapore-based Synergy Group but had been chartered to carry cargo by Danish shipping giant Maersk . The US Embassy in Singapore has been in contact with the country’s Maritime and Port Authority, a State Department spokesperson said.
- The investigation: The National Transportation Safety Board is leading the investigation into the collapse. A team of 24 experts will dig into nautical operations, vessel operations, safety history records, owners, operators, company policy and any safety management systems or programs, said NTSB Chair Jennifer Homendy. A voyage data recorder will be critical to the investigation, she added.
- Vehicles on the bridge: Officials are also working to verify the numbers of how many cars and people were on the bridge, Homendy said. Gov. Wes Moore said the quick work of authorities in closing the bridge had saved lives . Radio traffic captured how authorities stopped traffic and worked to clear the bridge seconds before the impact . Maryland State Police Secretary Col. Roland L. Butler Jr. said there is a “ distinct possibility ” more vehicles were on the bridge, but authorities have not found any evidence to support that.
- Looking ahead: NTSB will look into how the bridge was built and investigate the structure itself, including if it was flagged for any safety deficiencies , Homendy said. The federal government has also directed its resources to help with search and rescue, to reopen the port and rebuild the bridge, Vice President Kamala Harris said . Earlier, President Joe Biden said t he federal government will pay to fix the bridge.
- The economy: Transportation Secretary Pete Buttigieg warned the collapse will have a serious impact on supply chains . Until the channel is reopened, ships will likely already be changing course for other East Coast ports. Ocean carriers are already being diverted from the Port of Baltimore, where the bridge collapsed, to the Port of Virginia to “keep trade moving."
Please enable JavaScript for a better experience.
IMAGES
VIDEO
COMMENTS
16 to 20 would indicate reasonably good performance; above 20 suggests relatively high performance. SA/D = SA (ft²) ÷ [Disp (lbs) / 64]^.666 Bal./Disp.: A Ballast/Displacement ratio of 40 or more translates into a stiffer, more powerful boat that will be better able to stand up to the wind. Bal./Disp = ballast (lbs)/ displacement (lbs)*100 ...
The Cal 20 is an American sailboat, that was designed by C. William Lapworth and first built in 1961. Production. The boat ... The Cal 20 is a small recreational keelboat, built predominantly of fiberglass. It has a fractional sloop rig, a transom-hung rudder and a fixed fin keel with a weighted bulb. It displaces 1,950 lb (885 kg) and carries ...
The Cal 20 is a 20.0ft fractional sloop designed by C. William Lapworth and built in fiberglass by Jensen Marine/Cal Boats between 1961 and 1975. 1945 units have been built. The Cal 20 is a light sailboat which is a high performer. It is very stable / stiff and has a low righting capability if capsized. It is best suited as a racing boat.
61st Class Champs on Friday - Sunday, September 8 - 10. Cabrillo Beach Yacht Club, San Pedro California. Make plans now for sailing at the 2023 Cal 20 Class Championships. We will be racing at the infamous "Hurricane Gulch.". Given the September date, you can expect a bit less breeze than what is seen mid Summer which will make this ...
The Cal 20 fleets provide an excellent opportunity for local racing, socializing, and sharing tips and information on equipment and tuning. Many fleets hold regular social mixers and this is a great opportunity to enjoy the comradery of the Cal 20 sailors. The Cal 20 Class Association holds an annual Class Championship Regatta. Held in quite a ...
Cal 20 is a 20′ 0″ / 6.1 m monohull sailboat designed by C. William Lapworth and built by Jensen Marine/Cal Boats and Calgan Marine Ltd. between 1961 and 1975. ... The lower a boat's ratio is, the less power it takes to drive the boat to its nominal hull speed or beyond. Read more. Formula. D/L = (D ÷ 2240) ÷ (0.01 x LWL)³ D ...
The Cal-20 boom has so little extension beyond the measurement band the one needs to either rig an internal multi part purchases or side blocks at the end of the boom. We find ourselves utilizing the Cunningham, outhaul, Vang, sheet and backstay to shape main as well as the backstay, halyard and sheets to control the jib so take the time to be ...
Cal 20 National Class Association . www.cal20.org. Cal 20 National Class Association. Related Sailboats: 1 Sailboats / Per Page: 25 / Page: 1. 0 CLICK to COMPARE . MODEL LOA FIRST BUILT FAVORITE COMPARE; CAL 20: 20.00 ft / 6.10 m: 1961: ShipCanvas. KiwiGrip. Bruntons. Rudder Craft ...
Nina K. Jussila October 6, 2017. SAN PEDRO ― The California 20 was a boat in demand in the 1960s, but production on the popular sailboat halted in 1975 for reasons unknown. Cal 20s are still popular today despite being out of production and were on full display during a recent sailing event in San Pedro. Cabrillo Yacht Club hosted the 56th ...
The competitive crew weight for the Cal 20 is between 340 and 500 lbs. It does seem that it is faster to be on the heavier side of the weight range. Move the crew weight as far forward as the cockpit will allow in all conditions. In light air, the crew weight should be as low in the boat as possible to reduce the pitching of the boat.
Cal 20 Boat and Class Overview; Class Bylaws; Class Officers; Join the Class; Class Champions; Fleet Info; Cal 20 History; EVENTS; NEWS. General; Regatta Reports. Cal 20 Class Championships; 2017 Canadian Championships; Long Beach Fleet 1; Cabrillo Beach Fleet 4; RESOURCES. Classifieds. Boats For Sale; Used Sails & Parts;
Keith Ives and Chuck Stevens overcame a tight battle to win the 2022 Cal 20 Championships held August 12-14 in Long Beach, CA. ... Both boats finished within a couple of boat lengths of each other ...
Last fall Scott Lamson tore a Classy Classified ad out of Latitude 38 and said to Paul Kaplan, "Here's a Cal 20. You should buy it." Lamson and Kaplan have been friends for a long time. The 40 Years in Review feature in the April issue of Latitude 38 included a photo of the two of them coming back from the ill-fated, horribly windy 1982 Doublehanded Farallones Race on Paul's Nordic 44 ...
Hull Type Fin w/transom hung rudder. LOA 20.00 ft / 6.10 m. Beam 7.00 ft / 2.13m. Rigging Type Fractional Sloop. Ballast 900 lb / 408 kg. S.A/Disp. 20.03. First Built
Cal 20 Fleet 8. Tacoma Yacht Club is the home for Fleet #8 of the Cal 20 Class Association. The California 20 sailboat is a sturdy and fun sailboat that is easy to sail, but challenging to master. Although originally built as racer/cruisers our Cal 20s are used primarily for one design racing. The Cal 20 is Tacoma Yacht Clubs primary keelboat ...
CAL 20 Detailed Review. If you are a boat enthusiast looking to get more information on specs, built, make, etc. of different boats, then here is a complete review of CAL 20. Built by Jensen Marine/Cal Boats and designed by C. William Lapworth, the boat was first built in 1961. It has a hull type of Fin w/transom hung rudder and LOA is 6.1.
For the record, I had a great time last weekend at the Portland Boat Show for three hours helping to staff the Cal 20 Fleet 7 display. Schooner Creek Boatworks helps the fleet bring in and set up 2 Cal 20s for anyone to climb on and in to check out, and I pretty much spent the 3 hours up in the cockpits encouraging people new to sailing to come ...
Cal 20 Class Association. Cal 20 Class Association, Long Beach. 533 likes. One design sailing for everyone! See our website for more information about the Cal 20 Fleet Racing!
30 to 40 indicates a moderate bluewater cruising boat; 40 to 50 indicates a heavy bluewater boat; over 50 indicates an extremely heavy bluewater boat. Comfort ratio = D ÷ (.65 x (.7 LWL + .3 LOA) x Beam^1.33), where displacement is expressed in pounds, and length is expressed in feet. Capsize Screening Formula (CSF): Designed to determine if a ...
Complete Sail Plan Data for the Cal 20 Sail Data. Sailrite offers free rig and sail dimensions with featured products and canvas kits that fit the boat. ... Sailboat Data ; Cal 20 Sail Data ; Cal 20 Sail Data. Pinit. SKU: X-SD-4584 . Quantity discounts available . Quantity Price; Quantity -+ Add to Cart . You may also like. Sheet Bag Kits ...
Jensen would soon be building a 20 footer each day ! These quick little sailboats with four bunks, an eight foot cockpit, lots of storage and a marine head were within the price range of the masses. The Cal 20 is a great boat even today. A used Cal 20 in good shape will bring nearly as much in today's market as she sold for new over 30 years ...
The result is the Ultimate 20, a boat finding great acceptance among a group of mid-level sailors seeking new levels of performance, and experienced sailors looking for big kicks on smaller boats. It also appeals to the budget-conscious shopper. A college dropout with a penchant for water sports, Canepa began sailing in 1968 when he abandoned ...
SailboatData.com …is a database that contains information on over 9000 production and semi-production sailboats dating back to the late 1800's. COMPARE BOATS To compare up to three boats at one time, click the (+) Remove a compared boat by clicking (-)
The ship is about 984 feet long, according to MarineTraffic data. That's the length of almost three football fields. 9:07 p.m. ET, March 26, 2024 Baltimore woman says bridge collapse was "like a ...