- Search forums
- Practical Boat Owner's Reader to Reader

What's a check stay ?
- Thread starter Boo2
- Start date 30 Aug 2010
- 30 Aug 2010
Well-known member
Sorry for the very obvious question but I've come across a boat advert which mentions "check stays" and google didn't seem to help much. Are they like running backstays, or like baby forestays, or what ? Thanks, Boo2

See this old thread .
pvb said: See this old thread . Click to expand...
They're running backstays Don't know why they're also called check stays, except that the can be used to "check" mast bend, outside of stopping the mast from pumping..

Active member
Boo2 said: Yes, I already saw that, but what are they ? Are they baby stays (in front of the mast) or runners (behind the mast) ? Or what ? Thanks, Boo2 Click to expand...

pvb said: Click to expand...
30boat said: There's something wrong with that picture. Click to expand...
Members online
- justanothersailboat
- Fr J Hackett
- Bodach na mara
- rogerthebodger
- Sticky Fingers
- Sneaky Pete
- RivalRedwing
- AntarcticPilot
- TK Blue MAX
- jstarmarine
Share this page
What is a Sailboat Stay?

Last Updated by
Daniel Wade
June 15, 2022
A sailboat stay is a cable or line that supports the mast. Stays bear a significant portion of the mast load.
Stays are a significant part of a sailboat's standing rigging, and they're essential for safe sailing. Stays support the mast and bear the stress of the wind and the sails. Losing a stay is a serious problem at sea, which is why it's essential to keep your stays in good condition.
Table of contents
How to Identify Sailboat Stays
Sailboat stays connected to the top of the mast to the deck of the sailboat. Stays stabilize the mast in the forward and aft directions. Stays are typically mounted to the very front of the bow and the rearmost part of the stern.
Sailboat Forestay
The forestay connects the top of the mast to the bow of the boat. The forestay also serves an additional purpose—the jib sail luff mounts to the forestay. In fact, the jib is hoisted up and down the forestay as if it were a mast.
Boats equipped with roller furlings utilize spindles at the top and base of the forestay. The spindles rotate to furl and unfurl the jib. Roller furlings maintain the structural integrity of a standard forestay.
Sailboat Backstay
Backstays aren't as multifunctional as forestays. The backstay runs from the top of the mast (opposite the forestay) to the stern of the sailing vessel, and it balances the force exerted by the forestay. Together, the forestay and the backstay keep the mast upright under load.
Sailboat Stay vs. Shroud
Stays and shrouds are often confused, as they essentially do the same thing (just in different places). Stays are only located on the bow and stern of the vessel—that's fore and aft. Shrouds run from the port and starboard side of the hull or deck to the top of the mast.
Best Sailboat Stay Materials
Traditional sailboat stays were made of rope and organic line. These materials worked fine for thousands of years, and they still do today. However, rope has limitations that modern sailboat stays don't.
For one, traditional rope is organic and prone to decay. It also stretches, which can throw off the balance of the mast and cause serious problems. Other materials, such as stainless steel, are more ideal for the modern world.
Most modern fiberglass sailboats use stainless steel stays. Stainless stays are made of strong woven stainless steel cable, which resists corrosion and stress. Stainless cables are also easy to adjust.
Why are Stays Important?
Stays keep the mast from collapsing. Typical sailboats have lightweight hollow aluminum masts. Alone, these thin towering poles could never hope to withstand the stress of a fully-deployed sail plan. More often than not, unstayed masts of any material fail rapidly under sail.
When properly adjusted, stays transfer the force of the wind from the thin and fragile mast to the deck or the hull. They distribute the power of the wind over a wider area and onto materials that can handle it. The mast alone simply provides a tall place to attach the head of the sail, along with a bit of structural support.
Sailboat Chain Plates
Sailboat stays need a strong mounting point to handle the immense forces they endure. Stays mount to the deck on chainplates, which further distribute force to support the load.
Chainplates are heavy steel mounting brackets that typically come with two pieces. One plate mounts on top of the deck and connects to the stay. The other plate mounts on the underside of the deck directly beneath the top plate, and the two-bolt together.
Mast Stay Mounting
Stays mount to the mast in several ways depending on the vessel and the mast material. On aluminum masts, stays often mount to a type of chain plate called a "tang." A tang consists of a bracket and a hole for a connecting link. Aluminum masts also use simple U-bolts for mounting stays.
Wooden masts don't hold up to traditional brackets as well as aluminum. A simple u-bolt or flat bolt-on bracket might tear right out. As a result, wooden masts often use special collars with mounting rings on each side. These collars are typically made of brass or stainless steel.
Sailboat Stays on Common Rigs
Stays on a Bermuda-rigged sailboat are critical. Bermuda rigs use a triangular mainsail . Triangular sails spread their sail area vertically, which necessitates a tall mast.
Bermuda rig masts are often thin, hollow, and made of lightweight material like aluminum to avoid making the boat top-heavy. As a result, stays, and shrouds are of critical importance on a Bermuda rig.
Traditional gaff-rigged sail plans don't suffer as much from this issue. Gaff rigs use a four-pointed mainsail. This sail has a peak that's taller than the head and sometimes taller than the mast.
Gaff-rigged cutters, sloops, schooners, and other vessels use comparatively shorter and heavier masts, which are less likely to collapse under stress. These vessels still need stays and shrouds, but their stronger masts tend to be more forgiving in unlucky situations.
How to Adjust Sailboat Stays
Sailboat stays and shrouds must be checked and adjusted from time to time, as even the strongest stainless steel cable stretches out of spec. Sailboats must be in the water when adjusting stays. Here's the best way to keep the proper tension on your stays.
Loosen the Stays
Start by loosening the forestay and backstay. Try to do this evenly, as it'll reduce the stress on the mast. Locate the turnbuckles and loosen them carefully.
Match the Turnbuckle Threads
Before tightening the turnbuckle again, make sure the top and bottom threads protrude the same amount. This reduces the chance of failure and allows you to equally adjust the stay in both directions.
Center the Mast
Make sure the mast is centered on its own. If it's not, carefully take up the slack in the direction you want it to go. Once the mast is lined up properly, it's time to tighten both turnbuckles again.
Tighten the Turnbuckles
Tighten the turnbuckles as evenly as possible. Periodically monitor the direction of the mast and make sure you aren't pulling it too far in a single direction.
Determine the Proper Stay Pressure
This step is particularly important, as stays must be tightened within a specific pressure range to work properly. The tension on a sailboat stay ranges from a few hundred pounds to several tons, so it's essential to determine the correct number ahead of time. Use an adjuster to monitor the tension.
What to Do if you Lose a Stay
Thankfully, catastrophic stay and shroud failures are relatively rare at sea. Losing a mast stay is among the worst things that can happen on a sailboat, especially when far from shore.
The stay itself can snap with tremendous force and cause injury or damage. If it doesn't hurt anyone, it'll certainly put the mast at risk of collapsing. In fact, if you lose a stay, your mast will probably collapse if stressed.
However, many sailors who lost a forestay or backstay managed to keep their mast in one piece using a halyard. In the absence of a replacement stay, any strong rope can offer some level of protection against dismasting .
How to Prevent a Stay Failure
Maintenance and prevention is the best way to avoid a catastrophic stay failure. Generally speaking, the complete failure of a stay usually happens in hazardous weather conditions or when there's something seriously wrong with the boat.
Stays sometimes fail because of manufacturing defects, but it's often due to improper tension, stripped threads, or aging cable that hasn't been replaced. Regular maintenance can prevent most of these issues.
Check the chainplates regularly, as they can corrode quietly with little warning. The deck below the chainplates should also be inspected for signs of rot or water leakage.
When to Replace Standing Rigging
Replace your stays and shrouds at least once every ten years, and don't hesitate to do it sooner if you see any signs of corrosion or fraying. Having reliable standing rigging is always worth the added expense.
Choosing a high-quality stay cable is essential, as installing substandard stays is akin to playing with fire. Your boat will thank you for it, and it'll be easier to tune your stays for maximum performance.
Related Articles
I've personally had thousands of questions about sailing and sailboats over the years. As I learn and experience sailing, and the community, I share the answers that work and make sense to me, here on Life of Sailing.
by this author
Sailboat Parts
Learn About Sailboats
Most Recent

What Does "Sailing By The Lee" Mean?
October 3, 2023

The Best Sailing Schools And Programs: Reviews & Ratings
September 26, 2023
Important Legal Info
Lifeofsailing.com is a participant in the Amazon Services LLC Associates Program, an affiliate advertising program designed to provide a means for sites to earn advertising fees by advertising and linking to Amazon. This site also participates in other affiliate programs and is compensated for referring traffic and business to these companies.
Similar Posts

Affordable Sailboats You Can Build at Home
September 13, 2023

Best Small Sailboat Ornaments
September 12, 2023

Discover the Magic of Hydrofoil Sailboats
December 11, 2023
Popular Posts

Best Liveaboard Catamaran Sailboats
December 28, 2023

Can a Novice Sail Around the World?
Elizabeth O'Malley

4 Best Electric Outboard Motors

How Long Did It Take The Vikings To Sail To England?

10 Best Sailboat Brands (And Why)
December 20, 2023

7 Best Places To Liveaboard A Sailboat
Get the best sailing content.
Top Rated Posts
Lifeofsailing.com is a participant in the Amazon Services LLC Associates Program, an affiliate advertising program designed to provide a means for sites to earn advertising fees by advertising and linking to Amazon. This site also participates in other affiliate programs and is compensated for referring traffic and business to these companies. (866) 342-SAIL
© 2024 Life of Sailing Email: [email protected] Address: 11816 Inwood Rd #3024 Dallas, TX 75244 Disclaimer Privacy Policy
Sailboat Stays: Everything You Need to Know
by Emma Sullivan | Aug 10, 2023 | Sailboat Maintenance

Short answer sailboat stays:
Sailboat stays, also known as rigging stays, are structural wires or ropes used to support the mast of a sailboat. They provide lateral stability and prevent excessive vertical movement of the mast. Stays generally run from various points on the mast to different parts of the hull or deck, ensuring the integrity and balance of the entire rigging system.
Understanding Sailboat Stays: A Comprehensive Guide
As a sailing enthusiast or someone considering taking up this exhilarating water sport, understanding sailboat stays is an essential aspect of your knowledge base. Whether you’ve just purchased your first sailboat or simply want to expand your understanding of the technical elements involved in sailing, this comprehensive guide will provide you with all the information you need to become a confident and capable sailor. So, grab a cup of coffee, sit back, and delve into the fascinating world of sailboat stays!
1. What are Sailboat Stays?
Let’s start at the basics – what exactly are sailboat stays? Well, these are essential components that support the mast on a sailing vessel . They consist of wires or ropes attached to specific points on the mast and then secured elsewhere on the boat ‘s deck or hull. The purpose behind stays is to provide stability for the mast by counterbalancing its immense forces during navigation.
2. The Functionality of Stays
To truly grasp how sailboat stays work, imagine yourself onboard a racing yacht gliding through choppy seas with strong winds propelling you forward. The mast takes on massive amounts of tension from opposing forces like wind pressure and gravitational pull. In such circumstances, without proper support, your vessel would be at risk of losing control or even experiencing a catastrophic collapse.
That’s where boat stays come into play! These supporting systems ensure that your mast remains upright, secure, and efficiently transfers loads from sails to other parts of the boat ‘s framework. By strategically distributing tension throughout various stay points along with shrouds (diagonal supports), mainstays (fore-and-aft supports), and backstays (rearward supports), your vessel can maintain stability even under fierce conditions.
3. Types of Sailboat Stays
Stays come in several different forms depending on their positioning and intended function:
– Forestay: Located at the bow (front) of your sailboat, this crucial stay helps to stabilize the mast against forward movement. It connects to the top portion of the foredeck and restricts the mast from leaning too far or buckling under pressure.
– Shrouds: These diagonal supports are attached at spreader bars further up the mast and extend outward, connecting to either side of your vessel’s hull. Shrouds help counteract lateral forces on the mast, preventing it from shifting sideways.
– Backstays: Positioned aft (rear) of your sailboat, backstays provide additional support by countering backward tension exerted on the mast. They inhibit excessive bending while balancing other forces acting on the stays.
4. Materials Used in Stays
Historically, traditional sailboat stays were crafted using natural fibers such as hemp ropes or even metal chains for larger vessels. However, modern technology has revolutionized stay construction with high-performance materials like stainless steel wires or synthetic fibers such as Dyneema and Spectra.
These new-age materials offer superior strength-to-weight ratios, resistance to corrosion, and heightened durability in comparison to their predecessors. Sailors benefit from reduced maintenance demands while enjoying extended longevity for their staying systems.
5. Maintaining and Inspecting Stays
To ensure optimal functionality and safety aboard your sailboat, routine inspections and maintenance of stays is crucial. Regularly check for signs of wear and tear such as frayed wires or weakened sections in synthetic stays. Additionally, keep an eye out for loose fittings or improperly fastened connections that may compromise stability.
If you detect any issues during inspection or observe unusual behavior while sailing (such as excessive flexing), promptly address them with professional assistance. A well-maintained staying system will not only enhance your overall sailing experience but also safeguard against potential accidents.
In conclusion, understanding sailboat stays is a fundamental aspect of becoming a proficient sailor. By comprehending their purpose, types, materials used, and maintenance procedures associated with stays, you’re now equipped with knowledge to navigate the vast waters confidently and securely. Sail on, fellow seafarers, and may your sailing adventures be filled with smooth winds, picturesque vistas, and unforgettable memories!
How to Properly Install Sailboat Stays: Step-by-Step Instructions
If you’re a seasoned sailor or just stepping into the world of sailboats, knowing how to properly install sailboat stays is crucial for a smooth and safe sailing experience. Stays are essential components that provide support and tension to the mast , ensuring stability and reducing the risk of damage while out on the water. In this step-by-step guide, we’ll walk you through the process of installing sailboat stays with detailed instructions that will have you sailing in no time.
Step 1: Prepare Your Tools and Equipment Before diving into the installation process, make sure you have all necessary tools and equipment at hand. This includes an assortment of stainless steel shackles, turnbuckles, cotter pins, wire cutters or cable crimpers (depending on your preferred method of termination), tape measure, wire rope clips, and a strong knowledge of basic knot tying techniques .
Step 2: Inspect Your Existing Rigging Begin by inspecting your existing rigging system thoroughly. Look out for signs of wear or corrosion such as broken strands, frayed wires, rusted hardware, or any other visible damage that could compromise the integrity of your rigging. It’s vital to identify any potential issues before proceeding further.
Step 3: Measure and Order New Stays To ensure accurate measurements for your new stays, use a tape measure to determine the required length. Remember to consider any deviation from straight alignment due to deck bends or attachment positions on deck fittings. Once measured accurately, order high-quality replacement stays made from marine-grade stainless steel for maximum durability and resistance against weather elements.
Step 4: Remove Old Stay(s) Carefully remove the old stay(s) by loosening turnbuckles or detaching shackles one end at a time. Be mindful not to let go of loose ends as they may swing dangerously when released from tension. Keep track of each disconnected part so reinstallation becomes easier later on.
Step 5: Attach New Stay(s) Begin by attaching the lower end of your new stay(s) to their respective deck fittings or chainplates. It’s essential to ensure a secure connection using proper stainless steel shackles or other suitable hardware, depending on your boat’s configuration.
Step 6: Adjust and Tension With the lower ends securely attached, it’s time to adjust and tension the stays. To do this, utilize turnbuckles or rigging screws depending on your sailboat ‘s setup. Gradually tighten each stay until they are taut but not excessively stretched. This step requires careful attention as overtightening can lead to excessive strain on both the rigging and the mast.
Step 7: Terminate the Upper End To terminate the upper end of your stays, you have two common options – wire rope clips or cable crimps. Both methods require precision and care to create a secure termination point capable of withstanding heavy loads and frequent vibrations while sailing.
Step 8: Inspect and Test After completing the installation process, always conduct a thorough inspection of your newly installed stays. Look for any signs of weakness, improper tensioning, or potential hazards that may affect proper functionality. Once satisfied, give your rigging system a gentle shake or two to confirm stability before setting sail .
By following these step-by-step instructions meticulously, you’ll have successfully installed new sailboat stays, ensuring safe travels on open waters . Remember that routine inspections and maintenance of your rigging system are crucial for longevity and safety purposes. So before planning future sailing adventures, make sure you have properly installed sailboat stays to enjoy an exhilarating journey with peace of mind!
Frequently Asked Questions About Sailboat Stays: Your Queries Answered
Introduction to Sailboat Stays
Sailboat stays are a unique and exciting way of experiencing the water. Whether you’re a seasoned sailor or a first-timer, staying on a sailboat offers an unforgettable adventure . But we understand that many questions may be floating in your mind about this unconventional type of accommodation. Fear not, because we have compiled some commonly asked questions and provided detailed, professional, witty, and clever explanations to put your queries to rest.
1. Is staying on a sailboat safe ?
Absolutely! Safety is of paramount importance for both the boat owner and guests. Boat owners must comply with strict safety regulations, ensuring that all necessary equipment is onboard. Additionally, experienced sailors are always available to guide you through any potential concerns. So rest assured, you’ll be in good hands throughout your stay.
2. What amenities can I expect on a sailboat?
While sailboats may be compact compared to traditional accommodations like hotels or apartments, they offer everything you need for a comfortable stay. Most boats come equipped with basic amenities such as sleeping quarters (cabins), bathrooms (heads), kitchen facilities (galley), and dining areas (salon). Some even have luxurious extras like air conditioning and entertainment systems.
3. Will I experience seasickness while staying on a sailboat ?
Seasickness is certainly a concern when spending time at sea. However, it predominantly affects those who are more prone to motion sickness or exposed to choppy waters. Sailboats are typically situated in calm anchorages or marinas where the rocking motion is minimal. If you’re worried about seasickness, prepare accordingly by bringing over-the-counter remedies or consulting with medical professionals who can provide effective solutions.
4. How do I manage privacy on a sailboat?
Privacy can sometimes feel limited aboard a sailboat due to its close-quarters layout. However, boat owners usually go above and beyond to ensure their guests have ample personal space by assigning separate cabins or creating privacy curtains. It’s essential to communicate your privacy needs beforehand, so the boat owner can make suitable arrangements for your comfort.
5. What activities can I engage in during a sailboat stay ?
Sailboat stays offer an abundance of unique activities to keep you entertained. Besides enjoying recreational water sports like snorkeling, kayaking, and paddleboarding straight from the boat, you can also fish, swim in pristine waters, explore nearby islands, or simply relax on deck while appreciating breathtaking sunsets. Each day brings new opportunities for adventure and leisure during your sailboat stay.
6. Can anyone book a sailboat stay , even without sailing experience?
Absolutely! You don’t need any sailing experience to enjoy a sailboat stay. Boat owners often provide basic training upon arrival to familiarize guests with the vessel’s features and operations. They are there to assist you throughout your stay, ensuring that you have an enjoyable and hassle-free sailing vacation.
7. How do I find reputable sailboat stays?
To find reputable sailboat stays around the world, numerous platforms specialize in connecting guests with experienced boat owners looking to share their vessels. By conducting thorough research or seeking recommendations from fellow travelers or online communities dedicated to boating enthusiasts, you’re likely to discover trustworthy options that meet your expectations.
Sailboat stays provide a one-of-a-kind experience for those seeking adventure on the open waters . Regardless of concerns about safety, amenities, seasickness, privacy, activities, or sailing experience — there’s something for everyone on a sailboat stay. So step aboard this extraordinary mode of accommodation and prepare for a memorable journey filled with relaxation and enchantment at every turn of the tide!
Top Tips for Maintaining and Inspecting Sailboat Stays
Sailboat owners understand the importance of regular inspection and maintenance to ensure their vessel is in optimal condition. One significant area that requires attention is the sailboat stays, essential components for maintaining mast stability. Neglecting proper care can lead to potential dangers and even structural failures. In this blog post, we will provide you with top tips for maintaining and inspecting sailboat stays.
1. Regular Cleaning: It may seem obvious, but a simple yet effective way to keep your sailboat stays in good condition is through regular cleaning. Over time, dirt, saltwater residue, or even bird droppings can accumulate on the surfaces. These contaminants not only impair the aesthetics but also contribute to corrosion and degradation of the material. A thorough rinse with clean water and a mild detergent goes a long way in preserving the integrity of your stays.
2. Visual Inspection: Before setting sail or after returning from an expedition, it’s crucial to visually inspect your sailboat stays carefully. Look out for signs of fraying, corrosion, kinks, or any other damage that may compromise their strength and integrity. Also, pay close attention to fittings and connections; loose or damaged hardware can weaken the whole system.
3. Check Tension: Proper tension is critical for maintaining stability during sailing trips. Using a tension gauge specifically designed for wire rigging systems allows you to measure tension accurately at various points along your stays. Aim for manufacturer-recommended tension levels or consult an expert if you’re uncertain about the specifications for your particular boat model.
4. Lubrication: To prevent rusting and assist with smooth operation, apply appropriate lubricants regularly to any moving parts of your sailboat stays like turnbuckles or clevis pins. It’s advisable to use products specifically formulated for marine applications as they offer superior protection against harsh marine environments.
5. Rigging Tune-Up: Periodically assess the overall rigging system alongside regular stay inspections by employing the services of a professional rigger. They possess the expertise to spot potential issues that may have gone unnoticed and can recommend adjustments or replacement parts as needed. Maintaining a good relationship with a trusted rigger ensures your rigging receives comprehensive care.
6. Weather Protection: Exposure to extreme weather conditions can accelerate wear and tear on your sailboat stays. When not in use, consider covering them with UV-resistant guards or fabric sleeves that shield against harmful sunlight, while also minimizing the impact of rain, snow, or ice on the stays’ surfaces.
7. Record-Keeping: Keeping detailed maintenance records is highly beneficial for sailboat owners. Documenting inspections, repairs, replacements, and specific notes about your stays’ condition allows you to monitor patterns and plan future maintenance schedules more effectively. Additionally, these records serve as useful references when discussing any concerns or seeking advice from industry professionals.
By adhering to these top tips for maintaining and inspecting sailboat stays, you ensure the safety and longevity of your vessel while maximizing its performance on the water. A well-maintained rigging system gives you peace of mind during sailing adventures, knowing that every precaution has been taken to minimize risks associated with stay failures or malfunctions. So don’t overlook this crucial aspect – prioritize the care of your sailboat stays today!
Evaluating Different Types of Sailboat Stays: Pros and Cons
When it comes to evaluating different types of sailboat stays, there are several factors to consider. Stays play a crucial role in supporting the mast and keeping it upright, so making the right choice is essential for smooth sailing . In this blog post, we will dive into the pros and cons of various sailboat stays, helping you make an informed decision.
1. Wire Rigging: Wire rigging is the most commonly used type of stay on sailboats . Its popularity stems from its strength and durability. Made from high-tensile stainless steel wires, it offers excellent support and can withstand heavy loads. This makes it suitable for larger vessels or boats that frequently navigate challenging waters .
Pros: – Superior strength: Wire rigging can handle significant tension without breaking or stretching. – Long-lasting: Unlike other materials that degrade over time, stainless steel wires resist corrosion and have a longer lifespan. – Versatile: Can be used for both standing rigging (supports when stationary) and running rigging (controls while sailing).
Cons: – Complexity: Installation requires experience as specialized tools are necessary to adjust tension properly. – Cost: Wire rigging can be expensive compared to alternative materials. – Weight: The weight of wire stays may affect performance on smaller boats with limited stability .
2. Synthetic Materials: Synthetic materials like Dyneema or Spectra have gained popularity in recent years due to their impressive strength-to-weight ratio. These fibers are coiled together to form a lightweight yet durable stay.
Pros: – Lightweight: Synthetic stays reduce boat weight , enhancing speed and maneuverability. – Low maintenance: They do not corrode like metal stays, reducing upkeep requirements. – Easy installation: Less knowledge required than wire stays as there is no need for specialized tools.
Cons: – Chafe susceptibility: Synthetic materials are susceptible to chafing against contact points, which necessitates protective coverings or regular inspection. – UV degradation: Prolonged exposure to sunlight can weaken the fibers over time, requiring periodic replacement. – Cost: Synthetic stays can be expensive initially, though they often provide long-term cost savings in terms of maintenance.
3. Rod Rigging: Rod rigging consists of solid metal rods that are corrosion-resistant and extremely stiff. Typically made of stainless steel or carbon fiber composite, this type of stay offers a unique set of advantages.
Pros: – Stiffness: Rod rigging provides exceptional rigidity, resulting in minimal stretch under heavy loads. – Low windage: The slender profile reduces drag, improving sailing performance in light winds . – Reliability: Potential failures are easier to detect as rod rigging shows signs before complete rupture.
Cons: – High cost: Rod rigging is more expensive than wire and synthetic options due to the manufacturing process and materials used. – Limited flexibility: Unlike wire or synthetic stays, rod rigging cannot accommodate dynamic adjustments during prolonged use. – Specialist installation: Requires professional expertise with specific knowledge and skill set for proper fitting.
In conclusion, choosing the right sailboat stay depends on various factors such as boat size, sailing conditions, budget, and personal preferences. While wire rigging remains the go-to option for many sailors due to its strength and durability, synthetic materials offer lightweight alternatives with low maintenance needs. On the other hand, rod rigging provides unmatched stiffness but comes at a higher cost and requires specialist knowledge for installation. By carefully assessing these pros and cons, you can confidently make an informed decision about which sailboat stay best suits your needs. Happy sailing!
The Importance of Properly Tuning Sailboat Stays for Optimal Performance
Sailing enthusiasts understand that achieving optimal performance on a sailboat requires attention to detail and careful tuning. One crucial aspect that often goes overlooked is the proper tuning of sailboat stays. Yes, those seemingly inconspicuous cables or rods that support the mast play a pivotal role in determining a boat’s overall performance on the water .
Now, you may be wondering what exactly is meant by “tuning” sailboat stays. In simple terms, it refers to adjusting the tension of these rigging components to attain maximum efficiency and minimize any potential issues while sailing . This process involves ensuring that the stays are neither too loose nor too tight but rather precisely tuned to strike an equilibrium.
Why does this matter? Well, let’s delve into why properly tuning sailboat stays is of utmost importance for optimal performance.
Firstly, properly tuned stays greatly affect a sailboat’s stability and balance while under sail . When tensioned correctly, they help counteract the forces exerted on the mast by wind pressure and sails . A well-tuned rig keeps the mast in an upright position, preventing excessive movement that could negatively impact sailing performance . Without stable stays, your boat may experience excess heeling or dangerous oscillations, making it harder to maintain control over speed and direction.
In addition to stability, properly tuning your stay also ensures efficient power transfer between your sails and hull, maximizing overall boat speed. When stays are accurately adjusted, they allow for better alignment of the mast with respect to the wind direction. This alignment optimizes how sails catch and utilize wind energy effectively – allowing you to harness nature’s power efficiently while gliding through the water like a pro!
Furthermore, balanced tensions in your stay system contribute to enhanced upwind sailing abilities – perfect for those thrilling races or navigating challenging conditions. In these scenarios where boats must tack into the wind at different angles, precise tuning of stays becomes even more critical. Properly tensioned rigging increases the boat’s ability to point higher, enabling it to sail closer to the wind without losing speed or experiencing excessive leeward drift.
Now, we wouldn’t be discussing sailboat stays’ optimal tuning without highlighting the importance of safety. While increased performance is undoubtedly appealing, a properly tuned rig also decreases the risk of catastrophic failures. Loose stays can lead to mast pumping (undesirable vertical movement), creating tremendous strain on rigging components and potentially causing structural damage or failure. Conversely, overtightened stays can put excessive stress on the mast, placing it at risk of cracking or even snapping during heavy winds or sudden maneuvers. Neglecting proper tuning could result in costly damages as well as endanger the crew onboard.
It’s not just about a mechanical advantage; tuning your sailboat stays can also have psychological benefits! Picture this – you’re out on the water, racing alongside fellow sailors, and you’ve spent time meticulously honing your boat’s performance. With every sail trim adjustment and precision tuning placed into action, you feel an unspoken bond with your vessel – knowing that you’ve optimized its capabilities to their fullest potential. This connection adds an element of confidence and satisfaction that only comes from understanding and taking control of every aspect of your craft.
In conclusion, proper tuning of sailboat stays is far more than just an arcane nautical art – it is vital for achieving optimal performance on the water. From stability and speed enhancements to improved maneuverability and safety measures, a finely tuned rig elevates both sailing pleasure and competitiveness. So next time you set sail, remember to pay extra attention to those humble but mighty stays; they hold the key to unlocking exciting adventures while embracing the timeless allure of sailing!
Recent Posts

- Sailboat Gear and Equipment
- Sailboat Lifestyle
- Sailboat Maintenance
- Sailboat Racing
- Sailboat Tips and Tricks
- Sailboat Types
- Sailing Adventures
- Sailing Destinations
- Sailing Safety
- Sailing Techniques
How to Tune a Sailboat Mast
Here are some general guidelines for tuning your mast’s standing rigging . please see our blog on how to properly adjust a turnbuckle before you begin. as always we recommend seeking the advice of a professional rigger for more specific tips and tricks regarding tuning your boat’s rigging..
Your boat must be in the water. Begin by just slacking off all of the side shrouds as evenly as possible, so that all stays can be adjusted by hand. Once loose, try and adjust all turnbuckles so that they are pretty much equally open (or closed) from port to starboard respectfully. Also go ahead and line up the cotter pin holes (if present) in the studs so that they are in a pin-able position. Now is also the time to balance out the threads, between the upper and lower studs of the turnbuckle, IF they are not even. Do this by unpinning the turnbuckle from the chainplate – BE CAREFUL HERE – to ensure the mast is secure before unpinning any one stay. Lastly, loosen all halyards or anything that may pull the mast to port, starboard, forward or aft.
1. Check by sighting up the backside of the mast to see how straight your spar is side to side. You can take a masthead halyard from side to side to ensure that the masthead is on center. Do this by placing a wrap of tape 3′ up from the upper chainplate pin hole on each upper shroud. Cleat the halyard and pull it to the tape mark on one side, mark the halyard where it intersects the tape on the shroud. Now do this to the other side, the mark on the halyard should also intersect the tape similarly. Please note: when the mast is equipped with port and starboard sheaves, instead of just one center-line sheave, it will appear slightly off to one side. Just keep this in mind……
2. Using the upper shrouds as controls, center the masthead as much as possible using hand tension only. Some masts are just crooked. If yours is(are) crooked, it will reveal itself when you loosen all of the stays and halyards initially and sight up the mast. Although you should use hand tension only, you can use a wrench to hold the standing portion (the stay portion) of the turnbuckle. If for some reason the shroud is totally slack and you still can’t turn the turnbuckle by hand then the turnbuckle may need to be serviced, inspected, and maybe replaced.
3. Tune the mast from the top shroud on-down, making sure the mast is in column. Remember: as you tension one shroud by adjusting the turnbuckle, to loosen the opposing shroud the same amount.

4. Once the mast is fairly straight from side to side, tighten the shrouds all evenly using tools for tensioning. Typically, for proper tension, the shrouds should be tightened using these guidelines; uppers are the tightest, and then fwd. lowers, then the aft lowers and intermediates should be hand tight plus just a turn or two. ~ With an in-mast furler it is recommended to tension the aft lower a bit more to promote a straighter spar (fore and aft) for better furling.
5. Now you can tension the aft most backstay (s). If the backstay has an adjuster it should be set at a base setting (500-1000 lbs). If the backstay simply has a turnbuckle then it should be tightened well. After this has been done, in either situation (adjustable or static backstay), one should site up the mast from a-beam and notice that the masthead has a ‘slight’ aft bias. If there is no aft bias, too much, or the mast is inverted (leaning forward), then the forward most forestay (s) will most likely need to be adjusted to correct this. If a furler is present then seek the council of a professional rigger or refer to your furler’s manual for instructions on how to access the turnbuckle if there is one present.
6. Finally, sight up the mast one last time and make any necessary adjustments.
7. MAKE SURE ALL TURNBUCKLES AND PINS HAVE COTTER PINS AND ARE TAPED NEATLY TO PREVENT CHAFE!
Read HERE for how to use a LOOS & Co. Tension Gauge!
Here is a little vid from our friend Scott at Selden Masts (click the link then hints and advice for more info) on rig tune…..
[youtube http://www.youtube.com/watch?v=rcCALZ4x6R4&w=420&h=315]
Is your mast fractionally rigged, only has a single set of lowers or is just plain different? Be sure to leave any questions or comments below.
Similar Posts
Still here, are you coming down, keeping up with the cup.
Just over a week ago, the Americas Cup teams took it back to the water on their AC 45’s as the AC World Series continued in beautiful Naples Italy. Check out the final day highlights as helmsman Francesco Bruni of Luna Rossa Swordfish takes the overall championship over the Australian Tom Slingsby of Oracle Team…
Extreme 40’s Start Back Up…….
………and it appears the racing action is going to be tight a-top the leader board. In a light air battle, winning the start on the correct end of the line seems to pay a huge roll in such a short course. Enjoy Team Oman Air’s celebration as they stay in contention with only 3 of…
HAPPY HOLIDAYS
From us here at The Rigging Company! ~SEE YOU NEXT YEAR…..
The Highfield Lever
The Highfield lever was originally invented by the late Mr J. S. Highfield in about 1930. I believe this concept was initially intended to load and release running backstays at a predesignated tension. This method for runner tensioning has since been replaced with ‘high speed’ synthetics, fancy blocks, tackles, and/or dedicated winches. Some years later,…
How to Break Your Mast and Fix it!
Here is a neat rigging related find from yachtingmonthly.com’s YouTube feed. In this first video you will see the crew attempt to force a dismasting by replacing the standing rigging clevis pins with shortened fiberglass battens. At first the fiberglass battens hold up, much to their surprise. After replacing the pins with even smaller fiberglass pins and accidentally unfurling the Genoa all the…
Leave a Reply Cancel reply
Your email address will not be published. Required fields are marked *
Save my name, email, and website in this browser for the next time I comment.
54 Comments
I have a 1965 Alberg 30. On a starboard tack the boat has more weather helm than on a port tack. I have not been able to achieve a balanced helm on either tack. New full batten main, new 150 roller furl genoa.
Other than the boat being evenly ballasted from port to starboard, e.g. holding tanks, fuel tanks, below deck furnishings, and storage items, I would check the rig from side to side. A crooked mast or poor static tune can result in the boat sailing differently on both tacks. A good way to test this is either sighting up the mast at the dock to ensure that the mast is relatively straight side to side and in column. You can also see that when beating (aka hard on the wind), you have to make adjustment’s to the mainsail sheet tension (NOTE: the traveler will likely need to be adjusted to mirror the same setting as on the previous tack). If notice that with the traveler in the same position on each respective tack that the sail is bubbling or flogging more on one tack than on the other, it is likely necessary to re-tune the mast. This can be done at the dock by following the guidelines in the article once the everything has been appropriately loosened to tension.
Let us know if this helps.
Any Hints, tips for tuning a 1977 Whitby 27 sloop 1/4 ton rig?
Nothing special that I can think of. Just follow the guidelines in the article. From what I can gather there are only a single set of lowers correct? Are the spreaders aft swept at all or just straight out? If it is single lowers and no sweep to the spreaders you’ll need to set the rake using the forestay adjustment to set the rake and the backstay to control the forestay tension. If you are interested in optimizing sail tuning, like in racing situations: higher wind sailing conditions will desire more tension on the shrouds, a bit more tension on the lower than the upper, but only slightly; and in lighter winds loosen them up a bit, a tad looser on the lower than the upper.
Hope that helps, and good luck.
How do I tune /2 in rigging. Neither of the loos gaug s are large enough?
Thanks for the question. Yes, I think the Loos gauges only go up to 3/8″ wire. First let me say that a tension gauge is not a must for proper tuning, more for tension recording and also not exceeding max tension which is typically hard to achieve without additional fulcrums or wrench extensions. Having said that, if you know that you need one simply search google for cable tensioning gauges. There are a few others like this one https://www.checkline.com/product/136-3E , pricing is not easily apparent and may be excessive for your needs.
My recommendation is that if you have a good local rigger have them do a static dock-side tune and perhaps sail-tune in the boat’s ideal conditions. Perhaps they can provide a tutorial on their process for you to be able to make rigging adjustments over time.
Hope that helps.
Hi. Nice article. I have a Mirage 27 (the Bob Perry design). It’s a masthead rig with single spreaders and the shrouds on each side come to the same chainplate. I have been tuning so that tension on the lower and uppers is the same and trying to set them so that (as you say) the leeward shrouds are just slightly slack. But how do I induce mast rake? I have a split backstay with a 6:1 purchase on the adjuster; should the mast have rake even with the adjuster off? or do I just haul on it? or should the tension on the inners and outers be different?
HI Michael,
You will need to lengthen the headstay and shorten the backstay. This can be done a few ways either with turnbuckle adjustment or actually shortening and lengthening cables, sometimes you can add or remove toggles also.
Hope that helps!
- Pingback: Buying a second-hand luxury yacht? Here’s what you need to look for - Phuketimes news
I recently purchased a 1988 Catalina S&S 38 and experienced my first launch this season, including stepping the mast and tuning the rig. As we prepared, we found that the Cap Shroud and Intermediate Shroud were clamped together at the four spreader ends. The folks at the yard had never seen that, and I certainly didn’t know why it was there … possibly to keep the spreader ends and shrouds consistent? Anyway, as I am learning how to tune my rig, it seems to me that these clamps would prevent me from tuning the cap shroud and intermediate separately and correctly Thoughts? Should I remove them and re-tune the rig?
So it is a double spreader rig I take it? The upper shroud wire should run freely through the first spreader, or the closest one to the deck, and be clamped at the top spreader. The intermediate shroud wire should be clamped at the lower spreader.
Before stepping, if this was done correctly, both upper spreader and lower spreader should be clamped equal distance from the mast attachment point, when looking at the mast from port and starboard.
In other words, you should measure the distance from where the upper shroud attaches to the mast to the end of the upper spreader and it should be the same distance on the other side, port to starboard. Then the same goes for the intermediate shroud and the lower spreader. The upper shroud should run freely through the lower spreader although it is covered by the clamp, but not actually clamped at the lower spreader, j ust the top one.
If all 4 spreaders are clamped equally port to starboard. You should be good to tune from there. The spreaders should show a slight up angle, to be specific slightly more up at the upper spreader than at the lower, but all of them should be just ever so slightly pointing up. You even want to think about clamping them slightly higher than that before tensioning, as this will pull them down and into their preferred angle, just slightly up. Specific angles are really only determined on the spar builders drawing and vary for manufacturer to manufacturer. Generally it is pretty clear where they want to sit. With the shrouds loose if you find that angle that appears to be the right one, and push them up slightly from there then clamp. This will allow them to be pulled down slightly once tensioned.
Kind of a tricky thing to explain in writing but hopefully it helps.
Have further questions? Give us a call 443-847-1004, or email us [email protected]
I have a Catalina 275 fractional rig with single swept back spreaders and an adjustable backstay. My questions are: how much rake, tension on cap and lower shrouds and on chain plate should cap shroud be forward and lower aft. I am racing and want the best performance. Thanks for any help. Bill
If the two shrouds are on the same plate, right next to each other, and the pin holes are the same diameter, and the plate is configured in a fore and aft configuration, I would choose the aft hole for the lower shroud and the forward one for the upper shroud.
In terms of specific rake, you will need to look towards the maker of your sails and or the boat manufacturer. I discuss how to measure rake in the preceding comments.
“You can measure rake by hanging a small mushroom anchor from the main halyard, with the boat floating on its lines, if you wish”
For racing I would start off with a good static tune at the dock by following the points in the article. If you know it’s going to be light day, start off with light rig tension. Be sure to use either Velcro wrap style cotter pins or simply lash the upper and lower shroud turnbuckles together to secure them. This will give you access to removing the pins or lashing while sailing and adjusting the stays.
From there you will need to sail tune for that days specific conditions, your shrouds will tell you what needs to be tighter and looser. I have answered how to do this a few times already in the comments below, please take your time to peruse the comments section to see what sail tuning entails. Doing this will always ensure that the cable tensions are set up ideally for the conditions and the boat can be sailed at maximum potential.
“For racing, ideally once the static tune at the dock (the part we just talked about) is done, go out and sail tune. Do this by going hard on the wind and checking to see if the leeward shrouds are just starting to dance, this is ideal. If they are swaying about they are too loose for the current conditions. If the leeward shrouds are tight, they may be a touch to tight. Tension and loosen as needed; count what you did and to what shroud, then tack and do the same to the other side.
ALWAYS secure the turnbuckles when you are finished adjusting them.”
Just hit ‘Ctrl F’ and search the page for “sail tune” and “rake”
I am trying to tune a Hallberg Rassy HR36 masthead rig. The rig has two in-line spreaders. The cap shroud is 3/8 inch and terminates at the lower spreader. From the lower spreader, the cable transitions to a 5/16 inch cable passing over the upper spreader to the masthead. A second 9/32 inch cable runs from the lower spreader to the mast (just below the upper spreader). The Selden rigging suggests that the “upper shroud” be at 15 percent of the breaking strength of the cable. In this situation, is it 15 percent of the 3/8 inch lower portion? If so, how should the upper 5/16 inch and 9/32 inch cables be tensioned?
Thanks for your help.
Hi Bryant, good question. Once proper alignment and centering of the spar has happened (static tune), and you are perhaps a hair tighter than hand tight on all shrouds, you can begin to tension things to a percentage of breaking strength. Do this by using the cables at the deck and use their diameters to determine the tensioning amount.
The V1 (aka cap shroud) in your case is a 3/8″ cable which supports the two cables above ii, hence its large diameter. The 5/16 V2,D3 and the 9/32 D2 total 19/32. So if 15% of the 3/8 cable is achieved you will below that threshold for the cables aloft. Does that make any sense?
With that in mind there is a range of acceptable tension from light air to heavy air. 15% sounds like a good middle of the road tension. Generally you do not want to exceed 30%. Sail tuning in ideal conditions is generally the best way to determine the right tension, but 15% of breaking strength sounds like a good place to start.
Don’t forget your cotter pins and tape, especially aloft.
Hope that helps and thanks for the question.
T.R.C. Thanks you for the clarification regarding the V2,D3 and D2 load distribution. When I set the V1 tension to 15%, the tension on the V2,D3 was at 8 %. I then tensioned the forward shroud to 12 % and the aft shroud to 10 %. Then I tensioned the backstay to 14 %. After doing this, I measured the tension on the V1 to be 10 %. The only information I could find regarding tension on the D2 was that is did not have to be tensioned much. I tensioned it to 5%. The mast sights straight and I used a bossen seat on a halyard to measure to the lower part of the V1, which also indicated that the mast was straight. Did I overtension the fore and aft stays? Is the tension in the D2 too much or too little? Again, I appreciate your advice.
When you tighten the backstay it usually induces a bit of aft bend in the mast which will soften the upper shroud (V1) a bit. You can just take up on it again to get it back to 15% if you like. As I said there is a acceptable range for all of the stays, which you are well within. Everything else sounds like you did a pretty good job. Next up sail tune and see if there is excessive waggling on the leeward side, but in moderate breeze. The shrouds will begin to sway as the breeze builds, this could be a telltale to either reduce sail a bit or you can add some tension to the shrouds all the way around.
Should be all good as they say.
Cheers, ~T.R.C.
T.R.C., your advice has been invaluable. I took her out in 12-15 knots and was very happy with the sail luff and stiffness of the rig. Thanks for you help!😁⚓️
Hi , can you provide any tuning guides for a Swan 38 Tall mast single spreader rig with baby stay, I am keen to set the rig up for new North sails and race her competitively. The mast is an exact Nautor factory replacement in 1998. She shall not have furling sails.
Hi Peter and thanks for the comment.
Unfortunately we do not have a guide for that boat. I would ask the sailmaker however to see what info he or she might have. Alternatively you can always start with a good static tune and then sail tune the boat as I describe in some of the comments below. This is the best way. I may use a Swan 45 Tuning guide as the template and then just fill in my own numbers over time. This is ideal, but infidelity start with asking the sailmaker you are working with, he should have some good info.
This may seem like a silly question, but it has me perplexed. How long should my cotter pins be? Long enough to ‘jam’ against the surrounding body, to prevent rotation? Otherwise, I don’t see how they’ll prevent my stays from loosening.
The length should be the minimum amount to just be able to bend the legs. Too long and they get caught up on things, too short and you can’t adequately bend the legs to keep the pin in place. The head of the pin is a actually providing the security.
Does that help?
Great article to get me started, thanks! I just have a few questions…
I originally owned a Tanzer 7.5. Her mast was rigid and simple to tune with a LOOS and an eyeball. I however now own a Mirage 33 (1982) and things are a bit more complex (but not too much). When I bought her the mast was already stepped and the owners said they replaced the forestay (inside the furler) 1 season ago. I went about the boat tuning the rig as best I could but I started second guessing the rake. I found noticeable rake in the mast with virtually no backstay tension on. So I think my forestay stretched (being “new”) and I need to bring it forward.
How do I measure how much rake (at rest on the tensioner) is enough? With my rig as is I felt worried that if I pulled down on the backstay tensioner I might buckle my mast by bending it too far. It seems to me it’s ALOT of downward pressure on the column when you pull down on her especially if the mast was already raked or maybe in my case leaned too far back to start? She has a babystay too, I wasn’t sure how far to tension that other than to assist adding bend\rake but since I had too much already I just lightly tightened it and hoped for the best!
Thanks for the question. With the backstay tensioner completely off, you should be able to adjust the static/ base tension of the backstay with a turnbuckle (s). Loosen the Baby Stay so that it is completely loose, sloppy, to take it out of the equation. Then mark furling line spool direction and remove the line. Next, open the furler up to gain access to the turnbuckle inside, if present. Remove all cotter pins or locking nuts to free the turnbuckles on the headstay and the backstay. You should then loosen things so that the headstay and the backstay can be adjusted by hand. Close the headstay turnbuckle and open the backstay turnbuckle to reduce rake, and vice versa if wanting to add rake.
You can measure rake by hanging a small mushroom anchor from the main halyard, with the boat floating on its lines, if you wish. Then once you achieve the desired mast rake go ahead and tension the forestay and backstay a few turns equally with tools; not too tight, but a good base light air setting, or as loose as you can imagine the headstay ever needing to be. Lastly, tension the baby stay a bit until it just starts to tug on the mast, helping induce bend. From here the backstay tensioner will do the rest: wind it on and it will tension the headstay and induce mast bend via the baby stay. You may have to take the boat sailing and adjust things as you find out how it performs at various degrees of rake and bend.
I hope that’s not too wordy, but helps explain it all a bit. Feel free to email or call with further questions.
Regards, ~T.R.C.
Can you provide some specific information regarding rig for 1980 C&C 32. Looking to purchase new main and want to get the most from it for Wednesday nights. Boat currently does not have a pony stay, it has been removed. Can replace that track/car. What should initial bend look like, keel step is fixed so assume I need to some chock aft of mast at deck? Have rod rigging but no Loos gauge for same, should I acquire one? Love this site, very helpful RayK
Thanks for the compliment. This may be less technical than you might expect. I would start with the basic guidelines given in the article to ensure a good base, static tune setting. A Loos gauge is good but not needed. If you focus on getting the spar straight, side to side, with a slight aft bias and then the tension is set so that it feels fairly tight. I know that sounds vague, but keep this in mind: if you are anticipating heavier wind make things a bit tighter, and loosen things up if less windy. The order of tension, in regards to the which shroud (upper vs intermediate vs lower) is important; more so than the amount of tension. Make sure nothing is so loose it is just flapping about.
The headstay should have some good slack to it with the backstay adjuster totally off. Adjust the backstay and headstay turnbuckles, with them in the slack position until the masthead is favoring a slight aft lean or rake, but only slight. From there, tension the backstay adjuster very tight and see what the headstay tension feels like, should be very tight.
PLEASE NOTE: if the backstay adjustment is totally bottomed out at this point, the backstay needs to be shortened a bit. Just pay attention to how this affects the rake. …
This part is where the pony stay or the baby stay will play a critical part, for mast bend. You may even find the pony stay to be good for mast pumping in light air and waves. Making this baby stay removable is a good idea, as well as, we’ve found that Dynema rope is the best choice here.
So… a centered mast head, side to side. A straight, in column mast from the top on down. A slight aft rake to start with…and as you begin to wind on the backstay and the baby stay you will add some rake but also a good bit more bend.
Take this set up for a few test sails and see how things act, in different conditions. After that you can make some adjustments here and there as needed: weather helm, shroud tension, mast rake, pre bend, etc…Moving chocks and using a Loos gauge.
ADDT’L TIP: Chocks and mast step position affect bend and rake properties. Want more rake? Chock mast aft in collar and move step forward. Want more bend? Chock mast forward in collar and move mast aft. As all things, there is more to it than that, but that’s the gist of the whole chocks and mast step thing…
“Sail Tuning” is a blog we are in the works of, but the punchline is that if hard on the breeze, and the leeward shrouds are excessively loose, and you are sure you aren’t over canvased…then go ahead and take turns on the leeward side until they just stop waggling, count what you’ve done, tack and mirror the turns on the other side.
Once the boat is set up for that specific condition, and you return to the dock, you should take your loose gauge and record these settings…creating a tension gauge setting for various conditions.
Hi, Thanks for your information. I have a Dehler 34. 1986… How much mast prebend and rake is recommended? The boat is new to me in March. Raced ok but I want to get a new main and want it to fit a well tuned mast. What do you think of a 2 degree rake and 4″ prebend at the speaders? Also, I have a Harken furler, How do you measure the forestay tension? Thanks, Duke
The answer, this boat is pretty sporty so it should show some rake. The spreaders are swept slightly aft so this will produce some natural bend just to tension the headstay.
Head-stays are always tough to measure with any sort of gauge, there are some class specific tricks for using a gauge in funky ways in order to get data, but they aren’t really reliable in my opinion. If you live in a typically windy area, go for bit more shroud tension, headstay tension and mast bend, and see how the boat feels. This will take some trial and error. If the forestay feels too stiff, slot too tight, loosen the uppers a bit, thus reducing bend and slackening the headstay.
Once the boat is sailing well in the ideal conditions, record that bend and those tensions. This is where I would leave things set, record it, and then just adjust shroud tension to affect bend and headstay in order to compliment different wind strengths and sea states. It takes quite a bit of back and forth, and documentation to get it right. One designers have already worked all of this out and then they share it for others…..very helpful. The rest of us will have to be the trailblazers for this type of information for other boat owners with the same (similar) boats to benefit.
Hope that helps, thanks for the kind words, and good luck. Once you figure things out post a link here for others with the same boat…..would be helpful.
Hello, Thanks for all of this great info. I just purchased a 37′ boat with a 3/4 fractional rig and a tapered mast. I was wondering if there were any special considerations when tuning the fractional rig? Currently the stays and shrouds are a little loose and can be wiggled (borderline flopping) by hand although the mast stands and is visually centered. (We are in SW Florida and the boat went through a direct hit by hurricane Irma like this and still stands tall!) Also is it advisable to increase shroud tension in small increments first on one side and then do the same on the opposing side? Thanks so much for any info
Hi Nathan. There are some thoughts, so fractional masts are usually fitted with aft swept shrouds and spreaders. If so, this means that the uppers also tension the headstay and create mast bend. The lowers then also act to reduce mast bend, so the tighter you make them you are actually reducing mast curve, thus powering the mainsail up. So be conscious of these two thoughts when tensioning the shrouds. The rest is fundamentally the same as the guide suggests. Loose or wiggling shrouds (excluding the scenario where we are talking about the leeward shrouds under sail), should be tightened. Doing things in increments is definitely a good idea.
Hope that helps. Thanks for the questions.
Thanks!! Now that you say that about the swept spreaders helping create mast bend it makes perfect sense. I had an ‘oh duh’ moment. I’ll probably err on the side of looser lower shrouds knowing if we need more power we can always tighten them up. Thank you again this helped immensely!
I want to buy a tension gage. Most familiar with Loos. But do I need Pt 1 or 2? (Pretty sure I don’t need 3 or Pro.) I have two rigs to tune: a 1972 Morgan 27 and a Catalina 22, I think 73 or thereabouts. The Morgan 27 is mine, fresh water for life, and 99.9% most likely factory wire. The Catalina 22 is a borrower in the Gulf, but pretty sure the owner has never tuned it. My problem is I can’t find the gage of wire for either standing rigging anywhere! Any help?
I think this one will do… https://sep.yimg.com/ca/I/yhst-70220623433298_2270_120385950 . The Morgan is likely 3/16″ wire and the Catalina is likely 5/32″, that’s an educated guess. Hope that helps.
I just purchased a 1980 C&C 40. I was told that I need to replace the rod rigging as it is “too old”. The mast is down and the rod rigging seems ok but I have not done any penetration testing. Does rod rigging need to be replaced due to age? Thanks Rigging Co.
Not replaced, but re-headed. This can mean that some stays need to be replaced as a whole, but not typically not the whole set. There are instances where you’ve almost replaced all of it anyways, so full replacement just makes sense. Other than those scenarios, full replacement is due after a certain mileage with rod…60,000 NM. Please keep in mind these standards are very general recommendations. It sounds like in your case, you should send in the rod, tangs, and chainplates for service and inspection. once we receive everything we will make a quote for the recommended services and/or replacement.
Hope that helps and give us an email for more info.
I have had a problem with securing the spreaders to the shrouds, resulting in the spreaders dropping. I am using stainless wire to seize them but still having a problem. Any tips on how to do this properly?
Seizing the wire onto spreaders with hinged spreaders is a bit of a trick of the trade that requires some practice. We use the X’s and O’s method. The end result should be something that looks like this… https://theriggingcompany.files.wordpress.com/2011/11/2012-06-07_14-26-09_899.jpg?w=900 . A trick to make the wire bite into the spreader end a bit more is to wedge a small piece of leather between the spreader and the wire before seizing. Also parceling and serving the wire where it intersects the spreader will help create more bite too. Lastly, and I don’t like this method but you can install a bull dog cable clamp beneath the spreader, nuts facing in, to keep it from dropping when slack.
I hope that helps a little. Thanks for commenting.
I am struggling to get enough rake into my mast. 33 foot Charger 33 keel stepped. Have loosened forestay and moved mast foot forward by about 10 mm. Should the chocks in the collar be adjusted? Runners and 2 spreaders, and check spreader. Spreaders do not have much aft angle. Move mast step more forward? Outers are tight with inners looser. Thoughts?
Hey Bernard,
Yeah, it sounds like chocks are the last thing. Maybe remove the chocks with the rigging slack and see if you can get the mast to sit where you like it with just hand tension. Then chock it where it wants to sit. It sounds like you are on the right track everywhere else, perhaps add a toggle into the headstay and shorten the backstay is next. Good luck and I hope that helps somewhat.
Hi, We have a Lagoon Catamaran with fractional rig, upper and lower shrouds, fore stay and upper and lower diamonds. No back stay. The mast has a degree of pre-bend. I do not plan to drop the mast.
I may have to do some work on the port side upper diamond. Is it as easy as just undoing the turnbuckle? Or do I need to loosen the starboard one at the same time. If it needs replacement should I also replace the starboard one even if in good condition?
As a further question, what happens if a diamond breaks, does it result in mast failure?
You would need to loosen the other counterpart to that stay for sure. It is just good practice, will keep the mast straight, and also make your life easier for removal install. Now, do you replace both? I don’t know. How old is the standing rigging? Why are you replacing the one? If it is not all due for replacement and you are just replacing due to damage, just do the one, but loosen both sides to do this.
Hope that helps and thanks for the visit.
Hello! I recently purchased a keel-stepped 1982 Goman Express 30 which came with an Alado Furler. I have been sailing it since May of this year. My question is this: Despite relocating mast wedges at the cabin roof to bias the lower mast aft about 2″, I still have a pronounced backward bend (10 degrees or so) just above the highest spreader. When sailing on jib alone, most wave action causes the mast to pump right at the bend point. I have a split backstay that is as un-tensioned as possible and the forestay only has another inch of adjustment left. There is no baby stay.
How can I get the bend out of the mast? How concerned should I be that the mast might break at that point?
Thanks in advance for your reply!
Eric Hassam – Delta Flyer
Thanks for taking the time to comment on our site. It sounds like you are on the right track. So one other adjustment that you have is the mast step position. This greatly affects mast bend on keel stepped masts. For a stronger bend and less rake, move the mast butt aft. For more rake and less bend (probably what you need to try), move the mast step forward a bit. If neither of these help, you may be off to have your headstay shortened and this means it is too long. This is likely not the case, but it is a possibility.
Keep in mind….A mast should have a slight aft rake bias along with a small amount of mast bend. This is quite normal. You can send us a picture if you’d like a second opinion on if it is over-bent. Having said all of that, even if you remove all of the mast bend, the mast may still pump. This is a design flaw in many spar designs that lots of end users have experienced. This can be remedied by redesigning the stay lay out. Is there a place for a staysail stay and/ or runner backstays? If so add them. Is there a place for a baby stay? If not, that may be a consideration.
Thanks again and I hope that helps.
Hi, I have a 48 foot yawl with a 7/8 fractional rig, is the tuning procedure the same as a masthead rig? I seem to have trouble getting aft rake and proper headstay tension. Also, is there a particular tension number the upper shrouds should have? many thanks in advance
Hi Bill, thanks for taking the time. 7/8 is very close and I would treat it like a masthead rig, especially if the none of the spreaders are aft swept. Tesnsion the headstay using the backstay(s). This should pull the top of the mast aft. If there are any other forward stays, i.e. stay sail stay, forward lowers, or anything else that could be holding the mast forward, go ahead and loosen those completely. You then may need to tighten the Tri-attic (the stay that connects the top of the mizzen and top of the main) if present. OR if the mizzen needs more rake too, then lossen all forward stays and pull it back using the available aft stays for this as well.
Hope this helps and please email us and send some pictures if you need more help.
I have a 1972 Morgan 27, which has both forward and after lower shrouds. I wish to remove the forward lowers so I can trim a 110% jib inside the stays. I see a lot of boats without forward lowers and think this will work OK, but wonder if I should increase the size of the aft lowers and beef up the chain plates. Any suggestions?
THANKS FOR YOUR INPUT. I AM GOING TO REMOVE THEM ANYWAY AND SEE WHAT HAPPENS. “HOLD MY BEER, WATCH THIS….” FAMOUS LAST WORDS.
Lol! Good luck. Call us if you need assistance.
I have rod rigging on my Beneteau 32s5
Any other guidance on tuning them vs wire rigging
Hi and thanks for commenting.
Just follow the guidelines in the write up. The over all goal is that the mast needs to be straight and in-column when looking at it from side to side.
Fore and aft, the mast should show a very slight lean aft. Depending on whether or not the spreaders are in-line or aft swept; you should also see some slight bend if there is any aft sweep to the spreaders just from the tension of the uppers.
A Rod stay tends to run a bit tighter than wire, so keep that in mind.
For racing, ideally once the static tune at the dock (the part we just talked about) is done, go out and sail tune. Do this by going hard on the wind and checking to see if the leeward shrouds are just starting to dance, this is ideal. If they are swaying about they are too loose for the current conditions. If the leeward shrouds are tight, they may be a touch to tight. Tension and loosen as needed; count what you did and to what shroud, then tack and do the same to the other side.
ALWAYS secure the turnbuckles when you are finished adjusting them.
- Pingback: Tuning a Sailboat Mast | ChesapeakeLiving.com
- Pingback: Rig Tuned | middlebaysailing
Wow, I would hate to be charged by her for three trips up the rig and forget the screw driver the rubber plugs that are sacraficial and replaced everytime removed just to clean the stainless 1×19 rigging.
Username or Email Address
Remember Me
Lost your password?
Review Cart
No products in the cart.
- Privacy Overview
- Strictly Necessary Cookies
This website uses cookies so that we can provide you with the best user experience possible. Cookie information is stored in your browser and performs functions such as recognising you when you return to our website and helping our team to understand which sections of the website you find most interesting and useful.
Strictly Necessary Cookie should be enabled at all times so that we can save your preferences for cookie settings.
If you disable this cookie, we will not be able to save your preferences. This means that every time you visit this website you will need to enable or disable cookies again.
What You Need to Know About Rig Tune & Performance
For many sailors, the relationship between rig tune and performance often seems like a black hole. Quantum’s Dave Flynn takes us on a tour of the core elements of the rig and what you need to know to demystify tuning for optimum performance.

Mastering rig tuning for optimal sail trim and performance might seem daunting, but fortunately it’s not as complicated as tuning a Stradivarius violin! To keep it in perspective, remember you are just pulling on a hunk of aluminum or carbon with cables. To master the rig, there are four elements you need to understand: rake, athwartship tuning, mast bend, and headstay sag. Each of the four elements of rig tune either adds power or takes it away. If you understand the basic mechanics of each element, you can tune your rig to improve trim and overall setup.
Mast rake is a measure of how far the mast is angled aft from a straight vertical. A typical mast rake ranges from one to one-and-a-half degrees on a cruising masthead rig to as much as four degrees on a fractional racing rig. A mast should never be raked forward unless there is something unusual in the boat design (You’ll know if this is the case!). When you add rake to the mast, you tilt the whole sail plan aft. This, in turn, shifts the power aft, pushing more load on the stern and forcing the bow up into the wind, creating weather helm.
Rake is determined by headstay length: The longer the headstay, the greater the rake. To adjust your rake, adjust the length of the headstay. How much rake a boat needs to generate the right amount of weather helm is a function of hydrodynamics (hull form, keel shape, and placement). In most one-design racing classes, where lots of time is invested in figuring out what works best, tuning guides specify headstay lengths for conditions. In more developed classes, this will change as a function of wind speed. You’ll want more rake in light air when it is hard to generate helm and less as the breeze builds. For boat setup and trim, adding rake is a tool for generating power in light air, and reducing rake is part of the de-powering process in heavy air.
For cruisers and many non-one-design rigs, you likely don’t have a tuning guide to work from, so to optimize upwind performance you need some helm loading in light-to-moderate conditions. Three to five degrees of rudder angle in 8kts-10kts of wind is a commonly cited target. To test if this angle works for you, sail upwind in 8kts-10kts and let the helm go; the boat should turn gently into the wind. If it goes straight or bears off, you need more rake and vice versa if it spins out of control. Don’t try this test when it is windy; your boat will round up and exhibit too much helm due to heel not rake, and you’ll get a false read.
ATHWARTSHIP TUNING
If the rig is not centered, performance and trim will be different tack to tack. To remedy this, center the top of the rig. Using the diagonal shrouds, bring each successive panel in line with the top. The amount of tension you need is tough to predict at the dock–the mast really needs to be under load. Test tension by sailing upwind in 10kts-12kts of breeze with appropriate trim settings and then check the mast. Is it straight when you put your eye to the aft face and look up the mainsail track? If the tip is falling off, you need more upper tension. If the leeward upper shrouds are flopping around, you need more tension for a given velocity. The shrouds should be firm.
Work on the diagonals next. How much tension you need in the leeward diagonals is determined by how stiff the mast is. In over 10 kts, you definitely want the mast to be straight. For more power in light air, you can let the middle of the mast sag an inch or two to leeward to increase the depth in the mainsail. It is common in one-design classes to ease tension on the diagonals in light air to create this smooth sag.
Dinghies and small keelboats are great boats to experiment with how tuning inputs affect your sail plan. The smaller diameter wire shrouds and relatively small masts dramatically show the impact of tuning adjustments. This isn’t as visible on larger racing or cruising boats with rod rigging. Cruisers will want to set a good base athwartship tune as well. If the rig is uneven side-to-side, you will experience frustrating differences in point and power on each tack. Skip the headache and set a good base tune early in the season. Whatever the condition you are sailing in, once you have established good upwind trim, have a look up the mast to make sure it is in column or sagging slightly to leeward in the middle in light air.
If you have an older cruising boat with a mast stiffness that resembles that of a telephone pole, you can skip this section! But for cruisers with a relatively modern rig, swept-back spreaders, traditional sails with flaking system, or even in-boom or in-mast furling, pay attention here.
While rake is the amount the mast is angled aft, mast bend is the amount you bend the mast aft after you have set your rake. A rig that bends gives you a powerful tool for changing the shape of the mainsail: More mast bend flattens the sail and de-powers it; a straighter mast creates shape and power. Rig tune affects how much a mast bends, particularly on modern fractional rig boats with swept back spreaders. But no matter what type of rig you have, you want to start with a little mast bend, or pre-bend, which refers to the amount of bend that has no backstay tension. Lengthening the headstay increases the bending moment and adds pre-bend. This is why it’s important to set the rake first. Other factors affecting the pre-bend are the position of the mast step and the blocking of the mast in the partner, which is the hole where the mast goes through the deck. To add pre-bend, either move the mast step aft or move the mast forward in the partners. A target of 1”-3” of pre-bend is typical on a medium-sized boat. Pre-bend ensures the mast will move forward in the middle and flatten the mainsail when you pull on the backstay.
On a rig with in-line spreaders (typically masthead rigs), the side shrouds have little impact on the mast bend created by pulling on the backstay. On some rigs, however, there are check stays to keep the mast from bending too far. Sometimes there are even multiple sets.
How far is too far when bending the mast? You’ll know when your mainsail develops diagonal wrinkles from the clew up to the luff and is beginning to turn inside out. For maximum de-powering, bend just to the point where wrinkles appear. If available, use check stays to help.
On modern fractional rigs with spreaders swept well aft, the side shrouds have a big impact on mast bend. The diagonal shrouds are controlling not only athwartship tuning but also acting like check stays to inhibit mast bend, since they are swept back and pulling aft. Too tight, and the diagonal shrouds will keep the mast from bending and flattening the mainsail; too loose, and the mast can over-bend and turn the sail inside out. In many classes, overall rig tension is increased by taking turns on the shrouds, shortening the headstay, or pumping the whole rig up with a mast jack for more backstay tension without allowing the rig to over-bend as it gets windier.
HEADSTAY SAG
If some mast bend is good, why isn’t more better? The answer is headstay sag. When the headstay sags, the headsail becomes full and more powerful, which is great in light conditions. But as the breeze builds, you want to reduce the amount of sag as much as possible to de-power the boat and help with pointing. In breeze, it’s all about headstay tension–you can’t get too much. So why is mast bend a factor? When you pull back on the rig with the backstay, it will tighten the headstay, which is good. But you are also pulling down and compressing the rig, which makes it bend. You want some mast bend in order to flatten the mainsail, but not so much that you soften the whole rig and increase headstay sag. This is why we use check stays to control mast bend on a masthead rig and tighter diagonal tension on a swept aft spreader rig.
Rig tune still matters even when you aren’t routinely adding turns to your shrouds based on the wind and conditions. Many modern cruising sailboats with in-mast furling rigs have comparatively smaller tune adjustments, as the rig needs to stay in column for the mainsail to furl properly. Some boats are outfitted with a cascading backstay adjuster that allows for minor tweaks and lets you easily reset the rig when it’s time to furl the mainsail. To get the most performance from your cruising setup, don’t overlook rig tune. Racing sailboats often have their rigs removed for transport and then re-rigged, whereas many cruising boats may never have had the rig adjusted since the boat was first commissioned. If you can't remember the last time your rig was tuned, now is a great time to give your local loft a call.
Having a properly tuned rig is essential to boat setup and performance. While this can be a DIY process, if you have questions or need additional input, please contact a professional rigger or your local loft where our expert Quantum team can help sort out your rig and tune. For one-design tuning guides and resources, select your OD class on the Quantum website or get in touch with a Quantum Class Expert.
Get in touch with David Flynn with additional questions and dive deeper into rig tune for performance. E: [email protected] P: 410-268-1161 ext. 206
The Discussion

Us, too. We pour that passion into each of our newsletters to help you enjoy sailing even more.
No products in the cart.
Sailing Ellidah is supported by our readers. Buying through our links may earn us an affiliate commission at no extra cost to you.
The Standing Rigging On A Sailboat Explained
The standing rigging on a sailboat is a system of stainless steel wires that holds the mast upright and supports the spars.
In this guide, I’ll explain the basics of a sailboat’s hardware and rigging, how it works, and why it is a fundamental and vital part of the vessel. We’ll look at the different parts of the rig, where they are located, and their function.
We will also peek at a couple of different types of rigs and their variations to determine their differences. In the end, I will explain some additional terms and answer some practical questions I often get asked.
But first off, it is essential to understand what standing rigging is and its purpose on a sailboat.
The purpose of the standing rigging
Like I said in the beginning, the standing rigging on a sailboat is a system of stainless steel wires that holds the mast upright and supports the spars. When sailing, the rig helps transfer wind forces from the sails to the boat’s structure. This is critical for maintaining the stability and performance of the vessel.
The rig can also consist of other materials, such as synthetic lines or steel rods, yet its purpose is the same. But more on that later.
Since the rig supports the mast, you’ll need to ensure that it is always in appropriate condition before taking your boat out to sea. Let me give you an example from a recent experience.
Dismasting horrors
I had a company inspect the entire rig on my sailboat while preparing for an Atlantic crossing. The rigger didn’t find any issues, but I decided to replace the rig anyway because of its unknown age. I wanted to do the job myself so I could learn how it is done correctly.
Not long after, we left Gibraltar and sailed through rough weather for eight days before arriving in Las Palmas. We were safe and sound and didn’t experience any issues. Unfortunately, several other boats arriving before us had suffered rig failures. They lost their masts and sails—a sorrowful sight but also a reminder of how vital the rigging is on a sailboat.
The most common types of rigging on a sailboat
The most commonly used rig type on modern sailing boats is the fore-and-aft Bermuda Sloop rig with one mast and just one headsail. Closely follows the Cutter rig and the Ketch rig. They all have a relatively simple rigging layout. Still, there are several variations and differences in how they are set up.
A sloop has a single mast, and the Ketch has one main mast and an additional shorter mizzen mast further aft. A Cutter rig is similar to the Bermuda Sloop with an additional cutter forestay, allowing it to fly two overlapping headsails.
You can learn more about the differences and the different types of sails they use in this guide. For now, we’ll focus on the Bermuda rig.
The difference between standing rigging and running rigging
Sometimes things can get confusing as some of our nautical terms are used for multiple items depending on the context. Let me clarify just briefly:
The rig or rigging on a sailboat is a common term for two parts:
- The standing rigging consists of wires supporting the mast on a sailboat and reinforcing the spars from the force of the sails when sailing.
- The running rigging consists of the halyards, sheets, and lines we use to hoist, lower, operate, and control the sails on a sailboat.
Check out my guide on running rigging here !
The difference between a fractional and a masthead rig
A Bermuda rig is split into two groups. The Masthead rig and the Fractional rig.
The Masthead rig has a forestay running from the bow to the top of the mast, and the spreaders point 90 degrees to the sides. A boat with a masthead rig typically carries a bigger overlapping headsail ( Genoa) and a smaller mainsail. Very typical on the Sloop, Ketch, and Cutter rigs.
A Fractional rig has forestays running from the bow to 1/4 – 1/8 from the top of the mast, and the spreaders are swept backward. A boat with a fractional rig also has the mast farther forward than a masthead rig, a bigger mainsail, and a smaller headsail, usually a Jib. Very typical on more performance-oriented sailboats.
There are exceptions in regards to the type of headsail, though. Many performance cruisers use a Genoa instead of a Jib , making the difference smaller.
Some people also fit an inner forestay, or a babystay, to allow flying a smaller staysail.
Explaining the parts and hardware of the standing rigging
The rigging on a sailing vessel relies on stays and shrouds in addition to many hardware parts to secure the mast properly. And we also have nautical terms for each of them. Since a system relies on every aspect of it to be in equally good condition, we want to familiarize ourselves with each part and understand its function.
Forestay and Backstay
The forestay is a wire that runs from the bow to the top of the mast. Some boats, like the Cutter rig, can have several additional inner forestays in different configurations.
The backstay is the wire that runs from the back of the boat to the top of the mast. Backstays have a tensioner, often hydraulic, to increase the tension when sailing upwind. Some rigs, like the Cutter, have running backstays and sometimes checkstays or runners, to support the rig.
The primary purpose of the forestay and backstay is to prevent the mast from moving fore and aft. The tensioner on the backstay also allows us to trim and tune the rig to get a better shape of the sails.
The shrouds are the wires or lines used on modern sailboats and yachts to support the mast from sideways motion.
There are usually four shrouds on each side of the vessel. They are connected to the side of the mast and run down to turnbuckles attached through toggles to the chainplates bolted on the deck.
- Cap shrouds run from the top of the mast to the deck, passing through the tips of the upper spreaders.
- Intermediate shrouds run from the lower part of the mast to the deck, passing through the lower set of spreaders.
- Lower shrouds are connected to the mast under the first spreader and run down to the deck – one fore and one aft on each side of the boat.
This configuration is called continuous rigging. We won’t go into the discontinuous rigging used on bigger boats in this guide, but if you are interested, you can read more about it here .
Shroud materials
Shrouds are usually made of 1 x 19 stainless steel wire. These wires are strong and relatively easy to install but are prone to stretch and corrosion to a certain degree. Another option is using stainless steel rods.
Rod rigging
Rod rigging has a stretch coefficient lower than wire but is more expensive and can be intricate to install. Alternatively, synthetic rigging is becoming more popular as it weighs less than wire and rods.
Synthetic rigging
Fibers like Dyneema and other aramids are lightweight and provide ultra-high tensile strength. However, they are expensive and much more vulnerable to chafing and UV damage than other options. In my opinion, they are best suited for racing and regatta-oriented sailboats.
Wire rigging
I recommend sticking to the classic 316-graded stainless steel wire rigging for cruising sailboats. It is also the most reasonable of the options. If you find yourself in trouble far from home, you are more likely to find replacement wire than another complex rigging type.
Relevant terms on sailboat rigging and hardware
The spreaders are the fins or wings that space the shrouds away from the mast. Most sailboats have at least one set, but some also have two or three. Once a vessel has more than three pairs of spreaders, we are probably talking about a big sailing yacht.
A turnbuckle is the fitting that connects the shrouds to the toggle and chainplate on the deck. These are adjustable, allowing you to tension the rig.
A chainplate is a metal plate bolted to a strong point on the deck or side of the hull. It is usually reinforced with a backing plate underneath to withstand the tension from the shrouds.
The term mast head should be distinct from the term masthead rigging. Out of context, the mast head is the top of the mast.
A toggle is a hardware fitting to connect the turnbuckles on the shrouds and the chainplate.
How tight should the standing rigging be?
It is essential to periodically check the tension of the standing rigging and make adjustments to ensure it is appropriately set. If the rig is too loose, it allows the mast to sway excessively, making the boat perform poorly.
You also risk applying a snatch load during a tack or a gybe which can damage the rig. On the other hand, if the standing rigging is too tight, it can strain the rig and the hull and lead to structural failure.
The standing rigging should be tightened enough to prevent the mast from bending sideways under any point of sail. If you can move the mast by pulling the cap shrouds by hand, the rigging is too loose and should be tensioned. Once the cap shrouds are tightened, follow up with the intermediates and finish with the lower shrouds. It is critical to tension the rig evenly on both sides.
The next you want to do is to take the boat out for a trip. Ensure that the mast isn’t bending over to the leeward side when you are sailing. A little movement in the leeward shrouds is normal, but they shouldn’t swing around. If the mast bends to the leeward side under load, the windward shrouds need to be tightened. Check the shrouds while sailing on both starboard and port tack.
Once the mast is in a column at any point of sail, your rigging should be tight and ready for action.
If you feel uncomfortable adjusting your rig, get a professional rigger to inspect and reset it.
How often should the standing rigging be replaced on a sailboat?
I asked the rigger who produced my new rig for Ellidah about how long I could expect my new rig to last, and he replied with the following:
The standing rigging should be replaced after 10 – 15 years, depending on how hard and often the boat has sailed. If it is well maintained and the vessel has sailed conservatively, it will probably last more than 20 years. However, corrosion or cracked strands indicate that the rig or parts are due for replacement regardless of age.
If you plan on doing extended offshore sailing and don’t know the age of your rig, I recommend replacing it even if it looks fine. This can be done without removing the mast from the boat while it is still in the water.
How much does it cost to replace the standing rigging?
The cost of replacing the standing rigging will vary greatly depending on the size of your boat and the location you get the job done. For my 41 feet sloop, I did most of the installation myself and paid approximately $4700 for the entire rig replacement.
Can Dyneema be used for standing rigging?
Dyneema is a durable synthetic fiber that can be used for standing rigging. Its low weight, and high tensile strength makes it especially popular amongst racers. Many cruisers also carry Dyneema onboard as spare parts for failing rigging.
How long does dyneema standing rigging last?
Dyneema rigging can outlast wire rigging if it doesn’t chafe on anything sharp. There are reports of Dyneema rigging lasting as long as 15 years, but manufacturers like Colligo claim their PVC shrink-wrapped lines should last 8 to 10 years. You can read more here .
Final words
Congratulations! By now, you should have a much better understanding of standing rigging on a sailboat. We’ve covered its purpose and its importance for performance and safety. While many types of rigs and variations exist, the hardware and concepts are often similar. Now it’s time to put your newfound knowledge into practice and set sail!
Or, if you’re not ready just yet, I recommend heading over to my following guide to learn more about running rigging on a sailboat.
Sharing is caring!
Skipper, Electrician and ROV Pilot
Robin is the founder and owner of Sailing Ellidah and has been living on his sailboat since 2019. He is currently on a journey to sail around the world and is passionate about writing his story and helpful content to inspire others who share his interest in sailing.
Very well written. Common sense layout with just enough photos and sketches. I enjoyed reading this article.
Thank you for the kind words.
Leave a Reply Cancel reply
Your email address will not be published. Required fields are marked *
Yachting Monthly
- Digital edition

Skippers’ Tips: Replacing jack stays & rudder checks
- Katy Stickland
- May 15, 2020
Yachting Monthly experts and seasoned skippers share their advice on a whole range of issues for the cruising sailor. Do you have a tip to share? Email us at [email protected]

Credit:Tor Johnson
Keep an eye on your jackstay stitching

Jackstay stitching in a different colour will reveal when it is UV degraded
At sea, especially with bad weather, heavy clothing, working on the fore deck or sailing shorthanded, most of us use weather jackstays and tethers.
Only recently I was sailing with a friend of mine and he had rigged jackstays on deck, which I think was a good idea because the ride was quite bumpy and the water temperature was far below summer levels.
The reason I am writing this, however is not to give him a compliment, but because we had a discussion on the material to be used.
Basically there are three options: a line, a steel cable (with or without plastic cover) and a flat nylon strap.
I would suggest to choose the last because the first two have the disadvantage that you can slip over them as these can ‘roll’ under your shoes.
The nylon webbing also has a disadvantage though and that is the deterioration of the stitching under the influence of UV light.
To avoid this disadvantage, I have asked my sail maker to use a different colour for the stitching on the loops at both ends; blue stitches on white nylon.
Once the stitches are discoloured (to white) I know it’s time to renew the stitches.
Harry Dekkers
Cleaning sails

Green mould is the precursor to mildew, which can stain. Keep on top of sail cleaning to keep it at bay
Sailcloth manufacturers have developed chemical treatments to retard mildew growth when the fabric is produced.

Bill Gladstone heads up North Sail’s North U
However, there is a delicate balance between killing the fungus and killing the humans. So the problem has not gone away.
Surface mildew can be cleaned off the sail with a diluted bleach solution.
Vigilance is needed in this area, as once mildew creeps between layers of fabric, the sails need to be sent out for industrial cleaning.
In our experience, once a sail has had a mildew problem, it will probably always have a mildew problem.
A good canvas cleaner can reduce the black spots to dirty white spots, but if the boat stays in the same area where the mildew started, the spots will soon be grey, and then it’s only a matter of time before they are black again.
Bill Gladstone
Epoxy rudder filling

Where cracks open up on your rudder and around the stock, fill them with epoxy
Rudders on many craft can be quite poorly produced, and every owner should check their rudder blade for problems if it’s foam- or paste-filled.

Ben Sutcliffe-Davies is a marine surveyor and former boatbuilder who cruises the Bristol Channel from Swansea
Over time both will absorb moisture especially if any damage occurs, and any water in the rudder can freeze and expand in sub-zero temperatures; causing more damage.
Another issue is that with stainless steel stocks and moisture ingress the risk of crevice corrosion increases.
Not only can the moisture freeze but the added weight can be really quite significant, just where you don’t want it at the end of the boat.
There are now products on the market like West System’s new Pro-Set, which absorb minimal moisture and are good to fill in an old blade keeping it light, also the epoxy is well known to stick to almost anything including aluminum and stainless stocks, an area that I regularly find early signs of detachment of the stock from the filling when surveying yachts.
Ben Sutcliffe-Davies
Taking care of your teak

It is worth keeping your teak clean, but do it wrong and you will shorten its life and make your decks dirtier.
My former yacht (a 36ft steel Koopmans design) had all her decks, cabin and cockpit surfaces covered with teak.
And I have to admit that she looked really smart.
Besides the looks, it also provided good insulation, and above all, great anti-slip qualities.
All these advantages come with a price, however, because teak decks might be the most beautiful but it is still and will remain the most expensive option.
There are other disadvantages too and one of these is that teak needs maintenance.
There are many ways to keep your decks in top condition, but not all of them are effective, easy and environmentally friendly.

Harry Deckers is an RYA Yachtmaster Offshore and has sailed around the UK singlehanded
The easiest way is to take a high-pressure washer.
But this has a devastating negative effect on the wood in the long run as it deepens the grain in the wood every time you use the washer, which results in an even faster build-up of dirt.
Another option is to use one of the many different products available to either clean the decks or create a preventive protective layer.
The option I prefer is, once or twice a year, to use a scouring pad with fresh water.
The use of a pad prevents the deepening of the grain and the fresh water is not only environmentally friendly, but it also results in the authentic nice grey colour of the teak once it is dry.
It is not the quickest option but if you look for the dirt that is flushed away it gives you pride in your work and I promise you will like the result.
One last remark: never leave anything on your decks unless necessary as it prevents the deck from drying once wet.
For the same reason, although coiled lines might look nice, they should be avoided.
- New Sailboats
- Sailboats 21-30ft
- Sailboats 31-35ft
- Sailboats 36-40ft
- Sailboats Over 40ft
- Sailboats Under 21feet
- used_sailboats
- Apps and Computer Programs
- Communications
- Fishfinders
- Handheld Electronics
- Plotters MFDS Rradar
- Wind, Speed & Depth Instruments
- Anchoring Mooring
- Running Rigging
- Sails Canvas
- Standing Rigging
- Diesel Engines
- Off Grid Energy
- Cleaning Waxing
- DIY Projects
- Repair, Tools & Materials
- Spare Parts
- Tools & Gadgets
- Cabin Comfort
- Ventilation
- Footwear Apparel
- Foul Weather Gear
- Mailport & PS Advisor
- Inside Practical Sailor Blog
- Activate My Web Access
- Reset Password
- Pay My Bill
- Customer Service

- Free Newsletter
- Give a Gift
How to Sell Your Boat

Cal 2-46: A Venerable Lapworth Design Brought Up to Date

Rhumb Lines: Show Highlights from Annapolis

Open Transom Pros and Cons

Leaping Into Lithium

The Importance of Sea State in Weather Planning

Do-it-yourself Electrical System Survey and Inspection

Install a Standalone Sounder Without Drilling

When Should We Retire Dyneema Stays and Running Rigging?

Rethinking MOB Prevention

Top-notch Wind Indicators

The Everlasting Multihull Trampoline

How Dangerous is Your Shore Power?

DIY survey of boat solar and wind turbine systems

What’s Involved in Setting Up a Lithium Battery System?

The Scraper-only Approach to Bottom Paint Removal

Can You Recoat Dyneema?

Gonytia Hot Knife Proves its Mettle

Where Winches Dare to Go

The Day Sailor’s First-Aid Kit

Choosing and Securing Seat Cushions

Cockpit Drains on Race Boats

Rhumb Lines: Livin’ the Wharf Rat Life

Re-sealing the Seams on Waterproof Fabrics

Safer Sailing: Add Leg Loops to Your Harness

Waxing and Polishing Your Boat

Reducing Engine Room Noise

Tricks and Tips to Forming Do-it-yourself Rigging Terminals

Marine Toilet Maintenance Tips

Learning to Live with Plastic Boat Bits
- Sails, Rigging & Deck Gear
Standing Rigging: How Tight Is Right?
Standing rigging tension is a peculiarly under-addressed subject. Easy to see how it would worry a new boat owner or someone going to sea.
Most experts step aboard, yank or twang the shrouds and stays and mutter, Pretty slack, Too Tight, or, Thats about right.
Youll find in the sailing literature very few discussions of the question: What does tight mean?
Even riggers rarely explain how much tension they like to see.
There are a few sailors who like the rigging so tight you could send an elephant up the backstay. It can result in excessive loads and wear on fittings, chain plates and the hull. The ultimate penalty for those who can’t stand any sag in the forestay is what ocean racing sailors call a gravity storm or, less dramatically, dropping the rig.
Others like to take up the slack just enough so that the rig is at rest when the boat is motionless. This approach sometimes leaves excessive slack to leeward that can result in shock loads, excessive wear and misalignment in fittings. It may take longer, but the ultimate penalty is the same.
In between (and probably in the most logical position) are those who like to take up the slack and stretch the wire just a bit. This is frequently accomplished, at least for the stays, with an adjustable backstay. When sailing, especially on the wind, tighten down to minimize slack in the forestay. When reaching, running or at anchor, ease off.
But the question is: How much stretch…especially in the shrouds?
If you stretch the wire 5% of its breaking strength, it will be considered moderate tension. Crank in 15% of the breaking strength and it is regarded as tight. These figures apply for any diameter of wire. You need only know the wires breaking strength.
Three years ago, in the June 15, 1995 issue, we published a discussion of the views of author Richard Henderson, Skenes Elements of Yacht Design and several riggers, along with an evaluation of an excellent booklet published by Sailsystems about a Selden Mast approach (described in detail in the October 15, 1991 issue) and an entirely new method developed by Michael Dimen, who called his gadget a Rigstick.
Mentioned was the familiar (see photo) Loos rigging tension gauge, which comes in two sizes. The Model 91 ($39) is for wire 3/32″ to 5/32″. The Model 90 ($45.50) is for 3/16″ to 9/32″. The gauge depends on the bending property of aluminum plate.
The strange-looking gauges don’t willingly produce great accuracy because you have to hold one reading steady while noting another, which also requires that you make a judgment about where the centerline of the wire falls on a scale. Not easy to do.
The big name in galvanized and stainless cable (as wire is called in the trade), cable hardware and tools, Loos & Co., Inc. went looking for a better mousetrap.
Who did Gus Loos go to? The guy who designed the original gauge, his old friend, Donald J. Jordan, an 82-year-old retired Pratt & Whitney engineer who has been sailing out of Marblehead, Massachusetts, in the likes of Lightnings, Friendship sloops, Sound Schooners (which was the prized New York Yacht Club class in 1918), Pearson Wanderers and currently in a 16′ Starling Burgess design, appropriately called a Marblehead.
The old tension gauge wasnt bad, said Jordan. But it tended to get bent. Then the patent ran out and I told Gus we could do a better one.
The new version (see photo) is a distinct improvement over the old aluminum version. A better design, its also much more substantially made of aluminum, stainless and nylon.
The design problems were interesting, Jordan said. A conventional cable tension gauge has two rollers at the ends with a spring-loaded plunger in the middle and a dial gauge to measure the plunger movement. The wheels have to rotate…because they must permit some small but vital movement. That makes the tool expensive. My approach was to have two stationary wheels and a carefully contrived square slider in a arc-slot on the other.
The new Loos gauges use a long-lasting stainless spring to produce the tension. Slip the lower grooved wheels on a shroud or stay, pull the lanyard to engage the upper hook, relax, read the tension at your leisure and consult the scale to learn the pounds of pressure on the wire and the percentage of breaking strength of the wire. There are three wire gauge notches in the edge. The gauge can be left on the wire while turnbuckle adjustments are made.
The accompanying booklet, very well-done, contains a good tight discussion of the subject; some recommendations; a table on how to equalize tension in different sizes of wire, and line-drawn diagrams clearly showing rig tensions (windward and leeward) created by light, medium and heavy winds.
The wire gauge comes in three sizes, for 3/32″-5/32″, 3/16″-1/4″ and 9/32″-3/8″. West Marine sells them, respectively, for $57.99, $69.99 and $$122.99. Defender Industries cuts them to $49.95, $51.95 and $105.95. Prices in the BOAT/U.S. catalog are in between.
What if, instead of 1×19 wire, you have rod rigging? There are four new models that are bigger, heavier and, of course, more costly. They work the same, but take some arm strength. One is for .172-.250 rod, another for .281-.375. Two others models are for metric rod. West Marine sells the rod gauges for $186.99. Neither Defender nor BOAT/U.S. shows them in their catalogs.
Contact- Loos & Co., Inc., 901 Industrial Blvd., Naples, FL 34104, 800/321-5667. Rigstick, 311 Jackson, Port Townsend, WA 98368; 800/488-0855. Sailsystems, PO Box 1218, Marblehead, MA 01945; 978/745-0440.
RELATED ARTICLES MORE FROM AUTHOR
Leave a reply cancel reply.
Log in to leave a comment
Latest Videos

Island Packet 370: What You Should Know | Boat Review

How To Make Starlink Better On Your Boat | Interview

Catalina 380: What You Should Know | Boat Review
- Privacy Policy
- Do Not Sell My Personal Information
- Online Account Activation
- Privacy Manager

- Forum Listing
- Marketplace
- Advanced Search
- All Topics Sailing
- Sailboat Racing
- SailNet is a forum community dedicated to Sailing enthusiasts. Come join the discussion about sailing, modifications, classifieds, troubleshooting, repairs, reviews, maintenance, and more!
- Add to quote
I''ve heard some scary stories about rig failure due to badly adjusted runners and checkstays, and in regard to this I have a question; If the runners are for adjusting the headstay, backstay is for adjusting the mastrake, what are the checkstays main purpose, and when is it most critical to use them right? mOrten

You don''t quite have that right. Here''s how it works. On a fractional rig, the runners are for adjusting headstay tension. The permanent backstay (the backstay that runs to the masthead) is to control mastbend. Checkstays are to prevent overbending and pumping. If you only had runners and a permanent backstay on a highly flexible rig, the compression of the two backstays would induce too much bend and so you could never get the forestay tight because no matter how tight that the you made the runners the more the mast would bend. On a Masthead rig, the permanent backstay, controls the forestay tension. The babystay works like the permanant backstay on a fractional rigger and so induces bend. On a very flexible masthead rig the runners and checkstays limit the amount of bending that is induced by the babystay, and resists pumping. Working in combination the runners and check stay can control where mastbend occurs in much the same way as a the permanent backstay and checkstay does on a fractional rig. On most bendy rigs that have checkstays, they are needed almost all of the time. Jeff
- ?
- 173.8K members
Top Contributors this Month

- BOAT OF THE YEAR
- Newsletters
- Sailboat Reviews
- Boating Safety
- Sailing Totem
- Charter Resources
- Destinations
- Galley Recipes
- Living Aboard
- Sails and Rigging
- Maintenance
- Best Marine Electronics & Technology
Backstays to the Future
- By Alvah Simon
- Updated: March 28, 2013
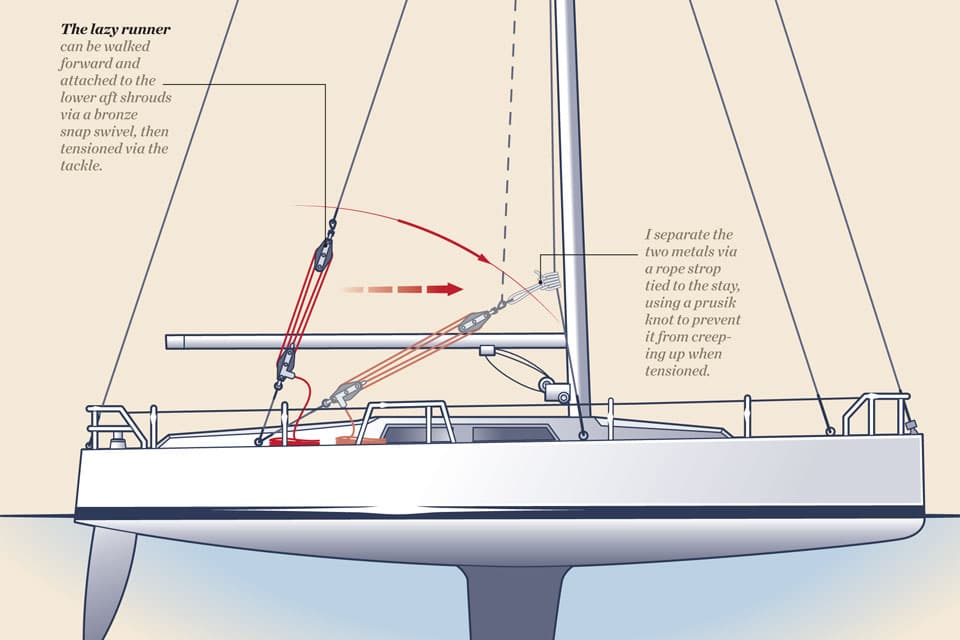
backstay setup
A running backstay is a removable stay that provides aft support to the mast from either the masthead or the point at which an inner forestay is attached. It originated as a response to the material limits of the period. At that time, solid wooden masts, for example, were either too weak or too heavy to be made particularly tall. Therefore, to achieve an acceptable area of sail for the heavy-displacement boats of the day, either the boom had to be extended beyond the transom or a gaff had to be added to the top of the sail—or both. This precluded the use of fixed backstays because the boom and gaffs had to be free to swing across the vessel when it tacked and jibed. As a tack or jibe was initiated, the burdened backstay had to be released and, as the spars swung through, the new, now windward, stay had to be fastened quickly before the entire rig came tumbling down.
With the advent of hollow masts, first of wood and then of alloy, and stainless-steel wire, the aspect ratio of the rigs began to extend to 3-to-1 and beyond. This allowed for the development of the Bermuda or Marconi rig, which eliminated gaffs and shortened the booms considerably without the loss of sail area or performance.
Running backstays, or runners, were then generally found only on cutter-rigged vessels. But through the 1960s and 1970s, the sloop became the rig du jour, and running backstays fell from favor. With the introduction of Freedom Yachts’ freestanding mast and Hunter’s B&R rig, the trend veered toward eliminating backstays, running or not, altogether.
Where are we today? Are running backstays now simply anachronisms that add unnecessary weight, windage, and clutter? I think not, especially in the context of bluewater cruising.
Sloops are fast around the buoys, but in the open sea, they display two disadvantages. First, the sail area is shared by only two large and therefore more difficult to handle sails. Second, in storm conditions, a sloop’s headsail, no matter how much it’s furled, still leaves the center of effort too far forward and too high to produce a safe and comfortable motion.
The cutter rig distributes the sail area over an additional sail, and that inner forestay is a superior position from which to hank on a low-flown storm sail. But with any real force upon it, the inner forestay can distort the shape of the mast; this will require a countereffort. Enter the intermediate running backstay. The arguable benefit of a staysail aside, this lower triangulation of support adds strength and stability to the mast, which translates into a better chance of coming up from a knockdown with the rig intact. Think sailing in the South Atlantic Ocean —it matters.
But alas, when you’re sailing off the wind, these same runners will have to be attended to on each and every tack. In open-ocean situations, this might not happen for days at a time. In confined waters, however, it’s necessary to have a quick and efficient method for setting and stowing runners.
Ideas and hardened opinions on running backstays are diverse and plentiful enough to keep seaside barstools warm all night. See the accompanying images and diagrams to learn about some of the most common approaches to setup and stowage.
If you’re considering adding an inner forestay and running backstays, I recommend that you get professional advice addressing the minimum engineering angles required, appropriate deck hardware, proper tangs and toggles needed at the mast, and wire types and diameters.
I don’t mean to imply that running backstays are suitable for all boats and applications. But if your interests lie in bluewater passagemaking and you take a belt-and-suspenders approach to your safety, I believe that you’ll agree that the added weight, windage, cost, and inconvenience are more than justified.
Alvah Simon, a CW contributing editor, is the author of North to the Night .
Click here for more pictures of running backstay setups . Click here to read about how an inner forestay and staysail can help you beat along in a blow.
- More: How To , seamanship , ship's systems
- More How To

Is There a Doctor Aboard?

3 Clutch Sails For Peak Performance

It’s Time to Rethink Your Ditch Kit

8 Ways to Prevent Seasickness

10 Best Sailing Movies of All Time

Kirsten Neuschäfer Receives CCA Blue Water Medal

2024 Regata del Sol al Sol Registration Closing Soon

US Sailing Honors Bob Johnstone
- Digital Edition
- Customer Service
- Privacy Policy
- Email Newsletters
- Cruising World
- Sailing World
- Salt Water Sportsman
- Sport Fishing
- Wakeboarding

Adding a staysail
A properly rigged staysail is a great passagemaking tool.
Sail selection is key for offshore sailing. You need a combination that provides speed without overburdening the boat and enough flexibility that you don’t have to make frequent sail changes.

Everyone knows what to do when the wind pipes up: take a reef in the main and roll in some headsail. If you are on an afternoon sail, a reefed headsail is OK, but it’s not perfect. The effect of rolling in the sail raises the center of effort, inducing more heel, and the sail shape and the sail suffer. Offshore, these attributes will slow you down and make for a miserable passage. A better solution is to use a staysail, the center of effort will be low and the shape perfect.
With the exception of bluewater battlewagons, you don’t see staysails on most boats these days, and for good reason. Placing a stay right in the middle of the foretriangle makes tacking the genoa difficult, and it’s a few thousand dollars of gear and weight that seldom get used on a coastal afternoon. But for offshore sailing, the extra hassle and cost are well worth it.
On a typical bluewater boat, a single reef and a staysail are perfect for going to windward in more than 25 knots. A deeper reef will allow you to make way in higher winds. A tough boat can forereach through about anything with a deep mainsail reef and a robust staysail setup.
There are three items that need attention when adding a staysail: the standing rigging, the running rigging and the sail itself.
In order to install a stayed staysail, you are essentially adding a second forestay about a third closer to the mast. The stay attaches to the deck about a third of the way back and to the mast around the upper spreader. It’s important, although not critical, that the staysail stay is parallel to the forestay. You can play with the angle a little, but it will look the best parallel.
While the stay seems simple, there are big forces at play here. When loaded up, the stay will pull upward on the deck and forward on the mast, and forces need to be opposed. A deck seems pretty strong, but it will deflect and fail if you attach a chainplate right in the middle of your foredeck. The most common way to reinforce the deck is by attaching the chainplate into a bulkhead, perhaps at the aft end of the chain locker. Another common solution is to use a tie rod attached to the hull, allowing the rod to transfer the load to the much stronger hull.
The next force to deal with is the one pulling the mast forward. Every stay on your boat has an equal and opposite partner balancing the loads. With the staysail pulling forward and to leeward, we need a stay that will pull backward and to windward, at roughly the same angle. The same angle part is important, people have tried to use aft led intermediate stays, but the angle on those is typically way too steep to be effective. You will need running backstays, and yes, they will get in the way of the main, but it won’t be a big deal.

The first decision to make is how you want the stay set up. Do you want a fixed wire stay, a furler or maybe a removable cordage stay? A fixed wire stay allows you to hank a staysail on directly and go to sea. It’s a bulletproof solution, but there are negatives. You’ll need to go on the foredeck and hank on a sail to use it. A deck bag can help, but it’s still a hassle. The less obvious problem is that a bare wire stay is hard to tack the genoa around because the sail will almost always hang up on the wire. A furler solves both these issues: you can deploy from the cockpit and the furled sail presents a more slippery surface to tack around.
If you want a hanked-on sail, a more modern solution is a cordage stay. These stays are typically made of heat-treated Dyneema like Dynice Dux or New England STS, and winch tensioned through a block mounted to a padeye on the deck (reinforced as previously discussed) and to a rope clutch winch. The main benefit here is that the stay is easily removable and stowed like a halyard. A wire stay will clank around, but the lightweight Dyneema will stow nicely. If you choose a cordage stay, you will need to use soft hanks on the sail as standard bronze hanks will quickly chafe the cordage.
With the stay figured out, running backstays need to be addressed. The runners will go from the mast to as far aft and outboard as you can run them, to get as much advantage as possible to oppose the staysail. On any boat longer than 40 feet, you’ll need to lead the runner tails to winches, as the loads are just too high for a tackle alone. Invariably wire runners will chafe on the main and clank around when tacking. Heat-treated Dyneema comes to the rescue again, the material is very strong and won’t chafe the main, but handles loads like stainless steel wire. The lightweight property of the cordage makes them very easy to stow as well.
Use tangs to attach the runners to the mast, where a slot to accept the tang has been created and reinforced. These fittings will securely connect the stay to the mast and provide a large radius bearing surface for the cordage to ride on, they attach easily with a through-bolt or T-Ball adapter.
Staysail running rigging is not a complicated matter, but you want to get it right. Sheets can be tricky to lead and you may have to install a new fixed block or lead to a car on a very short track. It’s important that the lead is good, avoiding chafing on the shrouds, cockpit coaming, dodger and anything else that gets in the way of a fair lead to the winch. Since a staysail is a great sail in a blow, expect this to be a high-load setup.
Work with a sailmaker to build a nearly bulletproof sail, built with heavy cloth and heavily stitched appropriate for the high winds you’ll be using it in. Also make sure to discuss the foot height with your sailmaker, as you want to keep the center of effort of the sail low to reduce heeling, but high enough off the deck to prevent it from catching green water that breaks over the deck.
Engineering a staysail for your boat can be a lot of work, but it adds a lot of flexibility and capability to your sailplan. Do the work carefully and it will pay dividends over many stormy miles.

Also in Technique
- Winch servicing
- Repairing delaminated core
- Splicing Dyneema
- DIY custom bug screens
- Anchoring and mooring a catamaran
- Co-owning a boat
- Installing a steering wheel
- Helming skills
- Captain your own charter
- Asymmetric spinnaker skills
Also from Bob Pingel
- How do I stop my mast from leaking?
- How should I rig a preventer?
- Tachometer troubles and lazy jack mounting questions
- Do I need to add running backstays?
- What’s with the sour smell on my boat?
- Why is there water in the bilge when I run the engine?
- How do I make sure my VHF works properly?
- Installing a boiler for cold-weather sailing
- How do I fix my hot water system?

Sailboat rig checks – Part 1
by Simon Jollands | Boat Maintenance , Preparation , Yacht ownership

Sailing boat rigs need to be checked regularly to reduce the risk of rig failure at sea. In part one of Sail boat rig checks we run through a series of useful checks that owners and skippers can carry out.
Some boat owners inspect their rigs before every cruise, others two or three times a year – to a certain extent it depends on how much sailing the boat has done. Rig tensions should also be checked and adjusted on a regular basis. The mast manufacturer will recommend what they think is best, as will your local rigger.

Rig geometry
It is best to check over the whole rig with the mast stepped. Look around the rig from all angles to check the geometry is correct. This means standing back and checking the mast is straight, with no bends visible. The shrouds and stays should also be well balanced and feel roughly at the same tension. Check they are correctly aligned from the top swage to the chainplate at deck level to ensure that the loads on the rig are even.
Once you are satisfied with the overall geometry, you need to take a closer look at all the rig components. The easiest way to do this is with the mast down as you can detach the stays and shrouds for a thorough inspection. A magnifying glass is useful for this, to check for hairline cracks and pitting:
Chainplates
- Check for excessive wear on spacers or bushes, signs of elongation in pin holes, alignment with bottlescrews, stay angles, evidence of fracture at deck level.
- Check the condition of the chainplate fastenings to the hull below decks. Check for signs of leaking and crevice corrosion. The tiny cracks tend to occur horizontally due to a combination of stress and corrosion.
- Be aware that chainplates can fail because the structure that supports them rots due to water ingress in the deck core.
- Check split pins, adequacy of threaded fittings, chafe or breakage of stranded wires, rig cracking, rust streaking, condition of mast collar sheaves.
- Check the mast foot of aluminium deck-stepped masts for signs of corrosion, cracks or movement. Also check halyard alignment and halyard chafe guards.
- Check the mast foot of aluminium keel-stepped masts for signs of corrosion caused by sea water in the bilges.
- Check for water and rot in wooden mast foots.
- Check the condition of running rigging lead blocks and their attachments.
Mast stay wires and mast fittings
- Check all the shrouds and stays for fraying, making sure there are no broken strands of wire, visible signs of cracking along swage sections, or signs of rust streaking.
- Check T-bar plates have retaining plugs or locking tabs, look for corrosion around mast tangs.
- Check fastenings are secure, that threaded fittings are sound and rigging screws are locked with split pins or seizing wire.
- Check wire terminals, toggles, extension links, rigging screws, shackles, clevis pins and split pins for wear, distortion or cracks.
Mast and boom – anodized
- Check all fittings and holes for cracks, fastening wear, deformation and corrosion.
- Check all welded fixtures for cracks around the welds.
- Check keel stepped masts for cracks and dents at deck level.
- Check genoa halyard leads if fitted for wear and replace if necessary.
- Check all moving parts are moving freely – sheaves, locking arms etc.
- Check for signs of corrosion, that split pins are protected to safeguard sails, all fastenings are securely riveted.
- Check the gooseneck pin has washers to protect it from vertical movement.
Mast and boom – painted
- Carry out the same checks as with an anodized mast and boom.
- Check for any damage to painted sections.
Mast and boom – wooden
- Check varnish or paint finishes for peeling, cracking and blistering.
- Check for areas of chafe.
- Check for signs of water ingress and rot damage around fasteners. Fasteners that are put under a lot of stress can crush the wood beneath, allowing water to penetrate and rot to start.
- Check for broken wire strands in the area where the spreader end is connected to the shroud.
- Check the spreader roots for any signs of cracks, movement or mast corrosion.
- Check for signs of cracking, fastenings secure, no signs of rust streaking, no chafe, no corrosion. Look out for covered spreader tips as they can trap water which leads to corrosion. Avoid putting too much tape around spreader tips as this tends to trap moisture.
- Check the condition of rubber pads if your spreaders have them.
- Check the spreaders are angled correctly, slightly upwards but never downwards. The reason for this is that when the shroud is under a heavy load it will pull the spreaders downwards and could pull the spreader base away from the mast completely, leading to rig failure.
- Also check that the spreaders bisect their shrouds.

- Check the halyard sheaves rotate freely and are not worn, also the condition of the bushes and the split pins.
- Check that the halyard shackles are in good condition.
- Check the electrical wires are clamped correctly and are chafe free, the lights are operating.
- Check the VHF aerial wire is securely fastened and in good condition.
- Check the windex and wind gear are operating correctly.
- Check the forestay and backstay mounting holes for signs of wear or elongation.
Forestay (see also above: Mast stay wires and mast fittings )
- Check the roller furling headstay.
- Check halyard leads are at correct angle to swivel car, inspect halyards for wear on sheaves, fairleads and check swivel cars.
- Check for corrosion around mast tangs.
- Check the condition of threaded fittings.
- Check there are no broken strands of wire in the forestay.
Backstay (see also above: Mast stay wires and mast fittings )
- Check the condition of the backstay adjustment system.
Spinnaker pole ring
- Check the attachment points are secure.
- Check for signs of corrosion around mast tangs.
- Check for sunlight degradation of plastic insulators.
Look out for Sail boat r ig checks – part two where we discuss what a professional rig check entails and go through some useful rig maintenance tips.

[fts_facebook type=page id=820902544629856 access_token=EAAP9hArvboQBAMMusRb1XctIwYq9fUcSZCVNDQAMjkZCiqAIMiZBkawPJZB3VkeSsH6gCIDfIZAslzZBRAEXYdesg0fu11YIst1FXtABBwdULjOsYFGUYqNujLSxRIWxKAcqm7bb9dmAgzJDZCVhkRj6r9useCQqJr4wJnxkBv909ySYxqj7hYl posts=4 height=650px description=no posts_displayed=page_only]
Recent Posts
- Navigating narrow channels
- DIY boat upgrades: Budget-friendly projects to enhance your (older!) boat
- Boat Security: Protecting your vessel from theft & vandalism
- Learning about diesel engine maintenance
The Ultimate Pre-Sail Checklist (38 Steps)

Getting on a sailboat and cruising the open waters with your close family and friends is one of the greatest feelings of knowing how to sail. However, making sure your sailboat is in a safe state to do so is of the utmost importance when ensuring the safety of everyone on board. That’s why going through a thorough pre-sail checklist before setting sail on your next sailing trip can have a huge impact.
So what’s included in the pre-sail checklist? Ensuring your sailboat is safe in terms of having a healthy hull, well-maintained engine, functioning safety equipment, the proper housekeeping items, an operational dinghy, and spare parts will help out you and your crew tremendously before setting sail.
All in all, you want to know that everything on your sailboat is in good order and working properly.
It’s also a good time to check the location of all your essential sailing equipment , learn about the differences between of your sailboat and others’, know where the safety gear is located for you and the crew, and familiarize your crew with your sailboat in general.
Hull Checks
The health of your sailboat’s hull is incredibly important before setting out to sail and is on the top of the pre-sail checklist.
Essentially, the hull ensures that your sailboat stays afloat and does not let water in. Ensuring your sailboat has a healthy hull means you’re likely to be ready for a great sailing adventure!
1. Location and Condition of Thru-Hull Fittings
Knowing where and under which conditions the sailboat’s hull fittings is important since these are the likely locations where water can find it’s way into the sailboat.
Hull fittings are used to pass items, like electrical cables and sewage, through the hull.
2. Thru-Hulls and Seacocks Operate Properly
The thru-hulls and seacocks of your sailboat must operate easily since this is where water will flow through your hull.
It’s important to make sure the hoses connected to the seacocks are in good condition and the hose clamps are well-fitted.
3. Spare Hose Clamps Should Be Carried
Every sailboat should have spare hose clamps so that, in case of an emergency where they break, you’ll have backups ready to go.
Ideally, your sailboat should have two or three of each size needed on your sailboat.
4. Thru-Hull Plugs Attached to Each Seacock
All of your sailboat’s seacocks should have plugs attached to them in case they need to be plugged in an emergency.
Removing the chances of excess water getting into your sailboat is very important.
5. Bilges Are Clean and Dry
An essential item on your sailing checklists is to check if the bilges are clean and dry. The water that doesn’t drain off the side of the deck or through a thru-hull will typically end up in the bilge.
6. Bilge Pumps Are Operational
It’s common for a sailboat to collect some water in the bilge and it’s important that you’re able to properly remove that water.
A well-functioning bilge pump will ensure excess water in the bilge is removed from your sailboat.
7. Grab Rails, Life-Lines in Good Condition
The grab rails and lifelines surrounding your sailboat should be securely fastened and in good condition.
When the moment occurs when someone’s got to grab onto something while on deck, they’ll likely be grabbing and holding on to these to avoid going overboard.
Engine Checks
An essential set of checks that you’ll want to go through are those involving your sailboat’s engine.
Even though you’re on a sailboat, you’ll be using your engine guaranteed so you’ll want it to be in good condition. That’s why it’s included in the pre-sail checklist.
8. Engine Warning Lights and Alarms Working
Making sure the engine warning lights and alarms are working is important so that you’re alerted promptly and accurately when an issue arises with your sailboat’s engine.
9. Emergency Stopping of a Runaway Engine
If there’s ever the case when you need to kill your engine right away, you’ll need to be able to cut it off immediately.
Ensure your sailboat’s engine kill switch or fuel cut off is working properly before setting sail.
10. Steering and Shift Mechanisms in Good Condition
Taking a look at the functionality of your sailboat’s steering and shifting abilities is an important item for all sailing checklists since you’ll be using these quite often while out on the water.
11. Sufficient Amount of Fuel
Having a decent amount of fuel for your sailboat is important because you will be using your engine when sailing.
A reasonable margin of safety is approximately one-third (1/3) of a tank, but that depends on the size of your sailboat.
12. Fuel System Free of Leaks
If you have enough fuel in your sailboat, you’ll want to make sure you aren’t leaking any of it. Before taking your sailboat out on the water, check to see if there are any leaks in the fuel lines.
13. Engine Oil and Transmission Fluid Levels Correct
One of the most important engine checks is taking a look at the oil and transmission fluid levels. At the very least they should be looking clean and well above the minimum capacity.
14. Cooling Water Full
Keeping your engine cool is essential when chugging along, so you’ll need to ensure that the cooling water for your sailboat is full.
Some sailboats take in raw water from the seawater and some are a closed loop system, so check this out before setting sail.
15. Belt Tension Correct and in Good Condition
A very important pre-sail checklist item is to make sure the belt tension on your engine is snug and it’s in good condition.
If you can tell that it’s old, damaged, and worn out, you want to replace this ASAP.
Safety Equipment
Any pre-sail checklist wouldn’t be complete without a proper and thorough check of all your sailboat’s essential safety gear .
From fire extinguishers to flashlights to first aid kits to VHF radio, everything needs to be working properly in case of an unfortunate emergency. Here’s what to look at before setting sail.
16. Safety Equipment Has Not Expired
All of the equipment on board your sailboat must be in-date and, thus, not passed the expiry date. Anything that’s getting close or has already passed should be replaced immediately before setting sail.
17. Fire Extinguishers Are In-Date
This is already a part of the previous step, but it’s so important that it needs its own part of the checklist.
Be absolutely 100% sure your fire extinguishers are in date and not expired. You might be surrounded by water, but that doesn’t mean your sailboat can’t catch fire.
18. Signal Flares and Other Signaling Devices
Ensuring your signal flares and other signaling devices are useable and in-date is extremely important.
In the case that you need to alert passerby sailboats, ships, or planes, these will be essential when doing just that.
19. Life Jacket Suitable for Each Person on Board
One of the most important items to have on a pre-sail checklist is making sure you have enough life jackets of varying sizes on your sailboat.
These life jackets should be readily available and in good condition. In many places around the world, it’s illegal not to have enough life jackets on board.
20. MOB Equipment and Throwable Flotation
Having man overboard (MOB) equipment and throwable flotation devices readily available on your sailboat is incredibly important in case one of your crew members goes overboard.
Man overboard drills require these equipment items, so having them is an absolute must.
21. Flashlight with Extra Batteries
Keeping a few flashlights handy on board your sailboat can be useful for many reasons especially when cruising during the evenings and sleeping on your sailboat.
I like to bring an LED headlamp with me whenever I go overnight sailing for midnight head (toilet) run.
22. Horn Working
Just like in a car, there might be a situation when you’ll need to use your sailboat’s horn.
If you need to communicate with other vessels, signaling back and forth via sound is common especially under poor visibility and potentially malfunctioning VHF equipment.
23. First Aid Kit
An essential part of the pre-sail checklist is to ensure you have a first aid kit filled with the proper supplies.
Some of those supplies include sunscreen, pain relievers, special medication for the crew, sea sickness medicine, and potentially other items.
24. VHF Working
Whenever you’re sailing out on the water, you’ll need to make sure your VHF is working properly and in good condition.
Being able to communicate with other vessels is essential for ensuring the safety of your crew, boat, and neighboring sailors.
Housekeeping Items
Having a few housekeeping items will help increase the probability of having a safe voyage when out on the water sailing.
These pre-sail checklist items are essential and should be inspected every time you set off on your sailboat.
25. Water Tanks Full
A full water tank means you’ll have enough fresh water for you and the rest of your crew.
In case you run out, you’ll want to also make sure to bring on board some extra bottled water for emergencies.
26. Propane Gas
Having enough propane on board your sailboat is an important item on your checklist since you’ll need it for cooking and heating on your sailboat.
Propane tanks should be stored outside in a locker that has a drain.
27. Taps or Faucets Working
The taps and faucets in your sailboat should be working properly so that you have fresh water coming out of them.
If you have tanks full of fresh water but no access to them, that’s a big problem and should be avoided.
28. Heads Flushing or Pumping
No one wants to see what you’ve been up to in the bathroom, so making sure your heads are flushing or pumping properly is an essential pre-sail checklist item.
29. Ample Food and Water
You never know what’s waiting for you on your next sailing adventure, which means you should have plenty of food and water stored away.
Having a mix of food that needs to be cooked or not is a good idea as well as having a good amount that isn’t perishable.
A dinghy is great to have on board a sailboat for a number of reasons. Maybe you’ll need it in an emergency.
Maybe you’ll need it to take you on shore when anchoring out.
Or maybe you’ll want it to just go out and explore the area. Either way, you’ll need to make sure your dinghy’s in good shape before taking it out , which is why it’s a part of the pre-sail checklist.
30. Stowed Properly
You don’t want your dinghy to fall off of your sailboat for whatever reason resulting in you having to chase it. To avoid this, make sure your dingy is properly stored.
31. If Inflatable, Ensure It’s in Working Order
If your dinghy is inflatable, you’ll want to make sure there aren’t any leaks and that it’s working properly.
It’s not uncommon for leaks to pop up in inflatable dinghies, so this is an important item for your pre-sail checklist.
32. Paddles or Oars
In case your dinghy dies on you while you’re cruising around on it, you definitely will want some paddles or oars to get your back to your sailboat.
Outboard motors can suddenly stop working meaning you’ll need another form of energy to get back. Of course, if you have a sail for your dingy , that would be beneficial.
33. Outboard Motor Maintained and Stowed Properly
The outboard motor on your dinghy is how you’ll be scooting around in it, so ensuring it’s well-maintained and stowed properly is important.
Giving it a proper check from time to time would also be ideal.
34. Safety Equipment for Dinghy
Having safety gear on your dinghy is important and should be available to everyone easily. First aid kit, life jackets, and more can make huge differences when you need them.
35. Sufficient Fuel
Before setting out sailing, you’ll want to make sure your dingy has enough gasoline (or petrol) so it doesn’t suddenly die on you when scooting around. I’ve seen this happen too many times!
36. Bailing Device
There’s no question you’ll be getting a bit of water inside your dinghy when you take it out, so you always want to make sure that you have the necessary bailing devices to get that water out.
Pumps and/or buckets should do just fine.
General Considerations
37. keep spares.
There are a number of spare parts your sailboat should have on board to increase the chances of having a well-prepared response to any issues while out on the water.
Some spare parts to keep handy include:
- Oil filters
- Water impellers
- Lubrication oil
- Transmission fluids
- Hose clamps
- Engine hoses
- Flexible fuel line
- Air filters
- Engine drain plugs
- Spark plugs
- Lightbulbs or LEDs
- Electrical tape
- Screws, nuts, and bolts
- Two-part epoxy
- Wooden plugs
- Silicon sealant
- Electrical connectors
- WD-40 or slick lube
38. Regular Activities
- Maintenance schedule
- Allocate crew mooring duties
- Night sail procedures
- New crew orientation
- Monitoring the weather route
Final Thoughts
Following pre-sailing checklists (as well as post-sailing checklists) is extremely important when it comes to the safety of your and your crew’s well-being.
It’s not very glamorous and may feel like a chore, but it’s necessary and gives you a better understanding of your sailboat’s condition and abilities.
Get the very best sailing stuff straight to your inbox
Nomadic sailing.
At Nomadic Sailing, we're all about helping the community learn all there is to know about sailing. From learning how to sail to popular and lesser-known destinations to essential sailing gear and more.
Quick Links
Business address.
1200 Fourth Street #1141 Key West, FL 33040 United States
Copyright © 2024 Nomadic Sailing. All rights reserved. Nomadic Sailing is a participant in the Amazon Services LLC Associates Program, an affiliate advertising program designed to provide a means to earn fees by linking to Amazon.com and affiliated sites.

- Checklists & Guides
Pre & Post Sailing Checklists
- 23.0K views
- 3 minute read
If there was ever a good time for using checklists, before going sailing would be it. Especially if said sailboat is also your home! You’re pretty helpless at sea, especially offshore, so making sure everything is shipshape is definitely worth the extra care upfront. Heavens knows it’s also much easier to make sandwiches, remove a sail cover, or change an engine belt at anchor or in port than it is rolling around in 40kts! We’ve learned a few lessons the hard way, so are now big fans of a checklist.
Sailing is often compared to flying in terms of safety and procedures and we can see why. There are so many different tasks to remember, from the boat’s overall maintenance schedule to provisions, gear, new crew orientation, medical supplies, and more. The list goes on!
We’ve been asked a few times on our Instagram now, what checks we do before we go sailing, especially on the longer passages. So we’ve done our best here to get down the pre-sail and post-sail lists we go through, to keep us in check . If you are looking to create your own sailing checklist, maybe this will help get you started.
Pre-Sail Checklist
- Provisions, fuel, water, and gas – make up food for the journey
- Crew safety, passage, watch-keeping rota, and deck briefing
- One last check of the weather forecast (we use Windy and Predict Wind , alongside local options)
- Turn on Garmin InReach and test
- Update Predict Wind Offshore app and weather route
- Disconnect shore power electrics (if tied up)
- Inspect seacocks
- Check battery status
- Bilge check – clean, dry, and operational
- Navigation – all charts and apps on, start recording track
- Sunscreen, sailing gloves, safety gear & PFD’s on
- Swim ladder stowed
- On deck – everything there is supposed to be there(!) and secured
- Galley – everything stowed, hatches and portlights closed
- Cabin – everything stowed, hatches and portlights closed
- Clear the knot log
- Dingy secured
- Winch handles on deck
- Engine check – water filters, oil levels, belts, bilge, and generally have a good look!
- Turn engine on and check water out the back and exhaust
- Record engine hours and fuel status in ships log (including jerry cans)
- Turn off anchor light (turn on nav lights if it’s a night sail)
- Instruments on and remove covers
- VHF on, tuned to channel 16, and check squelch/volume
- Mainsail cover off, main halyard on the head of the mainsail, and secure. Does it need a reef?
- Wheel unlocked
- Set mooring lines to slip (if tied up) or prepare anchor locker for weighing anchor
- Allocate crew mooring duties (cover a plan B too if necessary!)
- Final visual check of the surrounding area – depth, hazards, other vessels, wind, swimmers/divers, rocks, and all the other nasties!
- Cast off/raise anchor and monitor with fenders if necessary
- Once clear of all hazards stow warps and fenders
Post-Sail Checklist
- Take a final log
- Take bearings (if at anchor)
- All lines coiled and stowed
- Mainsail cover on and halyard secured
- Wheel locked
- Instrument covers on
- Turn off Garmin InReach
- Turn off instruments, radar, GPS, and VHF
- Open hatches and rig mosquito screens
- Battery check
- Bilge check
- Stow winch handles
- Turn on anchor light (if at anchor)
- Move boom over for solar panels
- Rinse the deck to remove salt
If you think we’ve missed anything in our pre or post sailing checklists, do let us know in the comments below and we’ll keep adding to them. If you’re hungry for more, you’ll find a full list of all of our checklists and guides here . At the risk of sounding ridiculous, it probably is important to keep checking your checklists too! Anyway, hope this helps folks happy sailing.
Related Posts:
I fully agree with everything you’ve said. I hope this post reaches a broader audience because it was genuinely fascinating.
Wow. It’s a nice reminder that good people are real in this world.
Leave a Reply Cancel reply
Your email address will not be published. Required fields are marked *
Save my name, email, and website in this browser for the next time I comment.
Sign me up for the newsletter!
Latest from the Log
- 9 minute read
- Getting Started
Living aboard a Victoria 34 – what’s the scoop?
- 1 minute read
‘One of the hardest decisions we’ve had to make so far’ – Ch.19
- 2 minute read
‘Sailing the Peloponnese and discovering Monemvasia’ – Ch.18
- 29.2K views
- 6 minute read
Buying a Boat: A complete guide to buying a boat (with checklists)
Better Sailing

Sailboat Maintenance Checklist
Whether your sailboat is stationary for a long time, or whether you live and travel with it, there are several key things to keep an eye on. Regular maintenance of your sailboat will ensure more years of use and better performance. Furthermore, your sailboat will be safer and it will keep its value longer. Below you’ll find a checklist for routine mission-critical checks. Some of these checks have to be performed both daily and monthly. Others require monthly and annual checks, but always make sure to inspect everything, thoroughly. Follow the steps of the list and ensure trouble-free sailing.
The engine of your sailboat is something that requires a lot of care and attention. Inspect regularly the condition of the engine and look for corrosion, as well as make sure that the outboard motor is securely in place. Daily maintenance of the engine consists of:
- Check the engine’s oil level.
- Check the belt tension.
- Transmission fluid level.
- Inspect pulleys as well as the alignment.
- Alternator and water pump belts have to be tight.
And now we’re moving on to the monthly maintenance of the engine which includes:
- Change the oil and filter of the engine.
- Clean the thru-hull.
- Clean the siphon break.
- Fill up coolant and antifreeze if needed.
- Check pump, impeller, and raw water strainer.
Finally, let’s see the annual maintenance of your sailboat’s engine:
- Test the batteries.
- Check the diesel tank for damages.
- Inspect the shaft and propeller.
- Change primary and secondary fuel filters.
- Bleed the fuel system.
Check the Bilge and Bilge Pump
The bilge is situated at the bottom part of the sailboat and collects excess water. The bilge pump is the piece that removes water from the bilge. If the bilge pump is damaged, your sailboat can even be sunk! In order to keep yourself and your boat safe, check the pump hoses for debris that could cause clogs. In case you find a leak, the first thing you should do is to taste the water. Is it freshwater or saltwater? So, every few days survey the bilge for oil, water, or fuel leaks. Moreover, it’s important to lift a central floorboard often just to ensure that the bilge is dry. Leaks can be caused by different areas. For instance, leaks that come from holes in the deck, loose hatch seals, or improperly sealed windows.

>>Also Read: Common Sailboat Problems and How to Fix Them
Always inspect probable damages to your sailboat, even if it’s in a well-maintained condition. It’s recommended to make monthly and yearly checks to make sure it stays in perfect condition. Firstly, inspect the hull, keel, and rudder and look for any damages, cracks, and blisters. Then, make sure that the drain plugs are in place. Apply gel coat restorer or a rust inhibitor to the scratches or to the rusting of your sailboat’s bodywork. Moreover, you will also need to remove your sailboat from the water, once a year. It’s easier to do this during the winter months and although this can be a costly thing to do, is really worth it. Like this, you’ll get a better image of the hull’s condition and fix anything that needs repair. Finally, remember to annually carry out anti-fouling and any re-painting or zinc replacement.
Raw Water Strainers and Freshwater Levels
Don’t forget to check your seas strainers! If you’re running your generator, heat/air conditioning, or anything that requires saltwater or raw cooling system to function, you might want to surveil your strainers. Furthermore, inspect the water flow on all of the raw water cooling systems. You have to see an easy flow of heating, Genset, refrigeration, and aircon cooling water out of the system. If the freshwater system, which is pressurized by an accumulator tank gets too low, then it throws the whole system out and thus it will not be working properly. So, it’s imperative that you never let your water tanks empty.
As for the electrical system it is recommended to check it every month. Check the condition of the wires, if they’re neatly secured, dry, and inspect their casings to see if they are intact. However, there are some sailboats that have their generator running periodically to charge them up. So, keep an eye on your battery’s charge levels. Also, the electrical lines must be in good condition to keep the electrical system on your sailboat up and running. Any damaged lines could provoke a fire hazard. To prevent electrical lines from erosion, remember to keep them clean, and use a digital multimeter to make sure everything’s working properly.
Without the battery, which is the heart of your sailboat, the engine won’t start, nor the electrical components will work. So, take good care of the battery and check it once a year, or more often, i.e. during the boating season. Keep in mind that batteries naturally degrade over time, so this is a must task to perform. You can check the battery’s charge with a digital multimeter, and the connections for corrosion. Moreover, test the batteries and check if they’re clean and dry. There are sailboats that have solar and wind power that continuously tops up the batteries. Other sailboats depend on having the generator running periodically in order to charge them up.
In case you’re running the generator you will need to check its vitals at least once a week. So, check the oil, belt, water level, and inspect for leaks and loose connections. You can see the leaks easier if you keep the Genset clean.
Oil and Filter
Remember to regularly change the oil and oil filter. In case you don’t, then it is possible to provoke damage to the engine parts. In order to change the oil, let the engine run for about seven minutes, then turn it off. Subsequently, place a container under the drain plug. Take out the drain plug and loosen the screw that is located above. Then, let the oil drain out for about 30 minutes. During this process change also the oil filter. After the oil drains out, replace the drain plug and tighten the screw. Finally, fill the engine with the proper oil.
Fridge and Freezer Temperature
The effectiveness of a fridge often depends on the temperature of the sea. Many boat refrigeration systems get a charge over time which makes them less effective. Therefore they slowly reduce the temperature gauge. So, it is recommended to change the temperature gauge at least once a week. The temperature of the fridge has to be below 5 degrees and the freezer below freezing.
Sails and Rigging
Sails and rigging have to be checked at least once a month. Firstly, look out for any chaffing where the headsail sheets attach to the clew, and also to the traveller and boom vang. Secondly, examine thoroughly if there’s any wear on the mainsail. Then, check if the cotter pins and shroud are in place and in good condition. Finally, make sure that the turnbuckles and pelican hooks on the lifeline are in good condition.
Summary- Maintenance List
Your sailboat’s maintenance needs to be taken seriously. When you’re regularly maintaining your sailboat, you also ensure its life spanning. Some basic items that require constant maintenance are the generator, the battery, the plumbing, the bilge, oil, and the fridge and fluid levels, among others. However, there are others that require monthly or yearly maintenance, such as the engine, the electrical system, the sails and rigging, the propeller, zippers, hinges, upholstery, etc. In case you can’t repair or check the condition of these parts, then consider contacting a professional to help you with the maintenance process.

Peter is the editor of Better Sailing. He has sailed for countless hours and has maintained his own boats and sailboats for years. After years of trial and error, he decided to start this website to share the knowledge.
Related Posts

Atlantic vs Pacific: Which is More Dangerous for Sailing?

Why Do Sailboats Lean?

How Does a Boat Sail Upwind? Unveiling the Mechanics of Against the Wind Sailing

How Does Sailing Work? The Physics of Sailing
- Buyer's Guide
- Destinations
- Maintenance
- Sailing Info
Hit enter to search or ESC to close.
4-Day, 4-Park Magic Ticket from $99 Per Day, Plus Tax (Total Price from $396, Plus Tax)
View All Special Offers

Experience 4 days of magic and thrills across the Walt Disney World theme parks when you purchase a specially priced 4-Park Magic Ticket starting from US$99 per day , plus tax (total price starting from US$396, plus tax).
This ticket does not require a theme park reservation to enter a park.
Date-based ticket with start dates from April 2 through September 22, 2024. Ticket must be used within 7 days of selected start date.

Fun in the Theme Parks
Discover new experiences and classic favorites in all 4 Walt Disney World theme parks when you purchase a 4-Park Magic Ticket. Read More
Discover new experiences and classic favorites in all 4 Walt Disney World theme parks when you purchase a 4-Park Magic Ticket.
As a reminder, the 4-Park Magic Ticket provides one visit to each of the 4 Walt Disney World Resort theme parks (one theme park per day).
- NEW! Stroll along a lush trail where you can explore the wonders of water and discover its playful personality at Journey of Water, Inspired by Moana .
- NEW! Watch the skies come alive in Luminous The Symphony of Us , a nighttime spectacular with fireworks, fountains, lights and music.
- Spring into fresh flavors, lively entertainment and fun for all ages at EPCOT International Flower & Garden Festival —now through May 27, 2024.
- Sip, savor and celebrate a world of flavor at EPCOT International Food & Wine Festival —returning in fall 2024.
- Bring the whole family to zip, dash and scurry through Gusteau's kitchen as you take in the sights, sounds and even smells from Remy's world on Remy's Ratatouille Adventure .
- Board an ancient Norwegian vessel and be whisked away to the kingdom of Arendelle during a Frozen Ever After adventure.
- Soar across the sky during a hang-gliding adventure on Soarin' —with spectacular sights, pleasant scents and the graceful sensation of flight that take you to incredible heights.
Disney's Animal Kingdom Theme Park
- Celebrate the magic of nature at Pandora - The World of Avatar . Here, you can fly on the back of a banshee on Avatar Flight of Passage, hike amid floating mountains in the Valley of Mo'ara and take a mystical boat ride into a bioluminescent rainforest on the Na'vi River Journey.
- Set off in an open-air vehicle across a lush African savanna teeming with exotic animals on Kilimanjaro Safaris.
- Witness Finding Nemo: The Big Blue... and Beyond! —a vibrant stage show set in the underwater world of Finding Nemo .
- Speed through the Himalayas on a runaway train while avoiding the clutches of the Yeti on Expedition Everest - Legend of the Forbidden Mountain .
- Behold Festival of the Lion King —a larger-than-life show filled with pageantry, puppetry and classic songs from The Lion King .
- Splash your way through a lush Asian jungle on Kali River Rapids .
Magic Kingdom Park
- Leave the real world behind for a high-stakes race across the Grid—the dark, computerized world from TRON —on TRON Lightcycle / Run presented by Enterprise.
- Explore iconic attractions and experiences in 6 incredible lands—including Seven Dwarfs Mine Train , a swaying family coaster ride that will have you racing through a diamond mine.
- Be dazzled by music, dancing and vivid pageantry during the Festival of Fantasy Parade —a grand tribute to the tales and inhabitants of Fantasyland.
- Meet some of your favorite Disney pals , enjoy a royal reception from Disney princesses and so much more. You may even spot Mirabel or Bruno from the animated film Encanto !
- Take off on an exhilarating coaster ride on Space Mountain and Big Thunder Mountain Railroad .
- Rediscover beloved classic Disney attractions such as Jungle Cruise, Haunted Mansion and more.
- Feast your eyes on a nighttime fireworks spectacular featuring lights, lasers and special effects.
Disney's Hollywood Studios
- Live your adventure in a galaxy far, far away at Star Wars : Galaxy's Edge ! Experience 2 thrilling attractions, build your own droid or lightsaber, savor Batuu's tasty food and beverages, shop for themed merchandise and more!
- Discover big fun for kids and grown-ups alike at Toy Story Land . Take a wild ride on Slinky Dog Dash and go for a whirl on Alien Swirling Saucers.
- Pack your imagination, switch tracks and take a ride on the cartoon side like never before when you hop aboard Mickey & Minnie’s Runaway Railway.
- Hurtle up and down on a haunted elevator ride at The Twilight Zone Tower of Terror™.
- See some favorite Characters around the park—including Toy Story Characters, Disney Junior pals, Frozen friends and Star Wars Characters.

Stay in the Magic... and Save!
Turn your visit into an unforgettable vacation with a special offer at select Disney Resort hotels. Read More
Turn your visit into an unforgettable vacation with a special offer at select Disney Resort hotels.
Stay in the magic with the Disney Resorts Collection—and save with this offer:
Spring and Early Summer Room Offer
Save up to 30% on rooms at select Disney Resort hotels when you stay 5 nights or longer, valid for stays most nights through July 7, 2024. Other savings may be available for shorter stays. View offer details .
Why Stay in the Magic?
When you book this room offer, you can enjoy a Walt Disney World vacation filled enchantment.
As a Disney Resort hotel Guest, you can:
- Experience the same legendary storytelling, detail and service found in the Walt Disney World theme parks
- Stay close to the theme parks
- Enjoy extra time in the theme parks — view details about this benefit for Disney Resort hotel Guests
- Get around Walt Disney World Resort with ease using complimentary transportation options—like bus, boat and monorail services
- Delight in other great benefits !
Check out Walt Disney World room offers to learn more about these benefits—and save on your stay!

Make the Most of Your Day
Save time waiting in line with Lightning Lane entry .
- Admission is subject to capacity closures and other restrictions.
- Parks, attractions and other offerings are subject to availability, closures and change or cancellation without notice or liability. Admission to a theme park is not guaranteed.
- Tickets are subject to the Walt Disney World Resort Ticket Store Terms and Conditions .
Stay in the Magic at Select Walt Disney World Resort Hotels by booking a non-discounted room with a discounted 4-Park Magic Ticket now through 9/22. To book, call 407-934-7639 and speak with a vacation planning expert or call your travel agent. The number of rooms allocated for this offer is limited.
†Guests under age 18 must have parent or guardian permission to call.
Other Offers You May Like

Use CoBrowse to Share Your Screen?
Even as the Disney Cast Member guides you around our site, they will be unable to access or view any files or information on your device or anything you type.
To stop the session, click the X in the screen-sharing window at any time. You can remain on the phone with the Cast Member.
Enter the code provided by the Cast Member and Accept to get started.
Invalid code. Please reenter
Not on the Phone with a Cast Member?
India top court stays government move to form fact check unit under IT laws
Supreme Court says ‘serious constitutional questions’ have been raised by the petitioners challenging the IT ministry’s notification.

India’s top court has ordered a stay on the government notifying a state-run press body to check alleged fake news or misinformation about the government’s policies on social media.
The Supreme Court’s order on Thursday said “serious constitutional questions” were raised in the petitions challenging the government’s move.
Keep reading
India court seeks gov’t response on comic’s challenge to it rules, ‘assault on free speech’: india editors slam ‘fake news’ proposal, deepfake democracy: behind the ai trickery shaping india’s 2024 election, what does india’s plan to target ‘fake news’ mean for media.
The court’s ruling came a day after the Ministry of Electronics and Information Technology issued a notification establishing the Press Information Bureau’s (PIB) Fact Check Unit (FCU) as a statutory body with powers to flag allegedly false information related to the government and its agencies ahead of the general election starting next month.
The provision for an FCU was part of the government’s amendments to the Information Technology (Intermediary Guidelines and Digital Media Ethics Code) Rules, 2021, in April last year. The amendments included a provision for an FCU by the government to identify “fake or false or misleading” online content related to the “business” of the federal government.
But stand-up comic Kunal Kamra, the Editors Guild of India and the Association of Indian Magazines challenged the amendments in the Bombay High Court, citing “unreasonable restrictions to freedom of speech and expression”.
The News Broadcasters and Digital Association also said the fact checking unit will “have a chilling effect on the media” and should be withdrawn.
In his petition, Kamra said the law would also restrict his “fundamental right to practice trade or profession” since he relies on social media platforms to share his content. He said it could also lead to his content being “arbitrarily blocked” or taken down , or his accounts being suspended or deactivated.
But a two-judge bench at the high court delivered a split verdict on January 31 and the case was referred to a third judge who rejected the pleas, effectively making it a majority decision and allowing the government to notify the FCU.
On March 14, the petitioners moved the Supreme Court, challenging the Bombay High Court’s refusal to stay the creation of the fact-checking unit.
In a report on Thursday, The Wire news website said there were also serious concerns regarding the PIB’s ability to function as an independent body to conduct fact checks.
It said researchers at the Internet Freedom Foundation last year found that the PIB received nearly 120,000 fact-checking requests between 2020 and 2023, but could only act on just 1,223 – or about 1 percent – of the cases.
A look at the most expensive superyachts at the Palm Beach yacht show and their insane features, from basketball courts on deck to ice baths and saunas
- The Palm Beach International Boat Show kicks off later this week.
- Eight megayachts are expected to be on display for would-be buyers and charter customers.
- These are the show's biggest yachts — and how many millions of dollars they are going for.
The Palm Beach International Boat Show — the yacht world's flashiest event stateside — is returning this year with over 800 boats for both deep-pocketed potential owners and window shoppers to peruse.
While it's impossible to know what exactly will be on display until the show begins on Thursday, it's expected that eight megayachts — generally defined as ships over 60 meters long — will be docked at the show and at nearby marinas like the Rybovich Marina in the ritzy Florida town.
Some of these are for sale at eye-popping prices, but others are available to if in case you fancy living like a billionaire for a week or two this summer (and if you have six figures to spare on a vacation).
These are the eight biggest yachts that will be at the Palm Beach International Boat Show and nearby marinas, in size order.
Nero: 90.1 meters
Price: From $497,000 a week (charter) Standout features: Pizza ovens, beauty salon, massage room, resistance pool
Reportedly owned by Irish billionaire Denis O'Brien, Nero is modeled after J.P. Morgan's 1930s ship , and was built in 2007 and updated in 2021.
She now boasts a gym on her sundeck with multiple cardio machines and a beauty salon, and has an on-board beautician for manicure, pedicure, hair, and massage needs. There's also an upgraded movie theater, two new pizza ovens, and both a pool and a jacuzzi.
For those who want to go overboard, she has more than a dozen toys, including a waterslide, Jet Ski, and flyboard.
Victorious: 85 meters
Price: From $876,600 a week in the summer and $950,000 a week in the winter Standout features: Hammam (Turkish bath), wine cellar, wood-burning fireplace, children's playroom
Victorious brings a party vibe to the yacht show. With a beach club on board, a wine cellar, a cigar clubroom , multiple bars, and a lounge with a piano, the vessel is made for entertaining. Plus, there's a playroom and movie theater to entertain the kids.
For tamer charter clients, Victorious has a suite of wellness features such as a gym, massage room, beauty salon and hammam, or Turkish bath — perhaps a custom request of her owner, Turkish businessman Vural Ak.
She also boasts a treasure trove of water toys, including Jet Skis, jetsurfs, inflatable kayaks, and scuba equipment.
Casino Royale: 72 meters
Price: TBD Special Features: Infinity pool, helipad, private jacuzzi
Purchased and refitted by car dealer magnate John Staluppi last year, Casino Royale is the latest of his James Bond-inspired yachts (he's also owned an Octopussy and a Skyfall, among others).
Casino Royale has a helipad that turns into a dancefloor, an infinity pool, and a wellness center with a gym and sauna. The owner's cabin has its own deck, which features a private bar and jacuzzi.
Related stories
However, the boat's price isn't listed, and while she's not necessarily officially for sale, that might change depending on who's prepared to buy, Mr. Bond.
Talisman C: 70.6 meters
Price: $60 million (or from $567,000 a week to charter) Special features: Massage and beauty room, private library
Likely the largest yacht for sale (not just charter) at the show, the Talisman C is a 2011 six-bedroom boat. The owner's cabin comes with an en suite bathroom, dressing room, private library, and crystal chandeliers.
Amenities include a gym, a beauty room, oversized jacuzzi, and a fully equipped bar. Her crew of 19 includes a trained masseuse, and the toy room comes equipped with a wakeboard, eFoil , and WaveRunners.
Joy: 70 meters
Price: From $650,000 a week Special features: Disco club, basketball court, onboard fitness instructor
Superyacht Joy testifies to the fact that owners want as many on-board experiences as they can get.
There's an expansive suite of fitness features, including a basketball court (don't shoot that hoop too hard!), a personal trainer on staff, boxing equipment, and a handful of machines. For post-workout winddowns, there's a spa with a steam room and onboard masseuse. And for entertainment, there's both an outdoor and indoor cinema, and a disco club.
Triumph: 65.4 meters
Price: From $707,600 a week in the summer and $650,000 a week in the winter Special features: Sauna, helipad, banana boat
This 2021 superyacht is named after Triumph motorcycles — a reported favorite of her rumored owner, British businessman Chris Dawson — and even has one on display as an art piece in the upper deck's lounge. The primary suite is 1,400 square feet and has its own study , and there's a sauna, an indoor-outdoor gym, a helipad, and a massage room spread among her six decks.
She boasts an "armada of water toys," including two kinds of Jet Skis, electric water bikes, and a banana boat.
Seanna: 64.5 meters
Price: $54,000,000 (or from $462,000 a week to charter) Special features: marble foyer, movie room, sundeck pool
The recently refurbished Seanna is available for sale and charter.
Her indoor-outdoor gym is on sea level so that passengers can take a dip after a session with the onboard personal trainer. There's also a sundeck pool, a helipad, a two-room massage facility, and, for the more cerebral guests, a library with an electric fireplace.
There are a number of toys on board, including a popular water trampoline and two WaveRunners.
Come Together: 60 meters
Price: $65,000,000 Special Features: DJ and videographer on board, ice bath, sauna
Next-to-new yacht Come Together is looking for a new owner after doing charters during the 2023 season.
The Beatles' influence is evident beyond the yacht's name, with guitars dotting the sky lounge and a crewmember who doubles as a DJ. There's also an outdoor cinema and bar for entertainment and an ice bath and sauna for the day after the party. The owner's suite has a private study and lounge, and each guest cabin has its own ensuite.
The sale includes a number of toys, like Jet Skis, kayaks, and Seabobs.
Watch: Inside the world's biggest cruise ship that just set sail
- Main content
At least 3 dead, 7 missing after migrant boat capsizes off southern Spain
The Reuters Daily Briefing newsletter provides all the news you need to start your day. Sign up here.
Reporting by David Latona; Editing by Emma Pinedo
Our Standards: The Thomson Reuters Trust Principles. , opens new tab

Ukraine says Russia preparing 100,000 troops, possibly for summer offensive push
Russia is preparing 100,000 troops who could be used for a possible new offensive push in Ukraine this summer or to replenish depleted units, the commander of Ukraine's ground forces said on Friday.

IMAGES
VIDEO
COMMENTS
A sailboat's standing rigging is generally built from wire rope, rod, or occasionally a super-strong synthetic fibered rope such as Dyneema ®, carbon fiber, kevlar or PBO. 1×19 316 grade stainless steel Wire Rope (1 group of 19 wires, very stiff with low stretch) is standard on most sailboats. Wire rope is sized/priced by its diameter which ...
508. 0. Dec 22, 2013. #3. Checkstays on your rig enable you to power up your mainsail upwind and get more headstay tension. Go out in 8 knots with some peeps on the rail. Pull on the check and watch your main power up. You'll get more point & power. When it's nuking, you can ease the check stay a little and watch your main blade out.
Checkstays are used to "check" mast bend. Powerful hydraulic backstay adjusters, while they are trying to increase headstay tension, can put a huge compression load on the mast. Un"checked", this action can actually lower the entire rig, slacking off shrouds rather than tension the headstay. (Picture squeezing the ends of a toothpick between ...
Aug 14, 2015. It's one of the most important features on a sailboat, but many owners put standing rigging at the back of their minds when it comes time to do their pre-season safety checks. A prudent sailor should inspect his or her standing rig at least once each season and should know when the time comes to replace most or all of it.
Typically only on a fractional rig. They can have two purposes. In light air, ease the backstay a bit (lets top of mast forward) and pull on a bit of checkstay (pulls center of mast aft) to straighten the mast (not invert it, just get it more nearly straight and take out some of the bend). This makes the main fuller and more powerful.
Daniel Wade. June 15, 2022. A sailboat stay is a cable or line that supports the mast. Stays bear a significant portion of the mast load. Stays are a significant part of a sailboat's standing rigging, and they're essential for safe sailing. Stays support the mast and bear the stress of the wind and the sails. Losing a stay is a serious problem ...
Short answer sailboat stays: Sailboat stays, also known as rigging stays, are structural wires or ropes used to support the mast of a sailboat. They provide lateral stability and prevent excessive vertical movement of the mast. Stays generally run from various points on the mast to different parts of the hull or deck, ensuring the.
1. Check by sighting up the backside of the mast to see how straight your spar is side to side. You can take a masthead halyard from side to side to ensure that the masthead is on center. Do this by placing a wrap of tape 3′ up from the upper chainplate pin hole on each upper shroud. Cleat the halyard and pull it to the tape mark on one side ...
The diagonal shrouds are controlling not only athwartship tuning but also acting like check stays to inhibit mast bend, since they are swept back and pulling aft. Too tight, and the diagonal shrouds will keep the mast from bending and flattening the mainsail; too loose, and the mast can over-bend and turn the sail inside out.
The rig or rigging on a sailboat is a common term for two parts: The standing rigging consists of wires supporting the mast on a sailboat and reinforcing the spars from the force of the sails when sailing. The running rigging consists of the halyards, sheets, and lines we use to hoist, lower, operate, and control the sails on a sailboat.
In our experience, once a sail has had a mildew problem, it will probably always have a mildew problem. A good canvas cleaner can reduce the black spots to dirty white spots, but if the boat stays in the same area where the mildew started, the spots will soon be grey, and then it's only a matter of time before they are black again. Bill Gladstone
Standing rigging tension is a peculiarly under-addressed subject. Easy to see how it would worry a new boat owner or someone going to sea. Most experts step aboard, yank or twang the shrouds and stays and mutter, Pretty slack, Too Tight, or, Thats about right. Youll find in the sailing literature very few discussions of the question: What does ...
predominately by the boat's displacement and type of usage. Heavy sile fatigue issues rather than those of category III & IV, which will base inspection intervals on usage and ntial Safe Working Load issues. At bare minimum, a level A mast system inspection is suggested at least once a year, regardless of the yacht classification category.
I prefer to have the checkstays in place but drawn to the mast or stays and deploy when needed. Checkstays are required for two reasons: 1) When you apply backstay to tighten up the forstay you also de-power the mainsail, putting the checkstay on will allow some of the draft to return to the forward third of the mainsail giving it more power.
Make sure it's not overly slack and flopping around like loose spaghetti. If so, add more shroud tension to both sides. A tension-testing gauge will work, but many sailors do fine estimating by hand. Cruising-boat rigs shouldn't have the same amount of rig tension as a raceboat beating to windward.
Sailboat Racing. SailNet is a forum community dedicated to Sailing enthusiasts. Come join the discussion about sailing, modifications, classifieds ... Working in combination the runners and check stay can control where mastbend occurs in much the same way as a the permanent backstay and checkstay does on a fractional rig. On most bendy rigs ...
Tim Barker. A running backstay is a removable stay that provides aft support to the mast from either the masthead or the point at which an inner forestay is attached. It originated as a response to the material limits of the period. At that time, solid wooden masts, for example, were either too weak or too heavy to be made particularly tall.
The inspection will look for items such as cracks in rigging components, misalignment of stays and corrosion. Rig tensions should be checked and adjusted as necessary. A written record should be completed listing existing or potential concerns. Every 5 years or so, more thorough rig checks should be carried out, which involve disassembly of the ...
There are three items that need attention when adding a staysail: the standing rigging, the running rigging and the sail itself. In order to install a stayed staysail, you are essentially adding a second forestay about a third closer to the mast. The stay attaches to the deck about a third of the way back and to the mast around the upper spreader.
Chainplates. Check for excessive wear on spacers or bushes, signs of elongation in pin holes, alignment with bottlescrews, stay angles, evidence of fracture at deck level. Check the condition of the chainplate fastenings to the hull below decks. Check for signs of leaking and crevice corrosion.
Hull Checks. The health of your sailboat's hull is incredibly important before setting out to sail and is on the top of the pre-sail checklist. Essentially, the hull ensures that your sailboat stays afloat and does not let water in. Ensuring your sailboat has a healthy hull means you're likely to be ready for a great sailing adventure! 1 ...
Pre-Sail Checklist. Provisions, fuel, water, and gas - make up food for the journey. Crew safety, passage, watch-keeping rota, and deck briefing. One last check of the weather forecast (we use Windy and Predict Wind, alongside local options) Turn on Garmin InReach and test. Update Predict Wind Offshore app and weather route.
Clean the thru-hull. Clean the siphon break. Fill up coolant and antifreeze if needed. Check pump, impeller, and raw water strainer. Finally, let's see the annual maintenance of your sailboat's engine: Test the batteries. Check the diesel tank for damages. Inspect the shaft and propeller.
Stay in the Magic at Select Walt Disney World Resort Hotels by booking a non-discounted room with a discounted 4-Park Magic Ticket now through 9/22. To book, call 407-934-7639 and speak with a vacation planning expert or call your travel agent. The number of rooms allocated for this offer is limited.
India's top court has ordered a stay on the government notifying a state-run press body to check alleged fake news or misinformation about the government's policies on social media. The ...
Likely the largest yacht for sale (not just charter) at the show, the Talisman C is a 2011 six-bedroom boat. The owner's cabin comes with an en suite bathroom, dressing room, private library, and ...
A fabricated quote about England taking Scotland from the European Union "against its democratic will" has been baselessly attributed to French President Emmanuel Macron on social media.
Fact Check: Macron dancing clip is altered 80s nightclub footage. By Reuters Fact Check. March 21, 2024 5:21 PM UTC Updated ago. ... Stay Informed. Download the App (iOS), opens new tab;
The service said another vessel had issued an alert at 8 a.m. local time (0700 GMT) after sighting the semi-sunken black boat 26 nautical miles (48 km) south of Cape Sacratif in the city of Motril.