
Top 15 Free Nautical Quilt Patterns To Try (+8 Bonus Patterns For Sale)
Categories Free Quilt Patterns
- Save To Pinterest 25

Have you ever found yourself entranced by the magnificent serenity of the ocean, the majesty of a ship under full sail, or the call of the seagulls from the shore? Imagine encapsulating these awe-inspiring elements into a quilt pattern that warms not only your body but also your maritime spirit. The Nautical Quilt Pattern is a charming motif inspired by these aquatic wonders, intricately depicting elements that sing tales of voyages, harbors, lighthouses, and more. We handpicked these free nautical quilt patterns any quilter will love in the sea of quilt patterns. It would be a thoughtful gift for sailors or family, friends, or acquaintances who love the water, marine life, and sailing adventures. So, are you ready to embark on your quilting voyage? It’s time to unfurl your creativity, raise your sails, and navigate through the tranquil waters of nautical quilting. These free nautical quilt patterns are your compass guiding you to craft treasures.
Free Nautical Quilt Patterns – Top Picks
1. free quilt pattern: ships go sailing.

Designer: Riley Blake Designs
Set sail on a quilting adventure with the Ships Go Sailing quilt pattern. Created by Riley Blake Designs, this free pattern showcases the exquisite Nautical Caskata Artisanal Home fabric collection. Measuring 76 inches x 79 ¼ inches, it’s the perfect bed quilt for sailors or voyagers at heart. With the strip piecing technique, you’ll see stunning nautical prints including sailboats, compasses, and aquatic animals. The quilt’s charm is further enhanced by the addition of flying geese quilt blocks , adding a geometric touch. Dive into this maritime-inspired project and let your imagination soar as you create a quilt that embodies the spirit of the open seas.
2. Free Quilt Pattern: Ahoy Sailor

Designer: Suzy Williams of Suzy Quilts
Prepare to embark on a whimsical nautical adventure with the Ahoy Sailor Quilt. Designed by Suzy Williams, this captivating pattern captures the essence of the ocean with mermaids, sand dollars, and charming sea creatures brought to life by the Saltwater fabric by Emily Winfield Martin. With a finished size of 60″ x 60″, this quilt is perfect for snuggling on the couch or adding a whimsical touch to any space. Whether as a gift or a cozy addition to your home, the Ahoy Sailor Quilt embraces the spirit of adventure and invites dreamers of all ages to explore the wonders of the deep blue sea.
3. Free Quilt Pattern: GO! Let’s GO Sailing

Designer: Reed Johnson of Blue Bear Quilts for AccuQuilt
Ready your ships as we set sail on a captivating quilting adventure with the Go! Let’s GO Sailing Quilt, a masterpiece designed for sea farers and lovers of the open water. Created by the talented Reed Johnson of Blue Bear Quilts for AccuQuilt, this free quilt pattern combines the beauty of quilting with the language of the sea. Each block showcases international maritime signal flags, allowing you to communicate short messages through vibrant colors and intricate designs! Imagine the joy of stitching together a quilt that not only brings warmth and comfort but also serves as an educational tool for sailors and their loved ones in size 50 inches x 50 inches. This amazing quilt symbolizes adventure, communication, and the bond between sea and shore. Embark on this quilting journey, and witness the joy and appreciation that this unique piece will bring!
4. Free Quilt Pattern: Sail Away Quilt Block

Designer: Glenda Wilder of Glenda Wilder Designs
Unleash your creativity with the captivating Sail Away Quilt Block. Designed by Glenda Wilder for Quilt Block Mania Summer Fun 2020, this block invites you to dive into the tranquility of the ocean waves. Piece together the Half Square Triangle Units, Sunshine Unit, and Four Patch Units to bring this stunning block to life. With a finished size of 12.5″ x 12.5″, it’s perfect for creating a beautiful quilt or adding to your quilting repertoire. This free printable quilt pattern captures nautical bliss with its vibrant colors and skillfully appliqued sailboat. Whether for houseboats or nautical-themed homes, the Sail Away Quilt Block is a simple yet stunning masterpiece that celebrates the love for the sea.
5. Free Quilt Pattern: Come Sail Away

Designer: Ramona Burke for Robert Kaufman Fabrics
Embark on a nautical adventure with the Come Sail Away Quilt pattern. Designed by the talented Ramona Burke for Robert Kaufman Fabrics, this free pattern showcases the delightful fabrics from the Don’t be crabby collection by Laurie Wisbrun. Measuring 49″ x 49″, this wall hanging quilt features charming boat, snowball, and whale blocks arranged in a captivating manner. Let your creativity set sail as you piece together this whimsical quilt, bringing the spirit of the ocean into your home. Whether you’re a sailing enthusiast or simply love the coastal vibe, the Come Sail Away Quilt is a delightful project that captures the joy of the sea.
6. Free Quilt Pattern: Beach Baby

Designer: Toby Lischko for P&B Textiles
Indulge in the nostalgic memories of carefree summer days by the shore with the Beach Baby Quilt. Designed by Toby Lischko, this delightful quilt pattern brings to life the playful charm of sailboats and buckets, beautifully showcasing the vibrant hues inspired by Retro Vintage’s Beach Baby fabric collection. With its finished size of 50″ x 60″, this quilt is perfect for snuggling up or adding a touch of coastal elegance to any space. This pattern is designed to be accessible for advanced beginners, allowing you to embark on a beach-themed quilting adventure. Gift it to a fellow quilter or use it to adorn your own beach-inspired decor, the Beach Baby Quilt is sure to evoke fond memories of sun-soaked shores and create a joyful ambiance wherever it resides.
7. Free Quilt Pattern: GO! Nautical Compass Pillow

Designer: Melanie Call for AccuQuilt
Add a touch of coastal charm to your home with the GO! Nautical Compass Pillow. Designed by Melanie Call, this free quilt pattern features a compass, sailboat, ship wheel, and anchor, capturing the essence of the sea. Measuring 22.5 inches x 22.5 inches, this oversized nautical throw pillow is a perfect addition to beach-worthy decor. Whether it’s a housewarming gift, a present for travel enthusiasts, or a treat for yourself, this beginner-friendly project is made even more delightful with nautical-themed fabrics. Embrace the maritime spirit and create a chic beach vibe in your home.
8. Free Quilt Pattern: Commotion in the Ocean Quilt

Designer: Denise Russell for Blank Quilting
If you’re a beginner, looking for some advanced quilts to conquer, then, this piece is perfect for you! Introducing the Commotion in the Ocean Quilt by Denise Russell. With a size of about 58″ x 67″, this quilt is definitely a good goofy gift for your sea-loving friends. Featuring the fabric collection Commotion in the Ocean by Patty Rybolt, this is a magnificent play of colors and sea organisms from seaweeds to worms, this quilt has it all for you!
9. Free Quilt Pattern: Lucy’s Voyage Quilt

Touch your patriotic soul with this red, blue, and white quilt from Riley Blake Designs! The piece is called Lucy’s Voyage. It has 4 Stars as the main focus, which represent the colors of the American Flag. It talks about the connection between the ocean and homeland. This piece is relevantly easy to recreate, friendly for beginners like you! This masterful quilt is 48″ x 48″ in size, making this piece a perfect wall runner during the 4th of July.
10. Free Quilt Pattern: Nautical Quilt

Designer: Lynne Goldsworthy for Andover Fabrics
Satisfy the cozy and cuddly aesthetic of this masterful quilt entitled Nautical Quilt. Designed by Lynne Goldsworthy to be a perfect throw blanket that will envelop your loved ones with warmth and comfort! If you’re worried about the difficulty of this art, this piece requires the experience of an intermediate quilter. The size of this piece is approximately 58 ½” x 77 ½” making it as functional as it could be.
11. Free Quilt Pattern: Ocean Quilt

Nautical quilts are not nautical quilts if they don’t explore the bounty of the ocean. The Ocean quilt was created by the ever-talented Denise Russell. Featuring the Commotion in the Ocean fabric collection by Patty Rybolt. Dawning a size of 41″ x 53″ this masterpiece is definitely one of the best ocean-themed blankets you could ever have! Although this quilt looks intricate, this piece can easily be recreated by advanced beginners like you, so get your quilting tools now!
12. Free Quilt Pattern: Anchors Aweigh

Designer: Tula Pink
Dive into the maritime world with the Anchors Aweigh quilt pattern by Tula Pink . Created in collaboration with the Salt Water fabric collection, this quilt boasts a striking anchor motif at its heart, offering a true nautical flair. At a finished size of 90 inches by 96 inches, it’s perfect for a bed quilt that exudes coastal charm. The pattern’s intricate design, combined with the vibrant fabric palette, brings a touch of the sea into your living space, making it a standout piece for any ocean enthusiast.
13. Free Quilt Pattern: Lost at Sea

Designer: Christine Stainbrook for RJR Fabrics
Embark on a quilting voyage with the Lost at Sea pattern by Christine Stainbrook. Anchored in the vibrant Splash fabric collection by Alex Anderson , this quilt, measuring 92” x 92”, captures the spirit of the open ocean. Employing the foundation paper piecing technique, it showcases mariner’s compass quilt blocks , adding an extra layer of maritime charm. The interplay of color and pattern evokes the ebb and flow of the sea, creating a captivating quilt that’s perfect for those who yearn for the beauty of the open water in their quilting endeavors.
14. Free Quilt Pattern: Set Sail

Designer: Michael Miller Fabrics
Prepare to Set Sail on a quilting adventure with the Bon Voyage fabric collection from Michael Miller Fabrics. This free pattern by Project House 360, designed for confident beginners, yields a delightful quilt measuring 51” x 51”. Crafted with the artful touch of appliqué, this pattern creates a captivating interplay of sailboats and eight-point stars. It’s the perfect quilt for those seeking to journey through a sea of colors and textures, creating a nautical masterpiece that’s sure to infuse any space with the serenity of the open waters.
15. Free Quilt Pattern: Ahoy

Designer: Erin Schlosser for Windham Fabrics
Ahoy there! Dive into quilting with the Ahoy pattern by Erin Schlosser, showcasing the Sail Away fabric collection from Whistler Studios. Measuring 52″ x 68″, this pattern is a wonderful project for quilters seeking a touch of nautical charm. The design features appliquéd elements like the cheerful ‘Ahoy’ text, an anchor, and a charming nautical banner, all coming together to create a quilt that’s perfect for those who love the open sea. With clear instructions and the delightful Sail Away collection, this pattern is sure to make your quilting journey a smooth sail.
BONUS Nautical Quilt Patterns For Sale from Online Shops
1. sailboat baby quilt pattern (downloadable pattern for sale).

Designer: Christine J. of Christine J Designs
Indulge your babies with this warm and cozy quilt titled Sailboat Baby Quilt. Created by Christine J. of Christine J Designs, this quilt is a revolution. With its size of 42″ x 42″ this art will surely cover your babies in warmth and comfort. This intermediate-level piece can be a cute and interactive blanket that will definitely tickle the imagination of your toddlers!
2. Regatta Quilt (PDF Printable Pattern For Sale)

Designer: Darlene of Salt Street Designs
Decorate your beach house with this lovely Regatta Quilt by Darlene of Salt Street Designs! The exquisite quilt is adorned with beautifully crafted anchors and boats, capturing the essence of maritime adventure. The finished size of this quilt is around 65″ x 78″ making it a good throw size quilt. This piece is labeled as easy, making it suitable for beginners alike!
3. Scrap Happy Sailboats (PDF Downloadable Pattern For Sale)

Designer: Judit Hajdu of QuiltFOX Design
Satisfy your quilting cravings with the Scrap Happy Sailboats, a delightful creation by Judit Hajdu of Quilt Patterns. This quilt, measuring 60 inches by 80 inches, brings a burst of nautical joy to your crafting world. The pattern’s step-by-step instructions are thoughtfully illustrated with numerous images, making it a breeze for quilters to follow along. Dive into the world of sailboats and seafaring adventures as you piece together this charming quilt, which is perfect for adding a touch of the coast to your home. Get ready to set sail on your quilting journey with Scrap Happy Sailboats!
4. Coastal Quilt (Downloadable Pattern For Sale)

Designer: Nina Dodge of SkyClad Quilt
If you’re a minimalist looking for a sunset-inspired quilt, then, we’ve got you covered! Presenting the Coastal Quilt by Nina Dodge of SkyClad Quilt. This amazing play of shapes looks at the perspective of the deepest part of the ocean during sunset. This beginner-friendly quilt is 38″ x 44″ in size, making it an ideal wall runner for your favorite spaces!
5. The Explorer Ocean Quilt (PDF Printable Pattern For Sale)

Designer: Rugile Stanyte of Magic Little Dreams
One thing that comes to mind when you look at The Explorer Ocean Quilt is the tale of Moby Dick. This iconic piece was created by Rugile Stanyte of Magic Little Dreams to advertise the tapestry of the ocean. This quilt is available in three sizes: Baby Quilt 42″ x 51″, Small Throw 52″ x 63″, and Large Throw 62″ x 76″. This intermediate-friendly quilt is definitely something to explore!
6. Beach Hut Nautical Quilt Block (Downloadable Pattern For Sale)

Designer: Nadra Ridgeway
If you’re looking for a beach house and just can’t afford that yet, here’s an inspiration that will definitely get you up to work for that dream! Introducing the Beach Hut Nautical quilt block, a lovely pastel beach hut in a beach atmosphere. Created by Nadra Ridgeway, this piece is suitable for advanced beginners. When finished, this piece can be two sizes, 6″ x 6″ or 12″ x 12″ making it a wonderful clip-on decoration for your spaces!
7. Lifesaver Quilt Block (PDF Downloadable Pattern For Sale)

If you aspire to be a lifeguard, then, this quilt titled Lifesaver Quilt block is for you! This piece is created by Nadra Ridgeway and intended for Advanced Beginners. This block can be made in two size options, 6″ x 6″ or 12″ x 12″ that makes this piece a dainty decoration to your home. This quilt, with vibrant blues in the background and a lifesaver as the centerpiece, represents your aspiration to save lives.
8. Regatta in Blue Quilt (PDF Printable Pattern For Sale)

Designer: Lori Jonker of Pinecone Hill Quilting
If you desire a quilt backdrop that truly captures the allure of sailing across vast stretches of ocean, then the Regatta in Blue Quilt is the perfect choice for you! Created by Lori Jonker, this piece exhibits 48 colorful sailboats racing towards the regatta. With its 80″ x 100″ size, this piece is perfect as a bed quilt for a nautical-themed bedroom. Designed with experienced quilters in mind, this quilt may pose a challenge if you’re a start-up quilter.
Our group member tested out this Nautical Quilt Pattern and here is her feedback:
American and nautical quilt made by deborah crutchfield.
“American and Nautical quilt I made 5 years ago.” – Deborah Crutchfield

If you aren’t yet part of the I Love Quilting Forever Facebook Group, then you will need to join the community HERE before you can access any of the content listed above.
Here Are More Nautical Quilt Pattern Ideas For Inspiration

Photo Source: Sandra Healy Designs

Photo Source: Riley Blake Designs

Photo Source: Erika Jeanne

Photo Source: Täschis Nähstube

Photo Source: asewingnook

Photo Source: quiltybaker

Photo Source: Kelly Hull

Photo Source: Nancy Chick

Photo Source: Janine Pope

Photo Source: Wendy Bermingham
The world of quilting is as expansive as the ocean itself, harboring an abundance of treasures for you to discover and recreate. So, hoist the anchor, man the helm, and set course for the uncharted waters of quilting expression!

- Make a Quilt
- Quilting Techniques
- Very Easy Star Blocks
- Other Quilt Blocks
- Easy Quilt Patterns
Subscribe to the Quilt Blocks Digest newsletter for updates, special offers & exclusive content!
Sailboat quilt block pattern tutorial.
The 12 inch sailboat quilt block pattern can be used in a baby quilt or flip the HSTs to piece an underground railroad sailboat block. See how!

This block is easy to make. It uses a stitch and flip quilting method to turn squares and rectangles into a boat shape.
A variation of the sail boat quilt block has a storied history. It is told that it was used in quilts to help slaves along the Underground Railroad. (Fact or fiction? I don't know, but I'd like to think it's true.)
Maybe it served as a symbol of hope.
Reportedly, when US slaves saw this block in a quilt hanging on a clothes line they knew that a waterway was nearby or that a boat was available.
Both could whisk them away on the sometimes treacherous journey to freedom, usually Canada.
Danger lurked around almost every corner for both slaves and the people who assisted them on the path to freedom.
Just imagine what the person who saw this quilt block, seemingly so innocuous, must have felt. Yes, I would say hopeful.
Let's see how to make it.
Fabric and Block Measurements
Fabric A = sails (white)
Fabric B = sky (blue)
Fabric C = water (brownish grey)
Fabric D = boat (red)
Here are the unit cutting measurements to make an 8 inch and 12 inch sailboat block.
Simply choose your block size and follow the instructions below to make the block.

(Note: To increase photo size, on your keyboard hold 'Ctrl' and hit the + key.)
Block Layout
This is a 4 patch block and is laid out on a grid of 4 rows and 4 columns. The rectangles cover two rows and are attached to two separate rows of squares.
Finished block sizes that are evenly divisible by four - 8, 12, 16 inch finished block sizes - will be the easiest quilt block to make.

The 8 units that make up the block are
- 2 rectangles, vertical
- 4 half square triangles (aka HSTs)
- 2 triangles and 1 wedge
- 1 rectangle, horizontal
Sailboat Quilt Block Pattern Instructions
Step 1 Make HSTs
According to measurement chart above cut 2 squares from fabric A (white) and 2 squares fabric B (blue).
Make 4 half square triangles .
Press the seams open or towards the darker fabric.

Step 2a Make Boat
This step uses the stitch and flip method to make the boat shape.
According to measurement chart above...
Cut 2 squares from fabric B (blue) and cut 1 rectangle from fabric D (red).

Sew on the drawn line (or a thread or two away from it) to attach the squares to the rectangle. If you sew a thread or two away from the line, stitch on the side of the line closest to bottom corner of the square.

Place a 1/4 inch line of a ruler along the seam line and use a rotary cutter to cut away the bottom part of the triangle.
Repeat for the second end of the rectangle.

Flip remaining side of both squares down to reveal triangles. Finger press seams towards triangles.

Step 3 Layout Block
Near your sewing machine layout, as pictured below, the block in the grid format.
Step 4a Sew Top Half of Block Together
Without changing the orientation of the units sew the HSTs and rectangles of rows 1 and 2 together.
HSTs Row 1: With right sides together, place the half square triangle from row 1 column 3 on top of the half square triangle from row 1 column 2. Sew the units together using a 1/4 inch seam along the right side of the block units. Flip the 2nd HST open, right side up. Finger press the seam open.
HSTs Row 2: Repeat for the second set of half square triangles.

With right sides together place row 1 on top of row 2. The bottom of row 1 meets the top of row 2.
To get a perfectly aligned center match the points of the HSTs. Using a marker draw a line on the wrong side of the fabric where the points meet. Sew rows 1 and 2 together using a 1/4 inch seam, careful to stitch over the drawn line (even if it's not exactly 1/4 inch from the edge of the fabric). Usually, finger press the seam open.
To see the above done in step by step photos check out the pinwheel quilt block pattern tutorial .

Perfectly aligned center!
Take the sewn rows to the ironing board and press the seams (not pictured).
Use a starch alternative pressing solution if desired.

Step 4d Layout Block
Place the HSTs back in the block layout.

Step 5 Sew Rectangles to HSTs
Now sew the two side rectangles of the sailoat quilt block pattern to the HSTs.
With right sides together, place the left rectangle face down over the HSTS. Align edges along the long sides of both units. Sew together using a 1/4 inch seam
Repeat for the second side rectangle.
Finger press the seam toward the rectangles.

Step 6a Sew Row 4 to Row 3
With right sides together, place the bottom rectangle (water) face down over the boat rectangle unit of row 3.

Sew rows 4 and 3 together using a 1/4 inch seam. Finger press the seam toward the bottom rectangle (water).

Step 7 Sew Bottom of Block to Top of Block
With right sides together, place the bottom half of the block (boat and water rectangles face down over the top half of the block (side rectangles and HSTs).
Sew together using a 1/4 inch seam. Finger press the seam toward the boat rectangle.

Step 8 Block Completed
Beautiful! Once the maple leaf quilt block is sewn together, take it to the ironing board and give it a final press.

Here's the backside of the sailboat quilt block pattern. You can see how the seams are pressed. (Okay, I missed the mark on the seam between the row of the HSTs. I meant to press it open. If you do the same, just go with it - press the seam in the direction it wants to go.)

This completes the traditional sailboat quilt block pattern tutorial.
Underground Railroad Sailboat Quilt Block Pattern
To make an Underground Railroad sailboat quilt block pattern make a few changes.
The difference between the traditional sailboat quilt block and the Underground Railroad sailboat block is in the half square triangles that make up the sails and a portion of the sky.
In the traditional sailboat block there are four sails . These are made up of four half square triangles. One of the triangles of a HST represents the sky and the other represents a sail.
The triangles that represent the sky point upward to the left . The triangles that represent the sails point downward and to the right .
In the Underground Railroad sailboat quilt block there are three sails . Again, they are made up of half square triangles, but only three. What would be the fourth is a plain square .
The triangles that represent the sky point upward to the right . The triangles that represent the sails point downward to the left .
(Cut the plain square the same size as the trimmed half square triangle that you won't use. You can place this HST in your scrap pile and use it in another project.)
Now, see the Underground Railroad sailboat quilt block pattern.

When I was researching the Underground Railroad sailboat block I noticed that in all of the pictures that I saw (and I am sure I did not see all) the sky was done in a cream or white color. At the very least the sky was done in a very light color.
I did not see any commentary about this but my thinking is that it could represent a nighttime sky lit by the stars and moonlight.
Maybe this is due to the fact that travelers along the Underground Railroad did so mostly at night.
Another possibility is that it would be easier to see this color in a quilt hung outside at night.
Whichever version you choose to make have fun making the sailboat quilt block pattern.
You will receive an email asking you to confirm your consent to subscribe. You must click on the confirmation link contained in that email in order to be subscribed and receive emails.
Your email address is never shared. Unsubscribe any time.
Recent Tutorials
Courthouse Steps Quilt Block Pattern Tutorial
Oct 23, 22 02:11 PM
Churn Dash Quilt Block Pattern Tutorial - 6 Inch, 9 Inch and 12 Inch
Jul 18, 22 07:11 PM
4 Flying Geese At Once Oversized Instructions
Mar 19, 22 04:02 PM

Home | About | Contact | Newsletter | Privacy Policy | What's New!
By Wanda Epps , Copyright 2017 - 2023 Scrapish.com
scrapish.com.com does not sell any personal information.
- Free Quilt Block Patterns
- Free Paper Piecing Patterns
- Beginner Quilt Blocks
- Quilt Design Inspiration
- Quilt Sizes Recommendations
- Machine Applique (Invisible)
- Paper Piecing
- Machine Quilting 101
- Free Motion Quilting 101
- Quilt Binding
- Quilt Fabrics
- Quilting Tools/Supplies
- Best Sewing Machine
- Quilt Guilds
- Quilt Stores
- Show and Tell
- Quilt Patterns
- Sailboat Quilt Block
Sailboat Quilt Block Pattern
From our Free Quilt Block Patterns Library
This post contain s affiliate links for which I receive compensation.
Skill Level: Beginner
This Sailboat quilt block pattern is perfect for a little boy's quilt—and not nearly the number of half square triangles to make as most Sailboat blocks.
Here we'll use a couple of quick pieced triangle squares, a couple of connector corners and join them all together. It's that simple.
Ahoy there, me-matey!
It's time for our Sailboat block to set sail!

General Instructions
If you need help printing this page, you'll find it here .
These abbreviations are used in this tutorial:
- SA - seam allowance
- RST - right sides together
- HST - half square triangle
All SA are 1/4" and pressed towards the darker fabric unless otherwise noted.
The newest quilt fabrics to tickle your fancy...
Click the images below to see the full collection. We share any commercial and/or free patterns that showcase them, too. (For inspiration, of course!)

Step 1: Cut patches for your Sailboat
Sample Size : 6" finished 6½" unfinished
Design Type: 4-patch
Two different fabrics are used for the sail, a lighter and a darker version of the same color. After stitching the sample, I wish I'd used two reds with a little bit more contrast.
I like to cut my patches larger than needed for HST and then trim them to size after stitching.
For my 6" sample block I cut the HST patches at 4-1/8" instead of the exact measurement of 3-7/8"square. (These patches are noted with an asterisk—*.)
Finally, one of each of the HST units created is not used. Save them for a future project or use them in another Sailboat block.

Step 2: Assemble the units
Half square triangles (hst).
One for each sail
Mark the back of each #5 square with a diagonal. If you're using a directional fabric—one that you'd like the design to go in all the same direction—use the photo below to help you determine how to mark them.
(An alternate way to mark the diagonals is to use a Quick Quarter Ruler. If you have one and need a refresher, click here .)
For the fabric's design to run top to bottom in the block, layout the squares with the pattern moving in the same direction. Then draw the line from upper left to lower right on one, and from lower left to upper right on the other.

With right sides together (RST), layer a #4/#5 and a #4/#6.
Stitch a quarter inch away from both sides of the line for both sets.

Cut each in two between the stitching. Set one of each pair aside for use in another quilt.
Press with the SA to the #5 or #6 patch.

At this stage your HST should measure the size indicated in the chart below. Trim down to size if you started with oversized patches as I did for this sample Sailboat quilt block.
Your finished HST look like this, the #6 dark sail on the right, the #5 light sail on the right. In retrospect, I wish I'd have chosen two reds with more contrast.

Stitch these two HST together along the #5 and #6 sides.
Since the SA are pressed in the same direction (see arrows), it is E XTREMELY helpful to use pins.

After stitching the pair together, I chose to press this SA open to reduce bulk.
Using the Connector Corner technique, draw a diagonal line on the back of both #3 squares.
To keep the design of the background fabric running in the same direction as the previous HST, layout the squares with the pattern moving in the same direction. Then draw the line from upper left to lower right on one, and from lower left to upper right on the other.
With RST, layer the #3 and #2. Flip back the #2 to see that once sewn, the pattern moves in the correct direction.
Stitch ON the line this time for Connector Corners .

Press. Trim away the excess fabric closest to the corner, leaving a quarter inch SA. You can do this with scissors (which is what I usually use) or rotary cutter and ruler.
SA are pressed to the #3.

Step 3: Assemble the Sailboat quilt block
Arrange the pieced units and cut rectangle to create your Sailboat.

Stitch the rows together with a quarter inch seam. The diagonal seams in the boat and sail nest to make matching the points easier.
Please feel free to use pins if they help you.

Give your Sailboat quilt block one last press—try our simple pressing technique for wonderfully flat quilt blocks. Click here to see just how simple it is.
Your Sailboat block is ready to sail off into your next quilt!
What about a different quilt block?
For a list of all the 215+ quilt block patterns on this site, start here .
If you know the name of the block, shorten your search by using these links:
Click here if you're looking for blocks with at least some paper piecing .
Click here if you're looking for the basic building blocks of quilting , i.e., Flying Geese, half square triangles, quarter square triangles, etc., along with several techniques to make each.
And finally, use these links to find blocks in these finished sizes:
For even more blocks to make...

For you, are quilt block designs like potato chips...
...you can't have just one?!!
Check the amazing resources I rely on for all the quilt block designs you see on this website.
To see if they're worthy of a spot in YOUR quilting library, CLICK HERE .
This article was printed from Generations-Quilt-Patterns.com

S ite Admin
About Privacy Policy
FTC/Amazon Disclosure
Useful Pages
'How Many Blocks Do I Need' Chart
Standard Quilt Sizes Chart
Setting Triangles Chart
By Julie Baird
Copyright © 2008-2024 Generation Quilt Patterns, LLC
All Rights Reserved
Generations-quilt-patterns.com does not sell any personal information. (See Privacy Policy )
Visit our Shopify site for handmade and digital products!

Free Sailboat PDF Quilt Pattern
I have written a free quilt pattern for this sailboat quilt! It’s fun to make and finishes up at a good size at 64″ x 76″. Scroll down to the bottom of this post and sign up for my maker’s email list to get this free pattern. If you do not wish to subscribe to my email list you can purchase this pattern in my pattern shop.

I used a charm pack for the sails and a few fat eighths for the boats. This is a nice quilt for any gender and of course it’s perfect for sailing enthusiasts.

Subscribe to our Maker’s email list for free pattern downloads, discount codes and exclusive content. Plus be the first to know about new pattern releases! You will receive a welcome email from Daydreams of Quilts with the download link for the pattern inside as well as links for several other free patterns from us. Check your junk and/or promotions folder if you don’t see it in your main email folder.
Daydreams of Quilts will use the information you provide on this form to be in touch with you and to provide updates and marketing. Please let us know all the ways you would like to hear from us:
You can change your mind at any time by clicking the unsubscribe link in the footer of any email you receive from us, or by contacting us at [email protected]. We will treat your information with respect. For more information about our privacy practices please visit our website. By clicking below, you agree that we may process your information in accordance with these terms.
We use Mailchimp as our marketing platform. By clicking below to subscribe, you acknowledge that your information will be transferred to Mailchimp for processing. Learn more about Mailchimp’s privacy practices here.
Share this:
- Click to share on Twitter (Opens in new window)
- Click to share on Facebook (Opens in new window)
- Click to share on Pinterest (Opens in new window)
- Click to email a link to a friend (Opens in new window)
Leave a Reply Cancel reply
Your email address will not be published. Required fields are marked *
Notify me of follow-up comments by email.
Notify me of new posts by email.
This site uses Akismet to reduce spam. Learn how your comment data is processed .

- Quilts Gallery
- Quilt Books
Friday, March 29, 2019
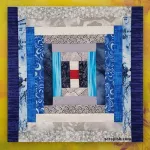
Making a strip pieced sailboat.

5 comments:

Susan, All of those blues are so beautiful! What a clever quilt.

Your jib is in great proportion to the mainsail and the boat itself!! I grew up sailing and currently have a 16' Albacore (mahogany, day-sailor). I want to try to make a block like yours...it will always remind me of my dad and his love of sailing!

You are so so so talented Susan - love the block!

Hi Susan! What a great explanation on how you made your improv boat. Both sails looks fabulous, and the mast is a necessary but usually missing piece from most quilting block boats. ~smile~ Roseanne

Wow, what a great idea!
Thank you so much for commenting...you just made my day!
Explore AllPeopleQuilt.com
Profile menu, ships ahoy.

Designer: Rhoda Nelson
- 1- 1⁄8 yards solid white (center block, star blocks, small boat blocks)
- 1⁄2 yard navy polka dot (center block, star blocks, middle border)
- 18×22" piece (fat quarter) blue large boat print (center block)
- 1⁄2 yard white polka dot (center block, inner border)
- 1⁄3 yard blue tone-on-tone (center block, sashing)
- 9×22" piece (fat eighth) blue wave print (center block)
- 1⁄3 yard blue small boat print (small boat blocks)
- 1 -7⁄8 yards white boat print (outer border, binding)
- 2-7⁄8 yards backing fabric
- 51×63" batting
Finished quilt: 441⁄2×561⁄2"
Finished star block: 3" square
Finished small boat block: 6" square
Quantities are for 44⁄45"-wide, 100% cotton fabrics.
Measurements include 1⁄4" seam allowances. Sew with right sides together unless otherwise stated.
Cut Fabrics
Cut pieces in the following order. Because the white boat print is a directional print, cut long outer border strips lengthwise (parallel to the selvages) and short outer border strips crosswise. Cut binding strips lengthwise, as well. Click on "Download this Project" above for pattern pieces.
From solid white, cut:
- 1--1-1⁄2×16-1⁄2" rectangle
- 3--1-1⁄2×14-1⁄2" rectangles
- 1--8-3⁄8×9-7⁄8" rectangle, cutting it in half diagonally for 2 extra-large triangles total (you will use 1)
- 1--6-7⁄8×8-3⁄8" rectangle, cutting it in half diagonally for 2 large triangles total (you will use 1)
- 1--3-7⁄8" square, cutting it in half diagonally for 2 medium triangles total
- 1--2×6-1⁄2" rectangle
- 1--1-1⁄2×8" rectangle
- 1--1-1⁄2×6 -1⁄2" rectangle
- 6--1-1⁄2×3 -1⁄2" rectangles
- 4--1×3-1⁄2" rectangles
- 35--2-3⁄8" squares, cutting each in half diagonally for 70 small triangles total
- 70--2" squares
- 16--1-7⁄8" squares, cutting each in half diagonally for 32 extra-small triangles total
- 32--1 -1⁄2" squares
From navy polka dot, cut:
- 2--1-1⁄2×42-1⁄2" middle border strips
- 2--1-1⁄2×32-1⁄2" middle border strips
- 1--3-1⁄2×8-1⁄2" rectangle
- 8--1-1⁄2" squares
- 1 of Pattern A
From blue large boat print, cut:
- 1--8-3⁄8×9-7⁄8" rectangle, cutting it in half diagonally (upper left-hand corner to lower right-hand corner for directional print) for 2 extra-large triangles total (you will use 1)
From white polka dot, cut:
- 1--6-7⁄8×8 -3⁄8" rectangle, cutting it in half diagonally (upper right-hand corner to lower left-hand corner, if substituting directional print) for 2 large triangles total (you will use 1)
- 10--6-1⁄2" squares
From blue tone-on-tone, cut:
- 2--1-1⁄2×28-1⁄2" sashing strips
- 2--1-1⁄2×18-1⁄2" sashing strips
- 2--1-1⁄2×16-1⁄2" sashing strips
- 1--1×10⁻¹⁄2" strip
- 1 of Pattern B
From blue wave print, cut:
- 1--5-1⁄2×16-1⁄2" rectangle
From blue small boat print, cut:
- 20--2" squares
From white boat print, cut:
- 3--6-1⁄2×42" strips for outer border (cut crosswise)
- 2--6-1⁄2×44-1⁄2" outer border strips (cut lengthwise)
- 5--2-1⁄2×44-1⁄2" binding strips (cut lengthwise)
Assemble Center Block
1. Sew together a solid white medium triangle and a navy polka dot medium triangle to make a medium triangle-square (Diagram 1). Press seam toward navy polka dot. The triangle-square should be 3-1⁄2" square including seam allowances. Repeat to make a second medium triangle-square.

2. Referring to Diagram 2, join medium triangle-squares to navy polka dot 3-1⁄2×8-1⁄2" rectangle to make boat bottom unit. Press seams toward rectangle.

3. Referring to Diagram 3, join a solid white extra-large triangle to a blue large boat print extra-large triangle to make a right-hand sail rectangle. Press seam toward blue triangle.

4. Sew solid white 1-1⁄2×8" rectangle to bottom edge of right-hand sail rectangle. Then sew blue tone-on-tone 1×10⁻¹⁄2" strip to left side edge of sail rectangle to make a right sail section (Diagram 4). Press seams toward added rectangles.

5. Referring to Diagram 5, join solid white and white polka dot large triangles to make a left-hand sail rectangle; press seam toward polka dot triangle.

6. Join solid white 2×6-1⁄2" rectangle to bottom edge of left-hand sail rectangle. Add solid white 1-1⁄2×6-1⁄2" rectangle to top edge to make a left sail section (Diagram 6). Press seams toward added rectangles.

7. Referring to Diagram 7, join sail sections to make sails unit; press seam toward blue tone-on-tone strip. Join sails unit to boat bottom unit to make pieced boat. Press seams toward boat bottom.

8. Referring to Diagram 8, sew a solid white 1-1⁄2×14-1⁄2" rectangle to top of pieced boat. Press seam toward solid white rectangle. Then sew solid white 1-1⁄2×14-1⁄2" rectangles to side edges of pieced boat. Join blue wave print 5-1⁄2×16-1⁄2" rectangle to bottom of pieced boat and solid white 1-1⁄2×16-1⁄2" rectangle to top edge to make center block. Press all seams toward added rectangles. The center block should be 16-1⁄2×20-1⁄2" including seam allowances.

9. Using thread that matches appliqués and turning under seam allowances as you go, hand-appliqué A flag and B circle to center block (Diagram 8).
Assemble Quilt Center
1. Join a navy polka dot extra-small triangle and a solid white extra-small triangle to make an extra-small triangle-square (Diagram 9). Press seam toward navy triangle. The triangle-square should be 1-1⁄2" square including seam allowances. Repeat to make 32 extra-small triangle-squares total.

2. Lay out four extra-small triangle-squares, four solid white 1-1⁄2" squares, and a navy polka dot 1-1⁄2" square in three rows (Diagram 10). Join pieces in each row; press seams in one direction, alternating direction with each row. Join rows to make a star block. Press seams in one direction. The star block should be 3-1⁄2" square including seam allowances. Repeat to make eight star blocks total.

3. Sew blue tone-on-tone 1-1⁄2×16-1⁄2" sashing strips to top and bottom edges of center block (Quilt Assembly Diagram). Press seams toward sashing.

4. Referring to Diagram 11, join four star blocks and three solid white 1-1⁄2×3-1⁄2" rectangles in a row, alternating blocks and rectangles. Press seams toward solid white rectangles. Sew a solid white 1×3-1⁄2" rectangle to each end of row to make a star block sashing row. Press seams toward solid white rectangles. The row should be 3-1⁄2×16-1⁄2" including seam allowances. Repeat to make a second star block sashing row.

5. Join star block sashing rows to top and bottom edges of center block (Quilt Assembly Diagram). Press seams toward blue tone-on-tone sashing strips.
6. Sew blue tone-on-tone 1-1⁄2×28-1⁄2" sashing strips to side edges of center block (Quilt Assembly Diagram). Join blue tone-on-tone 1-1⁄2×18-1⁄2" sashing strips to remaining edges to make quilt center. Press all seams toward sashing strips. The quilt center should be 18-1⁄2×30-1⁄2" including seam allowances.
Assemble Small Boat Blocks
1. Sew together a blue small boat print small triangle and a solid white small triangle to make a small triangle-square (Diagram 12). Press seam toward blue triangle. The triangle-square should be 2" square including seam allowances. Repeat to make 70 small triangle-squares total.

2. Lay out seven small triangle-squares, seven solid white 2" squares, and two blue small boat print 2" squares in four rows (Diagram 13). Join pieces in each row. Press seams in one direction, alternating direction with each row. Join rows to make a small boat block. Press seams in one direction. The block should be 61⁄2" square including seam allowances. Repeat to make 10 small boat blocks total.

Assemble and Add Borders
1. Sew together three white polka dot 6-1⁄2" squares and two small boat blocks, alternating squares and blocks, to make a side inner border strip (Quilt Assembly Diagram). Press seams toward polka dot squares. Repeat to make a second side inner border strip. Join side inner border strips to side edges of quilt center; press seams toward quilt center.
2. Join three small boat blocks and two white polka dot 6-1⁄2" squares, alternating blocks and squares, to make a top inner border strip (Quilt Assembly Diagram). Press seams toward polka dot squares. Repeat to make a bottom inner border strip. Join top and bottom inner border strips to remaining edges of quilt center. Press seams toward quilt center.
3. Sew navy polka dot 1-1⁄2×42-1⁄2" middle border strips to long edges of quilt center. Join navy polka dot 1-1⁄2×32-1⁄2" middle border strips to remaining edges. Press all seams toward middle border.
4. Cut and piece crosswise-cut white boat print 6-1⁄2×42" strips to make:
- 2--6-1⁄2×44-1⁄2" pieced outer border strips
5. Join lengthwise-cut white boat print outer border strips to side edges of quilt center. Sew pieced outer border strips to remaining edges to complete quilt top. Press all seams toward outer border.
Finish Quilt
1. Layer quilt top, batting, and backing; baste.
2. Quilt as desired. Designer Rhoda Nelson machine-quilted a horizontal wave pattern across the quilt top.
3. Bind with white boat print binding strips.
Share & More

Sail Boat Block {Tutorial}

So cool! I love it! Thanks!
Looks good Anorina, i need to make quick baby quilt, sex unknown, colours yellow black and white. Any suggestions?
Too cute! I adore it!
What a great idea! thank you for sharing it!
love the sailboat pattern-- is there a printable version ?

I made this sailboat quilt last week (Dec. 2021!) for our local children's hospital. added some blank squares where I put a whale, a dolphin....will probably make this again as it was so easy and fun! Wonderful!!!! Thank you so much.
Thank you for your comment. I truly appreciate the time you've taken to leave me a message. I will attempt to answer comments via email.
- PUBLISHED WORK
- PATTERNS & TUTORIALS

Get new posts by email:
Featured post.

Scrappy Strip Pillow {Free Tutorial}

Most Popular (this month)

Blog Archive

Linky Parties
- Design Walls Monday
- Monday Making
- Craftastic Monday
- Wednesday Wait Loss
- Needle & Thread Thursday
- Finished (or not) Friday
- Patchwork & Quilts
- Can I get a Whoop Whoop?
- Friday Night Sew In
- Friday Night with Friends
- Thank Goodness it's Finished Friday
- Peacock Parade
- Slow Sunday Stitching
- One Monthly Goal
- Free Motion Mavericks

- Hand Embroidery
- Machine Embroidery
- Submit a Pattern

- Quilt Patterns
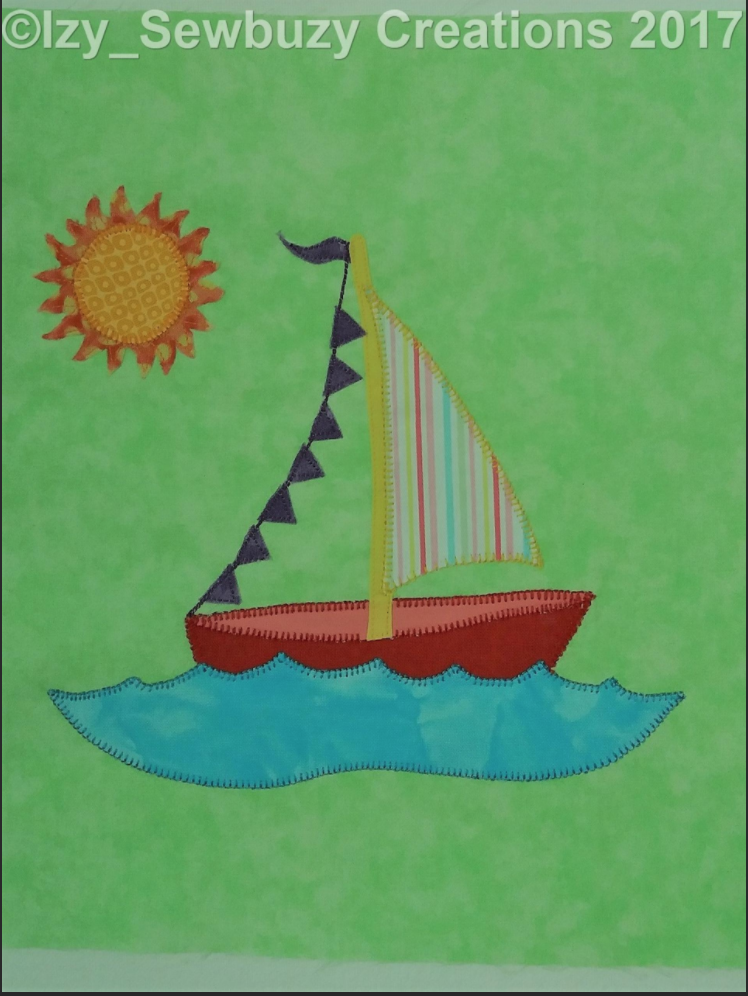
Free Quilt Pattern: Sailboat

This free quilt pattern from Izy Sewbuzy Creations is a sailboat.
RELATED ARTICLES MORE FROM AUTHOR

Free Quilt Pattern: Quadrangle

Free Quilt Pattern: Oh La La

Free Quilt Pattern: Color Explosion

Free Quilt Pattern: Spring Quilt

Free Quilt Pattern: Harmony Block

Free Quilt Pattern: Apple Green Quilt
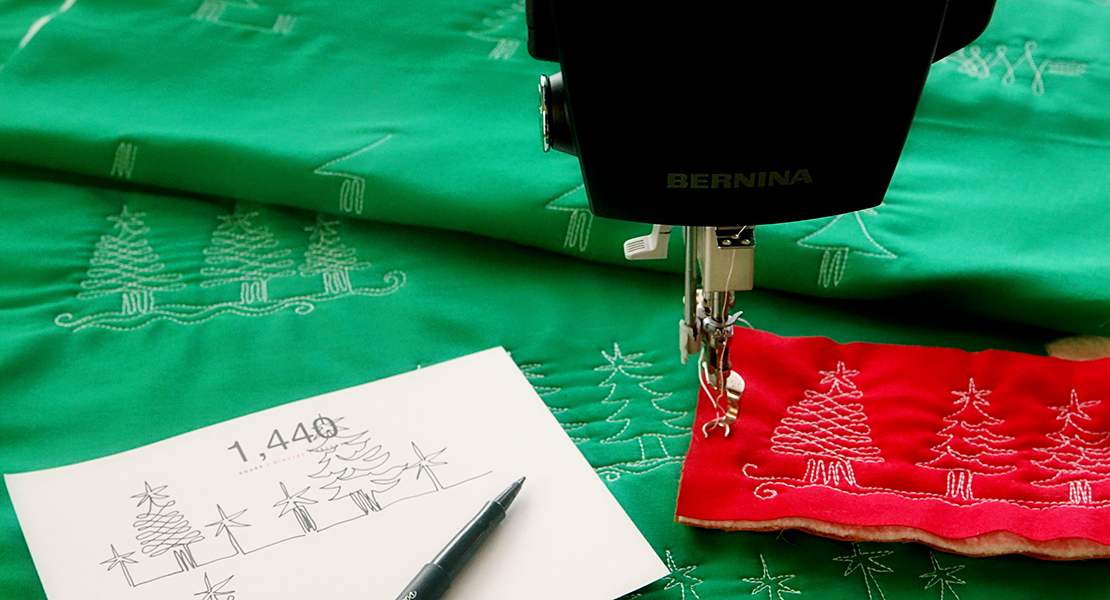
How to Free-motion Quilt Sailboats
Summer is here and it’s time to quilt the high seas with the adorable Sailing Away border!
I’m Lori Kennedy from Lori Kennedy Quilts with another machine quilting motif tutorial and video.
The sailboat motif adds a nautical touch to any border. Or stitch a single sailboat in the center of a block. Once you know the basic quilting formula, customize your boats with different size sails, flags and masts to fit your quilt. Then add embellishments like clouds, wind or the sun to add more fun and interest to the design.

Begin by drawing two parallel lines as guidelines. In the sample here, the lines are three inches apart.
Begin stitching on the bottom line. Stitch a curly line and then stitch over the line to create a knot.
Next, add the back of the boat by stitching a short line, angled to the left and a horizontal line.

Stitch a vertical line to create the mast and add a small triangle flag.

Add a larger triangle, stopping to the right of the vertical line.

Stitch a slightly curved line, stopping to the left of the small triangle flag.

Add two triangles, stopping to the right of the vertical line.

Stitch down two or three stitches, then add a horizontal line and an angled line to create the front of the sailboat.

From the front of the boat add a curl, then echo stitch the outside of the curl.

Stitch a wavy line under the boat, then echo stitch the line. From here you can add the next sailboat in the border.

Add a row of scallops to create clouds around the Sailboats for a fuller border.
PRO TIP : Be sure to doodle the motif first! Doodling helps develop the muscle memory necessary for smooth stitching and is the best way to determine what size sailboat is best for your quilt border or block.
For machine set up see my tutorial Twelve Steps to Free Motion Quilting here on WeAllSew.
You might also like:
Free Motion Quilt Nora’s Rose
How to Free-Motion Quilt Chicks
Free-Motion Stitching Shamrocks
For more tips and tutorials, please visit me at LoriKennedyQuilts.com and on Instagram .
Used Products

What you might also like

How to Free-motion Quilt Chicks

How to Free-motion Quilt a Paddy’s Hat

How to Free-motion Quilt Pencils

How To Free-Motion Quilt a Menorah

How to Free-motion Quilt a Gnome Motif

How to Free-motion Quilt an Umbrella

How to Free-motion Quilt Lucky the Dog

How to Free-motion Quilt a Love Letter

How to Free-motion Quilt an Apple Motif

How to Free-motion Quilt Butterflies

How to Free-motion Quilt an Anchor Motif

How to Free-motion Quilt Ice Cream Cones

How to Free-Motion Quilt Swirl Designs

How to Free-motion Quilt a Dinosaur Motif

How to Free-motion Quilt the Busy Bee Motif
How to Free-motion Quilt a Christmas Tree
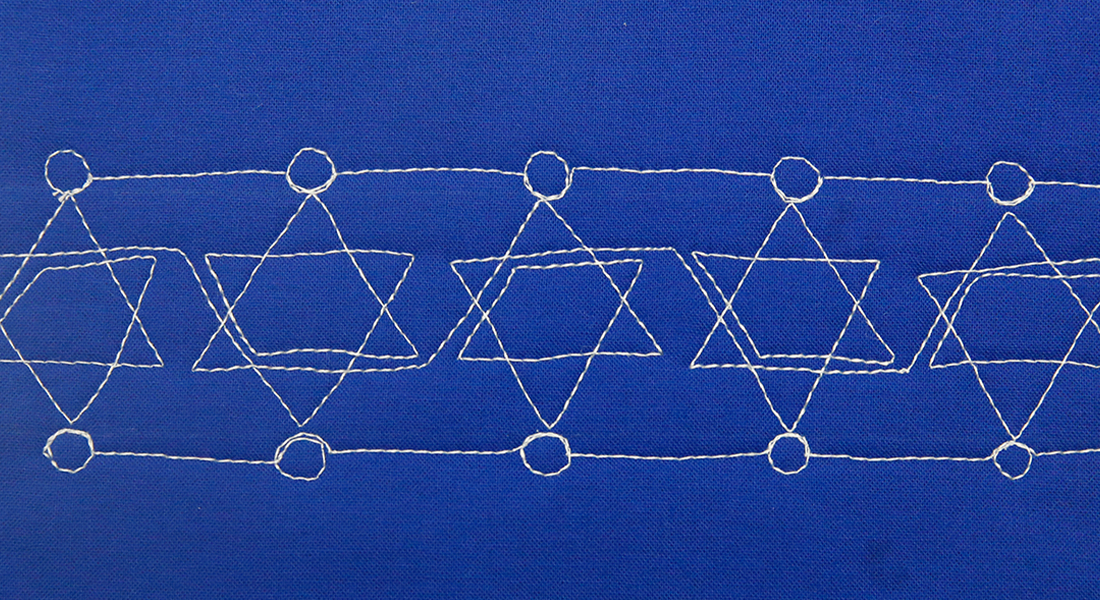
How to Free-motion Quilt a Star of David Motif
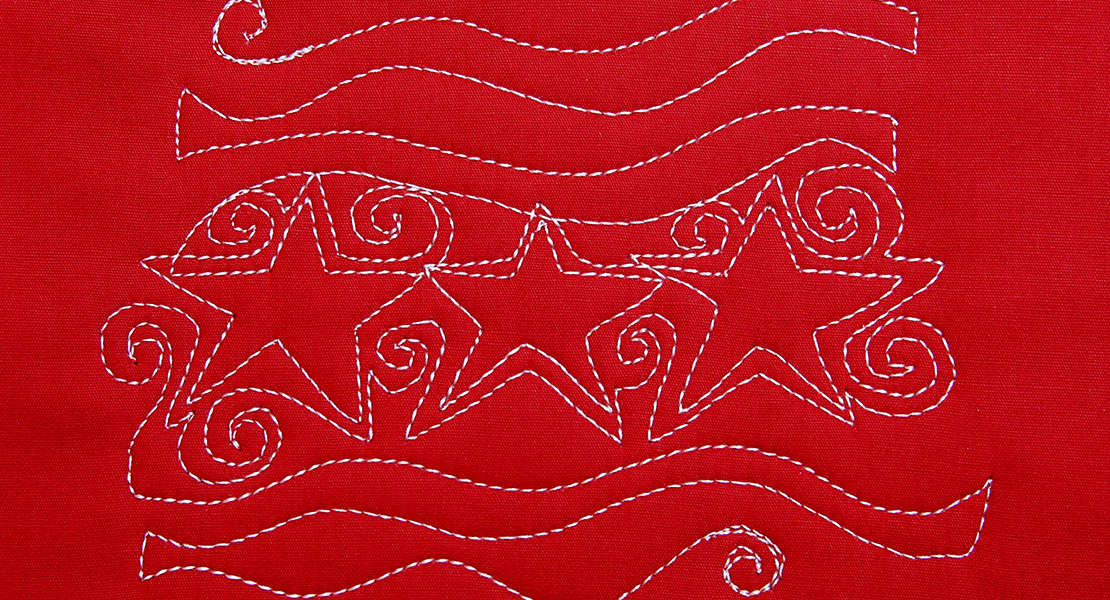
How to Free-motion Quilt Stars and Stripes

How to Free-motion Quilt Pretty Packages

How to Free-motion Quilt Scalloped Hearts
4 comments on “how to free-motion quilt sailboats”.
Thanks Lori! What a great design and helpful video.
So glad you liked it! Can’t wait to see what you create with this fun motif!!
So glad you liked it!
That was a great lesson. Thanks for posting free-motion quilting motif with the step by step instructions below the video. It certainly helps to see the process in a step by step format.
Leave a Reply Cancel reply
You must be logged in to post a comment.

Recent Blog Posts
- Casserole Carrier Bag Tutorial
- Top 10 Best-Selling BERNINA Presser Feet
- Quilt Safari, Part Five: Sewing the Rhino
- Sewing with Leather on the BERNINA 535
- Remnant Eco Easter Egg Pillow
Subscribe to our newsletter!
- February 2024
- January 2024
- December 2023
- November 2023
- October 2023

17 Enchanting Fat Quarter Quilt Patterns: All Free!
Posted: February 19, 2024 | Last updated: February 19, 2024

Are you looking for fat quarter-friendly quilt patterns?
Sew through your stash of fat quarters with 15 beautiful fat quarter throw quilt patterns. Fat quarter-friendly quilts are great for beginner quilters (and quilters of all levels) because you can purchase a perfectly coordinated bundle of fabrics. So get those fat quarter stacks off your shelves and sewn into beautiful quilts. Of course, you can also use your fabric stash too.
All of these free patterns include step-by-step photo instructions.

Grandma’s Lattice Quilt
Sew up a beautiful lattice quilt with patchwork squares – just like grandma would make! This free pattern is for a generous 77’’ x 77’’ size throw quilt. Grandma’s Lattice Quilt Pattern uses just 15 fat quarters plus background fabric.

Whirlwind Throw Quilt Pattern
The classic whirlwind quilt is easier to sew than ever with my free pattern that includes a template plus step-by-step instructions. You can sew a 66” x 55” throw-size quilt with 10 fat quarters to make 30 blocks, or make any size you want – each FQ you pick is enough for 3 blocks that finish at 11”.

Signature Cross Throw Quilt Pattern
This Signature Cross Quilt Pattern ticks off all the boxes for the perfect weekend quilt project:
- It’s fast and easy to sew.
- It is designed for fat quarters.
- It’s Accuquilt-friendly if you own an Accuquilt fabric-cutting machine.
- The 60” x 60” throw size can easily be quilted on a regular sewing machine.
- You can easily resize it to make it bigger or smaller if you need a different size.

Color By Number Free Throw Quilt Pattern
The Color by Number free quilt pattern is a simple bargello quilt. It may look like it takes a long time to sew all those patchwork squares together, but you can do it very quickly! It is done by cutting the strips, sewing them together, and cutting and sewing again. This quilt is fat-quarter-friendly, too.

Fat Quarter Fancy Quilt Pattern
If you’re looking for a fast and fun quilt, then you must try the famous Fat Quarter Fancy free quilt pattern. You will need 9 fat quarters plus a little more than a yard of fabric as your background. You can also adapt this lap quilt pattern to make it larger or smaller. Make this your latest quilt project!

Fat Quarter Fancy 2 Quilt Pattern
If you loved the first fat quarter fancy quilt pattern, you will love this, too! Fat Quarter Fancy II is another free quilt pattern that uses a simple block and gives you unlimited ways to arrange it. Three fabrics will be used in this sewing pattern – two prints and a background fabric.

Sawtooth Stars and Irish Chains Quilt Pattern
My Fat Quarter Stars and Irish Chain quilt was inspired by classic blue and white Amish quilts, but you could easily sew this one up in red, white, and blue for a patriotic 4th of July quilt or in red and white for a Christmas quilt!

Ohio Star Quilt Pattern Using 7 Fat Quarters
Sew an easy Ohio Star Quilt using my free quilt pattern! The Ohio Star is a traditional quilt block that is popular again in quilts of all sizes. This Ohio Star Quilt Pattern uses 7 fat quarters (pre-cut 18” x 21” pieces of fabric) and 4 1/2 yards of background fabric to make a 71” x 86” twin-size quilt.

Enchanted: Moroccan Inspired Throw Quilt Pattern
Sew a beautiful Moroccan-inspired quilt using everyone’s favorite pre-cut cotton fabrics… fat quarters! This fast and easy quilt pattern is free in the blog post below. I used 9 fat quarters plus 3 yards of background fabric to sew a generous 68’’ x 68’’ square throw quilt.

Gnome Forest Quilt
This Gnome Forest Quilt Pattern is a fat-quarter friendly holiday quilt pattern that is perfect for any time of year. There are 12” quilt blocks made up of flying geese, rectangles, and snowball corners, with a single appliqué for the nose. Learn easy tricks for making flying geese units, how to use the snowball corner method to make the gnome bottom, and how to assemble the entire quilt. The pattern only has a few blocks, but you could easily make more blocks to make a quilt as large as you’d like!

Pinwheel Daydreams Patchwork Quilt
The Pinwheel Daydreams Quilt is simple patchwork at its best. This quilt pattern uses fat quarters and lets you play with light and dark values of whatever fabrics you choose. You can make it into a small throw quilt, too.

Little Pine Trees Throw Quilt Pattern
Here’s an easy pine tree quilt pattern that is darling for the holidays or any time of the year! The Little Trees Quilt isn’t just for Christmas, though. Pine trees are evergreen – so this sweet quilt can be enjoyed during any season, don’t you think? Sew up this free quilt pattern to keep you and your loved ones cozy all season long!

Bow Tie Quilt Pattern
Enjoy an easy peasy sewing project with this free bow tie quilt pattern . With a cute coordinating fat quarter bundle, you’ll have it done in a snap. Or take your time and enjoy sewing this sweet quilt.

Fat Quarter Fizz Throw Quilt Pattern
At first glance, you would think this sailboat quilt is tricky, but it’s not! It’s a super easy fat quarter-friendly pattern. The gorgeous ocean with quarter square triangles makes this baby quilt so adorable. This tutorial also includes tips for sewing fast and easy half and quarter square triangles two at a time.

Fat Quarter Fancy Star
If you want a big and easy quilt, make my Fat Quarter Fancy Star Quilt Pattern : it’s a generous 88” x 88”, but you could easily make it smaller.

Hashtag Quilt Pattern
Fun, modern, and easy! This hashtag quilt has all that! This easy quilt pattern includes big quilt blocks, so you’ll make a large throw quilt in almost no time at all.

The Huddle Quilt
Medallion quilt patterns are beautiful sewing projects you would want to try if you’re a newbie. This fast and easy fat quarter huddle quilt pattern uses a technique that starts from the center and works towards the outside. When you finish, you won’t believe how easy it was to sew.

Fat Quarter Friendly Mug Caddy Sewing Pattern
Bonus: This isn’t a quilt, but I know you’ll love sewing my fat quarter-friendly free mug caddy pattern because your tools will be organized!

More from SewCanShe
- 15 Free Jelly Roll Patterns to Roll Out Your Next Quilt

15 Fun Sewing Projects for Kids
- 15 Easy Projects for Teaching Kids to Sew

25 Free Table Runner Patterns
- 25 Free Table Runner Patterns That Are So Stunning, You’ll Forget About the Food

- 15 Classic Quilt Blocks with Free Patterns
More ideas from SewCanShe:
- Quilting on a Small Scale: 18 Free Mini Quilt Patterns to Love
- Sew Cute Kitchen: 21 Free Patterns for Essential Kitchen Items
More for You
Donald Trump's Candidates Get Warning From Republican Strategist
Pro-Trump attorney released from custody after promising to turn herself in on Michigan warrant
Harvard psychologist shares 5 toxic things 'highly narcissistic' people always do in relationships
Texas pulls $8.5B from BlackRock in stunning blow to ESG movement
Fiery School Board Meeting Brings Out Black Panthers in Virginia
The Hard-To-Find Bourbon That's Somehow Available At Costco
Presidential Historian: Trump Actually Doing 'Us All A Favor' With Fascist Rhetoric
Peter Navarro Attacks Justice System Before Walking Into Prison
Britain is about to suffer a massive collision with reality
Teacher who says she was fired after refusing to socially transition 8-year-old student fights back in court
Recall Push to Remove Gavin Newsom Enabled By Unusual California Rules
NFL News: Kyle Shanahan and the 49ers lose a star player after their 2024 Super Bowl defeat
It's So Crazy How No One Wants to Help Trump With His Bond
Russian Neighbor Deals Blow to Putin With Western Pivot
Medicare Advantage Is Under Fire. What It Means for Your Health—and Wallet.
Here Are 6 Things White People Say That Highlight Their Privilege And OMG I Hear These Allllll The Time
Trump appeals Georgia judge ruling, seeks ouster of DA Fani Willis from election fraud case
Award ceremony canceled after Ginsburg family calls honorees 'affront'
Man Uncovers a Pre-Revolutionary War-Era Fort Inside His Own Home
Letters to the Editor: 'He just says stuff': Do far-right Trump supporters not hear themselves?
IMAGES
VIDEO
COMMENTS
Step 1: Cut the Sailboat patches. Sailboat pattern. Sample Size: 6" finished / 6½" unfinished. Grid: 4x4. The sample block has our Sailboat sailing during the daylight hours, but you could just as easily choose a night-time starry sky. Choose fabrics with enough contrast so that the points on your half square triangles don't get lost.
by Suzy Williams. Ahoy, ye landlubbers, scallywags and sailors! Find yer sea legs or walk the plank! This free Ahoy Sailor quilt pattern will have ye strap'n on yer boots and set'n sail! Arrrrr! With only one quilt block to master, you will be feeling as confident as 'ol Cap'n Jack Sparrow himself. One quilt block, a few stripes, and Ta-da!
Add a touch of coastal charm to your home with the GO! Nautical Compass Pillow. Designed by Melanie Call, this free quilt pattern features a compass, sailboat, ship wheel, and anchor, capturing the essence of the sea. Measuring 22.5 inches x 22.5 inches, this oversized nautical throw pillow is a perfect addition to beach-worthy decor.
Building the Quilt around one Quilt Block. My first step was to make the sailboat block. I used the blue waves fabric for the sea and the bird fabric for the sky and I added a pop of red for the bottom of the boat itself. Once the FPP block was finished I measured the size of the finished block. I think it was around 12″ plus the seam allowance.
This easy, fun seasonal sailboat quilt block is perfect for a summertime project! This block makes a lovely quilt, or, if you are short on time, you could ju...
Sew the 4 HST's into a sailboat pattern and then sew the 3 1/2" x 6 1/2" (6 1/2" x 12 1/2") rectangles on either side. Now all the rows are ready! Stitch them together and your block is done. Beware of this… the directional print strikes again (LOL)! At least it was an easy fix. Happy quilting!
Step 7 Sew Bottom of Block to Top of Block. With right sides together, place the bottom half of the block (boat and water rectangles face down over the top half of the block (side rectangles and HSTs). Sew together using a 1/4 inch seam. Finger press the seam toward the boat rectangle.
American Patchwork & Quilting Editors August 20, 2018. Advertisement. Make a cute sailboat block with our easy instructions. Join us for a nautical sewalong! Each week, we'll share how to make one block. This week, learn how to make a sailboat block. See all block patterns here.
To piece the sailboat blocks use our FREE sailboat block pattern with one revision. Above in the supplies section is a link to the free sailboat pattern tutorial. This is the original sailboat block pattern. When making this maritime quilt, the sailboat block is made without the bottom horizontal 3" x 10 1/2" piece of fabric.
Step 3: Assemble the Sailboat quilt block. Arrange the pieced units and cut rectangle to create your Sailboat. Stitch the rows together with a quarter inch seam. The diagonal seams in the boat and sail nest to make matching the points easier. Please feel free to use pins if they help you.
STEP 3: Boat Assembly. To make the rectangular boat strip, make half-square triangles with the final 3 1/2" square of background fabric and the 3 1/2" square of boat fabric. Draw a diagonal line from corner to corner on the lighter fabric. With the right sides together, lay the pieces together aligning the raw edges.
Learn how to make a classic quilt pattern, the sailboat block. This fun and easy quilt pattern can be used in a quilt, wall hanging, pillow or other project...
How to sew an easy sailboat quilt is sewn using a sailboat quilt block pattern. This charming nautical quilt is a perfect addition to a nautical themed bedr...
Free Sailboat PDF Quilt Pattern. I have written a free quilt pattern for this sailboat quilt! It's fun to make and finishes up at a good size at 64″ x 76″. Scroll down to the bottom of this post and sign up for my maker's email list to get this free pattern. If you do not wish to subscribe to my email list you can purchase this pattern ...
Making a Strip Pieced Sailboat. Today I thought I'd share how I did some improv piecing to make the sailboat in Seafarer. The full Seafarer pattern can be found on Etsy, in a baby, lap, and twin size. When making string blocks, a lot of quilters like to use a foundation upon which to stitch their strings to, mainly so they have a block outline ...
Finish Sewing the Baby Quilt Together. 1. Sew the small sailboats together side by side in sets of 2. 2. Sew a 8'' x 20 1/2'' background rectangle of fabric to the top of each set of 2 small sailboats. 3. Sew a large sailboat unit to the left side of each small sailboat unit. 4.
Ocean Breezes© by Debby Kratovil Sail Boat Templates (full size; add seams) Cut background square 8-1/2" Ocean Breezes Quilt, Sail Boat Block Finished Block: 8" x 8"
Assemble Quilt Center. 1. Join a navy polka dot extra-small triangle and a solid white extra-small triangle to make an extra-small triangle-square (Diagram 9). Press seam toward navy triangle. The triangle-square should be 1-1⁄2" square including seam allowances. Repeat to make 32 extra-small triangle-squares total.
These measurements will make a 12" (finished) Sail Boat Block. I find the easiest way to put this block together, is to lay out all of the pieces on a mat beside my sewing machine. Firstly, chain piece all of the HSTs (half square triangles). Trim and press the seams open. Lay out the pieces back in the correct order. Sew the pieces into rows.
Learn how to take any sailboat quilt block and turn it into a full quilt with loads of lovely modern negative space! I have a friend who lives by the sea and I knew I wanted to make her a sailboat quilt but I couldn't find a full quilt pattern I liked. So I bought an FPP sailboat block and used it to make a large family sized throw quilt I personally think it is one of the best quilts I've ...
Free Quilt Pattern: Sailboat. October 7, 2017. This free quilt pattern from Izy Sewbuzy Creations is a sailboat. Download.
Stitch down two or three stitches, then add a horizontal line and an angled line to create the front of the sailboat. From the front of the boat add a curl, then echo stitch the outside of the curl. Stitch a wavy line under the boat, then echo stitch the line. From here you can add the next sailboat in the border.
Jan 13, 2017 - Free quilt quilting paper pieced foundation pieced block pattern. Sailboat and Sunshine. Great for a beach themed quilt, seaside, seashore, boat, boats, sailboats, quilts
This fast and easy quilt pattern is free in the blog post below. I used 9 fat quarters plus 3 yards of background fabric to sew a generous 68'' x 68'' square throw quilt. Gnome Forest Quilt. ... At first glance, you would think this sailboat quilt is tricky, but it's not! It's a super easy fat quarter-friendly pattern.
The classic whirlwind quilt is easier to sew than ever with my free pattern that includes a template plus step-by-step instructions. You can sew a 66" x 55" throw-size quilt with 10 fat ...