- BOAT OF THE YEAR
- Newsletters
- Sailboat Reviews
- Boating Safety
- Sailing Totem
- Charter Resources
- Destinations
- Galley Recipes
- Living Aboard
- Sails and Rigging
- Maintenance

Backstays to the Future
- By Alvah Simon
- Updated: March 28, 2013
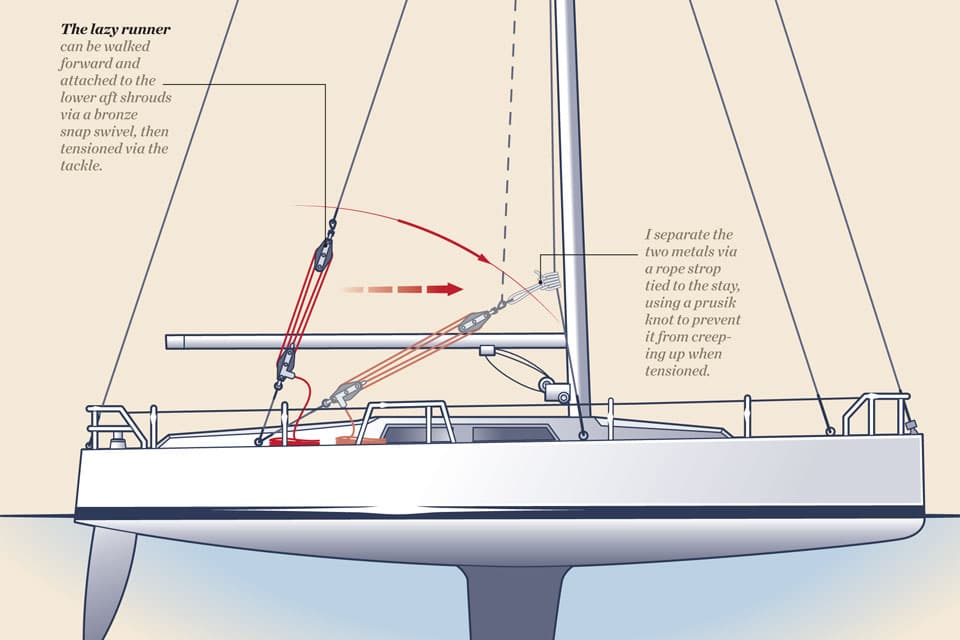
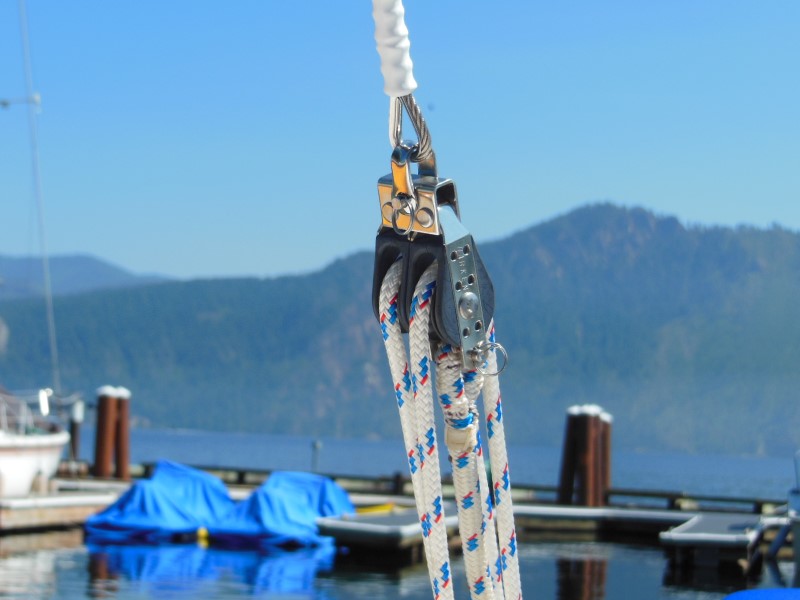
backstay setup
A running backstay is a removable stay that provides aft support to the mast from either the masthead or the point at which an inner forestay is attached. It originated as a response to the material limits of the period. At that time, solid wooden masts, for example, were either too weak or too heavy to be made particularly tall. Therefore, to achieve an acceptable area of sail for the heavy-displacement boats of the day, either the boom had to be extended beyond the transom or a gaff had to be added to the top of the sail—or both. This precluded the use of fixed backstays because the boom and gaffs had to be free to swing across the vessel when it tacked and jibed. As a tack or jibe was initiated, the burdened backstay had to be released and, as the spars swung through, the new, now windward, stay had to be fastened quickly before the entire rig came tumbling down.
With the advent of hollow masts, first of wood and then of alloy, and stainless-steel wire, the aspect ratio of the rigs began to extend to 3-to-1 and beyond. This allowed for the development of the Bermuda or Marconi rig, which eliminated gaffs and shortened the booms considerably without the loss of sail area or performance.
Running backstays, or runners, were then generally found only on cutter-rigged vessels. But through the 1960s and 1970s, the sloop became the rig du jour, and running backstays fell from favor. With the introduction of Freedom Yachts’ freestanding mast and Hunter’s B&R rig, the trend veered toward eliminating backstays, running or not, altogether.
Where are we today? Are running backstays now simply anachronisms that add unnecessary weight, windage, and clutter? I think not, especially in the context of bluewater cruising.
Sloops are fast around the buoys, but in the open sea, they display two disadvantages. First, the sail area is shared by only two large and therefore more difficult to handle sails. Second, in storm conditions, a sloop’s headsail, no matter how much it’s furled, still leaves the center of effort too far forward and too high to produce a safe and comfortable motion.
The cutter rig distributes the sail area over an additional sail, and that inner forestay is a superior position from which to hank on a low-flown storm sail. But with any real force upon it, the inner forestay can distort the shape of the mast; this will require a countereffort. Enter the intermediate running backstay. The arguable benefit of a staysail aside, this lower triangulation of support adds strength and stability to the mast, which translates into a better chance of coming up from a knockdown with the rig intact. Think sailing in the South Atlantic Ocean —it matters.
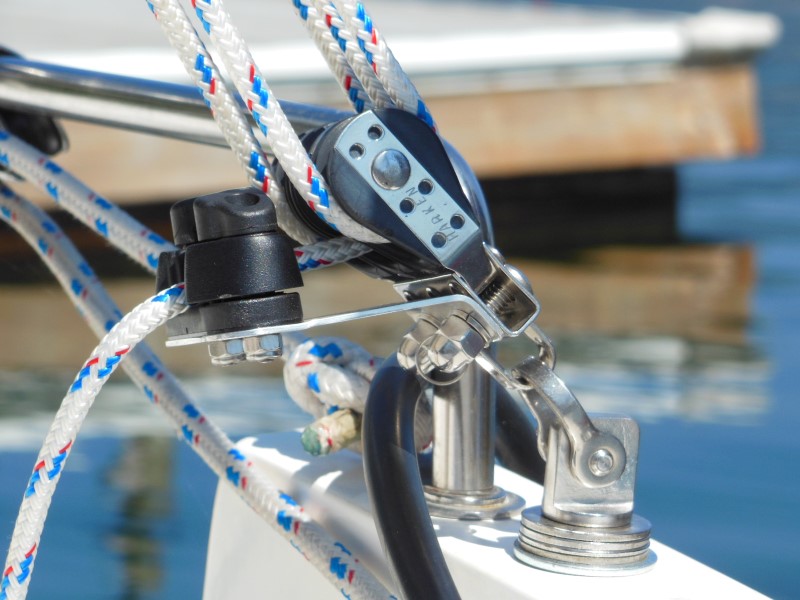
But alas, when you’re sailing off the wind, these same runners will have to be attended to on each and every tack. In open-ocean situations, this might not happen for days at a time. In confined waters, however, it’s necessary to have a quick and efficient method for setting and stowing runners.
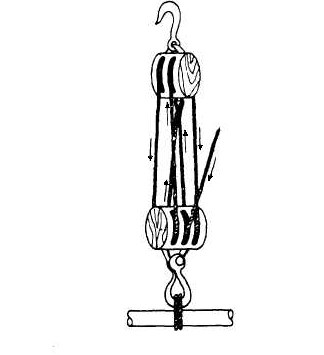
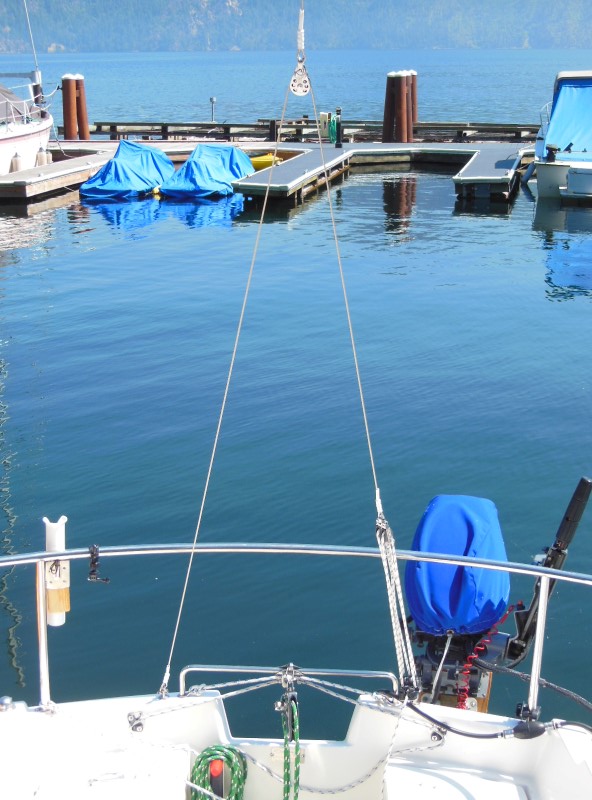
Ideas and hardened opinions on running backstays are diverse and plentiful enough to keep seaside barstools warm all night. See the accompanying images and diagrams to learn about some of the most common approaches to setup and stowage.
If you’re considering adding an inner forestay and running backstays, I recommend that you get professional advice addressing the minimum engineering angles required, appropriate deck hardware, proper tangs and toggles needed at the mast, and wire types and diameters.
I don’t mean to imply that running backstays are suitable for all boats and applications. But if your interests lie in bluewater passagemaking and you take a belt-and-suspenders approach to your safety, I believe that you’ll agree that the added weight, windage, cost, and inconvenience are more than justified.
Alvah Simon, a CW contributing editor, is the author of North to the Night .
Click here for more pictures of running backstay setups . Click here to read about how an inner forestay and staysail can help you beat along in a blow.
- More: How To , seamanship , ship's systems
- More How To

Preparing to Head Out

Adding Onboard Electronics? Here’s How To Get Started

7 Boating Safety Tips for Summer Cruising

How to Prep for a Diesel You Can Depend On

Sailboat Review: Italia Yachts 14.98

Competitive Cruising: It’s a Rally, Not a Race

The Data Difference: Advances in Marine Weather Forecasting
- Digital Edition
- Customer Service
- Privacy Policy
- Email Newsletters
- Cruising World
- Sailing World
- Salt Water Sportsman
- Sport Fishing
- Wakeboarding
Standing Rigging (or ‘Name That Stay’)
Published by rigworks on november 19, 2019.
Question: When your riggers talk about standing rigging, they often use terms I don’t recognize. Can you break it down for me?
From the Rigger: Let’s play ‘Name that Stay’…

Forestay (1 or HS) – The forestay, or headstay, connects the mast to the front (bow) of the boat and keeps your mast from falling aft.
- Your forestay can be full length (masthead to deck) or fractional (1/8 to 1/4 from the top of the mast to the deck).
- Inner forestays, including staysail stays, solent stays and baby stays, connect to the mast below the main forestay and to the deck aft of the main forestay. Inner forestays allow you to hoist small inner headsails and/or provide additional stability to your rig.
Backstay (2 or BS) – The backstay runs from the mast to the back of the boat (transom) and is often adjustable to control forestay tension and the shape of the sails.
- A backstay can be either continuous (direct from mast to transom) or it may split in the lower section (7) with “legs” that ‘V’ out to the edges of the transom.
- Backstays often have hydraulic or manual tensioners built into them to increase forestay tension and bend the mast, which flattens your mainsail.
- Running backstays can be removable, adjustable, and provide additional support and tuning usually on fractional rigs. They run to the outer edges of the transom and are adjusted with each tack. The windward running back is in tension and the leeward is eased so as not to interfere with the boom and sails.
- Checkstays, useful on fractional rigs with bendy masts, are attached well below the backstay and provide aft tension to the mid panels of the mast to reduce mast bend and provide stabilization to reduce the mast from pumping.
Shrouds – Shrouds support the mast from side to side. Shrouds are either continuous or discontinuous .
Continuous rigging, common in production sailboats, means that each shroud (except the lowers) is a continuous piece of material that connects to the mast at some point, passes through the spreaders without terminating, and continues to the deck. There may be a number of continuous shrouds on your boat ( see Figure 1 ).
- Cap shrouds (3) , sometimes called uppers, extend from masthead to the chainplates at the deck.
- Intermediate shrouds (4) extend from mid-mast panel to deck.
- Lower shrouds extend from below the spreader-base to the chainplates. Fore- (5) and Aft-Lowers (6) connect to the deck either forward or aft of the cap shroud.
Discontinuous rigging, common on high performance sailboats, is a series of shorter lengths that terminate in tip cups at each spreader. The diameter of the wire/rod can be reduced in the upper sections where loads are lighter, reducing overall weight. These independent sections are referred to as V# and D# ( see Figure 2 ). For example, V1 is the lowest vertical shroud that extends from the deck to the outer tip of the first spreader. D1 is the lowest diagonal shroud that extends from the deck to the mast at the base of the first spreader. The highest section that extends from the upper spreader to the mast head may be labeled either V# or D#.
A sailboat’s standing rigging is generally built from wire rope, rod, or occasionally a super-strong synthetic fibered rope such as Dyneema ® , carbon fiber, kevlar or PBO.
- 1×19 316 grade stainless steel Wire Rope (1 group of 19 wires, very stiff with low stretch) is standard on most sailboats. Wire rope is sized/priced by its diameter which varies from boat to boat, 3/16” through 1/2″ being the most common range.
- 1×19 Compact Strand or Dyform wire, a more expensive alternative, is used to increase strength, reduce stretch, and minimize diameter on high performance boats such as catamarans. It is also the best alternative when replacing rod with wire.
- Rod rigging offers lower stretch, longer life expectancy, and higher breaking strength than wire. Unlike wire rope, rod is defined by its breaking strength, usually ranging from -10 to -40 (approx. 10k to 40k breaking strength), rather than diameter. So, for example, we refer to 7/16” wire (diameter) vs. -10 Rod (breaking strength).
- Composite Rigging is a popular option for racing boats. It offers comparable breaking strengths to wire and rod with a significant reduction in weight and often lower stretch.
Are your eyes crossing yet? This is probably enough for now, but stay tuned for our next ‘Ask the Rigger’. We will continue this discussion with some of the fittings/connections/hardware associated with your standing rigging.
Related Posts
Ask the Rigger
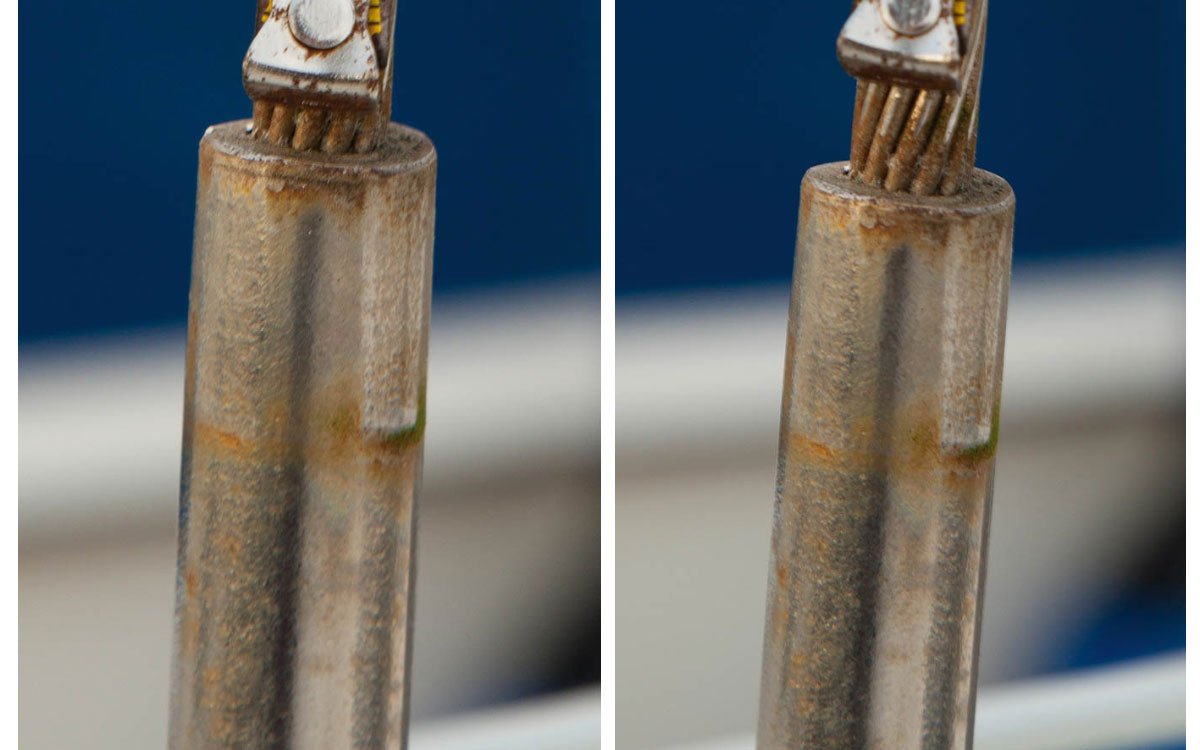
Do your masthead sheaves need replacing.
Question: My halyard is binding. What’s up? From the Rigger: Most boat owners do not climb their masts regularly, but our riggers spend a lot of time up there. And they often find badly damaged Read more…
Selecting Rope – Length, Diameter, Type
Question: Do you have guidelines for selecting halyards, sheets, etc. for my sailboat? From the Rigger: First, if your old rope served its purpose but needs replacing, we recommend duplicating it as closely as possible Read more…
Spinlock Deckvest Maintenance
Question: What can I do to ensure that my Spinlock Deckvest is well-maintained and ready for the upcoming season? From the Rigger: We are so glad you asked! Deckvests need to be maintained so that Read more…

The $tingy Sailor
Diy trailerable sailboat restoration and improvement without throwing your budget overboard.

Upgrade Your Rig With a DIY Adjustable Backstay
At some point when you get serious about sail trim, whether for racing or just high performance cruising, you’re going to want an adjustable backstay. Most C-22s and similar daysailers were rigged at the factory with fixed length backstays that are only slightly adjustable with a turnbuckle. They’re not intended for adjusting to different wind conditions. You set it and forget it.
Consequently, you only have one setting for mast bend and headstay tension. That’s fine for casual cruising. Set it for the conditions that you usually sail in and it will usually be close. But an adjustable backstay gives you a range of trim positions to optimize the mainsail and headsail shape for any conditions, which are what you can encounter when racing or when you’re no longer just a fair weather skipper.
Before I continue, a bit of legal housekeeping. This post contains affiliate links. That means I receive a small commission if you make a purchase using those links. Those commissions help to pay the costs associated with running this site so that it stays free for everyone to enjoy. For a complete explanation of why I’m telling you this and how you can support this blog without paying more, please read my full disclosure .
In other rigging posts on this site, I’ve described how to add DIY controls for each of the three sides of a mainsail:
- Luff – Control Mainsail Draft with a Boom Downhaul
- Leech – Control Your Mainsail Shape Better With a Boom Vang
- Foot – Flatten Your Mainsail Foot with an Outhaul
Each of them secondarily affects the middle or belly of the mainsail a little bit but an adjustable backstay primarily affects it and completes the sail trim picture. Genoa car placement also affects the leech and foot of the headsail and halyard tension also affects the luff. An adjustable backstay primarily affects the belly of the headsail. The cool thing about an adjustable backstay is that it affects the belly of both sails at the same time. It’s a two-for-one control that improves performance both upwind and downwind.
How an adjustable backstay improves sail shape
Your mainsail might have been designed and built with a slight outward curve in the luff specifically to take advantage of bend in your mast. With a fixed backstay or a loosened adjustable backstay, the mast (and consequently, the luff) is relatively straight. This lets the mainsail form a more rounded shape in its belly when it’s filled with air, which adds power and is just what you want in light air. The extra fabric width in the middle of the sail has to go somewhere, so it fills to leeward.
When you tighten an adjustable backstay, the top of the mast curves slightly aft. This makes it fit the curve in the mainsail luff, which flattens and depowers the mainsail, just what you want in a strong breeze. Even if your mainsail has a straight luff, the effect is the same. The mainsail is more efficient and the boat will heel less. Hence, you might not need to reef the mainsail as early or at all.
Similarly, your headsail was probably designed and built with straight luff but it can take advantage of an adjustable backstay as well. With a fixed backstay or a loosened adjustable backstay, the forestay should be tuned with several inches of sag in it. Like the mainsail, this lets the headsail form a more rounded shape in its belly when it’s filled with air, again, just what you want in light air.
When you tighten an adjustable backstay, since it pulls the masthead slightly aft, it also increases the tension on the headstay and pulls the sag out. Then it is straight and matches the luff, which removes some of the belly of the headsail and flattens it, again, just what you want in a strong breeze. Together with the mainsail, it too becomes more efficient.
Incidentally, a tighter headstay can also make your headsail furler work better. An adjustable backstay can also make trailering easier without the need for a quick release lever on the forestay. It lets you slacken the forestay, which can make disconnecting it to unstep the mast easier, especially if you have a furler. If you need just a little more slack, pull the mast forward by hand with one of the halyards.
The simple animation below illustrates this simultaneous flattening of the mainsail and headsail. An adjustable backstay deepens the middle of both sails a few inches.
Another benefit of an adjustable backstay is that after a day of sailing with a tight backstay in a strong breeze, you can slacken the backstay to let the rig relax and release tension on the hull while your sailboat is moored.
Direct vs. indirect backstays
Adjustable backstay designs fall into two types: direct and indirect. With a direct adjustable backstay, the adjuster (typically a tackle system) is integrated into the backstay. The adjuster directly controls the length of the backstay and bears the full load of the backstay. This is the type of system that I’ll describe how to make in this post.
The advantages of a direct system are that it is simpler and therefore, more economical to make. It’s also more mechanically efficient compared to indirect systems, as I’ll explain in a moment. The disadvantage of a direct system is that if any part of the adjuster breaks, the entire backstay can fail. That’s not likely to happen except under extreme conditions and it can be safeguarded against by adding a safety wire or strap to back up the adjuster in case of failure.
With an indirect adjustable backstay, the adjuster (also typically a tackle system) is not integrated into the backstay and it doesn’t carry the full load of the backstay. The adjuster indirectly controls the length of the backstay, which can function without the adjuster. The advantage of an indirect system is that it is more fail-safe. If the adjuster breaks, the backstay can continue to work, albeit without adjustment ability. The disadvantage of an indirect system is that is more complicated and therefore, more expensive to make and to maintain.
The adjustable backstay that was installed on C-22s at the factory is an indirect system that looks like this;
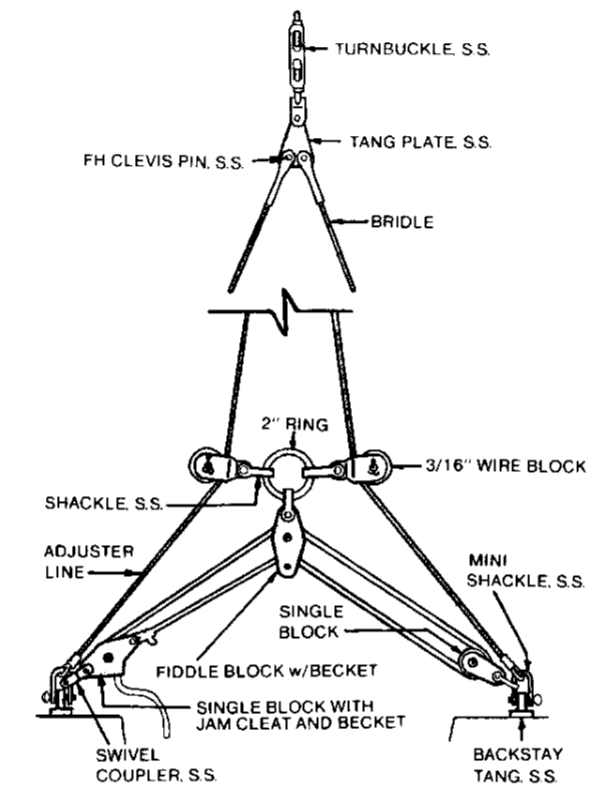
Tightening the tackle system pulls the center ring down, which pulls the bridle wires together and shortens the overall length of the backstay. Another disadvantage of this design is that the more you tighten the tackle, its mechanical advantage decreases.
The angle of the line through the center fiddle block decreases and the angle of the bridle wires through the wire blocks increases. Both of these effects increase the amount of force required to shorten the backstay. The end result is, it’s easier to adjust at the beginning of the adjustment range and harder to adjust at the end of the adjustment range. It gets hardest in strong winds, right when you need it most. That is why most modern backstays are direct designs.
DIY materials list
Following are the parts and materials you’ll need to make the direct adjustable backstay shown. I used a 5:1 tackle system because that’s what I had on hand but you could substitute a 4:1 tackle (two double blocks, no triple block) instead. It’s important that the breaking load of each part is equal to or greater than the breaking load of the backstay wire. You don’t want the adjuster to be the weakest link.
- Harken #304 1-1/2″ wire block or equivalent
- Harken #94 29mm triple block with cam cleat or equivalent
- Harken #85 29mm double block with becket or equivalent
- 1/2″ x 13 tpi SS eye bolt. The older C-22s used nearly identical eye bolts for the backstay, keel cable attachment, and the chain plate bolts. They’re readily available and inexpensive on eBay. However, the chain plate bolts are not threaded the full length of the bolt to the flange and need spacing washers. The backstay and keel eye bolts are fully threaded, do not need spacing washers, and are preferred for this project.
- 1/2″ SS washers (4-6 required if the eye bolt is not fully threaded)
- 20′ x 1/4″ New England Ropes Sta Set double braid
- 22′ x 1/8″ 1×19 SS wire w/swaged eyes on both ends. This is the main, non-adjustable part of the backstay.
- 10′ x 1/8″ 7×7 SS wire w/swaged eyes on both ends. This is the adjustable part of the backstay. Do NOT use 1×19 wire for this piece, which is not designed for use with wire blocks.
- SS shackles to attach the backstay to the eye bolts
For tips to help you decide whether to make the wire parts of the backstay yourself or to have a rigger make them for you, see How to Replace Your Standing Rigging for Less .
Installation instructions
To assemble and install the direct adjustable backstay shown:
1. If your sailboat already has an eye bolt installed in the port side of the transom, skip to step 2. If your sailboat does NOT have an eye bolt already installed in the port side of the transom, continue with this step. If your sailboat is not a Catalina 22, modify these instructions to provide adequate transom reinforcement.
A. Drill a 1/8″ starter hole through the top of the transom 2″ outboard of the traveler bar (6″ from the port side of the tiller cutout). Place the hole in the middle of the transom thickness. There is a 5/16″ thick brass bar embedded by the factory in the top of the transom for this purpose. Drill completely through the bar.
B. Redrill the hole to enlarge it to 3/8″ or 27/64″ (preferable if you have that bit).
C. Chamfer the fiberglass down to the brass bar with a countersink bit or large drill bit.
D. Tap the hole to 1/2″ x 13 tpi. The finished hole should look like this:
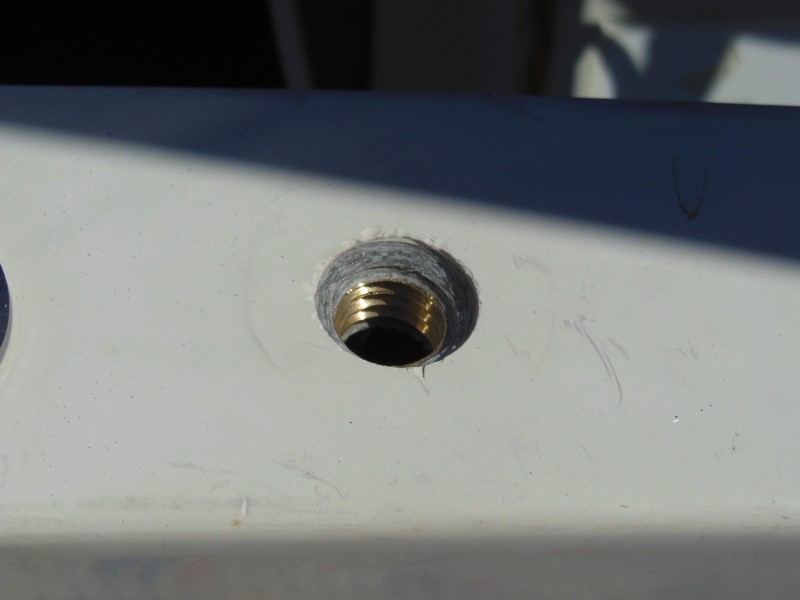
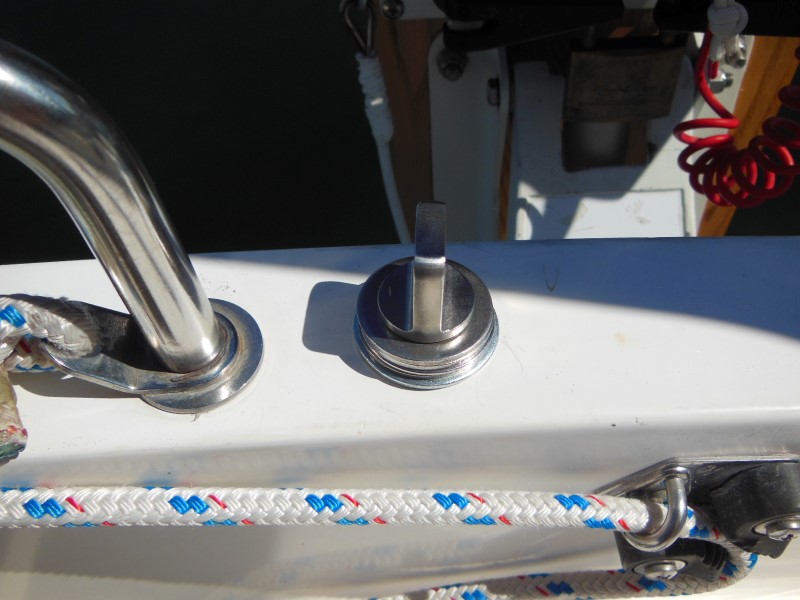
2. Test fit the 1/2″ eye bolt in the hole to decide how many washers you need for a tight fit. The tab of the eye bolt when tightened must point toward the cockpit like the picture below.
3. Apply a 1/4″ cone of butyl tape around the bolt and the underside of the lowest washer so that it will fill the countersink in the transom and squeeze out a little.
4. Apply blue thread locker to the eye bolt threads and install the eye bolt snug.
Do not overtighten the bolt or you might strip the brass threads. If you do strip the threads, then you will need to drill the hole out to 1/2″ and add washers and nuts on the inside of the transom, which is very difficult just to see, let alone work on. This is also a possible workaround if your sailboat is not a C-22. In that case, most owners end up cutting access holes in the front of the transom to install the nuts and then cover the holes with access plates or vents. To make matters worse, the back of the transom has a wood core and is thicker, the front of the transom has no core and is thinner. With the eye bolt centered on the transom, the threaded end of the bolt barely clears the core inside the transom. You will have to cut into the core to create clearance for the washers and nuts. To avoid all this, don’t strip the eye bolt threads.
5. Unstep the mast and, if necessary, move it so that you can work on the masthead.
6. Remove the existing backstay and attach one end of the 22′ wire to the masthead in its place.
7. Step the mast and reconnect the shrouds.
8. Reave the 10′ wire through the wire block and attach the wire block to the loose end of the 22′ wire like this:
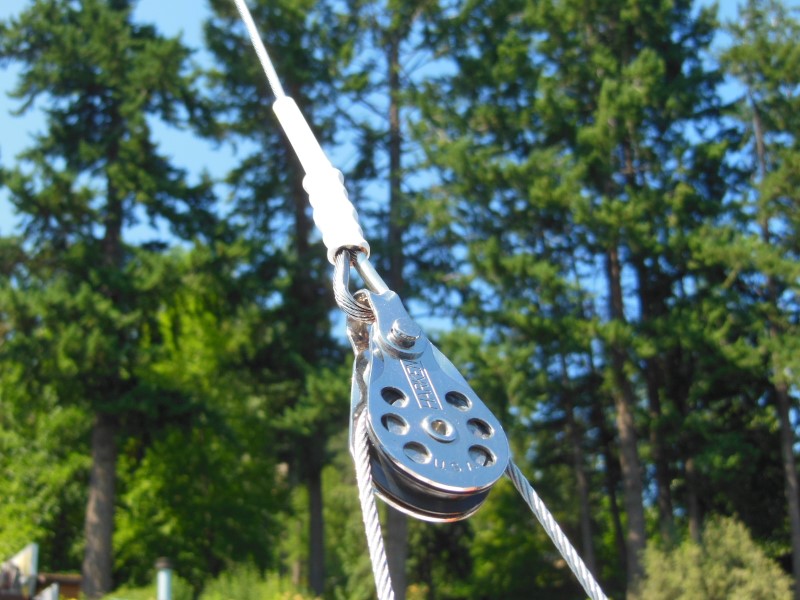
9. Use a shackle to connect one end of the 10′ wire to the transom eye bolt on the opposite side (typically the starboard side) from where you want the adjuster cam cleat to be located (typically the port side).
10. Attach the double block with becket to the loose end of the 10′ wire like this:
11. Reave the 1/4″ double braid line through the double and triple blocks.
Use a double luff reaving order like shown below.
Start from the becket on the double block, reave the line through the sheaves on one side of both blocks, through the opposite sides of both blocks in the opposite direction, and exit through the middle sheave of the triple block and the cam cleat. Do not spiral reave the line through the sheaves. Leave a long tail in the line until after the backstay is installed and the rig tuned.
12. Use a shackle to connect the triple block to the remaining eye bolt (typically on the port side) like this:
The completed installation should look like this:
13. With the adjuster slack, check the mast rake and prebend and the standing rigging tuning. If you’re not sure how, refer to the Catalina 22 Tuning Guide from North Sails. If you don’t have a tension gauge, consider purchasing one after you read How To Measure Standing Rigging Tension .
14. Tighten the adjuster just enough to take the slack out of the backstay and so that it won’t interfere with the boom when the mainsail is raised. This will be the minimum backstay tension setting.
15. Tie a stopper knot in front of the cam cleat to prevent the adjuster from being slackened any further.
16. Trim the excess adjuster line to leave about a 1′ tail. Tie another stopper knot on the end to give a better grip on the line.
17. Tighten the adjuster to 25% of the breaking strength of the main wire or the bridle wire, whichever is less . This should bend the top half of the mast aft a few inches. This will be the maximum backstay tension setting that you should not exceed.
For example, if the breaking load of the main wire is 1587 lbs and the breaking load of the bridle wire is 1350 lbs, calculate 25% of 1350 lbs, which is 337.5 lbs or a setting of 25 on a Loos PT1 tension gauge.
18. Mark the adjuster line in front of the cam cleat with a permanent marker. Do not tighten the adjuster beyond this mark when you are sailing.
Now go out and practice adjusting your new backstay in various wind conditions to optimize the headsail and mainsail shape and maximize your pointing ability and speed. When you’re done for the day, slacken the adjuster to the minimum setting.
Would you like to be notified when I publish more posts like this? Enter your email address below to subscribe to this blog and receive notifications of new posts by email. You will also receive occasional newsletters with exclusive info and deals only for subscribers and the password to the Downloads page. It’s free and you can unsubscribe at any time but almost nobody does!
Subscribe to Blog via Email
Enter your email address to subscribe to this blog and receive notifications of new posts by email.
Email Address:
Share this:
11 thoughts on “ upgrade your rig with a diy adjustable backstay ”.
Nice description of the why and how to add the direct backstay adjuster. If one doesn’t have a transom with the brass structure to mount to, I assume one would want to use the typical metal backplate when installing that eyebolt? Cheers, and thanks for some fresh inspiration to work on my project boat!
Yep, treat it just like you would a chain plate bolt because it’s doing much the same job.
I had an indirect system when I got my boat and it functioned (minimally) as you describe. I couldn’t tell any difference. Then I installed a system as you outline here. sailing on a close reach in light air and flat water, I could actually FEEL the boat accelerate as I eased the backstay and I could FEEL the boat slow down as the sails stalled when I tightened it up. I played with it for half hour like this just appreciating the noticeable difference from the “indirect” method I had previously uses. This is one of the best modifications you can make to your boat.
Thanks for sharing your experience, Mike!
Did your adjustable backstay make your quick release on the forestay and shrouds redundant?
Hello, Harry
No, I still use the levers with the adjustable backstay, especially on the forward lower shrouds. But I also tune my standing rigging a little tighter than normal for racing. I might be able to pin/unpin the forestay without a lever and the backstay relaxed but it wouldn’t be quick or easy.
Thanks for asking, $tingy
Hello, I have a few questions regarding adjustable backstay for C22. I am planing to replace rigging on my currently acquired Catalina 22 sport. Since I already have eye bolt installed in the port side, I think it would be good idea to install adjustable backstay, for two reasons: adjustment of back stay and better tension distribution (two bolts vs 1 bold). The only concern I have is safety, as you mentioned in your article (“The disadvantage of a direct system is that if any part of the adjuster breaks, the entire backstay can fail.”). So, is there risk that whole mast can fall or can aft shourds still hold the mast up? What is your recommendation for wire or strap to back up the adjuster in case of failure? Thank you.
I haven’t read any stories of adjustable backstays failing but that doesn’t mean there aren’t any, I just haven’t dug deep enough. My guess would be that a backstay failure would result in the mast folding forward above the lower shroud tangs. Assuming the standing rigging was in good condition otherwise, it would take a lot of wind to cause to cause it to fail and it would probably fail at a block or terminal. Sudden failure of the backstay would allow all of the load on the foresail to pull the top of the mast forward impeded only by the mainsail leech, main sheet, and possibly a vang. The upper and lower shrouds would likely survive and hold the bottom half of the mast in place. All this is speculation, of course, and the actual conditions would determine the result.
That said, I don’t have a safety strap on my adjustable backstay even though I do race my C-22 and occasionally sail in winds that can completely overpower it. But if I were to add one, I’d add a short length of wire rope on the static side of the adjuster with one end attached below the bridle block and the other end attached above the bridle block. I’d make it with no slack when the adjuster is at minimum tension. As the adjuster is tightened, the safety strap will slacken slightly and have the most slack when the backstay is at its tightest. Its purpose would not be to maintain tension on the backstay in case of a failure but simply to limit the masthead from springing forward and bending catastrophically. I wouldn’t use nylon webbing, which can deteriorate from UV exposure.
Hope that helps. Send me a picture of your sailboat if you would like to add it to the Readers Gallery. There aren’t any C-22 Sports there yet. $tingy
I purchased a Catalina Capri 26 about a year ago and have been thinking about upgrading to an adjustable backstay, that’s how I found your article and site which is very helpful. The current (non-adjustable) backstay runs diagonally from the masthead to a chainplate mounted to the transom (exterior – port side) about 18″ above the waterline. I was thinking of adding another chainplate same in the same area on the starboard side. But in order to have the adjusting sheet accessible to the cockpit I would need to reverse the configuration by attaching the Harken double block with becket down below at the chainplate and the Harken triple block with cam-cleat above near the skipper. Is that feasible and something that will work? I look forward to any advice you can offer and of course all your future articles!
Thanks, Kirk
I understand what you want to do but inverting the cam cleat block wouldn’t be very safe. The line tail would hang down and if a crew member or a fouled line accidentally pulled it downward, it could uncleat and unexpectedly slacken the backstay, which could damage the mast. Instead, consider leaving the tackle in the upright position and raise the whole assembly up with a short pendant or a long tang to where the skipper can reach it. Be sure every component in the system is rated to a working load at least equal to the backstay wire. However, I couldn’t find where anybody has done this before so you might be in uncharted territory and therefore I must recommend against it.
I do appreciate you getting back to me I had the same thought about a short pendant. I totally understand why you can’t (legally) endorse that but think I’m going to take a shot at it and make it as bullet proof as possible. Once again, thank you for your articles and I’m looking forward to several projects this winter as I really look forward to next Spring!
Leave a comment Cancel reply
This site uses Akismet to reduce spam. Learn how your comment data is processed .

- Already have a WordPress.com account? Log in now.
- Subscribe Subscribed
- Copy shortlink
- Report this content
- View post in Reader
- Manage subscriptions
- Collapse this bar
No products in the cart.
Sailing Ellidah is supported by our readers. Buying through our links may earn us an affiliate commission at no extra cost to you.
The Standing Rigging On A Sailboat Explained
The standing rigging on a sailboat is a system of stainless steel wires that holds the mast upright and supports the spars.
In this guide, I’ll explain the basics of a sailboat’s hardware and rigging, how it works, and why it is a fundamental and vital part of the vessel. We’ll look at the different parts of the rig, where they are located, and their function.
We will also peek at a couple of different types of rigs and their variations to determine their differences. In the end, I will explain some additional terms and answer some practical questions I often get asked.
But first off, it is essential to understand what standing rigging is and its purpose on a sailboat.
The purpose of the standing rigging
Like I said in the beginning, the standing rigging on a sailboat is a system of stainless steel wires that holds the mast upright and supports the spars. When sailing, the rig helps transfer wind forces from the sails to the boat’s structure. This is critical for maintaining the stability and performance of the vessel.
The rig can also consist of other materials, such as synthetic lines or steel rods, yet its purpose is the same. But more on that later.
Since the rig supports the mast, you’ll need to ensure that it is always in appropriate condition before taking your boat out to sea. Let me give you an example from a recent experience.
Dismasting horrors
I had a company inspect the entire rig on my sailboat while preparing for an Atlantic crossing. The rigger didn’t find any issues, but I decided to replace the rig anyway because of its unknown age. I wanted to do the job myself so I could learn how it is done correctly.
Not long after, we left Gibraltar and sailed through rough weather for eight days before arriving in Las Palmas. We were safe and sound and didn’t experience any issues. Unfortunately, several other boats arriving before us had suffered rig failures. They lost their masts and sails—a sorrowful sight but also a reminder of how vital the rigging is on a sailboat.
The most common types of rigging on a sailboat
The most commonly used rig type on modern sailing boats is the fore-and-aft Bermuda Sloop rig with one mast and just one headsail. Closely follows the Cutter rig and the Ketch rig. They all have a relatively simple rigging layout. Still, there are several variations and differences in how they are set up.
A sloop has a single mast, and the Ketch has one main mast and an additional shorter mizzen mast further aft. A Cutter rig is similar to the Bermuda Sloop with an additional cutter forestay, allowing it to fly two overlapping headsails.
You can learn more about the differences and the different types of sails they use in this guide. For now, we’ll focus on the Bermuda rig.
The difference between standing rigging and running rigging
Sometimes things can get confusing as some of our nautical terms are used for multiple items depending on the context. Let me clarify just briefly:
The rig or rigging on a sailboat is a common term for two parts:
- The standing rigging consists of wires supporting the mast on a sailboat and reinforcing the spars from the force of the sails when sailing.
- The running rigging consists of the halyards, sheets, and lines we use to hoist, lower, operate, and control the sails on a sailboat.
Check out my guide on running rigging here !
The difference between a fractional and a masthead rig
A Bermuda rig is split into two groups. The Masthead rig and the Fractional rig.
The Masthead rig has a forestay running from the bow to the top of the mast, and the spreaders point 90 degrees to the sides. A boat with a masthead rig typically carries a bigger overlapping headsail ( Genoa) and a smaller mainsail. Very typical on the Sloop, Ketch, and Cutter rigs.
A Fractional rig has forestays running from the bow to 1/4 – 1/8 from the top of the mast, and the spreaders are swept backward. A boat with a fractional rig also has the mast farther forward than a masthead rig, a bigger mainsail, and a smaller headsail, usually a Jib. Very typical on more performance-oriented sailboats.
There are exceptions in regards to the type of headsail, though. Many performance cruisers use a Genoa instead of a Jib , making the difference smaller.
Some people also fit an inner forestay, or a babystay, to allow flying a smaller staysail.
Explaining the parts and hardware of the standing rigging
The rigging on a sailing vessel relies on stays and shrouds in addition to many hardware parts to secure the mast properly. And we also have nautical terms for each of them. Since a system relies on every aspect of it to be in equally good condition, we want to familiarize ourselves with each part and understand its function.
Forestay and Backstay
The forestay is a wire that runs from the bow to the top of the mast. Some boats, like the Cutter rig, can have several additional inner forestays in different configurations.
The backstay is the wire that runs from the back of the boat to the top of the mast. Backstays have a tensioner, often hydraulic, to increase the tension when sailing upwind. Some rigs, like the Cutter, have running backstays and sometimes checkstays or runners, to support the rig.
The primary purpose of the forestay and backstay is to prevent the mast from moving fore and aft. The tensioner on the backstay also allows us to trim and tune the rig to get a better shape of the sails.
The shrouds are the wires or lines used on modern sailboats and yachts to support the mast from sideways motion.
There are usually four shrouds on each side of the vessel. They are connected to the side of the mast and run down to turnbuckles attached through toggles to the chainplates bolted on the deck.
- Cap shrouds run from the top of the mast to the deck, passing through the tips of the upper spreaders.
- Intermediate shrouds run from the lower part of the mast to the deck, passing through the lower set of spreaders.
- Lower shrouds are connected to the mast under the first spreader and run down to the deck – one fore and one aft on each side of the boat.
This configuration is called continuous rigging. We won’t go into the discontinuous rigging used on bigger boats in this guide, but if you are interested, you can read more about it here .
Shroud materials
Shrouds are usually made of 1 x 19 stainless steel wire. These wires are strong and relatively easy to install but are prone to stretch and corrosion to a certain degree. Another option is using stainless steel rods.
Rod rigging
Rod rigging has a stretch coefficient lower than wire but is more expensive and can be intricate to install. Alternatively, synthetic rigging is becoming more popular as it weighs less than wire and rods.
Synthetic rigging
Fibers like Dyneema and other aramids are lightweight and provide ultra-high tensile strength. However, they are expensive and much more vulnerable to chafing and UV damage than other options. In my opinion, they are best suited for racing and regatta-oriented sailboats.
Wire rigging
I recommend sticking to the classic 316-graded stainless steel wire rigging for cruising sailboats. It is also the most reasonable of the options. If you find yourself in trouble far from home, you are more likely to find replacement wire than another complex rigging type.
Relevant terms on sailboat rigging and hardware
The spreaders are the fins or wings that space the shrouds away from the mast. Most sailboats have at least one set, but some also have two or three. Once a vessel has more than three pairs of spreaders, we are probably talking about a big sailing yacht.
A turnbuckle is the fitting that connects the shrouds to the toggle and chainplate on the deck. These are adjustable, allowing you to tension the rig.
A chainplate is a metal plate bolted to a strong point on the deck or side of the hull. It is usually reinforced with a backing plate underneath to withstand the tension from the shrouds.
The term mast head should be distinct from the term masthead rigging. Out of context, the mast head is the top of the mast.
A toggle is a hardware fitting to connect the turnbuckles on the shrouds and the chainplate.
How tight should the standing rigging be?
It is essential to periodically check the tension of the standing rigging and make adjustments to ensure it is appropriately set. If the rig is too loose, it allows the mast to sway excessively, making the boat perform poorly.
You also risk applying a snatch load during a tack or a gybe which can damage the rig. On the other hand, if the standing rigging is too tight, it can strain the rig and the hull and lead to structural failure.
The standing rigging should be tightened enough to prevent the mast from bending sideways under any point of sail. If you can move the mast by pulling the cap shrouds by hand, the rigging is too loose and should be tensioned. Once the cap shrouds are tightened, follow up with the intermediates and finish with the lower shrouds. It is critical to tension the rig evenly on both sides.
The next you want to do is to take the boat out for a trip. Ensure that the mast isn’t bending over to the leeward side when you are sailing. A little movement in the leeward shrouds is normal, but they shouldn’t swing around. If the mast bends to the leeward side under load, the windward shrouds need to be tightened. Check the shrouds while sailing on both starboard and port tack.
Once the mast is in a column at any point of sail, your rigging should be tight and ready for action.
If you feel uncomfortable adjusting your rig, get a professional rigger to inspect and reset it.
How often should the standing rigging be replaced on a sailboat?
I asked the rigger who produced my new rig for Ellidah about how long I could expect my new rig to last, and he replied with the following:
The standing rigging should be replaced after 10 – 15 years, depending on how hard and often the boat has sailed. If it is well maintained and the vessel has sailed conservatively, it will probably last more than 20 years. However, corrosion or cracked strands indicate that the rig or parts are due for replacement regardless of age.
If you plan on doing extended offshore sailing and don’t know the age of your rig, I recommend replacing it even if it looks fine. This can be done without removing the mast from the boat while it is still in the water.
How much does it cost to replace the standing rigging?
The cost of replacing the standing rigging will vary greatly depending on the size of your boat and the location you get the job done. For my 41 feet sloop, I did most of the installation myself and paid approximately $4700 for the entire rig replacement.
Can Dyneema be used for standing rigging?
Dyneema is a durable synthetic fiber that can be used for standing rigging. Its low weight, and high tensile strength makes it especially popular amongst racers. Many cruisers also carry Dyneema onboard as spare parts for failing rigging.
How long does dyneema standing rigging last?
Dyneema rigging can outlast wire rigging if it doesn’t chafe on anything sharp. There are reports of Dyneema rigging lasting as long as 15 years, but manufacturers like Colligo claim their PVC shrink-wrapped lines should last 8 to 10 years. You can read more here .
Final words
Congratulations! By now, you should have a much better understanding of standing rigging on a sailboat. We’ve covered its purpose and its importance for performance and safety. While many types of rigs and variations exist, the hardware and concepts are often similar. Now it’s time to put your newfound knowledge into practice and set sail!
Or, if you’re not ready just yet, I recommend heading over to my following guide to learn more about running rigging on a sailboat.
Sharing is caring!
Skipper, Electrician and ROV Pilot
Robin is the founder and owner of Sailing Ellidah and has been living on his sailboat since 2019. He is currently on a journey to sail around the world and is passionate about writing his story and helpful content to inspire others who share his interest in sailing.
Very well written. Common sense layout with just enough photos and sketches. I enjoyed reading this article.
Thank you for the kind words.
Leave a Reply Cancel reply
Your email address will not be published. Required fields are marked *

- CLASSIFIEDS
- NEWSLETTERS
- SUBMIT NEWS

Global Solo Challenge: Standing rigging - Step by step guide on how to tune it on your sailboat

Related Articles

Practical Boat Owner
- Digital edition

How to set up your rig: tension your shrouds on masthead or fractional
- David Harding
- March 15, 2021
How to set up three common types of rig: the traditional masthead with a single set of in-line spreaders, single-spreader swept fractional rigs, and fractional rigs with two sets of swept spreaders. David Harding reports

How to set up your rig : tension your shrouds on masthead or fractional
If boats were cars, many of those I see sailing along would be coughing and spluttering down the motorway at 35mph in third gear with three flat tyres and a smoky exhaust. Others would cruise past in top gear at 70, making half the noise and using a fraction of the fuel.
Would these top-gear drivers be working any harder? Would they have cars that were faster by design and more expensive? Not at all. They would simply be the ones who had pumped up their tyres, learned their way around the gearbox and had their engines serviced.

It’s worth keeping an eye on your leeward cap shrouds during early-season outings after the mast has been re-stepped. The ones on this yacht could do with a little more tension
The obvious question, then, is why so many boat owners seem to leave their quest for efficiency and economy on the dockside.
One answer is that many are unaware how inefficiently their boats are performing. Another is that there’s no MOT for sailing boats and no driving test to make sure people know how to sail them (thank goodness on both counts).
Whatever the reasons, the fact remains that an efficient rig is fundamental. If the rig’s not right, the sails have no hope of setting properly.
And that’s important whether you’re racing or cruising, because sailors of both persuasions ultimately want the same: maximum lift for minimum drag.
For racers, that means more speed and better results. They carry more sail because they have more crew to handle it and more weight on the rail to balance it.
Cruisers carry less sail but, if it works efficiently, it means less heel, less leeway, better pointing, less tacking, a lighter helm and greater comfort than if it’s working inefficiently – plus the ability to get home before night falls or the pub shuts. Who can object to that?
What matters is that the sail you’re carrying is driving you forwards, not pushing you sideways.
When I question cruising sailors about the state of their rig I often get the reply ‘Oh it doesn’t matter – I’m not racing!’.
Those I know who have done something about it, however, have been delighted by the transformation their boats have undergone and have had to agree that cruising fast and comfortably is definitely better.
Setting up your boat rigging
In this article we’re going to look at how to set up the three most common types of rig: the traditional masthead with a single set of in-line spreaders, single-spreader swept fractional rigs, and fractional rigs with two sets of swept spreaders.
For simplicity we’re assuming the use of 1×19 rigging except where mentioned otherwise.
Variations in rig type are almost infinite by the time you take into account deck-stepped and keel-stepped masts, masthead rigs with swept spreaders, jumper struts, fractional rigs with in-line spreaders, and so on.
Once you understand the basics, however, you’ll find that you can apply your knowledge to good effect on most types of rig.
Rig-tuning is not only for the experts. Experience helps, of course, and a multiple-spreader fractional rig is harder to tune than an old tree-trunk of a masthead rig from the 1970s.
Nonetheless, with practice, a good eye and some observation you will probably find you can set it up pretty well.
You might want to call in a rigger or an experienced rig-tweaker to help or to do it for you the first time, and perhaps to check it periodically thereafter, but at least if you know what to look for you’ll notice when anything needs adjusting.
A word of warning when it comes to boatyards that have re-stepped your mast: sometimes re-stepping means just that and no more.
I have been on boats whose owners have assumed that the yard had set up the rig, whereas in fact it had just been dropped in and the bottlescrews hand-tensioned to stop it falling over.
It’s scary to think of the number of boats that must have been sailed in this condition.
What you will need to tune your rig Essential A calm day: don’t try setting up your rig in more than a few knots of wind A boat that’s floating level fore-and-aft (and preferably laterally as well) Screwdriver/lever bar Spanners (fixed or adjustable) Needle-nose pliers for split-pins Electrical insulation or self-amalgamating tape Lubricant for bottlescrews Tape measure (folding/small cassette type, or ideally folding rule) Useful Spring balance Long tape-measure Rig-tension gauge
The importance of enough tension: Why tight is right
If you think you’re being kind to your boat by leaving the rigging slack, think again. It’s true that some keelboats (such as Squibs and XODs) sail with the leeward cap shroud waving around in the wind, but that doesn’t work on yachts designed to go to sea.
Rigging that’s under-tensioned puts infinitely more load on the wire, bottlescrews, terminals and hull structure because of the snatch loads every time the boat falls off a wave. When it hits the bottom of the trough, anything that’s free to move gets thrown forwards and sideways before being brought up short by whatever happens to be in the way to stop it. That applies to the crew, to loose gear down below or to the mast. Think of the inertia to which a mast is subjected because of its height, and you can imagine the loads involved.
If the rigging is sensibly tight, on the other hand, movement and the consequent stresses are minimised.
Boats are built to withstand the static loads of a properly-tensioned rig, but asking them to cope with constant snatch loading is unfair – so don’t kill your boat with kindness.
As we discuss in the sections on the types of rig (below), masthead configurations with in-line spreaders need less cap-shroud tension than swept-spreader fractional rigs. This is because in-line caps are only supporting the mast laterally. The backstay stops it moving forwards, so each wire has a separate, clearly-defined role.
Aft-swept caps support the mast both laterally and fore-and-aft. Being swept aft typically about 25°, they need to be under a lot of tension to keep the forestay tight. Because they’re also at a much shallower angle to the mast, they bear between three and five times the load of the forestay.
With fractional rigs, then, it’s vital to keep the cap shrouds tight. If they’re too loose, the forestay will sag too much, the headsail will become too full and its leech will be too tight. Then the boat will become unbalanced, heel too far, make more leeway and lose both speed and pointing ability.
Structurally, under-tensioned rigging with a swept-spreader rig presents a problem in addition to the issue of snatch loading. Tension in the leeward cap shroud is important in keeping the mast in column, to the extent that Loos and Co (the manufacturer of the popular rig-tension gauges) states that a mast loses 50% of its lateral stiffness when the leeward cap goes slack. When this happens, the mast is effectively hinging around the forestay and the windward cap shroud and is far more prone to pumping as the boat bounces around.
The main reason why under-tensioned rigs on cruising boats stay standing as they do is that manufacturers build in enormous margins.
Even so, proper tension means better performance and greater safety. The ‘it doesn’t matter – I’m only cruising’ excuse for slack rigging just doesn’t cut it!
How to measure rig tension

This Loos gauge (left image) is indicating that the 6mm wire in the cap shroud is at 22% of its breaking strain (730kg). To measure the stretch, extend a tape measure (right) (or ideally a folding rule) to 2,000mm and mark this distance up the wire…
…but start with the end of the tape a couple of millimetres above the top of the swaging. As the wire is tensioned it will stretch, increasing the gap below the end of the tape.
Experienced riggers and rig-tweakers will often tension the rigging at the dockside by feel, then sight up the mast and make any adjustments under way.
Most people aren’t confident enough to do this, though – so what are the best ways to check the tension as you wind down the bottlescrews?
The simplest and quickest way is to use a rig-tension meter, such as the Loos gauge. Once you know the diameter of the wire, it will give you the load both in kg and as a percentage of its breaking strain.
The gauge for rigging of 5m and 6mm (and up to 14% of breaking strain on 7mm) typically costs around £65, while the bigger version for wire from 7mm to 10mm is closer to £200.
If you don’t have a tension gauge, you can calculate the percentage of a wire’s breaking strain by measuring its stretch, normally over a distance of 2m: when 1×19 wire has stretched by 1mm over a 2,000mm length, it’s at 5% of its breaking load whatever its diameter.
Most cruising boats have rigging made from 1×19 wire. On sportier boats it might be Dyform or rod, in which case 5% of breaking load is indicated by stretch of 0.95 and 0.7mm respectively. For the purpose or our illustrations we’ll assume 1×19.
For accurate measurement the rigging needs to be completely slack. Hold the end of the tape a couple of millimetres above the top of the swaging, then measure 2,000mm up the wire, secure the other end of the tape here and start tensioning. When the gap between the top of the swaging and the end of the tape has increased by 1mm, you have reached 5% of the wire’s breaking strain, so 3mm equates to 15% and 5mm to 25%.
Bear in mind that 1×19 wire will be affected by bedding-in stretch during its first few outings, so new rigging will need to be re-tensioned a time or two during the first season.
Sensible precautions 1. Don’t force dry bottlescrews: keep them well lubricated. 2. Don’t use massively long tools for extra leverage on the bottlescrews. If you can feel the load, you’re less likely to strain or break anything. 3. Most boats will flex to some extent when the rig is properly tensioned. If you’re concerned about excessive bend, take it easy, use a straight edge across the deck to check for movement, and seek advice. 4. The percentages of breaking load quoted assume that the rigging is of the correct diameter as specified by the designer, builder or rigger.
How to set up a masthead rig with single in-line spreaders
This is the simplest type of rig to set up. Whether it’s keel-stepped or deck-stepped and supported by forward lowers or a babystay, it’s the same basic procedure.
Step 1: Get the mast upright athwartships

Measure the distance to fixed points on both sides that are symmetrical about the centreline, such as the base of the chainplates.
If you don’t have a long tape measure, use the halyard itself (this is where a spring balance can help you gauge the same tension on each side).
Centre the masthead by adjusting the port and starboard cap shrouds until the measurements are the same, then hand-tighten the bottlescrews by taking the same number of turns on each side.
Re-check and adjust as necessary.
A long tape measure is useful for getting the mast upright.
Step 2: Setting the rake

Rake is determined principally by the length of the forestay. Some roller-reefing systems allow no adjustment but you can increase length by adding toggles.
Adjust the forestay and backstay, checking the rake with a weight suspended from the end of the main halyard. One degree of rake is about 6in (15cm) in 30ft (9m).
Hand-tight on the backstay’s bottlescrew (or gentle use of the tensioner) is fine at this stage.
Rake is measured from the aft face of the mast, at or below boom-level. If the boat’s rocking around, suspend the weight in a bucket of water to dampen the movement.
Step 3: Tighten the cap shrouds and backstay

Take no more than two or three full turns on one side before doing the same on the other.
Count carefully.
You’re aiming to tension the caps to 15% of their breaking strain, measured as explained on page 41.
That might be much tighter than you’ve ever had them before!
Tension the backstay to 15% of its breaking load.
Note: Using ordinary hand-tools on the bottlescrews, it’s hard to over-tension the rigging
Step 4: Tighten the lowers / babystay

A mast should bend forward in the middle, though only to a small extent on masthead rigs of heavy section.
This ‘pre-bend’ is principally to counter two factors in heavy weather: increased forestay loads pulling the top of the mast forward, and the head of a reefed mainsail pulling the middle aft.
Together, they can result in the middle of the mast bowing aft, which makes it unstable and is bad for sail trim. For maximum strength in extremis it should be straight.
Use the forward lowers or babystay to pull the middle of the mast forward. The bend thus induced should be no more than half the mast’s fore-and-aft measurement.
Then take up the slack in the aft lowers.
They don’t need to be tight; they’re just countering the forward pull.
Sight up the luff groove to make sure the mast is straight laterally. Correct any deflections with the lowers.
If you set up the caps properly to start with, you should not adjust them again at this stage.
Step 5: Check the rig under sail

First, make sure the leeward cap shroud isn’t waving around in the breeze. You should be able to deflect it with a finger by a few inches; no more.
If it’s too loose, take a turn or two on the leeward bottlescrew, then tack and do the same on the other side.
Now sight up the back of the mast.
It should be straight athwartships and bending slightly forward in the middle.
Athwartships deflection might make it look as though the top is falling away to one side (see diagram), but it won’t be if it was centred properly in Step 1. Straighten the middle by adjusting the lowers
If it’s straight or bending aft in the middle, try increasing the backstay tension (but not beyond 30% of its breaking strain) and, if necessary, tensioning the forward lowers/babystay and slackening the aft lowers.
Remove any lateral bends by adjusting the lowers.
Once you’re happy, lock off the bottlescrews to make sure they can’t come undone.

Inverted bend (mast bowing aft in the middle) is bad for sail trim and potentially dangerous for the rig.
Setting up a fractional rig with single, aft-swept spreaders
Widely used on smaller cruisers and cruiser/racers, this configuration needs a very different approach from an in-line masthead rig
This stage is the same as with a masthead rig (scroll up).
Step 2: Set the rake

This time, however, rake is set by the forestay and cap shrouds rather than the forestay and backstay.
With a swept-spreader fractional rig it’s the cap shrouds, not the backstay, that stop the mast moving forward. They provide both fore-and-aft and lateral support, so they’re doing two jobs.
The backstay’s principal role is to control the topmast and mast-bend. Because it’s above the point where the forestay joins the mast, it’s not pulling directly against the forestay and therefore has less effect on forestay tension. How much it pulls against the forestay depends on factors including the height of the topmast, the stiffness of the mast section and the tension of the lower shrouds (which determine the bend).
Step 3: Tighten the cap shrouds

Forestay tension is achieved primarily through the caps, and because they’re swept back at such a shallow angle they need to be seriously tight.
Their maximum tension is 25% of breaking load, but it’s best not to tension them all the way in one go because that would result in a very bent mast: tensioning the caps pushes the spreaders, and therefore the middle of the mast, forward.
Start by taking them to about 15% of breaking load, then tighten the lowers to pull the middle of the mast back so it’s straight.
This is how the swept-spreader fractional rig works: the caps and lowers are working against each other, caps pushing and lowers pulling, to stabilise the middle of the mast. Sight up the mast when it’s straight to check for lateral deflection, correcting it with the lowers.
With a flexible mast you might need to repeat the process, taking the caps to 20% before tensioning the lowers again.
Otherwise go straight to the next stage, which is to pull on the backstay.
Since the backstays on fractional rigs often have cascade purchases at the bottom you can’t measure the tension by stretch as you can with wire, so you have to do this by feel: pull it tight, but don’t go mad.
Tensioning the backstay bends the mast and therefore shortens the distance from the hounds (where the caps join) to the deck. This loosens the caps, so it’s easier to tension them back to the 20% mark.
When you let the backstay off, the caps will tension again and should be at about 25% of breaking load – but no more.
Step 4: Set the pre-bend

Take a few turns on the lowers to achieve the right amount of pre-bend. It should be more than with an in-line masthead rig, but a mast should never bend to more than 2% of the height of the foretriangle even with the backstay tensioned (that’s about 180mm in 9m, or 7in in 30ft).
Check to see how far the mast bends with a tight backstay. The optimum bend will often be determined by the cut of the mainsail, or recommended by the sailmaker or class association.
Pre-bend is vital because most fractional rigs don’t have forward lowers or a babystay, so if the mast were to bend aft in the middle (inverted bend) it could collapse.
In fresh conditions, especially under spinnaker, it’s a wise precaution never to release the backstay completely. That stops the upper section of the mast being pulled too far forward.
The caps should be tighter than with a masthead rig, with no significant slack on the leeward side when the boat’s hard on the wind and heeling 15-20°.
If the static tension is up to 25% but the leeward cap is always slack, the boat might be bending. That’s a topic beyond the scope of this article!
Sight up the mast to check the bend both fore-and-aft and athwartships, adjusting the lowers as necessary.
Setting up a fractional rig with two sets of aft-swept spreaders
As mast sections have become slimmer, this is now a popular configuration on boats between 30ft (9m) and 40ft (12m) but it’s more complex to tune.
This stage is the same as with the other types of rig.
Follow the procedure as described for single-spreader fractional rigs. Generally speaking, more rake improves upwind performance but too much will induce excessive weather helm and hamper performance downwind. Getting it right might involve some trial and error.
Steps 3 & 4: Tighten the caps and set the bend

The same fundamentals apply as for a single-spreader rig, but this time after each tensioning of the cap shrouds, which induces bend, you have to straighten the mast by tensioning both the lowers (also known as D1s) and the intermediates (D2s).
The D1s control the bend between the deck and the upper spreaders and the D2s between the lower spreaders and the hounds, so their areas of influence overlap.
On boats where the D2s terminate at the lower spreaders you have to send someone aloft to adjust them. These are referred to as discontinuous intermediates.
If they run over the spreader tips and down to the chainplates (continuous intermediates) you can do everything from on deck.
You need to achieve an even bend fore-and-aft. If the mast is bending too much at the bottom and is too straight at the top, tighten the D1s and slacken the D2s.
S-bends can creep in athwartships and make it look as though the top of the mast is off-centre. If you set up the cap shrouds properly it shouldn’t be, so don’t fiddle with them any further now: take out the bends with the D1s and D2s.
You’re aiming for a cap-shroud tension of 20-25% of breaking strain, as with a single-spreader fractional rig, and again the sweep-back of the spreader means that the caps will be slackened as you pull on the backstay.
As with other types of rig, get the boat heeling around 20° on the wind, tension the backstay and feel the leeward cap to make sure there’s only minimal slack.
Removing any kinks and S-bends can take more tweaking of lowers and intermediates, the latter being more fiddly to adjust if they’re discontinuous.
If the masthead looks as though it’s falling off one way, it’s probably because the D2 on the opposite side is too tight.

Left: Windward lower too loose. Right: Windward intermediate too tight.
Why not subscribe today?
This feature appeared in the May 2012 edition of Practical Boat Owner . For more articles like this, including DIY, money-saving advice, great boat projects, expert tips and ways to improve your boat’s performance, take out a magazine subscription to Britain’s best-selling boating magazine.
Subscribe, or make a gift for someone else, and you’ll always save at least 30% compared to newsstand prices.
See the latest PBO subscription deals on magazinesdirect.com
- New Sailboats
- Sailboats 21-30ft
- Sailboats 31-35ft
- Sailboats 36-40ft
- Sailboats Over 40ft
- Sailboats Under 21feet
- used_sailboats
- Apps and Computer Programs
- Communications
- Fishfinders
- Handheld Electronics
- Plotters MFDS Rradar
- Wind, Speed & Depth Instruments
- Anchoring Mooring
- Running Rigging
- Sails Canvas
- Standing Rigging
- Diesel Engines
- Off Grid Energy
- Cleaning Waxing
- DIY Projects
- Repair, Tools & Materials
- Spare Parts
- Tools & Gadgets
- Cabin Comfort
- Ventilation
- Footwear Apparel
- Foul Weather Gear
- Mailport & PS Advisor
- Inside Practical Sailor Blog
- Activate My Web Access
- Reset Password
- Customer Service

- Free Newsletter
Hunter 35.5 Legend Used Boat Review

Pearson Rhodes 41/Rhodes Bounty II Used Sailboat Review

Hallberg-Rassy 42 Used Sailboat Review

How to Perform Your Own Pre-Buy Inspection

Thinking Through a Solar Power Installation

How Does the Gulf Stream Influence our Weather?

Can You Run a Marine Air-Conditioner on Battery Power?

Preparing Yourself for Solo Sailing

Practical Sailor Classic: The Load on Your Rode

Anchor Rodes for Smaller Sailboats

Ground Tackle Inspection Tips

Shoe Goo II Excels for Quick Sail Repairs

Diesel Performance Additives

What Oil Analysis Reveals About Your Engine

Painting a New Bootstripe Like a Pro

Penetrating Epoxy—Another Marketing Gimmick?

The Best Tools for Bottom Painting

The Hidden Maintenance Problems That Can Ruin Your Day: Part 1

Alcohol Stoves— Swan Song or Rebirth?

Living Aboard with an Alcohol Stove

Choosing the Right Fuel for Your Alcohol Stove

How to Select Crew for a Passage or Delivery

Preparing A Boat to Sail Solo

Re-sealing the Seams on Waterproof Fabrics

Waxing and Polishing Your Boat

Reducing Engine Room Noise

Tricks and Tips to Forming Do-it-yourself Rigging Terminals

Marine Toilet Maintenance Tips

Learning to Live with Plastic Boat Bits
- Sails, Rigging & Deck Gear
Standing Rigging: How Tight Is Right?
Standing rigging tension is a peculiarly under-addressed subject. Easy to see how it would worry a new boat owner or someone going to sea.
Most experts step aboard, yank or twang the shrouds and stays and mutter, Pretty slack, Too Tight, or, Thats about right.
Youll find in the sailing literature very few discussions of the question: What does tight mean?
Even riggers rarely explain how much tension they like to see.
There are a few sailors who like the rigging so tight you could send an elephant up the backstay. It can result in excessive loads and wear on fittings, chain plates and the hull. The ultimate penalty for those who can’t stand any sag in the forestay is what ocean racing sailors call a gravity storm or, less dramatically, dropping the rig.
Others like to take up the slack just enough so that the rig is at rest when the boat is motionless. This approach sometimes leaves excessive slack to leeward that can result in shock loads, excessive wear and misalignment in fittings. It may take longer, but the ultimate penalty is the same.
In between (and probably in the most logical position) are those who like to take up the slack and stretch the wire just a bit. This is frequently accomplished, at least for the stays, with an adjustable backstay. When sailing, especially on the wind, tighten down to minimize slack in the forestay. When reaching, running or at anchor, ease off.
But the question is: How much stretch…especially in the shrouds?
If you stretch the wire 5% of its breaking strength, it will be considered moderate tension. Crank in 15% of the breaking strength and it is regarded as tight. These figures apply for any diameter of wire. You need only know the wires breaking strength.
Three years ago, in the June 15, 1995 issue, we published a discussion of the views of author Richard Henderson, Skenes Elements of Yacht Design and several riggers, along with an evaluation of an excellent booklet published by Sailsystems about a Selden Mast approach (described in detail in the October 15, 1991 issue) and an entirely new method developed by Michael Dimen, who called his gadget a Rigstick.
Mentioned was the familiar (see photo) Loos rigging tension gauge, which comes in two sizes. The Model 91 ($39) is for wire 3/32″ to 5/32″. The Model 90 ($45.50) is for 3/16″ to 9/32″. The gauge depends on the bending property of aluminum plate.
The strange-looking gauges don’t willingly produce great accuracy because you have to hold one reading steady while noting another, which also requires that you make a judgment about where the centerline of the wire falls on a scale. Not easy to do.
The big name in galvanized and stainless cable (as wire is called in the trade), cable hardware and tools, Loos & Co., Inc. went looking for a better mousetrap.
Who did Gus Loos go to? The guy who designed the original gauge, his old friend, Donald J. Jordan, an 82-year-old retired Pratt & Whitney engineer who has been sailing out of Marblehead, Massachusetts, in the likes of Lightnings, Friendship sloops, Sound Schooners (which was the prized New York Yacht Club class in 1918), Pearson Wanderers and currently in a 16′ Starling Burgess design, appropriately called a Marblehead.
The old tension gauge wasnt bad, said Jordan. But it tended to get bent. Then the patent ran out and I told Gus we could do a better one.
The new version (see photo) is a distinct improvement over the old aluminum version. A better design, its also much more substantially made of aluminum, stainless and nylon.
The design problems were interesting, Jordan said. A conventional cable tension gauge has two rollers at the ends with a spring-loaded plunger in the middle and a dial gauge to measure the plunger movement. The wheels have to rotate…because they must permit some small but vital movement. That makes the tool expensive. My approach was to have two stationary wheels and a carefully contrived square slider in a arc-slot on the other.
The new Loos gauges use a long-lasting stainless spring to produce the tension. Slip the lower grooved wheels on a shroud or stay, pull the lanyard to engage the upper hook, relax, read the tension at your leisure and consult the scale to learn the pounds of pressure on the wire and the percentage of breaking strength of the wire. There are three wire gauge notches in the edge. The gauge can be left on the wire while turnbuckle adjustments are made.
The accompanying booklet, very well-done, contains a good tight discussion of the subject; some recommendations; a table on how to equalize tension in different sizes of wire, and line-drawn diagrams clearly showing rig tensions (windward and leeward) created by light, medium and heavy winds.
The wire gauge comes in three sizes, for 3/32″-5/32″, 3/16″-1/4″ and 9/32″-3/8″. West Marine sells them, respectively, for $57.99, $69.99 and $$122.99. Defender Industries cuts them to $49.95, $51.95 and $105.95. Prices in the BOAT/U.S. catalog are in between.
What if, instead of 1×19 wire, you have rod rigging? There are four new models that are bigger, heavier and, of course, more costly. They work the same, but take some arm strength. One is for .172-.250 rod, another for .281-.375. Two others models are for metric rod. West Marine sells the rod gauges for $186.99. Neither Defender nor BOAT/U.S. shows them in their catalogs.
Contact- Loos & Co., Inc., 901 Industrial Blvd., Naples, FL 34104, 800/321-5667. Rigstick, 311 Jackson, Port Townsend, WA 98368; 800/488-0855. Sailsystems, PO Box 1218, Marblehead, MA 01945; 978/745-0440.
RELATED ARTICLES MORE FROM AUTHOR
Leave a reply cancel reply.
Log in to leave a comment
Latest Videos

An Italian Go Fast Sailboat – The Viko S 35 |...

What Is The Best Folding Bike For Your Sailboat?

The No Expense Spared Antigua 60 Cruising Sailboat Soolaimon

How To Buy Sails – With Joe Cooper
- Privacy Policy
- Do Not Sell My Personal Information
- Online Account Activation
- Privacy Manager
James Suggitt
David Flynn
The backstay is a powerful tool and you should introduce it to your toolbox for more than just keeping the rig in the boat. No matter what the rig type or stiffness the tensioning the backstay keeps the headstay from sagging. Headstay sag equals extra power in the headsail, so when you don’t want the power (heeling too much) use the backstay. On boats with rigs that bend, the backstay helps depower the mainsail. When you add backstay tension on this type of rig you are essentially compressing a straw. The mast bends forward at the middle pulling the luff away from the leech thereby flattening the sail. It is a hugely powerful tool which allows you take your mainsail from full and powerful in light air to flat and open in the leech for windier conditions. As the breeze builds and you start to generate too much heel and helm use your backstay!
The Discussion
This website uses cookies and collects usage statistics. Privacy Policy

Us, too. We pour that passion into each of our newsletters to help you enjoy sailing even more.
Fractional Rig: Everything You Need to Know
by Emma Sullivan | Aug 21, 2023 | Sailboat Maintenance

Short answer fractional rig:
A fractional rig is a sailboat mast configuration where the forestay (the wire or rope that supports the mast from the front) attaches to a point lower on the mast than its highest point. This design allows for greater control over sail shape and is commonly found in high-performance racing boats.
Understanding Fractional Rig: A Comprehensive Guide
Introduction: Sailing is an art that requires a deep understanding of boats, their components, and how they work together to harness the power of the wind. One essential aspect of sailboat design is the rigging system, which plays a crucial role in determining a boat’s performance and handling characteristics. In this comprehensive guide, we will delve into the world of fractional rigs – their purpose, composition, advantages, and tips for optimizing their use on the water.
What is a Fractional Rig? A fractional rig refers to a sailboat’s mast setup where the forestay (the wire or cable running from the top of the mast to the bow) does not intersect with the mast at its top point. Instead, it attaches at some point below it. This configuration creates two distinct sections in terms of percentage height: one shorter section above and one longer section below this intersection point – usually around 7/8 or 9/10 up the mast’s length.
The Purpose and Advantages of a Fractional Rig: 1. Versatility: The fractional rig is highly versatile as it allows sailors to adjust sail area quickly according to changing weather conditions while maintaining balance and control. 2. Enhanced Performance: Due to its ability to distribute loads more evenly along the mast, a fractional rig enables increased stability and reduced pitching moment during strong winds. 3. Improved Upwind Performance: By positioning more sail area forward compared to other rig configurations like masthead rigs, fractional rigs generate better drive upwind resulting in higher pointing angles. 4. Simplified Sail Handling: With lesser reliance on heavy overlapping headsails common in conventional rigs, managing sails becomes less physically demanding during maneuvers such as tacking or reefing.
Components of a Fractional Rig: 1. Mast Section: The mast used in fractional rigs often has slightly different dimensions than those employed in other systems due to its specialized function. Its shorter upper section allows for better control of the mainsail’s shape, while the longer lower section offers increased downwind power. 2. Forestay: The forestay is connected to the mast below its top point and usually runs from a fitting on deck to secure bow fittings. Its angle and tension can be adjusted to optimize sail trim and overall rig balance. 3. Backstay: Unlike a conventional rig where the backstay connects at the masthead, in fractional rigs, it attaches lower down – generally above or just below the intersection point with the forestay. Adjusting its tension further influences mast bend and sail shape .
Tips for Optimizing Fractional Rig Performance: 1. Experiment with Tensions: To maximize your boat’s capabilities, don’t hesitate to experiment with various forestay and backstay tensions until you find the optimum balance between mast bend, sail shape , and wind conditions. 2. Master Sail Controls: It is essential to understand how to adjust jib halyards, cunninghams, reef lines, vang tension, and other controls that directly affect sail shape and power distribution. 3. Fine-tune Rigging Settings: Regularly inspect all rigging components for wear or damage and fine-tune settings such as shroud tension or spreader positioning to ensure proper alignment and stability of your fractional rig.
Conclusion: The fractional rig is an ingenious design approach that empowers sailors with increased versatility, enhanced performance characteristics, improved upwind ability, and simplified sail handling. By understanding its composition, advantages, and optimizing techniques discussed in this comprehensive guide, you will be better equipped to master the art of sailing using a fractional rig system. So hoist your sails high with confidence as you explore new horizons guided by the power of an intelligently engineered fractional rig!
How to Set Up a Fractional Rig: Step-by-Step Instructions
Setting up a fractional rig may seem like a daunting task, but with our step-by-step instructions, you’ll be able to tackle it with ease. Before we dive in, let’s first understand what a fractional rig is.
A fractional rig refers to the configuration of the mast and stays on a sailboat. Unlike a masthead rig where the forestay attaches at the very top of the mast, a fractional rig has its forestay attached at a point lower on the mast. This design offers increased maneuverability and performance, making it popular among racing sailors.
Now that we know what a fractional rig is, let’s get into the nitty-gritty details of setting it up.
Step 1: Start by prepping your boat Before you even think about setting up your fractional rig, make sure your boat is properly prepped. Clean off any debris or dirt from the deck and check that all hardware is in good working condition. It’s crucial to have everything in place before proceeding.
Step 2: Assemble and attach your mast With your boat prepped, it’s time to assemble and attach the mast. Lay out all the sections of your mast and make sure they are aligned correctly before connecting them together. Once assembled, carefully raise the mast so that it sits securely in its step or tabernacle. Use proper support equipment if necessary for additional stability.
Step 3: Securely attach shrouds and stays Next comes attaching the shrouds (sideways supports) and stays (fore-and-aft supports). Begin with attaching the lower shrouds to their designated points on both sides of the hull. Ensure they are securely fastened using appropriate tensioning devices such as turnbuckles or pelican hooks.
Move on to attaching any intermediate shrouds if required for added stability – this will depend on your specific boat design. Finally, secure your forestay at its designated attachment point on the mast. Remember, in a fractional rig, the forestay attaches lower on the mast compared to a masthead rig .
Step 4: Tension your rig Once all the shrouds and stays are attached, it’s time to apply tension. This step is crucial as it ensures proper alignment of the rig and maximizes its performance. Use a tension gauge or similar tool to achieve the recommended tension specified by your boat’s manufacturer or tuning guide .
Ensure you evenly distribute tension across all stays and shrouds, avoiding any overtightening or loose spots. This will help maintain balance and prevent any unnecessary stress on the mast or rigging elements.
Step 5: Check for proper alignment and adjustments Now that your fractional rig is set up and properly tensioned, it’s time for some fine-tuning. Stand back and visually inspect how everything lines up – look out for any twists or misalignments in the mast or stays. Adjust as necessary.
If you notice any excessive sagging in your forestay, consider adjusting the jib halyard tension accordingly. Similarly, pay attention to mainsail luff tension by utilizing cunningham or downhaul controls provided on your boat .
Step 6: Test sail and make final adjustments With everything aligned and adjusted to perfection, take your sailboat out for a test sail . Pay close attention to how the boat performs – observe its handling characteristics in different wind conditions.
During this test sail, make note of any potential issues or areas that could be further improved. These observations will guide you in making final adjustments once you return to shore.
And there you have it – a step-by-step guide on how to set up a fractional rig! While this explanation may seem technical, don’t forget to approach each step with confidence and patience. With practice, setting up your fractional rig will become second nature, allowing you to fully enjoy all its benefits while out on the water.
Frequently Asked Questions about Fractional Rigging: Explained
Title: Demystifying Fractional Rigging – Your Comprehensive Guide to Frequently Asked Questions
Introduction:
Fractional rigging is a crucial aspect of sailing that often poses several questions for novice sailors and even some experienced mariners. In this blog post, we aim to shed light on the most commonly asked questions about fractional rigging, providing you with a detailed, professional, and insightful explanation. So let’s dive in and unravel the mysteries !
1. What is Fractional Rigging?
Fractional rigging refers to a sailboat configuration where the forestay (the cable supporting the mast from the bow) is attached at a point below the masthead. This setup determines how much of the sail area of a boat is located forward versus aft of the mast.
2. How does Fractional Rigging differ from Masthead Rigging?
In contrast to fractional rigging, masthead rigging involves attaching the forestay directly at or near the top of the mast. This design places more sail area ahead of the mast compared to fractional rigs, offering improved upwind performance but compromising downwind speed potential.
3. What are the advantages of Fractional Rigging?
Fractional rigging provides numerous benefits depending on your sailing preferences and objectives: – Enhanced control: The lower forestay attachment point allows for precise adjustment and tuning options during varying wind conditions. – Improved performance: Fractional rigs excel in upwind sailing due to increased ability to depower sails quickly, resulting in better stability and maneuverability. – Increased versatility: Unlike masthead rigs, fractional rigs exhibit superior characteristics across different wind strengths and points of sail .
4. Are there any downsides or limitations with Fractional Rigging?
While fractional rigs have many advantages, there are certain considerations as well: – Reduced downwind potential: Compared to masthead rigged boats, fractional rigged vessels may experience slightly slower downwind speeds due to lesser sail area positioned forward. – Complexity in tuning: Fractional rigs require more meticulous tuning, as the lower forestay attachment demands careful balancing of mast bend, rig tension, and sail trim . This tuning process can be time-consuming for less experienced sailors.
5. Can I switch from a Masthead Rig to a Fractional Rig?
Switching from masthead to fractional rigging is indeed possible but requires significant modifications. The conversion involves adjusting various elements, such as installing a new lower forestay attachment point and adjusting the sail plan accordingly. It’s essential to consult a professional rigger before undertaking such conversions.
6. How do I determine if my boat has Fractional Rigging or Masthead Rigging?
Determining whether your boat features fractional or masthead rigging can usually be done by inspecting where the forestay attaches on the mast. If it connects below the top of the mast, you have a fractional rig; otherwise, it’s likely a masthead rig.
7. Are there any specific maintenance requirements for Fractional Rigging?
Fractional rigging typically requires regular inspections to ensure its structural integrity and optimal performance: – Check for signs of wear and tear on all standing rigging components. – Regularly inspect fittings, turnbuckles, spreaders, and shrouds for corrosion or damage. – Perform periodic re-tuning of your fractional rig as per manufacturer specifications or with expert guidance.
Conclusion:
Fractional rigging possesses unique advantages that cater to different sailing scenarios while providing enhanced control and performance characteristics. By understanding these frequently asked questions about fractional rigging, you’ll be equipped with invaluable knowledge that will help you optimize your sailing experience. Remember to consult with professionals for advice specific to your boat model before making any major changes. Happy cruising!
The Advantages and Benefits of Using a Fractional Rig
When it comes to sailing, technology and innovation have played a crucial role in making the sport more accessible and enjoyable for enthusiasts . One such advancement that has revolutionized the sailing world is the fractional rig. This ingenious system offers numerous advantages and benefits to sailors, whether they are beginners or seasoned professionals.
To start with, let’s understand what exactly a fractional rig is. In simple terms, it refers to a sailboat rigging configuration where the forestay (the wire supporting the mast from its front) attaches below the top of the mast. Unlike a traditional masthead rig that secures the forestay at the very top of the mast, a fractional rig provides versatility and improved performance on different points of sail.
One advantage of using a fractional rig is its ability to offer better control in various wind conditions. The adjustability it provides allows for fine-tuning sail shape and balance, enabling sailors to optimize their boat’s performance. Whether you’re battling strong winds or gliding along in light breezes, being able to make precise adjustments can greatly enhance your sailing experience .
Additionally, compared to masthead rigs, fractional rigs offer increased maneuverability and responsiveness due to their lower center of effort . With less weight aloft, boats rigged with fractional systems are more agile and quick to respond to helm inputs. This allows sailors greater control over their vessel’s movements, especially when tacking or gybing.
Another significant benefit lies in the reduced loads experienced by both the hull and rigging components throughout maneuvers. By moving away from relying solely on headstay tension for stability under heavy winds, fractional rigs distribute loading more evenly along multiple stays – such as intermediates or runners – leading to decreased stress on hardware and overall increased safety levels.
What truly sets fractional rigs apart is their versatility across various points of sail . Compared to masthead rigs limited by upwind performance primarily, fractionally rigged boats excel in both upwind and downwind conditions. The adjustable forestay allows for a wider range of headsail options, enabling sailors to choose the most appropriate sail area for the prevailing wind strength and angle. This flexibility translates into improved speed, pointing ability, and overall performance across different points of sail .
Additionally, fractional rigs often feature smaller headsails – such as genoas or jibs – which are easier to handle than larger sails traditionally found on masthead rigs. This can be especially advantageous for sailors who prefer single or short-handed sailing, as it reduces physical strain and makes maneuvering the boat more manageable.
Finally, from an economic standpoint, employing a fractional rig can translate into cost savings over time. Smaller headsails generally require less fabric and maintenance compared to their larger counterparts. Moreover, the reduced loads on standing rigging components result in decreased wear and tear, prolonging their lifespan and lowering maintenance expenses.
In conclusion, using a fractional rig offers a range of advantages and benefits that enhance both the enjoyment and performance of sailing. From better control in varying wind conditions to increased maneuverability and improved versatility across points of sail, this innovative rigging system is truly a game-changer for sailors . So consider embracing this technology if you’re in search of enhanced sailing experiences – you won’t be disappointed!
Fine-Tuning Your Sailboat with Fractional Rigging: Tips and Tricks
Fine-tuning your sailboat with fractional rigging is a skill that can elevate your sailing experience to new levels. While the basics of rigging are essential, mastering the art of fractional rigging requires attention to detail, precision, and a touch of finesse. In this blog post, we will delve into the world of fractional rigging and share some tips and tricks that will empower you to optimize your sailboat’s performance .
Understanding Fractional Rigging:
To start off, let’s clarify what exactly we mean by “fractional rigging.” This term refers to a type of rig setup where the forestay is attached at a point below the mast’s top. Unlike a traditional rig setup where the forestay is attached at the masthead, a fractional rig allows for more efficient control over sail shape and balancing. The finer adjustments possible with this configuration can prove invaluable when it comes to maximizing speed and handling in various wind conditions.
Tip 1: Balancing Your Sails for Optimal Performance
One of the primary advantages of fractional rigging lies in its ability to fine-tune sail balance. To achieve optimal performance, it is crucial to ensure an appropriate balance between the mainsail and headsail. By adjusting tension on both halyards – main and jib – you can optimize leech tension and maintain proper airflow across your sails. Excessive headstay sag can lead to reduced pointing ability, while excessive mainsail luff tension can cause excessive weather helm. Experiment with different tensions until you find the sweet spot that offers maximum efficiency.
Tip 2: Controlling Mainsail Shape with Backstay Tension
Managing mainsail shape plays a pivotal role in harnessing wind power efficiently . With fractional rigging, backstay tension becomes an essential tool for shaping your mainsail on different points of sail . As you tighten or release the backstay, you will notice changes in both luff curve and mast bend. Take the time to familiarize yourself with how these adjustments affect your sail’s shape and make incremental changes based on wind conditions. Remember, a flatter mainsail works better in higher winds, while more depth can be beneficial when the breeze is light.
Trick 1: Fine-Tuning Rig Tension for Added Stability
Finding the right rig tension can enhance stability and control, contributing to overall performance. A useful trick involves adjusting cap shroud and lower shroud tensions. Incremental modifications to these tensions will influence your boat’s balance between weather helm and lee helm. If you find yourself fighting excessive weather helm, consider loosening the cap shrouds slightly or tightening the lowers. Conversely, if you experience lee helm, try tightening the cap shrouds or loosening the lowers. Striking a harmonious balance will result in improved handling and speed.
Trick 2: Mast Rake Adjustment for Upwind Performance
Fine-tuning your mast rake can significantly impact upwind performance by optimizing lift generated by your sails. By adjusting forestay tension (using either adjustable turnbuckles or backstay adjustment), you can alter mast rake subtly. Experiment with different settings to determine what works best for your boat and prevailing wind conditions. Keep in mind that a more raked mast generally provides increased pointing ability but may reduce overall downwind performance.
Fine-tuning your sailboat with fractional rigging requires a combination of knowledge, practice, and intuition. By understanding how different adjustments impact sail shape, balance, stability, and performance characteristics, you can gain a competitive edge on the water. Remember to always experiment incrementally, document changes made, and observe their effects before settling on an ideal configuration for each set of conditions you encounter. With these tips and tricks under your belt, prepare to take your sailing prowess to new heights as you fine-tune your sailboat with fractional rigging !
Common Mistakes to Avoid when Implementing a Fractional Rig
Implementing a fractional rig can be an incredibly beneficial decision for any sailing enthusiast or boat owner. It offers improved control, better balance, and increased efficiency on the water. However, like any complex system, there are common mistakes that inexperienced or unaware individuals often make when it comes to setting up and using a fractional rig. In this blog post, we will explore some of these pitfalls and provide you with professional insights on how to avoid them.
Mistake #1: Neglecting Proper Measurement and Tuning
One of the critical aspects of implementing a fractional rig is accurately measuring the mast height and properly tuning the rig. Failing to measure your mast correctly can lead to improper sail shape, reduced performance, excessive weather helm, or even mast failure in extreme cases. Take the time to measure your mast height accurately before choosing sail combinations or making adjustments.
To ensure proper tuning, consult with experts or refer to manufacturer guidelines specific to your boat model. Adjusting shrouds and stays too tight or too loose not only compromises performance but also poses safety risks. Utilize specialized tools like a Loos gauge when tightening standing rigging for accurate tension readings.
Mistake #2: Incorrect Placement of Fractional Attachment Point
Placing the fractional attachment point incorrectly is another critical error often made during implementation. This point determines where the jib’s tack attaches to the forestay above the deck level when running with smaller headsails (e.g., jibs). Placing it either too high or too low can result in imbalanced forces on the boat while sailing close-hauled or reaching.
If placed too high, excessive tension can be created in both forestays – leading to increased loads on hardware and potential structural damage. On the other hand, if positioned too low, it could cause excessive twist in larger sails – affecting overall power delivery and balance under various wind conditions. Therefore, carefully consider consulting knowledgeable sailing professionals or referring to design plans to ensure proper placement of this attachment point.
Mistake #3: Neglecting Proper Planning and Execution
Perhaps the most common mistake made during the implementation of a fractional rig is neglecting comprehensive planning and proper execution. Rushing into modifications or adjustments without careful consideration can lead to unnecessary expenses, compromised performance, or even jeopardize the safety of all onboard.
Before implementing a fractional rig, it is crucial to thoroughly evaluate your boat ‘s characteristics, sailing goals, and intended usage. Consider how various factors such as mast height, forestay length, sail combinations, and crew capabilities will impact performance. Pay attention to detail when setting up your rig by following manufacturer recommendations or consulting with experienced riggers who can offer tailored advice based on your specific needs.
Mistake #4: Using Inappropriate Sail Combinations
Matching sail combinations appropriately with a fractional rig is crucial for optimizing performance and preventing undue stress on the mast and other rigging components. One common mistake is utilizing oversized headsails with excessive overlap on staysail/stemstay setups.
Using overlapping headsails that are too big can lead to an imbalance in forces between headstay and inner forestay (stemstay), thus causing excessive loading on these components. This unbalanced load distribution can result in poor handling characteristics, diminished control while tacking or gybing maneuvers, compromised pointing ability in upwind conditions – ultimately undermining the benefits of a fractional rig setup.
To avoid this error, consult sailmakers or experienced sailors knowledgeable about fractional rigs regarding appropriate jib sizes for different wind strengths and expected sailing angles.
Mistake #5: Ignoring Regular Inspection and Maintenance
Lastly, neglecting regular inspection and maintenance is a common oversight that can have severe consequences for your fractional rig’s longevity and reliability. Failing to conduct routine checks for signs of wear, corrosion, loose connections/joints, or damaged components significantly increases the risk of catastrophic failure while at sea.
Develop a periodic inspection checklist or refer to manufacturer guidelines to assess critical points such as mast fittings, spreaders, stay and shroud terminals, turnbuckles, block attachments, and any other components integral to the rig’s integrity. Addressing minor issues promptly will help ward off major failures and ensure a longer lifespan for your fractional rig.
In conclusion, implementing a fractional rig can be an exhilarating endeavor that enhances your sailing experience. However, it is crucial to steer clear of these common mistakes discussed in this blog post. Remember to prioritize accurate measurement and tuning, ensure correct placement of the fractional attachment point, plan meticulously before execution, select appropriate sail combinations for optimized performance, and conduct regular inspections and maintenance for long-term reliability. By avoiding these pitfalls and taking heed of professional advice provided here, you will be well on your way towards maximizing the advantages offered by a fractional rig setup while enjoying safer and more rewarding adventures on the water!
Recent Posts

- Sailboat Gear and Equipment
- Sailboat Lifestyle
- Sailboat Maintenance
- Sailboat Racing
- Sailboat Tips and Tricks
- Sailboat Types
- Sailing Adventures
- Sailing Destinations
- Sailing Safety
- Sailing Techniques
× You are using an outdated browser. Please upgrade your browser to improve your experience.
We Ship Worldwide! | FREE SHIPPING! for US Continental orders over $99. Click for details.

Shopping Cart
Your cart is currently empty..
FREE SHIPPING! for US Continental orders over $99 click for details

Backstay & Babystay Rigging

A backstay is a part of the standing rigging that runs from the mast to back of the boat, counteracting the forestay and headsail. It is an important sail trim control and has a direct effect on the shape of the mainsail and the headsail. Backstays are generally adjusted by block and tackle, hydraulic adjusters, or lines leading to winches.
At MAURIPRO Sailing we carry a wide variety of rigging products, including backstay adjusters, backstay flickers, backstay split plate and backstay wheel adjuster from great brands such as Harken, Selden and Sailtec.
MAURIPRO Sailing, your direct access to Backstay & Babystay Rigging and all your other sailing and boating needs.
Copyright © 2024 MAURIPRO Sailing LLC.

Beginner’s Guide: How To Rig A Sailboat – Step By Step Tutorial
Alex Morgan
Rigging a sailboat is a crucial process that ensures the proper setup and functioning of a sailboat’s various components. Understanding the process and components involved in rigging is essential for any sailor or boat enthusiast. In this article, we will provide a comprehensive guide on how to rig a sailboat.
Introduction to Rigging a Sailboat
Rigging a sailboat refers to the process of setting up the components that enable the sailboat to navigate through the water using wind power. This includes assembling and positioning various parts such as the mast, boom, standing rigging, running rigging, and sails.
Understanding the Components of a Sailboat Rigging
Before diving into the rigging process, it is important to have a good understanding of the key components involved. These components include:
The mast is the tall vertical spar that provides vertical support to the sails and holds them in place.
The boom is the horizontal spar that runs along the bottom edge of the sail and helps control the shape and position of the sail.
- Standing Rigging:
Standing rigging consists of the wires and cables that support and stabilize the mast, keeping it upright.
- Running Rigging:
Running rigging refers to the lines and ropes used to control the sails, such as halyards, sheets, and control lines.
Preparing to Rig a Sailboat
Before rigging a sailboat, there are a few important steps to take. These include:
- Checking the Weather Conditions:
It is crucial to assess the weather conditions before rigging a sailboat. Unfavorable weather, such as high winds or storms, can make rigging unsafe.
- Gathering the Necessary Tools and Equipment:
Make sure to have all the necessary tools and equipment readily available before starting the rigging process. This may include wrenches, hammers, tape, and other common tools.
- Inspecting the Rigging Components:
In the upcoming sections of this article, we will provide a step-by-step guide on how to rig a sailboat, as well as important safety considerations and tips to keep in mind. By following these guidelines, you will be able to rig your sailboat correctly and safely, allowing for a smooth and enjoyable sailing experience.
Key takeaway:
- Rigging a sailboat maximizes efficiency: Proper rigging allows for optimized sailing performance, ensuring the boat moves smoothly through the water.
- Understanding sailboat rigging components: Familiarity with the various parts of a sailboat rigging, such as the mast, boom, and standing and running riggings, is essential for effective rigging setup.
- Importance of safety in sailboat rigging: Ensuring safety is crucial during the rigging process, including wearing a personal flotation device, securing loose ends and lines, and being mindful of overhead power lines.
Get ready to set sail and dive into the fascinating world of sailboat rigging! We’ll embark on a journey to understand the various components that make up a sailboat’s rigging. From the majestic mast to the nimble boom , and the intricate standing rigging to the dynamic running rigging , we’ll explore the crucial elements that ensure smooth sailing. Not forgetting the magnificent sail, which catches the wind and propels us forward. So grab your sea legs and let’s uncover the secrets of sailboat rigging together.
Understanding the mast is crucial when rigging a sailboat. Here are the key components and steps to consider:
1. The mast supports the sails and rigging of the sailboat. It is made of aluminum or carbon fiber .
2. Before stepping the mast , ensure that the area is clear and the boat is stable. Have all necessary tools and equipment ready.
3. Inspect the mast for damage or wear. Check for corrosion , loose fittings , and cracks . Address any issues before proceeding.
4. To step the mast , carefully lift it into an upright position and insert the base into the mast step on the deck of the sailboat.
5. Secure the mast using the appropriate rigging and fasteners . Attach the standing rigging , such as shrouds and stays , to the mast and the boat’s hull .
Fact: The mast of a sailboat is designed to withstand wind resistance and the tension of the rigging for stability and safe sailing.
The boom is an essential part of sailboat rigging. It is a horizontal spar that stretches from the mast to the aft of the boat. Constructed with durable yet lightweight materials like aluminum or carbon fiber, the boom provides crucial support and has control over the shape and position of the sail. It is connected to the mast through a boom gooseneck , allowing it to pivot. One end of the boom is attached to the mainsail, while the other end is equipped with a boom vang or kicker, which manages the tension and angle of the boom. When the sail is raised, the boom is also lifted and positioned horizontally by using the topping lift or lazy jacks.
An incident serves as a warning that emphasizes the significance of properly securing the boom. In strong winds, an improperly fastened boom swung across the deck, resulting in damage to the boat and creating a safety hazard. This incident highlights the importance of correctly installing and securely fastening all rigging components, including the boom, to prevent accidents and damage.
3. Standing Rigging
When rigging a sailboat, the standing rigging plays a vital role in providing stability and support to the mast . It consists of several key components, including the mast itself, along with the shrouds , forestay , backstay , and intermediate shrouds .
The mast, a vertical pole , acts as the primary support structure for the sails and the standing rigging. Connected to the top of the mast are the shrouds , which are cables or wires that extend to the sides of the boat, providing essential lateral support .
The forestay is another vital piece of the standing rigging. It is a cable or wire that runs from the top of the mast to the bow of the boat, ensuring forward support . Similarly, the backstay , also a cable or wire, runs from the mast’s top to the stern of the boat, providing important backward support .
To further enhance the rig’s stability , intermediate shrouds are installed. These additional cables or wires are positioned between the main shrouds, as well as the forestay or backstay. They offer extra support , strengthening the standing rigging system.
Regular inspections of the standing rigging are essential to detect any signs of wear, such as fraying or corrosion . It is crucial to ensure that all connections within the rig are tight and secure, to uphold its integrity. Should any issues be identified, immediate attention must be given to prevent accidents or damage to the boat. Prioritizing safety is of utmost importance when rigging a sailboat, thereby necessitating proper maintenance of the standing rigging. This ensures a safe and enjoyable sailing experience.
Note: <p> tags have been kept intact.
4. Running Rigging
Running Rigging
When rigging a sailboat, the running rigging is essential for controlling the sails and adjusting their position. It is important to consider several aspects when dealing with the running rigging.
1. Choose the right rope: The running rigging typically consists of ropes with varying properties such as strength, stretch, and durability. Weather conditions and sailboat size should be considered when selecting the appropriate rope.
2. Inspect and maintain the running rigging: Regularly check for signs of wear, fraying, or damage. To ensure safety and efficiency, replace worn-out ropes.
3. Learn essential knot tying techniques: Having knowledge of knots like the bowline, cleat hitch, and reef knot is crucial for securing the running rigging and adjusting sails.
4. Understand different controls: The running rigging includes controls such as halyards, sheets, and control lines. Familiarize yourself with their functions and proper usage to effectively control sail position and tension.
5. Practice proper sail trimming: Adjusting the tension of the running rigging significantly affects sailboat performance. Mastering sail trimming techniques will help optimize sail shape and maximize speed.
By considering these factors and mastering running rigging techniques, you can enhance your sailing experience and ensure the safe operation of your sailboat.
The sail is the central component of sailboat rigging as it effectively harnesses the power of the wind to propel the boat.
When considering the sail, there are several key aspects to keep in mind:
– Material: Sails are typically constructed from durable and lightweight materials such as Dacron or polyester. These materials provide strength and resistance to various weather conditions.
– Shape: The shape of the sail plays a critical role in its overall performance. A well-shaped sail should have a smooth and aerodynamic profile, which allows for maximum efficiency in capturing wind power.
– Size: The size of the sail is determined by its sail area, which is measured in square feet or square meters. Larger sails have the ability to generate more power, but they require greater skill and experience to handle effectively.
– Reefing: Reefing is the process of reducing the sail’s size to adapt to strong winds. Sails equipped with reefing points allow sailors to decrease the sail area, providing better control in challenging weather conditions.
– Types: There are various types of sails, each specifically designed for different purposes. Common sail types include mainsails, jibs, genoas, spinnakers, and storm sails. Each type possesses its own unique characteristics and is utilized under specific wind conditions.
Understanding the sail and its characteristics is vital for sailors, as it directly influences the boat’s speed, maneuverability, and overall safety on the water.
Getting ready to rig a sailboat requires careful preparation and attention to detail. In this section, we’ll dive into the essential steps you need to take before setting sail. From checking the weather conditions to gathering the necessary tools and equipment, and inspecting the rigging components, we’ll ensure that you’re fully equipped to navigate the open waters with confidence. So, let’s get started on our journey to successfully rigging a sailboat!
1. Checking the Weather Conditions
Checking the weather conditions is crucial before rigging a sailboat for a safe and enjoyable sailing experience. Monitoring the wind speed is important in order to assess the ideal sailing conditions . By checking the wind speed forecast , you can determine if the wind is strong or light . Strong winds can make sailboat control difficult, while very light winds can result in slow progress.
Another important factor to consider is the wind direction . Assessing the wind direction is crucial for route planning and sail adjustment. Favorable wind direction helps propel the sailboat efficiently, making your sailing experience more enjoyable.
In addition to wind speed and direction, it is also important to consider weather patterns . Keep an eye out for impending storms or heavy rain. It is best to avoid sailing in severe weather conditions that may pose a safety risk. Safety should always be a top priority when venturing out on a sailboat.
Another aspect to consider is visibility . Ensure good visibility by checking for fog, haze, or any other conditions that may hinder navigation. Clear visibility is important for being aware of other boats and potential obstacles that may come your way.
Be aware of the local conditions . Take into account factors such as sea breezes, coastal influences, or tidal currents. These local factors greatly affect sailboat performance and safety. By considering all of these elements, you can have a successful and enjoyable sailing experience.
Here’s a true story to emphasize the importance of checking the weather conditions. One sunny afternoon, a group of friends decided to go sailing. Before heading out, they took the time to check the weather conditions. They noticed that the wind speed was expected to be around 10 knots, which was perfect for their sailboat. The wind direction was coming from the northwest, allowing for a pleasant upwind journey. With clear visibility and no approaching storms, they set out confidently, enjoying a smooth and exhilarating sail. This positive experience was made possible by their careful attention to checking the weather conditions beforehand.
2. Gathering the Necessary Tools and Equipment
To efficiently gather all of the necessary tools and equipment for rigging a sailboat, follow these simple steps:
- First and foremost, carefully inspect your toolbox to ensure that you have all of the basic tools such as wrenches, screwdrivers, and pliers.
- Make sure to check if you have a tape measure or ruler available as they are essential for precise measurements of ropes or cables.
- Don’t forget to include a sharp knife or rope cutter in your arsenal as they will come in handy for cutting ropes or cables to the desired lengths.
- Gather all the required rigging hardware including shackles, pulleys, cleats, and turnbuckles.
- It is always prudent to check for spare ropes or cables in case replacements are needed during the rigging process.
- If needed, consider having a sailing knife or marlinspike tool for splicing ropes or cables.
- For rigging a larger sailboat, it is crucial to have a mast crane or hoist to assist with stepping the mast.
- Ensure that you have a ladder or some other means of reaching higher parts of the sailboat, such as the top of the mast.
Once, during the preparation of rigging my sailboat, I had a moment of realization when I discovered that I had forgotten to bring a screwdriver . This unfortunate predicament occurred while I was in a remote location with no nearby stores. Being resourceful, I improvised by utilizing a multipurpose tool with a small knife blade, which served as a makeshift screwdriver. Although it was not the ideal solution, it allowed me to accomplish the task. Since that incident, I have learned the importance of double-checking my toolbox before commencing any rigging endeavor. This practice ensures that I have all of the necessary tools and equipment, preventing any unexpected surprises along the way.
3. Inspecting the Rigging Components
Inspecting the rigging components is essential for rigging a sailboat safely. Here is a step-by-step guide on inspecting the rigging components:
1. Visually inspect the mast, boom, and standing rigging for damage, such as corrosion, cracks, or loose fittings.
2. Check the tension of the standing rigging using a tension gauge. It should be within the recommended range from the manufacturer.
3. Examine the turnbuckles, clevis pins, and shackles for wear or deformation. Replace any damaged or worn-out hardware.
4. Inspect the running rigging, including halyards and sheets, for fraying, signs of wear, or weak spots. Replace any worn-out lines.
5. Check the sail for tears, wear, or missing hardware such as grommets or luff tape.
6. Pay attention to the connections between the standing rigging and the mast. Ensure secure connections without any loose or missing cotter pins or rigging screws.
7. Inspect all fittings, such as mast steps, spreader brackets, and tangs, to ensure they are securely fastened and in good condition.
8. Conduct a sea trial to assess the rigging’s performance and make necessary adjustments.
Regularly inspecting the rigging components is crucial for maintaining the sailboat’s rigging system’s integrity, ensuring safe sailing conditions, and preventing accidents or failures at sea.
Once, I went sailing on a friend’s boat without inspecting the rigging components beforehand. While at sea, a sudden gust of wind caused one of the shrouds to snap. Fortunately, no one was hurt, but we had to cut the sail loose and carefully return to the marina. This incident taught me the importance of inspecting the rigging components before sailing to avoid unforeseen dangers.
Step-by-Step Guide on How to Rig a Sailboat
Get ready to set sail with our step-by-step guide on rigging a sailboat ! We’ll take you through the process from start to finish, covering everything from stepping the mast to setting up the running rigging . Learn the essential techniques and tips for each sub-section, including attaching the standing rigging and installing the boom and sails . Whether you’re a seasoned sailor or a beginner, this guide will have you ready to navigate the open waters with confidence .
1. Stepping the Mast
To step the mast of a sailboat, follow these steps:
1. Prepare the mast: Position the mast near the base of the boat.
2. Attach the base plate: Securely fasten the base plate to the designated area on the boat.
3. Insert the mast step: Lower the mast step into the base plate and align it with the holes or slots.
4. Secure the mast step: Use fastening screws or bolts to fix the mast step in place.
5. Raise the mast: Lift the mast upright with the help of one or more crew members.
6. Align the mast: Adjust the mast so that it is straight and aligned with the boat’s centerline.
7. Attach the shrouds: Connect the shrouds to the upper section of the mast, ensuring proper tension.
8. Secure the forestay: Attach the forestay to the bow of the boat, ensuring it is securely fastened.
9. Final adjustments: Check the tension of the shrouds and forestay, making any necessary rigging adjustments.
Following these steps ensures that the mast is properly stepped and securely in place, allowing for a safe and efficient rigging process. Always prioritize safety precautions and follow manufacturer guidelines for your specific sailboat model.
2. Attaching the Standing Rigging
To attach the standing rigging on a sailboat, commence by preparing the essential tools and equipment, including wire cutters, crimping tools, and turnbuckles.
Next, carefully inspect the standing rigging components for any indications of wear or damage.
After inspection, fasten the bottom ends of the shrouds and stays to the chainplates on the deck.
Then, securely affix the top ends of the shrouds and stays to the mast using adjustable turnbuckles .
To ensure proper tension, adjust the turnbuckles accordingly until the mast is upright and centered.
Utilize a tension gauge to measure the tension in the standing rigging, aiming for around 15-20% of the breaking strength of the rigging wire.
Double-check all connections and fittings to verify their security and proper tightness.
It is crucial to regularly inspect the standing rigging for any signs of wear or fatigue and make any necessary adjustments or replacements.
By diligently following these steps, you can effectively attach the standing rigging on your sailboat, ensuring its stability and safety while on the water.
3. Installing the Boom and Sails
To successfully complete the installation of the boom and sails on a sailboat, follow these steps:
1. Begin by securely attaching the boom to the mast. Slide it into the gooseneck fitting and ensure it is firmly fastened using a boom vang or another appropriate mechanism.
2. Next, attach the main sail to the boom. Slide the luff of the sail into the mast track and securely fix it in place using sail slides or cars.
3. Connect the mainsheet to the boom. One end should be attached to the boom while the other end is connected to a block or cleat on the boat.
4. Proceed to attach the jib or genoa. Make sure to securely attach the hanks or furler line to the forestay to ensure stability.
5. Connect the jib sheets. One end of each jib sheet should be attached to the clew of the jib or genoa, while the other end is connected to a block or winch on the boat.
6. Before setting sail, it is essential to thoroughly inspect all lines and connections. Ensure that they are properly tensioned and that all connections are securely fastened.
During my own experience of installing the boom and sails on my sailboat, I unexpectedly encountered a strong gust of wind. As a result, the boom began swinging uncontrollably, requiring me to quickly secure it to prevent any damage. This particular incident served as a vital reminder of the significance of properly attaching and securing the boom, as well as the importance of being prepared for unforeseen weather conditions while rigging a sailboat.
4. Setting Up the Running Rigging
Setting up the running rigging on a sailboat involves several important steps. First, attach the halyard securely to the head of the sail. Then, connect the sheets to the clew of the sail. If necessary, make sure to secure the reefing lines . Attach the outhaul line to the clew of the sail and connect the downhaul line to the tack of the sail. It is crucial to ensure that all lines are properly cleated and organized. Take a moment to double-check the tension and alignment of each line. If you are using a roller furling system, carefully wrap the line around the furling drum and securely fasten it. Perform a thorough visual inspection of the running rigging to check for any signs of wear or damage. Properly setting up the running rigging is essential for safe and efficient sailing. It allows for precise control of the sail’s position and shape, ultimately optimizing the boat’s performance on the water.
Safety Considerations and Tips
When it comes to rigging a sailboat, safety should always be our top priority. In this section, we’ll explore essential safety considerations and share some valuable tips to ensure smooth sailing. From the importance of wearing a personal flotation device to securing loose ends and lines, and being cautious around overhead power lines, we’ll equip you with the knowledge and awareness needed for a safe and enjoyable sailing experience. So, let’s set sail and dive into the world of safety on the water!
1. Always Wear a Personal Flotation Device
When rigging a sailboat, it is crucial to prioritize safety and always wear a personal flotation device ( PFD ). Follow these steps to properly use a PFD:
- Select the appropriate Coast Guard-approved PFD that fits your size and weight.
- Put on the PFD correctly by placing your arms through the armholes and securing all the straps for a snug fit .
- Adjust the PFD for comfort , ensuring it is neither too tight nor too loose, allowing freedom of movement and adequate buoyancy .
- Regularly inspect the PFD for any signs of wear or damage, such as tears or broken straps, and replace any damaged PFDs immediately .
- Always wear your PFD when on or near the water, even if you are a strong swimmer .
By always wearing a personal flotation device and following these steps, you will ensure your safety and reduce the risk of accidents while rigging a sailboat. Remember, prioritize safety when enjoying water activities.
2. Secure Loose Ends and Lines
Inspect lines and ropes for frayed or damaged areas. Secure loose ends and lines with knots or appropriate cleats or clamps. Ensure all lines are properly tensioned to prevent loosening during sailing. Double-check all connections and attachments for security. Use additional safety measures like extra knots or stopper knots to prevent line slippage.
To ensure a safe sailing experience , it is crucial to secure loose ends and lines properly . Neglecting this important step can lead to accidents or damage to the sailboat. By inspecting, securing, and tensioning lines , you can have peace of mind knowing that everything is in place. Replace or repair any compromised lines or ropes promptly. Securing loose ends and lines allows for worry-free sailing trips .
3. Be Mindful of Overhead Power Lines
When rigging a sailboat, it is crucial to be mindful of overhead power lines for safety. It is important to survey the area for power lines before rigging the sailboat. Maintain a safe distance of at least 10 feet from power lines. It is crucial to avoid hoisting tall masts or long antenna systems near power lines to prevent contact. Lower the mast and tall structures when passing under a power line to minimize the risk of contact. It is also essential to be cautious in areas where power lines run over the water and steer clear to prevent accidents.
A true story emphasizes the importance of being mindful of overhead power lines. In this case, a group of sailors disregarded safety precautions and their sailboat’s mast made contact with a low-hanging power line, resulting in a dangerous electrical shock. Fortunately, no serious injuries occurred, but it serves as a stark reminder of the need to be aware of power lines while rigging a sailboat.
Some Facts About How To Rig A Sailboat:
- ✅ Small sailboat rigging projects can improve sailing performance and save money. (Source: stingysailor.com)
- ✅ Rigging guides are available for small sailboats, providing instructions and tips for rigging. (Source: westcoastsailing.net)
- ✅ Running rigging includes lines used to control and trim the sails, such as halyards and sheets. (Source: sailingellidah.com)
- ✅ Hardware used in sailboat rigging includes winches, blocks, and furling systems. (Source: sailingellidah.com)
- ✅ A step-by-step guide can help beginners rig a small sailboat for sailing. (Source: tripsavvy.com)
Frequently Asked Questions
1. how do i rig a small sailboat.
To rig a small sailboat, follow these steps: – Install or check the rudder, ensuring it is firmly attached. – Attach or check the tiller, the long steering arm mounted to the rudder. – Attach the jib halyard by connecting the halyard shackle to the head of the sail and the grommet in the tack to the bottom of the forestay. – Hank on the jib by attaching the hanks of the sail to the forestay one at a time. – Run the jib sheets by tying or shackling them to the clew of the sail and running them back to the cockpit. – Attach the mainsail by spreading it out and attaching the halyard shackle to the head of the sail. – Secure the tack, clew, and foot of the mainsail to the boom using various lines and mechanisms. – Insert the mainsail slugs into the mast groove, gradually raising the mainsail as the slugs are inserted. – Cleat the main halyard and lower the centerboard into the water. – Raise the jib by pulling down on the jib halyard and cleating it on the other side of the mast. – Tighten the mainsheet and one jibsheet to adjust the sails and start moving forward.
2. What are the different types of sailboat rigs?
Sailboat rigs can be classified into three main types: – Sloop rig: This rig has a single mast with a mainsail and a headsail, typically a jib or genoa. – Cutter rig: This rig has two headsails, a smaller jib or staysail closer to the mast, and a larger headsail, usually a genoa, forward of it, alongside a mainsail. – Ketch rig: This rig has two masts, with the main mast taller than the mizzen mast. It usually has a mainsail, headsail, and a mizzen sail. Each rig has distinct characteristics and is suitable for different sailing conditions and preferences.
3. What are the essential parts of a sailboat?
The essential parts of a sailboat include: – Mast: The tall vertical spar that supports the sails. – Boom: The horizontal spar connected to the mast, which extends outward and supports the foot of the mainsail. – Rudder: The underwater appendage that steers the boat. – Centerboard or keel: A retractable or fixed fin-like structure that provides stability and prevents sideways drift. – Sails: The fabric structures that capture the wind’s energy to propel the boat. – Running rigging: The lines or ropes used to control the sails and sailing equipment. – Standing rigging: The wires and cables that support the mast and reinforce the spars. These are the basic components necessary for the functioning of a sailboat.
4. What is a spinnaker halyard?
A spinnaker halyard is a line used to hoist and control a spinnaker sail. The spinnaker is a large, lightweight sail that is used for downwind sailing or reaching in moderate to strong winds. The halyard attaches to the head of the spinnaker and is used to raise it to the top of the mast. Once hoisted, the spinnaker halyard can be adjusted to control the tension and shape of the sail.
5. Why is it important to maintain and replace worn running rigging?
It is important to maintain and replace worn running rigging for several reasons: – Safety: Worn or damaged rigging can compromise the integrity and stability of the boat, posing a safety risk to both crew and vessel. – Performance: Worn rigging can affect the efficiency and performance of the sails, diminishing the boat’s speed and maneuverability. – Reliability: Aging or worn rigging is more prone to failure, which can lead to unexpected problems and breakdowns. Regular inspection and replacement of worn running rigging is essential to ensure the safe and efficient operation of a sailboat.
6. Where can I find sailboat rigging books or guides?
There are several sources where you can find sailboat rigging books or guides: – Online: Websites such as West Coast Sailing and Stingy Sailor offer downloadable rigging guides for different sailboat models. – Bookstores: Many bookstores carry a wide selection of boating and sailing books, including those specifically focused on sailboat rigging. – Sailing schools and clubs: Local sailing schools or yacht clubs often have resources available for learning about sailboat rigging. – Manufacturers: Some sailboat manufacturers, like Hobie Cat and RS Sailing, provide rigging guides for their specific sailboat models. Consulting these resources can provide valuable information and instructions for rigging your sailboat properly.
About the author

Leave a Reply Cancel reply
Your email address will not be published. Required fields are marked *
Save my name, email, and website in this browser for the next time I comment.
Latest posts

The history of sailing – from ancient times to modern adventures
History of Sailing Sailing is a time-honored tradition that has evolved over millennia, from its humble beginnings as a means of transportation to a beloved modern-day recreational activity. The history of sailing is a fascinating journey that spans cultures and centuries, rich in innovation and adventure. In this article, we’ll explore the remarkable evolution of…

Sailing Solo: Adventures and Challenges of Single-Handed Sailing
Solo Sailing Sailing has always been a pursuit of freedom, adventure, and self-discovery. While sailing with a crew is a fantastic experience, there’s a unique allure to sailing solo – just you, the wind, and the open sea. Single-handed sailing, as it’s often called, is a journey of self-reliance, resilience, and the ultimate test of…

Sustainable Sailing: Eco-Friendly Practices on the boat
Eco Friendly Sailing Sailing is an exhilarating and timeless way to explore the beauty of the open water, but it’s important to remember that our oceans and environment need our protection. Sustainable sailing, which involves eco-friendly practices and mindful decision-making, allows sailors to enjoy their adventures while minimizing their impact on the environment. In this…
How to Tune a Sailboat Mast
Here are some general guidelines for tuning your mast’s standing rigging . please see our blog on how to properly adjust a turnbuckle before you begin. as always we recommend seeking the advice of a professional rigger for more specific tips and tricks regarding tuning your boat’s rigging..
Your boat must be in the water. Begin by just slacking off all of the side shrouds as evenly as possible, so that all stays can be adjusted by hand. Once loose, try and adjust all turnbuckles so that they are pretty much equally open (or closed) from port to starboard respectfully. Also go ahead and line up the cotter pin holes (if present) in the studs so that they are in a pin-able position. Now is also the time to balance out the threads, between the upper and lower studs of the turnbuckle, IF they are not even. Do this by unpinning the turnbuckle from the chainplate – BE CAREFUL HERE – to ensure the mast is secure before unpinning any one stay. Lastly, loosen all halyards or anything that may pull the mast to port, starboard, forward or aft.
1. Check by sighting up the backside of the mast to see how straight your spar is side to side. You can take a masthead halyard from side to side to ensure that the masthead is on center. Do this by placing a wrap of tape 3′ up from the upper chainplate pin hole on each upper shroud. Cleat the halyard and pull it to the tape mark on one side, mark the halyard where it intersects the tape on the shroud. Now do this to the other side, the mark on the halyard should also intersect the tape similarly. Please note: when the mast is equipped with port and starboard sheaves, instead of just one center-line sheave, it will appear slightly off to one side. Just keep this in mind……
2. Using the upper shrouds as controls, center the masthead as much as possible using hand tension only. Some masts are just crooked. If yours is(are) crooked, it will reveal itself when you loosen all of the stays and halyards initially and sight up the mast. Although you should use hand tension only, you can use a wrench to hold the standing portion (the stay portion) of the turnbuckle. If for some reason the shroud is totally slack and you still can’t turn the turnbuckle by hand then the turnbuckle may need to be serviced, inspected, and maybe replaced.
3. Tune the mast from the top shroud on-down, making sure the mast is in column. Remember: as you tension one shroud by adjusting the turnbuckle, to loosen the opposing shroud the same amount.

4. Once the mast is fairly straight from side to side, tighten the shrouds all evenly using tools for tensioning. Typically, for proper tension, the shrouds should be tightened using these guidelines; uppers are the tightest, and then fwd. lowers, then the aft lowers and intermediates should be hand tight plus just a turn or two. ~ With an in-mast furler it is recommended to tension the aft lower a bit more to promote a straighter spar (fore and aft) for better furling.
5. Now you can tension the aft most backstay (s). If the backstay has an adjuster it should be set at a base setting (500-1000 lbs). If the backstay simply has a turnbuckle then it should be tightened well. After this has been done, in either situation (adjustable or static backstay), one should site up the mast from a-beam and notice that the masthead has a ‘slight’ aft bias. If there is no aft bias, too much, or the mast is inverted (leaning forward), then the forward most forestay (s) will most likely need to be adjusted to correct this. If a furler is present then seek the council of a professional rigger or refer to your furler’s manual for instructions on how to access the turnbuckle if there is one present.
6. Finally, sight up the mast one last time and make any necessary adjustments.
7. MAKE SURE ALL TURNBUCKLES AND PINS HAVE COTTER PINS AND ARE TAPED NEATLY TO PREVENT CHAFE!
Read HERE for how to use a LOOS & Co. Tension Gauge!
Here is a little vid from our friend Scott at Selden Masts (click the link then hints and advice for more info) on rig tune…..
[youtube http://www.youtube.com/watch?v=rcCALZ4x6R4&w=420&h=315]
Is your mast fractionally rigged, only has a single set of lowers or is just plain different? Be sure to leave any questions or comments below.
Similar Posts
The vast U.S. cordage market allows us to have several competitive options including; Robline, New England, Samson, Yale, and Marlow Ropes, just to name a few. Each one of these manufacturers provide various rope constructions utilizing different materials to allow the consumer to achieve different functions based on application. All of the jargon like Spectra, Dyneema, Vectran, Kevlar, Technora, Dacron, Double Braid, Single Braid,…
A Most Destructive Leg – VOR
Video highlights of a disastrous leg 5. Mar Mastro was the only boat to escape with no damage. Now that all boats have arrived in Brazil (one way or another), let’s take a look and review…… [youtube http://www.youtube.com/watch?v=qE1ebE34lac&w=560&h=315]
Americas Cup Epic Crashes….
Check out the AC 45’s best wipe out moments……. [youtube http://www.youtube.com/watch?v=S-FlN97Y3ok&w=560&h=315]
The New Volvo Ocean Race 2014-2015……
…….will have an all woman team. Awesome! Quite the line up as well. Boys you better step up your game. Remember, the new VOR boats will be one design. I can’t wait! [youtube http://www.youtube.com/watch?v=PdroQqOuMVE&w=560&h=315]
Pin and Tape……
…….A term regularly used here at The Rigging Company. Yet this small detail appears to elude most, at least when it comes to doing it correctly. I always say, “details are what make the difference between a professional job and one that is well, not so professional”. If you take notice as to how your…
Views from Aloft
What a better way then to end the year with one of our last trips aloft for 2014? This was taken early November and was one of the last views from aloft for the year. Here we were aloft to conduct another one of our Rigging Safety Inspections. Maryland Yacht Club offers one of the…
Leave a Reply Cancel reply
Your email address will not be published. Required fields are marked *
Save my name, email, and website in this browser for the next time I comment.
58 Comments
I have a fractional rig with a cap shroud and one lower V1. The spreaders are swept aft with no backstay, and the rig is set up for a fathead main. The worse diameter is 5mm. The boat is 23 feet long. Could you provide any tuning advice for this style of rig. The past owner said he set the rig up at 10% breaking strength on the upper and 4% on the lowers which seemed really low for this style of rig. Any input would be very helpful as we go to rig the boat tomorrow
If you look at our reply below for the FarEast 23R tuning explanation, this should help shine some light on the topic. As far as percentage of breaking strength is concerned, just ensure a good static (dock) tune, then sail-tune setting tensions to the minimum requirement, and don’t exceed 30% of breaking strength.
Cheers, ~T.R.C.
Any hints with tuning a sportboat that only has a set of uppers, a short forestay and no backstay????
Just got an email from someone else with almost the same question, for a FarEast 23r. Since I don’t know what Sport boat you have, I’ll just copy and paste my reply here. Generally, these “guidelines” work for just about ANY type of sailboat. The article is trying to focus on the concept of mast tuning rather than specific numbers, but also touch on how a guide can be created that is specific to YOUR boat and your style of sailing.
Thanks for the comment and enjoy the read.
“The Fareast 23r looks like a fun boat and simple in terms of rigging. I am a bit surprised that there isn’t any real support offered to the aft end of the top of the mast given the masthead kite. The boat must sail at enough of an angle downwind when loaded that the main leech and vang support the masthead….. but it must work.
As for appropriate tension, in terms of what’s fast, you will need to dig into the class a bit and figure out who’s figured out what. Ultimately the maker of your sails should have some data in terms of prebend for the mainsail and perhaps even jib luff curve (a.k.a. intended sag). If you can gather that info, I would do a static dock tune and then make adjustments until I achieve the sailmakers recommended pre-bend.
Additionally, you may be able to start with the Fareast 28r’s base setting for just V1 and D1 and try that to get started. Or at least see how that compares to the previous owners’ notes.
I haven’t’ sailed the boat but as a general guideline, and as you will read in the comment section of this article, you will need to start with good dock tune. The amount of tension is irrelevant at this point, contentedness and straightness is numero uno….. and then just the order of tension.
Order of Tension (Single aft swept spreader rig) – the uppers are the tighter of the two: upper and lower. The upper is in charge of providing you headstay sag (or tension). The lower will allow the mast to create mid mast bend, or keep it from bending. The forestay length gets adjusted to affect the mast’s rake, the amount aft lean.
Once a straight and centered mast with adequate rake and a touch of pre-bend is achieved (static tune), using hand tension only and you can’t tighten it ‘by hand’ any further, add three or four whole turns to the uppers and one full turn to the lower. If you have pre-bend recommendations, now check them and adjust as needed. Then go sailing close hauled, ensure you are trimmed and canvased correctly given the condition, and observe the leeward shrouds.
IF the leeward shrouds are flailing about loosely in the lulls, add tension by hand while sailing until they just begin to fetch up. Count the number of turns, tack and do the same thing on the other side.
IF the leeward shrouds aren’t slightly moving in the lulls, you’re likely a bit a tight and you should do the opposite of the above procedure.
For me, while sailing close hauled, properly trimmed, and properly canvased, if I see the leeward shrouds just starting to slack in the puffs or waves, then I feel like the boat’s tune is typically pretty dialed in. Then if I want to make cheat sheet “Tuning Guide” when I get back to the dock, I pull out my loose gauge, pen and paper and note: today’s wind and wave condition, and the Loos Gauge setting that I thought was ideal.
Soon you’ll have created the Fareast 23r Tuning Guide😉
Hope that helps.”
I have a 1965 Alberg 30. On a starboard tack the boat has more weather helm than on a port tack. I have not been able to achieve a balanced helm on either tack. New full batten main, new 150 roller furl genoa.
Other than the boat being evenly ballasted from port to starboard, e.g. holding tanks, fuel tanks, below deck furnishings, and storage items, I would check the rig from side to side. A crooked mast or poor static tune can result in the boat sailing differently on both tacks. A good way to test this is either sighting up the mast at the dock to ensure that the mast is relatively straight side to side and in column. You can also see that when beating (aka hard on the wind), you have to make adjustment’s to the mainsail sheet tension (NOTE: the traveler will likely need to be adjusted to mirror the same setting as on the previous tack). If notice that with the traveler in the same position on each respective tack that the sail is bubbling or flogging more on one tack than on the other, it is likely necessary to re-tune the mast. This can be done at the dock by following the guidelines in the article once the everything has been appropriately loosened to tension.
Let us know if this helps.
Any Hints, tips for tuning a 1977 Whitby 27 sloop 1/4 ton rig?
Nothing special that I can think of. Just follow the guidelines in the article. From what I can gather there are only a single set of lowers correct? Are the spreaders aft swept at all or just straight out? If it is single lowers and no sweep to the spreaders you’ll need to set the rake using the forestay adjustment to set the rake and the backstay to control the forestay tension. If you are interested in optimizing sail tuning, like in racing situations: higher wind sailing conditions will desire more tension on the shrouds, a bit more tension on the lower than the upper, but only slightly; and in lighter winds loosen them up a bit, a tad looser on the lower than the upper.
Hope that helps, and good luck.
How do I tune /2 in rigging. Neither of the loos gaug s are large enough?
Thanks for the question. Yes, I think the Loos gauges only go up to 3/8″ wire. First let me say that a tension gauge is not a must for proper tuning, more for tension recording and also not exceeding max tension which is typically hard to achieve without additional fulcrums or wrench extensions. Having said that, if you know that you need one simply search google for cable tensioning gauges. There are a few others like this one https://www.checkline.com/product/136-3E , pricing is not easily apparent and may be excessive for your needs.
My recommendation is that if you have a good local rigger have them do a static dock-side tune and perhaps sail-tune in the boat’s ideal conditions. Perhaps they can provide a tutorial on their process for you to be able to make rigging adjustments over time.
Hope that helps.
Hi. Nice article. I have a Mirage 27 (the Bob Perry design). It’s a masthead rig with single spreaders and the shrouds on each side come to the same chainplate. I have been tuning so that tension on the lower and uppers is the same and trying to set them so that (as you say) the leeward shrouds are just slightly slack. But how do I induce mast rake? I have a split backstay with a 6:1 purchase on the adjuster; should the mast have rake even with the adjuster off? or do I just haul on it? or should the tension on the inners and outers be different?
HI Michael,
You will need to lengthen the headstay and shorten the backstay. This can be done a few ways either with turnbuckle adjustment or actually shortening and lengthening cables, sometimes you can add or remove toggles also.
Hope that helps!
- Pingback: Buying a second-hand luxury yacht? Here’s what you need to look for - Phuketimes news
I recently purchased a 1988 Catalina S&S 38 and experienced my first launch this season, including stepping the mast and tuning the rig. As we prepared, we found that the Cap Shroud and Intermediate Shroud were clamped together at the four spreader ends. The folks at the yard had never seen that, and I certainly didn’t know why it was there … possibly to keep the spreader ends and shrouds consistent? Anyway, as I am learning how to tune my rig, it seems to me that these clamps would prevent me from tuning the cap shroud and intermediate separately and correctly Thoughts? Should I remove them and re-tune the rig?
So it is a double spreader rig I take it? The upper shroud wire should run freely through the first spreader, or the closest one to the deck, and be clamped at the top spreader. The intermediate shroud wire should be clamped at the lower spreader.
Before stepping, if this was done correctly, both upper spreader and lower spreader should be clamped equal distance from the mast attachment point, when looking at the mast from port and starboard.
In other words, you should measure the distance from where the upper shroud attaches to the mast to the end of the upper spreader and it should be the same distance on the other side, port to starboard. Then the same goes for the intermediate shroud and the lower spreader. The upper shroud should run freely through the lower spreader although it is covered by the clamp, but not actually clamped at the lower spreader, j ust the top one.
If all 4 spreaders are clamped equally port to starboard. You should be good to tune from there. The spreaders should show a slight up angle, to be specific slightly more up at the upper spreader than at the lower, but all of them should be just ever so slightly pointing up. You even want to think about clamping them slightly higher than that before tensioning, as this will pull them down and into their preferred angle, just slightly up. Specific angles are really only determined on the spar builders drawing and vary for manufacturer to manufacturer. Generally it is pretty clear where they want to sit. With the shrouds loose if you find that angle that appears to be the right one, and push them up slightly from there then clamp. This will allow them to be pulled down slightly once tensioned.
Kind of a tricky thing to explain in writing but hopefully it helps.
Have further questions? Give us a call 443-847-1004, or email us [email protected]
I have a Catalina 275 fractional rig with single swept back spreaders and an adjustable backstay. My questions are: how much rake, tension on cap and lower shrouds and on chain plate should cap shroud be forward and lower aft. I am racing and want the best performance. Thanks for any help. Bill
If the two shrouds are on the same plate, right next to each other, and the pin holes are the same diameter, and the plate is configured in a fore and aft configuration, I would choose the aft hole for the lower shroud and the forward one for the upper shroud.
In terms of specific rake, you will need to look towards the maker of your sails and or the boat manufacturer. I discuss how to measure rake in the preceding comments.
“You can measure rake by hanging a small mushroom anchor from the main halyard, with the boat floating on its lines, if you wish”
For racing I would start off with a good static tune at the dock by following the points in the article. If you know it’s going to be light day, start off with light rig tension. Be sure to use either Velcro wrap style cotter pins or simply lash the upper and lower shroud turnbuckles together to secure them. This will give you access to removing the pins or lashing while sailing and adjusting the stays.
From there you will need to sail tune for that days specific conditions, your shrouds will tell you what needs to be tighter and looser. I have answered how to do this a few times already in the comments below, please take your time to peruse the comments section to see what sail tuning entails. Doing this will always ensure that the cable tensions are set up ideally for the conditions and the boat can be sailed at maximum potential.
“For racing, ideally once the static tune at the dock (the part we just talked about) is done, go out and sail tune. Do this by going hard on the wind and checking to see if the leeward shrouds are just starting to dance, this is ideal. If they are swaying about they are too loose for the current conditions. If the leeward shrouds are tight, they may be a touch to tight. Tension and loosen as needed; count what you did and to what shroud, then tack and do the same to the other side.
ALWAYS secure the turnbuckles when you are finished adjusting them.”
Just hit ‘Ctrl F’ and search the page for “sail tune” and “rake”
I am trying to tune a Hallberg Rassy HR36 masthead rig. The rig has two in-line spreaders. The cap shroud is 3/8 inch and terminates at the lower spreader. From the lower spreader, the cable transitions to a 5/16 inch cable passing over the upper spreader to the masthead. A second 9/32 inch cable runs from the lower spreader to the mast (just below the upper spreader). The Selden rigging suggests that the “upper shroud” be at 15 percent of the breaking strength of the cable. In this situation, is it 15 percent of the 3/8 inch lower portion? If so, how should the upper 5/16 inch and 9/32 inch cables be tensioned?
Thanks for your help.
Hi Bryant, good question. Once proper alignment and centering of the spar has happened (static tune), and you are perhaps a hair tighter than hand tight on all shrouds, you can begin to tension things to a percentage of breaking strength. Do this by using the cables at the deck and use their diameters to determine the tensioning amount.
The V1 (aka cap shroud) in your case is a 3/8″ cable which supports the two cables above ii, hence its large diameter. The 5/16 V2,D3 and the 9/32 D2 total 19/32. So if 15% of the 3/8 cable is achieved you will below that threshold for the cables aloft. Does that make any sense?
With that in mind there is a range of acceptable tension from light air to heavy air. 15% sounds like a good middle of the road tension. Generally you do not want to exceed 30%. Sail tuning in ideal conditions is generally the best way to determine the right tension, but 15% of breaking strength sounds like a good place to start.
Don’t forget your cotter pins and tape, especially aloft.
Hope that helps and thanks for the question.
T.R.C. Thanks you for the clarification regarding the V2,D3 and D2 load distribution. When I set the V1 tension to 15%, the tension on the V2,D3 was at 8 %. I then tensioned the forward shroud to 12 % and the aft shroud to 10 %. Then I tensioned the backstay to 14 %. After doing this, I measured the tension on the V1 to be 10 %. The only information I could find regarding tension on the D2 was that is did not have to be tensioned much. I tensioned it to 5%. The mast sights straight and I used a bossen seat on a halyard to measure to the lower part of the V1, which also indicated that the mast was straight. Did I overtension the fore and aft stays? Is the tension in the D2 too much or too little? Again, I appreciate your advice.
When you tighten the backstay it usually induces a bit of aft bend in the mast which will soften the upper shroud (V1) a bit. You can just take up on it again to get it back to 15% if you like. As I said there is a acceptable range for all of the stays, which you are well within. Everything else sounds like you did a pretty good job. Next up sail tune and see if there is excessive waggling on the leeward side, but in moderate breeze. The shrouds will begin to sway as the breeze builds, this could be a telltale to either reduce sail a bit or you can add some tension to the shrouds all the way around.
Should be all good as they say.
T.R.C., your advice has been invaluable. I took her out in 12-15 knots and was very happy with the sail luff and stiffness of the rig. Thanks for you help!😁⚓️
Hi , can you provide any tuning guides for a Swan 38 Tall mast single spreader rig with baby stay, I am keen to set the rig up for new North sails and race her competitively. The mast is an exact Nautor factory replacement in 1998. She shall not have furling sails.
Hi Peter and thanks for the comment.
Unfortunately we do not have a guide for that boat. I would ask the sailmaker however to see what info he or she might have. Alternatively you can always start with a good static tune and then sail tune the boat as I describe in some of the comments below. This is the best way. I may use a Swan 45 Tuning guide as the template and then just fill in my own numbers over time. This is ideal, but infidelity start with asking the sailmaker you are working with, he should have some good info.
This may seem like a silly question, but it has me perplexed. How long should my cotter pins be? Long enough to ‘jam’ against the surrounding body, to prevent rotation? Otherwise, I don’t see how they’ll prevent my stays from loosening.
The length should be the minimum amount to just be able to bend the legs. Too long and they get caught up on things, too short and you can’t adequately bend the legs to keep the pin in place. The head of the pin is a actually providing the security.
Does that help?
Great article to get me started, thanks! I just have a few questions…
I originally owned a Tanzer 7.5. Her mast was rigid and simple to tune with a LOOS and an eyeball. I however now own a Mirage 33 (1982) and things are a bit more complex (but not too much). When I bought her the mast was already stepped and the owners said they replaced the forestay (inside the furler) 1 season ago. I went about the boat tuning the rig as best I could but I started second guessing the rake. I found noticeable rake in the mast with virtually no backstay tension on. So I think my forestay stretched (being “new”) and I need to bring it forward.
How do I measure how much rake (at rest on the tensioner) is enough? With my rig as is I felt worried that if I pulled down on the backstay tensioner I might buckle my mast by bending it too far. It seems to me it’s ALOT of downward pressure on the column when you pull down on her especially if the mast was already raked or maybe in my case leaned too far back to start? She has a babystay too, I wasn’t sure how far to tension that other than to assist adding bend\rake but since I had too much already I just lightly tightened it and hoped for the best!
Thanks for the question. With the backstay tensioner completely off, you should be able to adjust the static/ base tension of the backstay with a turnbuckle (s). Loosen the Baby Stay so that it is completely loose, sloppy, to take it out of the equation. Then mark furling line spool direction and remove the line. Next, open the furler up to gain access to the turnbuckle inside, if present. Remove all cotter pins or locking nuts to free the turnbuckles on the headstay and the backstay. You should then loosen things so that the headstay and the backstay can be adjusted by hand. Close the headstay turnbuckle and open the backstay turnbuckle to reduce rake, and vice versa if wanting to add rake.
You can measure rake by hanging a small mushroom anchor from the main halyard, with the boat floating on its lines, if you wish. Then once you achieve the desired mast rake go ahead and tension the forestay and backstay a few turns equally with tools; not too tight, but a good base light air setting, or as loose as you can imagine the headstay ever needing to be. Lastly, tension the baby stay a bit until it just starts to tug on the mast, helping induce bend. From here the backstay tensioner will do the rest: wind it on and it will tension the headstay and induce mast bend via the baby stay. You may have to take the boat sailing and adjust things as you find out how it performs at various degrees of rake and bend.
I hope that’s not too wordy, but helps explain it all a bit. Feel free to email or call with further questions.
Regards, ~T.R.C.
Can you provide some specific information regarding rig for 1980 C&C 32. Looking to purchase new main and want to get the most from it for Wednesday nights. Boat currently does not have a pony stay, it has been removed. Can replace that track/car. What should initial bend look like, keel step is fixed so assume I need to some chock aft of mast at deck? Have rod rigging but no Loos gauge for same, should I acquire one? Love this site, very helpful RayK
Thanks for the compliment. This may be less technical than you might expect. I would start with the basic guidelines given in the article to ensure a good base, static tune setting. A Loos gauge is good but not needed. If you focus on getting the spar straight, side to side, with a slight aft bias and then the tension is set so that it feels fairly tight. I know that sounds vague, but keep this in mind: if you are anticipating heavier wind make things a bit tighter, and loosen things up if less windy. The order of tension, in regards to the which shroud (upper vs intermediate vs lower) is important; more so than the amount of tension. Make sure nothing is so loose it is just flapping about.
The headstay should have some good slack to it with the backstay adjuster totally off. Adjust the backstay and headstay turnbuckles, with them in the slack position until the masthead is favoring a slight aft lean or rake, but only slight. From there, tension the backstay adjuster very tight and see what the headstay tension feels like, should be very tight.
PLEASE NOTE: if the backstay adjustment is totally bottomed out at this point, the backstay needs to be shortened a bit. Just pay attention to how this affects the rake. …
This part is where the pony stay or the baby stay will play a critical part, for mast bend. You may even find the pony stay to be good for mast pumping in light air and waves. Making this baby stay removable is a good idea, as well as, we’ve found that Dynema rope is the best choice here.
So… a centered mast head, side to side. A straight, in column mast from the top on down. A slight aft rake to start with…and as you begin to wind on the backstay and the baby stay you will add some rake but also a good bit more bend.
Take this set up for a few test sails and see how things act, in different conditions. After that you can make some adjustments here and there as needed: weather helm, shroud tension, mast rake, pre bend, etc…Moving chocks and using a Loos gauge.
ADDT’L TIP: Chocks and mast step position affect bend and rake properties. Want more rake? Chock mast aft in collar and move step forward. Want more bend? Chock mast forward in collar and move mast aft. As all things, there is more to it than that, but that’s the gist of the whole chocks and mast step thing…
“Sail Tuning” is a blog we are in the works of, but the punchline is that if hard on the breeze, and the leeward shrouds are excessively loose, and you are sure you aren’t over canvased…then go ahead and take turns on the leeward side until they just stop waggling, count what you’ve done, tack and mirror the turns on the other side.
Once the boat is set up for that specific condition, and you return to the dock, you should take your loose gauge and record these settings…creating a tension gauge setting for various conditions.
Hi, Thanks for your information. I have a Dehler 34. 1986… How much mast prebend and rake is recommended? The boat is new to me in March. Raced ok but I want to get a new main and want it to fit a well tuned mast. What do you think of a 2 degree rake and 4″ prebend at the speaders? Also, I have a Harken furler, How do you measure the forestay tension? Thanks, Duke
The answer, this boat is pretty sporty so it should show some rake. The spreaders are swept slightly aft so this will produce some natural bend just to tension the headstay.
Head-stays are always tough to measure with any sort of gauge, there are some class specific tricks for using a gauge in funky ways in order to get data, but they aren’t really reliable in my opinion. If you live in a typically windy area, go for bit more shroud tension, headstay tension and mast bend, and see how the boat feels. This will take some trial and error. If the forestay feels too stiff, slot too tight, loosen the uppers a bit, thus reducing bend and slackening the headstay.
Once the boat is sailing well in the ideal conditions, record that bend and those tensions. This is where I would leave things set, record it, and then just adjust shroud tension to affect bend and headstay in order to compliment different wind strengths and sea states. It takes quite a bit of back and forth, and documentation to get it right. One designers have already worked all of this out and then they share it for others…..very helpful. The rest of us will have to be the trailblazers for this type of information for other boat owners with the same (similar) boats to benefit.
Hope that helps, thanks for the kind words, and good luck. Once you figure things out post a link here for others with the same boat…..would be helpful.
Hello, Thanks for all of this great info. I just purchased a 37′ boat with a 3/4 fractional rig and a tapered mast. I was wondering if there were any special considerations when tuning the fractional rig? Currently the stays and shrouds are a little loose and can be wiggled (borderline flopping) by hand although the mast stands and is visually centered. (We are in SW Florida and the boat went through a direct hit by hurricane Irma like this and still stands tall!) Also is it advisable to increase shroud tension in small increments first on one side and then do the same on the opposing side? Thanks so much for any info
Hi Nathan. There are some thoughts, so fractional masts are usually fitted with aft swept shrouds and spreaders. If so, this means that the uppers also tension the headstay and create mast bend. The lowers then also act to reduce mast bend, so the tighter you make them you are actually reducing mast curve, thus powering the mainsail up. So be conscious of these two thoughts when tensioning the shrouds. The rest is fundamentally the same as the guide suggests. Loose or wiggling shrouds (excluding the scenario where we are talking about the leeward shrouds under sail), should be tightened. Doing things in increments is definitely a good idea.
Hope that helps. Thanks for the questions.
Thanks!! Now that you say that about the swept spreaders helping create mast bend it makes perfect sense. I had an ‘oh duh’ moment. I’ll probably err on the side of looser lower shrouds knowing if we need more power we can always tighten them up. Thank you again this helped immensely!
I want to buy a tension gage. Most familiar with Loos. But do I need Pt 1 or 2? (Pretty sure I don’t need 3 or Pro.) I have two rigs to tune: a 1972 Morgan 27 and a Catalina 22, I think 73 or thereabouts. The Morgan 27 is mine, fresh water for life, and 99.9% most likely factory wire. The Catalina 22 is a borrower in the Gulf, but pretty sure the owner has never tuned it. My problem is I can’t find the gage of wire for either standing rigging anywhere! Any help?
I think this one will do… https://sep.yimg.com/ca/I/yhst-70220623433298_2270_120385950 . The Morgan is likely 3/16″ wire and the Catalina is likely 5/32″, that’s an educated guess. Hope that helps.
I just purchased a 1980 C&C 40. I was told that I need to replace the rod rigging as it is “too old”. The mast is down and the rod rigging seems ok but I have not done any penetration testing. Does rod rigging need to be replaced due to age? Thanks Rigging Co.
Not replaced, but re-headed. This can mean that some stays need to be replaced as a whole, but not typically not the whole set. There are instances where you’ve almost replaced all of it anyways, so full replacement just makes sense. Other than those scenarios, full replacement is due after a certain mileage with rod…60,000 NM. Please keep in mind these standards are very general recommendations. It sounds like in your case, you should send in the rod, tangs, and chainplates for service and inspection. once we receive everything we will make a quote for the recommended services and/or replacement.
Hope that helps and give us an email for more info.
I have had a problem with securing the spreaders to the shrouds, resulting in the spreaders dropping. I am using stainless wire to seize them but still having a problem. Any tips on how to do this properly?
Seizing the wire onto spreaders with hinged spreaders is a bit of a trick of the trade that requires some practice. We use the X’s and O’s method. The end result should be something that looks like this… https://theriggingcompany.files.wordpress.com/2011/11/2012-06-07_14-26-09_899.jpg?w=900 . A trick to make the wire bite into the spreader end a bit more is to wedge a small piece of leather between the spreader and the wire before seizing. Also parceling and serving the wire where it intersects the spreader will help create more bite too. Lastly, and I don’t like this method but you can install a bull dog cable clamp beneath the spreader, nuts facing in, to keep it from dropping when slack.
I hope that helps a little. Thanks for commenting.
I am struggling to get enough rake into my mast. 33 foot Charger 33 keel stepped. Have loosened forestay and moved mast foot forward by about 10 mm. Should the chocks in the collar be adjusted? Runners and 2 spreaders, and check spreader. Spreaders do not have much aft angle. Move mast step more forward? Outers are tight with inners looser. Thoughts?
Hey Bernard,
Yeah, it sounds like chocks are the last thing. Maybe remove the chocks with the rigging slack and see if you can get the mast to sit where you like it with just hand tension. Then chock it where it wants to sit. It sounds like you are on the right track everywhere else, perhaps add a toggle into the headstay and shorten the backstay is next. Good luck and I hope that helps somewhat.
Hi, We have a Lagoon Catamaran with fractional rig, upper and lower shrouds, fore stay and upper and lower diamonds. No back stay. The mast has a degree of pre-bend. I do not plan to drop the mast.
I may have to do some work on the port side upper diamond. Is it as easy as just undoing the turnbuckle? Or do I need to loosen the starboard one at the same time. If it needs replacement should I also replace the starboard one even if in good condition?
As a further question, what happens if a diamond breaks, does it result in mast failure?
You would need to loosen the other counterpart to that stay for sure. It is just good practice, will keep the mast straight, and also make your life easier for removal install. Now, do you replace both? I don’t know. How old is the standing rigging? Why are you replacing the one? If it is not all due for replacement and you are just replacing due to damage, just do the one, but loosen both sides to do this.
Hope that helps and thanks for the visit.
Hello! I recently purchased a keel-stepped 1982 Goman Express 30 which came with an Alado Furler. I have been sailing it since May of this year. My question is this: Despite relocating mast wedges at the cabin roof to bias the lower mast aft about 2″, I still have a pronounced backward bend (10 degrees or so) just above the highest spreader. When sailing on jib alone, most wave action causes the mast to pump right at the bend point. I have a split backstay that is as un-tensioned as possible and the forestay only has another inch of adjustment left. There is no baby stay.
How can I get the bend out of the mast? How concerned should I be that the mast might break at that point?
Thanks in advance for your reply!
Eric Hassam – Delta Flyer
Thanks for taking the time to comment on our site. It sounds like you are on the right track. So one other adjustment that you have is the mast step position. This greatly affects mast bend on keel stepped masts. For a stronger bend and less rake, move the mast butt aft. For more rake and less bend (probably what you need to try), move the mast step forward a bit. If neither of these help, you may be off to have your headstay shortened and this means it is too long. This is likely not the case, but it is a possibility.
Keep in mind….A mast should have a slight aft rake bias along with a small amount of mast bend. This is quite normal. You can send us a picture if you’d like a second opinion on if it is over-bent. Having said all of that, even if you remove all of the mast bend, the mast may still pump. This is a design flaw in many spar designs that lots of end users have experienced. This can be remedied by redesigning the stay lay out. Is there a place for a staysail stay and/ or runner backstays? If so add them. Is there a place for a baby stay? If not, that may be a consideration.
Thanks again and I hope that helps.
Hi, I have a 48 foot yawl with a 7/8 fractional rig, is the tuning procedure the same as a masthead rig? I seem to have trouble getting aft rake and proper headstay tension. Also, is there a particular tension number the upper shrouds should have? many thanks in advance
Hi Bill, thanks for taking the time. 7/8 is very close and I would treat it like a masthead rig, especially if the none of the spreaders are aft swept. Tesnsion the headstay using the backstay(s). This should pull the top of the mast aft. If there are any other forward stays, i.e. stay sail stay, forward lowers, or anything else that could be holding the mast forward, go ahead and loosen those completely. You then may need to tighten the Tri-attic (the stay that connects the top of the mizzen and top of the main) if present. OR if the mizzen needs more rake too, then lossen all forward stays and pull it back using the available aft stays for this as well.
Hope this helps and please email us and send some pictures if you need more help.
I have a 1972 Morgan 27, which has both forward and after lower shrouds. I wish to remove the forward lowers so I can trim a 110% jib inside the stays. I see a lot of boats without forward lowers and think this will work OK, but wonder if I should increase the size of the aft lowers and beef up the chain plates. Any suggestions?
THANKS FOR YOUR INPUT. I AM GOING TO REMOVE THEM ANYWAY AND SEE WHAT HAPPENS. “HOLD MY BEER, WATCH THIS….” FAMOUS LAST WORDS.
Lol! Good luck. Call us if you need assistance.
I have rod rigging on my Beneteau 32s5
Any other guidance on tuning them vs wire rigging
Hi and thanks for commenting.
Just follow the guidelines in the write up. The over all goal is that the mast needs to be straight and in-column when looking at it from side to side.
Fore and aft, the mast should show a very slight lean aft. Depending on whether or not the spreaders are in-line or aft swept; you should also see some slight bend if there is any aft sweep to the spreaders just from the tension of the uppers.
A Rod stay tends to run a bit tighter than wire, so keep that in mind.
For racing, ideally once the static tune at the dock (the part we just talked about) is done, go out and sail tune. Do this by going hard on the wind and checking to see if the leeward shrouds are just starting to dance, this is ideal. If they are swaying about they are too loose for the current conditions. If the leeward shrouds are tight, they may be a touch to tight. Tension and loosen as needed; count what you did and to what shroud, then tack and do the same to the other side.
ALWAYS secure the turnbuckles when you are finished adjusting them.
- Pingback: Tuning a Sailboat Mast | ChesapeakeLiving.com
- Pingback: Rig Tuned | middlebaysailing
Wow, I would hate to be charged by her for three trips up the rig and forget the screw driver the rubber plugs that are sacraficial and replaced everytime removed just to clean the stainless 1×19 rigging.
Username or Email Address
Remember Me
Lost your password?
Review Cart
No products in the cart.
- Privacy Overview
- Strictly Necessary Cookies
This website uses cookies so that we can provide you with the best user experience possible. Cookie information is stored in your browser and performs functions such as recognising you when you return to our website and helping our team to understand which sections of the website you find most interesting and useful.
Strictly Necessary Cookie should be enabled at all times so that we can save your preferences for cookie settings.
If you disable this cookie, we will not be able to save your preferences. This means that every time you visit this website you will need to enable or disable cookies again.
Posted 2024-05-25 15:59
Contact Information:
O'Day 22 Sailboat/Trailer & Motor - $1 (Irondequoit)

google map
QR Code Link to This Post
post id: 7750599641
posted: 2024-05-25 15:59
updated: 2024-05-25 17:16
♥ best of [ ? ]
refresh the page.
O'Day 22 Sailboat/Trailer & Motor - boats - by owner - marine sale -...
1978 O’Day 22 Masthead rigged sailboat Shoal Keel 3.5’ draft Trailer with new winch and tongue jack Sails: Custom made by Quantum Sails 2019 Both around 5 oz Cruising Dacron – Cross Cut panels....
IMAGES
VIDEO
COMMENTS
The cutter rig distributes the sail area over an additional sail, and that inner forestay is a superior position from which to hank on a low-flown storm sail. But with any real force upon it, the inner forestay can distort the shape of the mast; this will require a countereffort. Enter the intermediate running backstay.
A sailboat's standing rigging is generally built from wire rope, rod, or occasionally a super-strong synthetic fibered rope such as Dyneema ®, carbon fiber, kevlar or PBO. 1×19 316 grade stainless steel Wire Rope (1 group of 19 wires, very stiff with low stretch) is standard on most sailboats. Wire rope is sized/priced by its diameter which ...
It is easy to think of standing rigging and running rigging as two different parts on a sailboat, but in fact, they both share the same goal: Allow your yacht to sail. ... Ideally, you want to have a backstay adjuster present that way you can adjust your headstay tension while you sail along. Headstay tension is the last stay that should be ...
The running rigging on a sailboat is the lines and ropes controlling the sails and equipment. Get in the cockpit, and let's cruise through this guide together! ... Running Backstay. Running backstays is similar to a normal backstay but uses a line instead of a hydraulic tensioner. Some rigs have additional check stays or runners as well.
Another benefit of an adjustable backstay is that after a day of sailing with a tight backstay in a strong breeze, you can slacken the backstay to let the rig relax and release tension on the hull while your sailboat is moored. Direct vs. indirect backstays. Adjustable backstay designs fall into two types: direct and indirect.
The difference between standing rigging and running rigging. Sometimes things can get confusing as some of our nautical terms are used for multiple items depending on the context. Let me clarify just briefly: The rig or rigging on a sailboat is a common term for two parts:. The standing rigging consists of wires supporting the mast on a sailboat and reinforcing the spars from the force of the ...
Aug 14, 2015. It's one of the most important features on a sailboat, but many owners put standing rigging at the back of their minds when it comes time to do their pre-season safety checks. A prudent sailor should inspect his or her standing rig at least once each season and should know when the time comes to replace most or all of it.
Standing rigging on a fore-and-aft rigged sailboat. ... Backstay 5. Inner forestay 6. Sidestay 7. (Boom) 8. Running backstays Standing rigging on a square-rigged vessel (illustrated left), which supports a mast comprising three steps: main, top, and topgallant (illustrated right). The shrouds support each section laterally and the stays support ...
The backstay is both an element of the standing rigging but can also be tuned. Tensioning the backstay, the central part of the mast advances forward creating a slight "C" shape of the mast seen from the side. This curvature lets you bring the "fat" of the mainsail forward flattening the sail. Therefore, with a strong breeze, we can intervened ...
Running backstay. A running backstay is a rigging component on a sailboat which helps support the mast. [1] [2] A running backstay runs from each lateral corner of the stern to the mast at the level where the forestay begins in the fractional rig. Because they are attached low on the mast, they can present a significant problem in an accidental ...
Step 5: Check the rig under sail. As with other types of rig, get the boat heeling around 20° on the wind, tension the backstay and feel the leeward cap to make sure there's only minimal slack. Removing any kinks and S-bends can take more tweaking of lowers and intermediates, the latter being more fiddly to adjust if they're discontinuous.
A boat with a fractional rig, on the other hand, had its forestay attached 3/4 to 7/8 of the distance from the cabintop to masthead, had well-swept spreaders, carried a larger mainsail and smaller jib, and had a spar that was designed to be tweaked with adjustable backstay tension.
There are a few sailors who like the rigging so tight you could send an elephant up the backstay. It can result in excessive loads and wear on fittings, chain plates and the hull. The ultimate penalty for those who can't stand any sag in the forestay is what ocean racing sailors call a gravity storm or, less dramatically, dropping the rig.
The backstay is a powerful tool and you should introduce it to your toolbox for more than just keeping the rig in the boat. No matter what the rig type or stiffness the tensioning the backstay keeps the headstay from sagging. Headstay sag equals extra power in the headsail, so when you don't want the power (heeling too much) use the backstay. On boats with rigs that bend, the backstay helps ...
A backstay is a piece of standing rigging on a sailing vessel that runs from the mast to either its transom or rear quarter, counteracting the forestay and jib. It is an important sail trim control and has a direct effect on the shape of the mainsail and the headsail. Backstays are generally adjusted by block and tackle, hydraulic adjusters, or ...
I have a 39ft Jeanneau 409 with a 7/8ths rig and two sets of swept-back spreaders with no running backstays. There is no bottlescrew adjustment on the forestay, but there is one on the backstay. There is quite a bend in the forestay when sailing in 10 knots true wind.
Backstay Tensioner. Easy Upgrades: #1 of a seriesEvery fractionally rigged boat will have (or should have) a means of adjusting backstay tension. Its main purpose is to flatten and depower the mainsail in stronger winds, putting off the time at which a reef will be required. Because very few masthead-rigged boats are provided with backstay ...
Whether you're cruising or racing, an adjustable backstay is a helpful device for changing sail shape and controlling forestay tension for improved upwind and downwind performance. By dialing in the right backstay tension you can increase boatspeed. Regardless of whether you have a masthead or fractional rig, using an adjustable backstay is essential to good sail shape.
Its angle and tension can be adjusted to optimize sail trim and overall rig balance. 3. Backstay: Unlike a conventional rig where the backstay connects at the masthead, in fractional rigs, it attaches lower down - generally above or just below the intersection point with the forestay. Adjusting its tension further influences mast bend and ...
A backstay is a part of the standing rigging that runs from the mast to back of the boat, counteracting the forestay and headsail. It is an important sail trim control and has a direct effect on the shape of the mainsail and the headsail. Backstays are generally adjusted by block and tackle, hydraulic adjusters, or lines leading to winches.
5. Secure the mast using the appropriate rigging and fasteners. Attach the standing rigging, such as shrouds and stays, to the mast and the boat's hull. Fact: The mast of a sailboat is designed to withstand wind resistance and the tension of the rigging for stability and safe sailing. 2.
A New Backstay using Compact Strand 1×19, Hayn Hi-mod Failsafe Insulators. Maintaining the Oyster Yachts Factory Spec's. SSB is a commonly used abbreviation that stands for single side band radio. We are certainly not radio experts here at The Rigging Company. ... Therefore, they cannot be re-used when it's time to replace the boat's ...
1. Check by sighting up the backside of the mast to see how straight your spar is side to side. You can take a masthead halyard from side to side to ensure that the masthead is on center. Do this by placing a wrap of tape 3′ up from the upper chainplate pin hole on each upper shroud. Cleat the halyard and pull it to the tape mark on one side ...
1978 O'Day 22 Masthead rigged sailboat Shoal Keel 3.5' draft Trailer with new winch and tongue jack Sails: Custom made by Quantum Sails 2019 ... New SS standing rigging 2022 Forestay Backstay Shrouds Open frame turnbuckles Life lines CDI Roller furler Tiller tamer