- BOAT OF THE YEAR
- Newsletters
- Sailboat Reviews
- Boating Safety
- Sails and Rigging
- Maintenance
- Sailing Totem
- Sailor & Galley
- Living Aboard
- Destinations
- Gear & Electronics
- Charter Resources

Backstays to the Future
- By Alvah Simon
- Updated: March 28, 2013
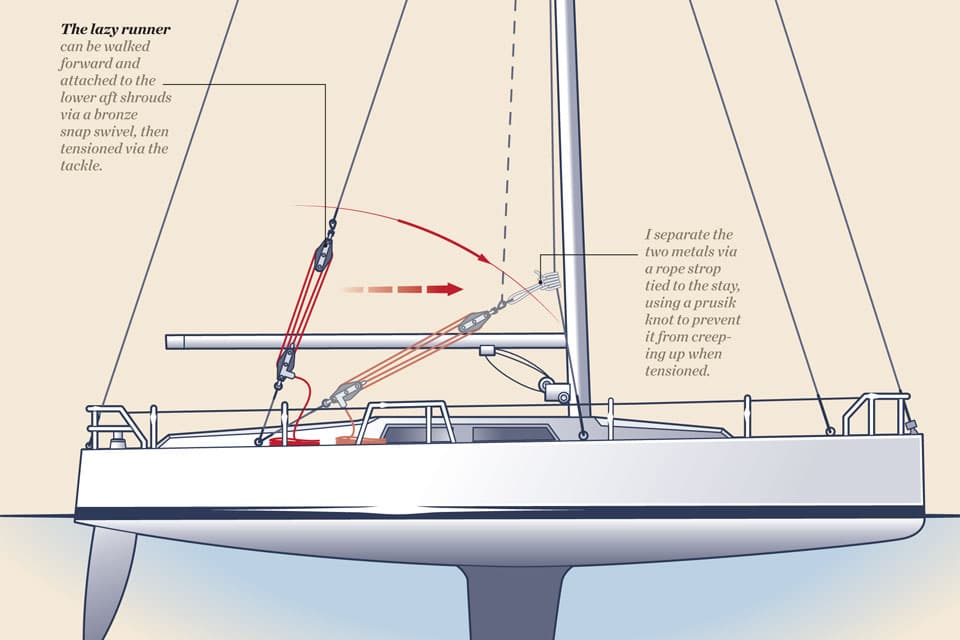
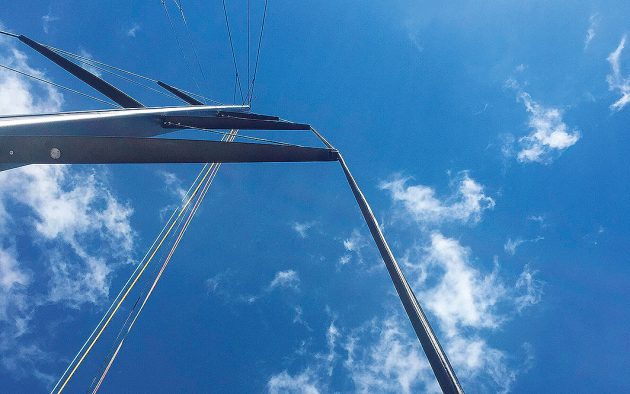
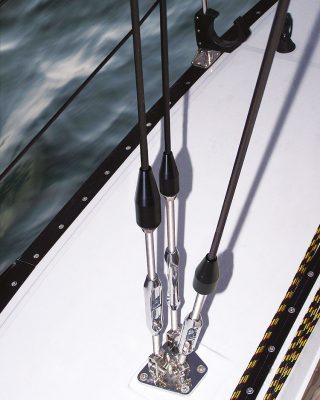
backstay setup
A running backstay is a removable stay that provides aft support to the mast from either the masthead or the point at which an inner forestay is attached. It originated as a response to the material limits of the period. At that time, solid wooden masts, for example, were either too weak or too heavy to be made particularly tall. Therefore, to achieve an acceptable area of sail for the heavy-displacement boats of the day, either the boom had to be extended beyond the transom or a gaff had to be added to the top of the sail—or both. This precluded the use of fixed backstays because the boom and gaffs had to be free to swing across the vessel when it tacked and jibed. As a tack or jibe was initiated, the burdened backstay had to be released and, as the spars swung through, the new, now windward, stay had to be fastened quickly before the entire rig came tumbling down.
With the advent of hollow masts, first of wood and then of alloy, and stainless-steel wire, the aspect ratio of the rigs began to extend to 3-to-1 and beyond. This allowed for the development of the Bermuda or Marconi rig, which eliminated gaffs and shortened the booms considerably without the loss of sail area or performance.
Running backstays, or runners, were then generally found only on cutter-rigged vessels. But through the 1960s and 1970s, the sloop became the rig du jour, and running backstays fell from favor. With the introduction of Freedom Yachts’ freestanding mast and Hunter’s B&R rig, the trend veered toward eliminating backstays, running or not, altogether.
Where are we today? Are running backstays now simply anachronisms that add unnecessary weight, windage, and clutter? I think not, especially in the context of bluewater cruising.
Sloops are fast around the buoys, but in the open sea, they display two disadvantages. First, the sail area is shared by only two large and therefore more difficult to handle sails. Second, in storm conditions, a sloop’s headsail, no matter how much it’s furled, still leaves the center of effort too far forward and too high to produce a safe and comfortable motion.
The cutter rig distributes the sail area over an additional sail, and that inner forestay is a superior position from which to hank on a low-flown storm sail. But with any real force upon it, the inner forestay can distort the shape of the mast; this will require a countereffort. Enter the intermediate running backstay. The arguable benefit of a staysail aside, this lower triangulation of support adds strength and stability to the mast, which translates into a better chance of coming up from a knockdown with the rig intact. Think sailing in the South Atlantic Ocean —it matters.
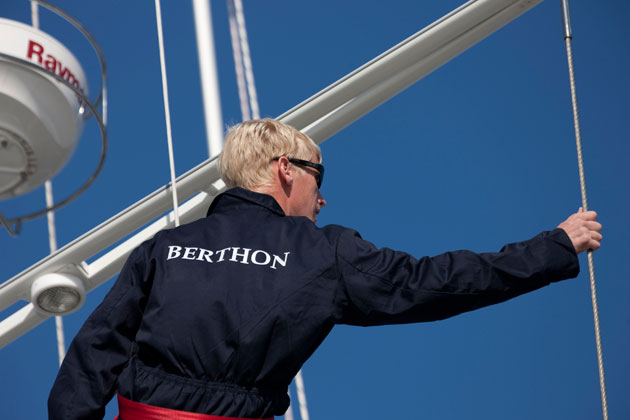
But alas, when you’re sailing off the wind, these same runners will have to be attended to on each and every tack. In open-ocean situations, this might not happen for days at a time. In confined waters, however, it’s necessary to have a quick and efficient method for setting and stowing runners.
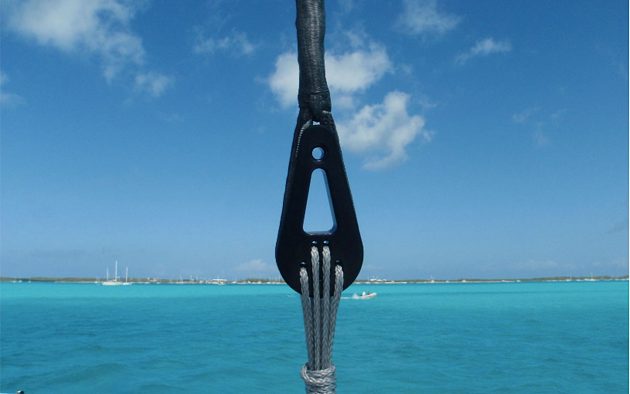
Ideas and hardened opinions on running backstays are diverse and plentiful enough to keep seaside barstools warm all night. See the accompanying images and diagrams to learn about some of the most common approaches to setup and stowage.
If you’re considering adding an inner forestay and running backstays, I recommend that you get professional advice addressing the minimum engineering angles required, appropriate deck hardware, proper tangs and toggles needed at the mast, and wire types and diameters.
I don’t mean to imply that running backstays are suitable for all boats and applications. But if your interests lie in bluewater passagemaking and you take a belt-and-suspenders approach to your safety, I believe that you’ll agree that the added weight, windage, cost, and inconvenience are more than justified.
Alvah Simon, a CW contributing editor, is the author of North to the Night .
Click here for more pictures of running backstay setups . Click here to read about how an inner forestay and staysail can help you beat along in a blow.
- More: How To , seamanship , ship's systems
- More How To

Practice Makes Perfect

DIY Tips for Repairing Nonskid

Shaft Bearing Maintenance Tips

When the Wind Goes Light

For Sale: 2015 Dufour 500 GL

Cruising Panama: Two Weeks in the Darién

Farewell to an Antarctic Legend: Rolf Bjelke

New Sailboat Brand: Mishi Yachts
- Digital Edition
- Customer Service
- Privacy Policy
- Email Newsletters
- Cruising World
- Sailing World
- Salt Water Sportsman
- Sport Fishing
- Wakeboarding
Standing Rigging (or ‘Name That Stay’)
Published by rigworks on november 19, 2019.
Question: When your riggers talk about standing rigging, they often use terms I don’t recognize. Can you break it down for me?
From the Rigger: Let’s play ‘Name that Stay’…

Forestay (1 or HS) – The forestay, or headstay, connects the mast to the front (bow) of the boat and keeps your mast from falling aft.
- Your forestay can be full length (masthead to deck) or fractional (1/8 to 1/4 from the top of the mast to the deck).
- Inner forestays, including staysail stays, solent stays and baby stays, connect to the mast below the main forestay and to the deck aft of the main forestay. Inner forestays allow you to hoist small inner headsails and/or provide additional stability to your rig.
Backstay (2 or BS) – The backstay runs from the mast to the back of the boat (transom) and is often adjustable to control forestay tension and the shape of the sails.
- A backstay can be either continuous (direct from mast to transom) or it may split in the lower section (7) with “legs” that ‘V’ out to the edges of the transom.
- Backstays often have hydraulic or manual tensioners built into them to increase forestay tension and bend the mast, which flattens your mainsail.
- Running backstays can be removable, adjustable, and provide additional support and tuning usually on fractional rigs. They run to the outer edges of the transom and are adjusted with each tack. The windward running back is in tension and the leeward is eased so as not to interfere with the boom and sails.
- Checkstays, useful on fractional rigs with bendy masts, are attached well below the backstay and provide aft tension to the mid panels of the mast to reduce mast bend and provide stabilization to reduce the mast from pumping.
Shrouds – Shrouds support the mast from side to side. Shrouds are either continuous or discontinuous .
Continuous rigging, common in production sailboats, means that each shroud (except the lowers) is a continuous piece of material that connects to the mast at some point, passes through the spreaders without terminating, and continues to the deck. There may be a number of continuous shrouds on your boat ( see Figure 1 ).
- Cap shrouds (3) , sometimes called uppers, extend from masthead to the chainplates at the deck.
- Intermediate shrouds (4) extend from mid-mast panel to deck.
- Lower shrouds extend from below the spreader-base to the chainplates. Fore- (5) and Aft-Lowers (6) connect to the deck either forward or aft of the cap shroud.
Discontinuous rigging, common on high performance sailboats, is a series of shorter lengths that terminate in tip cups at each spreader. The diameter of the wire/rod can be reduced in the upper sections where loads are lighter, reducing overall weight. These independent sections are referred to as V# and D# ( see Figure 2 ). For example, V1 is the lowest vertical shroud that extends from the deck to the outer tip of the first spreader. D1 is the lowest diagonal shroud that extends from the deck to the mast at the base of the first spreader. The highest section that extends from the upper spreader to the mast head may be labeled either V# or D#.
A sailboat’s standing rigging is generally built from wire rope, rod, or occasionally a super-strong synthetic fibered rope such as Dyneema ® , carbon fiber, kevlar or PBO.
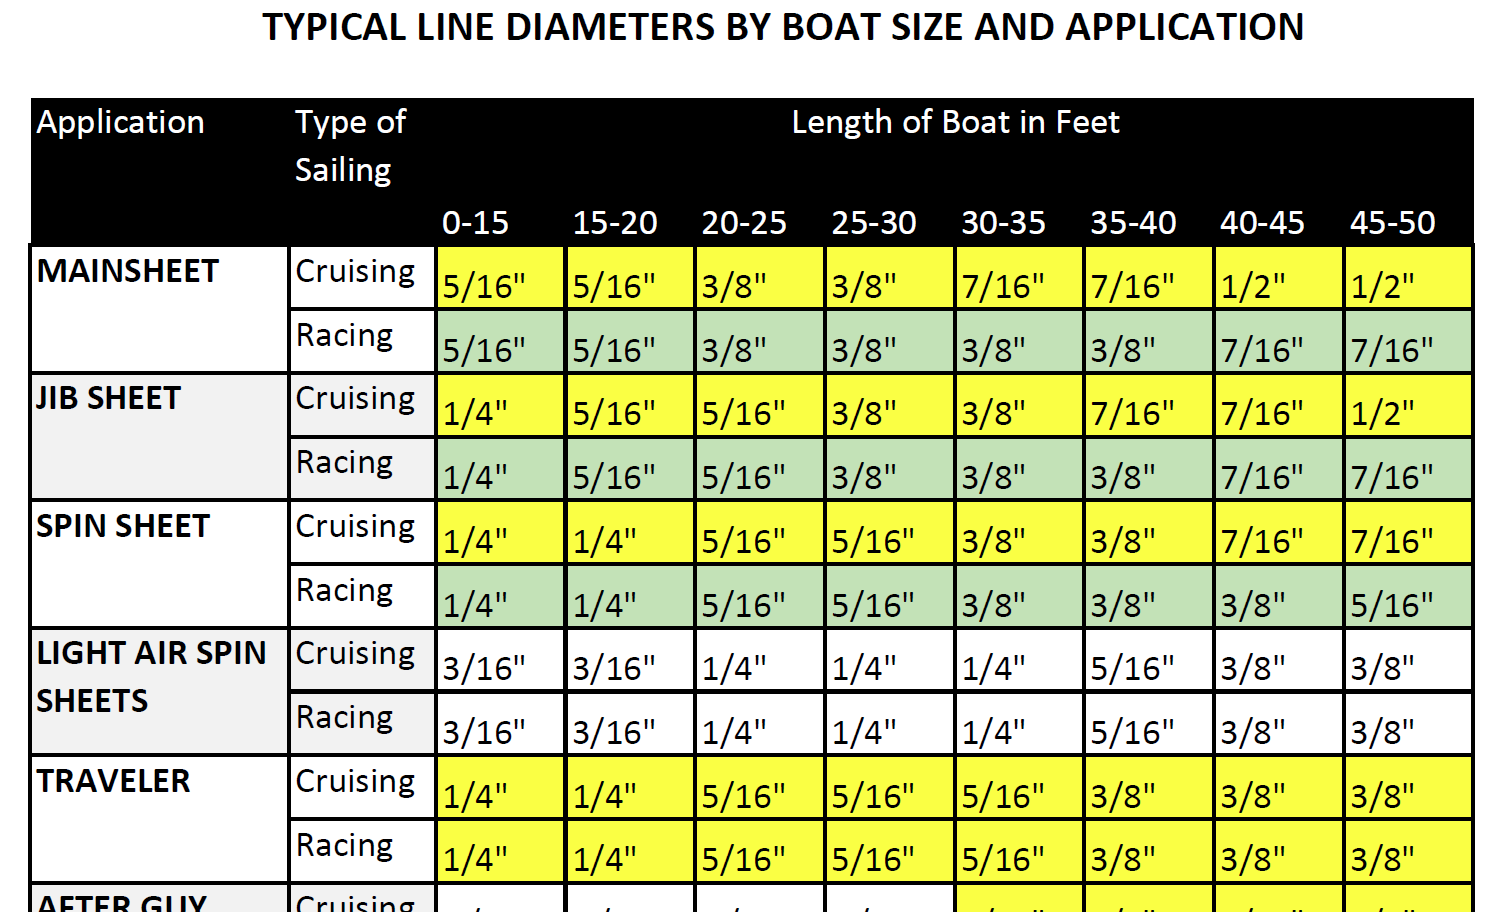
- 1×19 316 grade stainless steel Wire Rope (1 group of 19 wires, very stiff with low stretch) is standard on most sailboats. Wire rope is sized/priced by its diameter which varies from boat to boat, 3/16” through 1/2″ being the most common range.
- 1×19 Compact Strand or Dyform wire, a more expensive alternative, is used to increase strength, reduce stretch, and minimize diameter on high performance boats such as catamarans. It is also the best alternative when replacing rod with wire.
- Rod rigging offers lower stretch, longer life expectancy, and higher breaking strength than wire. Unlike wire rope, rod is defined by its breaking strength, usually ranging from -10 to -40 (approx. 10k to 40k breaking strength), rather than diameter. So, for example, we refer to 7/16” wire (diameter) vs. -10 Rod (breaking strength).
- Composite Rigging is a popular option for racing boats. It offers comparable breaking strengths to wire and rod with a significant reduction in weight and often lower stretch.
Are your eyes crossing yet? This is probably enough for now, but stay tuned for our next ‘Ask the Rigger’. We will continue this discussion with some of the fittings/connections/hardware associated with your standing rigging.
Related Posts
Ask the Rigger
Do your masthead sheaves need replacing.
Question: My halyard is binding. What’s up? From the Rigger: Most boat owners do not climb their masts regularly, but our riggers spend a lot of time up there. And they often find badly damaged Read more…
Selecting Rope – Length, Diameter, Type
Question: Do you have guidelines for selecting halyards, sheets, etc. for my sailboat? From the Rigger: First, if your old rope served its purpose but needs replacing, we recommend duplicating it as closely as possible Read more…
Spinlock Deckvest Maintenance
Question: What can I do to ensure that my Spinlock Deckvest is well-maintained and ready for the upcoming season? From the Rigger: We are so glad you asked! Deckvests need to be maintained so that Read more…
- AROUND THE SAILING WORLD
- BOAT OF THE YEAR
- Email Newsletters
- America’s Cup
- St. Petersburg
- Caribbean Championship
- Boating Safety
Getting the Most From Your Backstay
- By Mike Ingham
- Updated: September 15, 2015

While coaching, I’m often asked the best order of depowering. It is a good question because there are several options such as sheets, steering and controls, which all contribute to keeping the boat flat in a breeze. All of these tools should be used, but for just about any boat and condition, my suggestion is to start with the backstay. It’s a control that considerably reshapes both the headsail and mainsail at the same time. Since use of the backstay has almost no downside, it’s an excellent tool to depower the sails. Let’s explore why.
The discussion needs to start with how mast bend and forestay sag control the power of the main and jib, respectively. As a quick review, there’s inherent shape built into sails using what’s called “broad seam,” whereby the panels that make up the sections of the sail are designed and cut with curves on the connecting edges, or seams. There’s not much we can do to change it on the fly. The rest of the shape is built into the main and jib with luff curve and luff hollow, respectively. For the mainsail, luff curve is extra cloth added into the luff, in an arch from tack to head. When the mast is straightened, it pushes that material into the sail, adding depth. When the mast is bent, it pulls the extra cloth, and thus shape, out of the sail. The same is true with the jib, except cloth is cut out of the luff in an arch from tack to head to create luff hollow. When the forestay is sagged beyond that luff hollow, cloth — and shape — is pushed into the sail. When it’s tightened, cloth is pulled out of the jib luff, thereby flattening the sail.
The backstay takes advantage of luff hollow and luff curve simultaneously to depower the sails, much like an airplane lowers its wing flaps for high lift and retracts them when high lift is not required. With the backstay eased, the mast is relatively straight and the forestay is sagged for maximum power in both sails, like airplane flaps down. As the backstay is tensioned, the mast bends and the forestay tightens, depowering both sails — flaps up.
Because it’s not the only tool to depower the sails, it’s worth talking about the other significant controls and how they work in conjunction with the backstay. Steering is an important one. You can steer up a little into the wind, both because the apparent wind shifts aft in the puff, and because you get rid of power by pinching.
Easing the mainsheet certainly opens the leech, spilling power from the main. But easing the mainsheet also straightens the mast and sags the forestay, which is opposite of what the backstay does so well. It’s slight, but it does put power into both sails when you want the opposite. Depowering with the backstay is much more efficient. As an added advantage, when the backstay is tensioned, the mainsail leech opens up because the mast is bent, shortening the distance from head to clew.
Since the leech opens and closes with adjustments to the backstay, it’s well worth a glance up at the top of the main, and re-trim if necessary. I often find that the leech opens so much, I need to tension the mainsheet in order to get some leech tension back. Another important consideration here is when you ease the backstay in a lull, the leech will tighten so much that the main will need to be eased. Trimming in a puff and easing when needing power seems counterintuitive, but it’s worth keeping a constant eye on the leech to make sure you have the desired tension, especially with masts that have bendy upper sections.
At times, a puff might be too big or hitting too quickly and frequently to keep up with backstay. In these conditions I switch to playing the mainsheet because I can react more quickly. I will still use the backstay for trends and when things are less chaotic. In these unstable and quickly changing conditions, it’s most important to keep the boat at a constant heel angle, so it’s better to be able to keep it under control any way you can than to be searching for the ideal sail shape.
To augment the backstay, the flatter the sea state, the more mainsheet tension you can have while playing the traveler more aggressively. This technique helps keep the forestay tensioned and the mast bent, which is essentially assisting the backstay. I find this technique particularly effective with boats that have flexible masts. The choppier the water and the stiffer the mast, the less effective this is. With a stiff mast and choppy water, keeping the mainsheet eased opens the leech and twists the main open. This helps with aggressive steering and helps keep the bow down and the boat moving through the waves. Once in the correct range of backstay and mainsheet, the traveler is still the first move with the sheet and/or traveler fine-tuning depending on the boat and condition.
To use the backstay effectively, rig tune has to be set right. I try to set the rig so that in the lulls with my backstay off, the sails are fully powered. Thus, when the puffs hit, I can tension the backstay, keep the boat under control, and keep it at a constant heel. For most boats, it’s maybe a 4-knot wind range that the backstay will cover. If the puffs are beyond what the backstay can handle, I still set the rig for the lulls. If the puffs are too big for the backstay to handle, or if the wind builds beyond its range, as a last resort, I’ll switch to easing sheets and playing the traveler.
How do you know if you’ve overdone it with your backstay tension? Easy: If your overbend wrinkles become too extensive, you have too much. Overbend wrinkles are creases in the mainsail that start from the mast, usually just below the spreaders, and head toward the clew. If they extend all the way to the clew, for sure, the backstay is too tight. When wrinkles extend halfway to the clew, you’re at about maximum bend. If you’re at this point and still need to de-power, it’s time to ease the sheet and drop the traveler. If the backstay is tensioned most of the time and rarely eased all the way in the lulls, then your next move is to go tighter on the rig.
You’ll know you have it right when you can set up your rig and sails such that, in the lulls, the backstay is eased and you can comfortably depower using mostly backstay. You’ll still have to change point and play the sheets or traveler, but they should be mostly fine-tune adjustments. The bulk of the power control is with backstay. Your helm and heel should remain constant as you tension it in the puffs and ease it in the lulls.
Consider the comparisons between the images of a mainsail and jib with and without backstay tension below:

Read more: How To – Sail Trim
- More: sail trim , Sailing How To
- More How To

How To Refine Your Polars and Sail Charts

The Building Blocks of Asymmetric Spin Trim

Fundamental Tactics: How To Handoff

Racecourse Strategy: The Middle Versus the Edge

Spanish Squad Stuns in Thrilling SailGP San Fran Finale

Newport Bermuda Race Goes the Way of the Classic

- Digital Edition
- Customer Service
- Privacy Policy
- Cruising World
- Sailing World
- Salt Water Sportsman
- Sport Fishing
- Wakeboarding
No products in the cart.
Sailing Ellidah is supported by our readers. Buying through our links may earn us an affiliate commission at no extra cost to you.
The Running Rigging On A Sailboat Explained
The running rigging on a sailboat consists of all the lines used to hoist, lower, and control the sails and sailing equipment. These lines usually have different colors and patterns to easily identify their function and location on the vessel.
Looking at the spaghetti of lines with different colors and patterns might get your head spinning. But don’t worry, it is actually pretty simple. Each line on a sailboat has a function, and you’ll often find labels describing them in the cockpit and on the mast.
In this guide, I’ll walk you through the functions of every component of the running rigging. We’ll also look at the hardware we use to operate it and get up to speed on some of the terminology.
The difference between standing rigging and running rigging
Sometimes things can get confusing as some of our nautical terms are used for multiple items depending on the context. Let me clarify just briefly:
The rig or rigging on a sailboat is a common term for two parts, the standing , and the running rigging.
- The standing rigging consists of wires supporting the mast on a sailboat and reinforcing the spars from the force of the sails when sailing. Check out my guide on standing rigging here!
- The running rigging consists of the halyards, sheets, and lines we use to hoist, lower, operate and control the sails on a sailboat which we will explore in this guide.
The components of the running rigging
Knowing the running rigging is an essential part of sailing, whether you are sailing a cruising boat or crewing on a large yacht. Different types of sailing vessels have different amounts of running rigging.
For example, a sloop rig has fewer lines than a ketch, which has multiple masts and requires a separate halyard, outhaul, and sheet for its mizzen sail. Similarly, a cutter rig needs another halyard and extra sheets for its additional headsail.
You can dive deeper and read more about Sloop rigs, Ketch Rigs, Cutter rigs, and many others here .
Take a look at this sailboat rigging diagram:
Lines are a type of rope with a smooth surface that works well on winches found on sailboats. They come in various styles and sizes and have different stretch capabilities.
Dyneema and other synthetic fibers have ultra-high tensile strength and low stretch. These high-performance lines last a long time, and I highly recommend them as a cruiser using them for my halyards.
A halyard is a line used to raise and lower the sail. It runs from the head of the sail to the masthead through a block and continues down to the deck. Running the halyard back to the cockpit is common, but many prefer to leave it on the mast.
Fun fact: Old traditional sailboats sometimes used a stainless steel wire attached to the head of the sail instead of a line!
Jib, Genoa, and Staysail Halyards
The halyard for the headsail is run through a block in front of the masthead. If your boat has a staysail, it needs a separate halyard. These lines are primarily untouched on vessels with a furling system except when you pack the sail away or back up. Commonly referred to as the jib halyard.
Spinnaker Halyard
A spinnaker halyard is basically the same as the main halyard but used to hoist and lower the spinnaker, gennaker, or parasailor.
The spinnaker halyard is also excellent for climbing up the front of the mast, hoisting the dinghy on deck, lifting the outboard, and many other things.
A sheet is a line you use to control and trim a sail to the angle of the wind . The mainsheet controls the angle of the mainsail and is attached between the boom and the mainsheet traveler . The two headsail sheets are connected to the sail’s clew (lower aft corner) and run back to each side of the cockpit.
These are control lines used to adjust the angle and tension of the sail. It is also the line used to unfurl a headsail on a furling system. Depending on what sail you are referring to, this can be the Genoa sheet , the Jib sheet , the Gennaker sheet , etc.
The outhaul is a line attached to the clew of the mainsail and used to adjust the foot tension. It works runs from the mainsail clew to the end of the boom and back to the mast. In many cases, back to the cockpit. On a boat with in-mast furling , this is the line you use to pull the sail out of the mast.
Topping lift
The topping lift is a line attached to the boom’s end and runs through the masthead and down to the deck or cockpit. It lifts and holds the boom and functions well as a spare main halyard. Some types of sailboat rigging don’t use a topping lift for their boom but a boom vang instead. Others have both!
Topping lifts can also be used to lift other spars.
A downhaul is a line used to lower with and typically used to haul the mainsail down when reefing and lowering the spinnaker and whisker poles. The downhaul can also control the tack of an asymmetrical spinnaker, gennaker, or parasailor.
Tweaker and Barber Haul
A tweaker is a line, often elastic, attached to the sheet of a headsail and used to fine-tune the tension on the sheet.
Barber haul
A barber haul is a line attached to a headsail’s sheet to adjust the sheeting angle to the wind. It is often used to pull the clew further toward the center or outboard than the cars allow.
Boom Preventer
A boom preventer is a line attached to the boom’s end when sailing off the wind. Its function is to hold the spar in place and prevent it from swinging wildly.
If the boat were to get an accidental gybe, it could cause serious damage to the rigging or even harm people on board. It is important for the rigger to be cautious when setting up the boom preventer.
Running Backstay
Running backstays is similar to a normal backstay but uses a line instead of a hydraulic tensioner. Some rigs have additional check stays or runners as well.
Bonus tip: Reefing
The term reefing is used when reducing the effective sailing area exposed to the wind of a given sail. Headsails are usually reefed by partially furling them in, and they often have marks for what we refer to as 1st, 2nd, and 3rd reefs.
The mainsail is reefed similarly with an in-mast furling or in-boom furling system.
On a traditional mast, we use a system called slab reefing. The system has reefing lines running through the boom to reinforced points on the luff and leech, allowing you to pull the sail down to the boom and effectively reduce the sail area.
Having at least two reefing points in the mainsail is normal, but most cruising sailboats have 3. The 3rd is used for the heaviest conditions, giving you only a tiny bit of sail area exposed to the wind.
You want to reef your sails before the wind increases to a point where your boat gets overpowered.
It is essential to practice your reefing technique . You will find yourself in situations with rapidly increasing winds where you need to reduce your sails quickly.
Rule of thumb: If you think setting a reef might be a good idea, do it.
Shaking a reef is the term used when we sail with a reefed sail and want to increase the sail area back to full.
Hardware used for sail handling and the running rigging
Furling system.
Most sailboats have their headsail on a furling system. A furling system is a tube that runs along the forestay from the bottom furler drum to the masthead swivel.
This system allows you to roll the headsail around the forestay, making furling the sail in and out accessible. It is also convenient when reefing the sail when the wind picks up, as you can easily do this from the safety of the cockpit. These furling systems come in manual versions and electric versions.
In-mast furling
In-mast furling is a system that rolls the mainsail in and out of the mast. To unfurl the mainsail, we use the outhaul .
In-boom furling
In-boom furling is a system that rolls the mainsail in and out of the boom. This system has been costly and has mostly been seen on big yachts earlier. They are becoming more affordable and common on smaller boats, though. To unfurl this setup, we use the main halyard.
A Stack pack is also called a Lazy Bag or Lazy Pack. It is a bag with a zip attached to the boom where the mainsail is stored when unused. It protects the mainsail from UV rays from the sun and weather elements. It is a very nice and tidy way to store the mainsail and reefing lines if you don’t have in-mast or in-boom furling.
Lazy Jacks is a system of lines running from the stack pack to the mast. The Lazy Jacks guide the mainsail up and down from the Stack Pack and prevent it from falling down on the deck. It is also possible to rig Lazy Jacks without a Stack Pack.
A block is a pulley with a sheave wheel. Blocks are used to change the direction of a pull on a line or rope and give a mechanical advantage. They have many uses, especially onboard sailboats.
A winch is a metal drum that gives you a mechanical advantage to control and tighten lines. These can be operated by turning a rope around it and pulling manually or by a winch handle to get more force. Most modern winches are self-tailing, which means they lock the line on so you can winch the line without holding on to it. Some boats even have electrical winches operated by a button.
Mainsheet Traveler
The mainsheet traveler is a horizontal track that the mainsheet is attached to through a series of blocks. The traveler enables you to adjust and lock the boom at an angle and also plays a critical part in trimming the mainsail.
Most cruising sailboats have their traveler attached to the top of the coachroof in front of the spray hood. A racing boat typically has the traveler in the cockpit near the helm to give the helmsman better control over the mainsheet.
The cars are basically a pulley or block attached to a track on the port and starboard deck that your headsail sheets run through. Cars are used to control the angle of the sheet between the clew and the deck. The cars are handy when you trim the sail to set the right balance of tension between the foot and leech, depending on your point of sail.
The jammer is used to lock a line in place. Most sailboats use these for locking the halyards, mainsheet, outhaul, reef lines, traveler lines, boom vang lines, etc. You can pull or winch a line through a closed jammer, but it won’t run away if you let go of it unless you open the lock.
As I explained earlier, it is normal to have most or all of the lines led back to the cockpit, and they are usually run through a series of jammers.
The jammers are often labeled with the name of the line it locks, which makes it easier to remember which line goes where.
Spinnaker Pole
A spinnaker pole is a spar used to wing out a headsail when sailing off the wind, particularly the spinnaker. The spinnaker pole should have the same length as the distance between the mast and the forestay measured along the deck. We use a fore and aft guy and the pole’s topping lift to rig a pole correctly.
The rigging varies depending on the layout of the boat, but it usually looks like this:
- One line runs from the bow to the end of the pole.
- An aft line runs from near the stern to the end of the pole.
- A topping lift is used to raise and lower the pole.
Whisker Pole
A whisker pole is similar to the spinnaker pole and is rigged similarly. It is typically built lighter and attached to a track on the mast. These can be found in fixed lengths or adjustable lengths. Ideally, the length should be the same as the foot of the headsail you intend to pole out.
Boom Vang/Rod Kicker
The Boom Vang has a few different names. Rod-kicker, kicking strap, or kicker. It is used to tension the boom downwards. When you are sailing downwind and have the boom far out, the mainsheet won’t pull the boom down as much as inboard, and you can then use the vang to adjust the twist and shape of the mainsail.
Mooring line
A mooring line is a traditional rope lead through a fairlead to the vessel’s cleat and a mooring buoy, key, or pontoon.
Final words
Congratulations! By now, you should have a much better understanding of how the running rig on a sailboat functions. We’ve covered the different lines, their purpose, and the hardware used to operate them. I hope you’ve enjoyed this guide and learned something new.
Now it’s time to take what you’ve learned and put it into practice by getting out on the water, setting sail, and getting hands-on experience with the lines.
Or you can continue to my following guide and learn more about the different types of sails .
Sharing is caring!
Skipper, Electrician and ROV Pilot
Robin is the founder and owner of Sailing Ellidah and has been living on his sailboat since 2019. He is currently on a journey to sail around the world and is passionate about writing his story and helpful content to inspire others who share his interest in sailing.
Leave a Reply Cancel reply
Your email address will not be published. Required fields are marked *
James Suggitt
David Flynn
The backstay is a powerful tool and you should introduce it to your toolbox for more than just keeping the rig in the boat. No matter what the rig type or stiffness the tensioning the backstay keeps the headstay from sagging. Headstay sag equals extra power in the headsail, so when you don’t want the power (heeling too much) use the backstay. On boats with rigs that bend, the backstay helps depower the mainsail. When you add backstay tension on this type of rig you are essentially compressing a straw. The mast bends forward at the middle pulling the luff away from the leech thereby flattening the sail. It is a hugely powerful tool which allows you take your mainsail from full and powerful in light air to flat and open in the leech for windier conditions. As the breeze builds and you start to generate too much heel and helm use your backstay!
The Discussion
This website uses cookies and collects usage statistics. Privacy Policy

Us, too. We pour that passion into each of our newsletters to help you enjoy sailing even more.
Yachting Monthly
- Digital edition

Boat rigging: a guide to going composite
- Sam Fortescue
- July 1, 2021
Considering changing you boat rigging to composite but confused by the options? Sam Fortescue takes a look at the pros and cons of various solutions

‘Like the shift from wooden spars to alloy spars after the Second World War, we are moving to carbon spars and composite boat rigging for cruising boats,’ says well-known surveyor Kim Skov-Nielsen. ‘We are living on the cusp of a major shift to all-composite rigs.’
Four broad options for modern boat rigging run from ultra-high molecular weight polyethylene (HMPE) to aramid, PBO (poly-benzoxazole) and finally full carbon.
Compared to steel, all these options offer much lighter weight, which makes for less pitching and rolling in a sea. Greater rig stiffness improves sail trim and transfers forces more efficiently – particularly in lighter winds. And synthetic fibres resist the invisible fatigue that undoes stainless steel systems.
For budget-conscious boaters looking to save weight aloft, carbon rigging is a much cheaper way to do it than carbon spars
On the other hand, the cost can be two to four times that of wire boat rigging, and repairs are tricky outside major sailing centres. Some of the fibres degrade rapidly with exposure to UV or moisture, so damage to the sheathing will shorten the lifespan of the stay.
Carbon in particular is also susceptible to impacts from the side. Every sailor will weigh up the options differently, but here are your choices:
HMPE (Dyneema/Spectra)
Dyneema and Spectra has extraordinary tenacity and a very low weight, but many riggers are wary of using it on cruisers because they consider it too elastic.
However, US specialist Colligo Marine says it is just a question of picking the right grade of Dyneema and sizing it correctly. ‘Many people have mistakenly sized Dyneema for break strength and ended up with a very stretchy rig,’ says John Franta of Colligo Marine. ‘Stretch is a function of cross-sectional area, so all you need to do is pick the right diameter for your application.’
That means you’re going to end up with a bigger Dyneema line than your original wire, causing marginally more windage, albeit at a fraction of the weight. For example, the 8mm wire that is standard on many 40ft cruisers would have to be replaced with 11mm Dyneema in a Colligo Dux system, but this should creep less than 3mm per year.
Colligo’s aluminium chainplate eye can be tensioned with a lashing on sub-30ft boats
The variety of HMPE you use is vital, too, as the strands within the line align themselves with the load.
‘A 50ft-long backstay made from normal Dyneema can grow 4-6 inches in length,’ says Franta. That’s why Colligo only uses heat-stretched Dyneema SK75, where the fibres are already very tightly aligned, instead of higher-tech grades like SK99 and DM20.
A typical HMPE stay is spliced around a lightweight aluminium thimble, which fits easily to traditional fork at the deck end. You’ll need a special Colligo stemball fitting aloft or a CheekyTang, spliced into a loop at the top end of the shroud, then bolted through the mast.
Chafe and UV are the chief enemies of Dyneema rigs. ‘It is easier to cut and has a low melting point of 100°, so a fast-moving sheet could cut through it in seconds,’ warns Marlow sales director Paul Honess. Colligo is PVC shrink-wrapped for this reason and should last eight to 12 years without mishap.
Aromatic polyamides (Kevlar is a Dupont trademark) have low creep and high tenacity, but they also resist abrasion well – important when pitching and rolling across the Atlantic, for example.
Article continues below…
Improving performance through tuning standing rigging
To tune or not to tune? Would you drive your car with wheels misaligned? Run a marathon with your shoelaces…

How to check your rigging – video guide
A screwdriver, a straight edge and a good set of eyes are all that’s required for a basic rig check.…
Aramids are five times stronger than steel rope weight-for-weight, but that multiple falls if the fibres become wet and UV light causes them rapid damage, so cables have to be well sealed and protected.
Aramid stays
OYS has been designing Kevlar backstays with stainless steel terminations for years, and recommends a maximum working load of 40% of the cable’s breaking strain to minimise creep, so aramid stays are a little fatter than rod equivalents.
For example, an 8.5mm cable can take loads of 3000kg and yet weighs just 60g per metre. Compare that to Nitronic, where 7.5mm rod offering the same working load weighs 350g per metre. ‘You size it for stretch, and then you end up with a much higher safety factor,’ says Robbie Sargent of OYS. ‘It’s flexible and you can coil it up, plus it’s relatively price competitive and looks smart. Aramid is to all intents and purposes a cruising product.’
Black sheathing is standard, but lighter custom colours can reduce the cable’s resistance to UV. OYS does not recommend aramid shrouds on a monohull. ‘Rod and wire is pretty bullet-proof in terms of chafe and physical damage,’ says Sargent. ‘Composite rigging is a lot more fragile. A mid-sized Oyster or Swan has full battens – can go that goes through the textile sheath very quickly.’
The material works well in fore- and backstays, runners and inner fore-stays, or as lateral rigging on a multihull, he adds.
Dutch-based Aramid Rigging uses an advanced endless winding machine for made-to-measure stays. The bundle of fibres is in turn wrapped in heat shrink to keep out water, then an outer protective braid with a UV-resistant coating. The metal thimbles at each end are then sealed inside a polyurethane moulding, eliminating one common point of failure for steel rigs.
Developed in the 1980s, polybenzoxazole or PBO was seen as a step up from aramid for rigging raceboats, with nearly twice the strength and modulus – stiffness. It weighs less than 20% of rigging wire, and manufacturers have developed an easy-to-fit cruising product.
Powerlite PBO cables from Applied Fiber
Westmarine in the US worked with Applied Fiber to develop the Powerlite brand – fully compatible with normal terminations at the mast and deck, so it can be swapped for an existing wire or rod stay.
A sheath is extruded on to pre-tensioned bundles of PBO at the manufacturing stage, protecting the fibres from UV, water and abrasion. It can even be run through the spreaders like steel.
Allspars is the UK supplier for the Dutch EasyRigging system, but both manufacturers agree the rig should be replaced after eight years – sooner if the boats have been raced hard. Babystays, runners and removable forestays should be replaced after just four years. Some riggers, however, say that PBO has been eclipsed by carbon for performance, while Dyneema and aramid stays are cheaper and more robust. ‘PBO has proven unreliable, inexplicably brittle and very susceptible to UV damage,’ says surveyor Skov-Nielsen. ‘It doesn’t even get discussed these days when contemplating new rigging.’
The state of the art remains carbon, where Future Fibres dominates. Before you turn the page with a scoff, know that costs have plunged and manufacturing has improved – bringing carbon rigging within reach of cruising boats.
‘ECthree is entry-level for those that want to move away from rod rigging for better performance and more comfort at sea,’ says general manager James Austin. ‘We have a mission to democratise that and make it a more accessible product for someone in the 30-60ft category.’
ECthree is made of rods of pure carbon, bundled, sheathed and fitted with stainless steel terminations, making them easy to retrofit. It is similar to the peak performance ECsix product. ‘It is 20% lower in modulus but one fifth of the cost,’ says Austin. ‘We think that’s a good compromise.’
Moving from rod to carbon rigging on a 45ft yacht is ‘equivalent to having an extra person sitting on the rail’
Carbon boat rigging saves 65% of the weight of rod rigging. It is invulnerable to water or UV, so is ideal for use on a yacht. True, carbon doesn’t handle lateral forces as well as steel, but the construction allows the fibres to move and flex within the sheath.
The stainless-steel fittings are designed to be replaceable, but the cable should be inspected and serviced regularly – a service Future provides in the package.
‘It is unrealistic to think we can get to the same price as rod, but we would hope to be less than double,’ says Austin. ‘It’s undoubtedly a cost premium to have composite rigging, but you have to look at it over 15- to 20-year life-cycle of the boat.’ The lateral rigging on a Grand Soleil 46 refitted recently cost around £15,000.
LightSpeed, a smaller US manufacturer that is also trying to drive carbon rigging into the sub-80ft cruising bracket, uses the same Toray T700 as Future, with smart titanium terminals that fit most common types of standard rigging screw and mast fitting. ‘We are unique in building an integrated Technora blend into the hoop structure of the cable, which delivers unmatched cable chafe protection and durability without adding bulk of a cover,’ says technical specialist Mike Wasten.
Comparative boat rigging costs
- Wire and rod – rigging a Dehler 38 with standard 1×19 wire or Nitronic rod, would be an estimated £2,280 for wire and around £5,000 for rod.
- HMPE (Dyneema/ Spectra) – Cables to rig a Dehler 38 would cost £2,900-3,700.
- Aramid – costs of around £7,500 for the Dehler 38 are 40-60% more than rod rigging
- PBO – Powerlite claims its cables cost just 30% more than rod, quoting $8,525 (£6,210) for a Dehler 38 with running backstays.
- Carbon – $20,000 (£14,600) for a complete set of stays with runners to suit a Dehler 38.
Enjoyed reading this?
A subscription to Yachting Monthly magazine costs around 40% less than the cover price .
Print and digital editions are available through Magazines Direct – where you can also find the latest deals .
YM is packed with information to help you get the most from your time on the water.
- Take your seamanship to the next level with tips, advice and skills from our experts
- Impartial in-depth reviews of the latest yachts and equipment
- Cruising guides to help you reach those dream destinations
Follow us on Facebook , Twitter and Instagram.
- New Sailboats
- Sailboats 21-30ft
- Sailboats 31-35ft
- Sailboats 36-40ft
- Sailboats Over 40ft
- Sailboats Under 21feet
- used_sailboats
- Apps and Computer Programs
- Communications
- Fishfinders
- Handheld Electronics
- Plotters MFDS Rradar
- Wind, Speed & Depth Instruments
- Anchoring Mooring
- Running Rigging
- Sails Canvas
- Standing Rigging
- Diesel Engines
- Off Grid Energy
- Cleaning Waxing
- DIY Projects
- Repair, Tools & Materials
- Spare Parts
- Tools & Gadgets
- Cabin Comfort
- Ventilation
- Footwear Apparel
- Foul Weather Gear
- Mailport & PS Advisor
- Inside Practical Sailor Blog
- Activate My Web Access
- Reset Password
- Customer Service

- Free Newsletter
Aluminum Cruisers: The Basics for First-Time Buyers

Marshall Sanderling 18: Used Boat Review

Affordable Cruising Sailboats, Continued

Maine Cat 41 Used Boat Review

Tillerpilot Tips and Safety Cautions

Best Crimpers and Strippers for Fixing Marine Electrical Connectors

Thinking Through a Solar Power Installation

How Does the Gulf Stream Influence our Weather?

Need a New Headsail Furler? Here’s What’s Involved

Master the Sailing Basics: Never Stop Learning the Little Things

How to Mount Your Camera on Deck: Record Your Adventures with…

Un-Stepping the Mast for America’s Great Loop

Ensuring Safe Shorepower

Sinking? Check Your Stuffing Box

The Rain Catcher’s Guide

How to Change Your Engine Mounts

Vinyl Boat Lettering DIY Application and Repair

Those Extras you Don’t Need But Love to Have

Three-Model BBQ Test

Alcohol Stoves— Swan Song or Rebirth?

UV Clothing: Is It Worth the Hype?

Preparing Yourself for Solo Sailing

How to Select Crew for a Passage or Delivery

Preparing A Boat to Sail Solo

Dear Readers

Chafe Protection for Dock Lines

Waxing and Polishing Your Boat

Reducing Engine Room Noise

Tricks and Tips to Forming Do-it-yourself Rigging Terminals
- Sails, Rigging & Deck Gear
Standing Rigging: How Tight Is Right?
Standing rigging tension is a peculiarly under-addressed subject. Easy to see how it would worry a new boat owner or someone going to sea.
Most experts step aboard, yank or twang the shrouds and stays and mutter, Pretty slack, Too Tight, or, Thats about right.
Youll find in the sailing literature very few discussions of the question: What does tight mean?
Even riggers rarely explain how much tension they like to see.
There are a few sailors who like the rigging so tight you could send an elephant up the backstay. It can result in excessive loads and wear on fittings, chain plates and the hull. The ultimate penalty for those who can’t stand any sag in the forestay is what ocean racing sailors call a gravity storm or, less dramatically, dropping the rig.
Others like to take up the slack just enough so that the rig is at rest when the boat is motionless. This approach sometimes leaves excessive slack to leeward that can result in shock loads, excessive wear and misalignment in fittings. It may take longer, but the ultimate penalty is the same.
In between (and probably in the most logical position) are those who like to take up the slack and stretch the wire just a bit. This is frequently accomplished, at least for the stays, with an adjustable backstay. When sailing, especially on the wind, tighten down to minimize slack in the forestay. When reaching, running or at anchor, ease off.
But the question is: How much stretch…especially in the shrouds?
If you stretch the wire 5% of its breaking strength, it will be considered moderate tension. Crank in 15% of the breaking strength and it is regarded as tight. These figures apply for any diameter of wire. You need only know the wires breaking strength.
Three years ago, in the June 15, 1995 issue, we published a discussion of the views of author Richard Henderson, Skenes Elements of Yacht Design and several riggers, along with an evaluation of an excellent booklet published by Sailsystems about a Selden Mast approach (described in detail in the October 15, 1991 issue) and an entirely new method developed by Michael Dimen, who called his gadget a Rigstick.
Mentioned was the familiar (see photo) Loos rigging tension gauge, which comes in two sizes. The Model 91 ($39) is for wire 3/32″ to 5/32″. The Model 90 ($45.50) is for 3/16″ to 9/32″. The gauge depends on the bending property of aluminum plate.
The strange-looking gauges don’t willingly produce great accuracy because you have to hold one reading steady while noting another, which also requires that you make a judgment about where the centerline of the wire falls on a scale. Not easy to do.
The big name in galvanized and stainless cable (as wire is called in the trade), cable hardware and tools, Loos & Co., Inc. went looking for a better mousetrap.
Who did Gus Loos go to? The guy who designed the original gauge, his old friend, Donald J. Jordan, an 82-year-old retired Pratt & Whitney engineer who has been sailing out of Marblehead, Massachusetts, in the likes of Lightnings, Friendship sloops, Sound Schooners (which was the prized New York Yacht Club class in 1918), Pearson Wanderers and currently in a 16′ Starling Burgess design, appropriately called a Marblehead.
The old tension gauge wasnt bad, said Jordan. But it tended to get bent. Then the patent ran out and I told Gus we could do a better one.
The new version (see photo) is a distinct improvement over the old aluminum version. A better design, its also much more substantially made of aluminum, stainless and nylon.
The design problems were interesting, Jordan said. A conventional cable tension gauge has two rollers at the ends with a spring-loaded plunger in the middle and a dial gauge to measure the plunger movement. The wheels have to rotate…because they must permit some small but vital movement. That makes the tool expensive. My approach was to have two stationary wheels and a carefully contrived square slider in a arc-slot on the other.
The new Loos gauges use a long-lasting stainless spring to produce the tension. Slip the lower grooved wheels on a shroud or stay, pull the lanyard to engage the upper hook, relax, read the tension at your leisure and consult the scale to learn the pounds of pressure on the wire and the percentage of breaking strength of the wire. There are three wire gauge notches in the edge. The gauge can be left on the wire while turnbuckle adjustments are made.
The accompanying booklet, very well-done, contains a good tight discussion of the subject; some recommendations; a table on how to equalize tension in different sizes of wire, and line-drawn diagrams clearly showing rig tensions (windward and leeward) created by light, medium and heavy winds.
The wire gauge comes in three sizes, for 3/32″-5/32″, 3/16″-1/4″ and 9/32″-3/8″. West Marine sells them, respectively, for $57.99, $69.99 and $$122.99. Defender Industries cuts them to $49.95, $51.95 and $105.95. Prices in the BOAT/U.S. catalog are in between.
What if, instead of 1×19 wire, you have rod rigging? There are four new models that are bigger, heavier and, of course, more costly. They work the same, but take some arm strength. One is for .172-.250 rod, another for .281-.375. Two others models are for metric rod. West Marine sells the rod gauges for $186.99. Neither Defender nor BOAT/U.S. shows them in their catalogs.
Contact- Loos & Co., Inc., 901 Industrial Blvd., Naples, FL 34104, 800/321-5667. Rigstick, 311 Jackson, Port Townsend, WA 98368; 800/488-0855. Sailsystems, PO Box 1218, Marblehead, MA 01945; 978/745-0440.
RELATED ARTICLES MORE FROM AUTHOR
How to mount your camera on deck: record your adventures with diy innovations, leave a reply cancel reply.
Log in to leave a comment
Latest Videos

The Cheap Big Cruising Sailboat – Endeavour 42

Marine VHF Radio – What You Need to Know

Pearson 37 & 37-2 – Behind the Curtain

How To Test a Boat Engine
Latest sailboat review.

- Privacy Policy
- Do Not Sell My Personal Information
- Online Account Activation
- Privacy Manager
Visit our Popular Forums
- Monohull Sailboats
- Multihull Sailboats
- Powered Boats
- General Sailing
- Antares Yachts
- Fountaine Pajot
- Lagoon Catamarans
Cruising Business
- Boat Classifieds
- General Classifieds
- Crew Positions
- Commercial Posts
- Vendor Spotlight
Life Aboard a Boat
- Provisioning: Food & Drink
- Families, Kids, & Pets Afloat
- Recreation, Entertainment, & Fun
- Boat Ownership & Making a Living
- Liveaboard's Forum
Seamanship, Navigation & Boat Handling
- Seamanship & Boat Handling
- Training, Licensing, & Certification
- Health, Safety, & Related Gear
- Rules of the Road, Regulations, & Red Tape
Engineering & Systems
- Const. / Maint. / Refit
- Product / Service Reviews
- Electronics: Comms / AV
- Electrical: Batts / Gen / Solar
- Lithium Power Systems
- Engines & Propulsion
- Propellers & Drive Systems
- Plumbing / Fixtures
- Deck Hdw: Rigging / Sails
- Aux. Equipment & Dinghy
- Anchoring & Mooring
Photo Categories
- Member Galleries
- Life Onboard
- Sailing in the Wind
- Power Boats
- Cruising Destinations
- Maint. & Boat Building
- Marine Life
- Scuba Diving & Divers
- General Photos
Recent Photos

Listing Categories
- African Cats
- view more »
- Crew Wanted
- Crew Available
- Enhance Your Account
- Meet the Mods
- Meet the Advisors
- Signup for The Daily Cruiser Email

| ||||||||||||||||||||||||||||||||||||||||||||||||||||||||||||||||||||||||||||||||||||||||||||||||||||||||||||||||||||||||||||||||||||||||||||||||||||||||||||||||||||||||||||||||||||||||||||||||||||||||||||||||||||||||||||||||||||||||||||||||||||||||||||||||||||||||


IMAGES
VIDEO
COMMENTS
I don't mean to imply that running backstays are suitable for all boats and applications. But if your interests lie in bluewater passagemaking and you take a belt-and-suspenders approach to your safety, I believe that you'll agree that the added weight, windage, cost, and inconvenience are more than justified.
At some point when you get serious about sail trim, whether for racing or just high performance cruising, you're going to want an adjustable backstay. Most C-22s and similar daysailers were rigged at the factory with fixed length backstays that are only slightly adjustable with a turnbuckle. They're not intended for adjusting to different wind…
It is easy to think of standing rigging and running rigging as two different parts on a sailboat, but in fact, they both share the same goal: Allow your yacht to sail. Running rigging is thought of more often with sailing as sailors use them to set, trim and adjust the sails. The standing rigging,
The difference between standing rigging and running rigging. Sometimes things can get confusing as some of our nautical terms are used for multiple items depending on the context. Let me clarify just briefly: The rig or rigging on a sailboat is a common term for two parts:. The standing rigging consists of wires supporting the mast on a sailboat and reinforcing the spars from the force of the ...
Question: When your riggers talk about standing rigging, they often use terms I don't recognize. Can you break it down for me? From the Rigger: Let's play 'Name that Stay'… Forestay (1 or HS) - Read more…
The Highfield lever was originally invented by the late Mr J. S. Highfield in about 1930. I believe this concept was initially intended to load and release running backstays at a predesignated tension. This method for runner tensioning has since been replaced with 'high speed' synthetics, fancy blocks, tackles, and/or dedicated winches. Some years later,...
Whether you're cruising or racing, an adjustable backstay is a helpful device for changing sail shape and controlling forestay tension for improved upwind and downwind performance. By dialing in the right backstay tension you can increase boatspeed. Regardless of whether you have a masthead or fractional rig, using an adjustable backstay is essential to good sail shape.
There's more headstay sag when the backstay is eased, resulting in there being more shape in the front of the sail. Mike Ingham. While coaching, I'm often asked the best order of depowering.
The running rigging on a sailboat consists of all the lines used to hoist, lower, and control the sails and sailing equipment. These lines usually have different colors and patterns to easily identify their function and location on the vessel.
The backstay is a powerful tool and you should introduce it to your toolbox for more than just keeping the rig in the boat. No matter what the rig type or stiffness the tensioning the backstay keeps the headstay from sagging. Headstay sag equals extra power in the headsail, so when you don't want the power (heeling too much) use the backstay.
The variety of HMPE you use is vital, too, as the strands within the line align themselves with the load. 'A 50ft-long backstay made from normal Dyneema can grow 4-6 inches in length,' says Franta.
Here are some general guidelines for tuning your mast's standing rigging. Please see our blog on how to properly adjust a turnbuckle before you begin. As always we recommend seeking the advice of a professional rigger for more specific tips and tricks regarding tuning your boat's rigging. Your boat must be in the water. Begin by just slacking off all of...
Standing rigging tension is a peculiarly under-addressed subject. Easy to see how it would worry a new boat owner or someone going to sea. Most experts step aboard, yank or twang the shrouds and stays and mutter, Pretty slack, Too Tight, or, Thats about right.
Anything that retains moisture and can deprive the wire rigging of oxygen can significantly weaken the wire at the point of contact. I have attached rings, to which halyard blocks and cleats are attached with using seizing wire to good effect. A small seizing mallet ensures a tight wrap but one that will not retain moisture.
Backstay adjusters allow racers and cruisers to adjust and control mast rake and headstay tension. Adjusting the backstay shapes the main to optimize upwind and downwind performance.
A backstay is a part of the standing rigging that runs from the mast to back of the boat, counteracting the forestay and headsail. It is an important sail trim control and has a direct effect on the shape of the mainsail and the headsail.
Integral backstay adjusters can play a big role in how a boat sails. Being able to adjust the backstay tension from the pump of a handle can be useful on cruisers just as much as racers. We all need to make general changes to the boats trim depending on wind and wave conditions in order...
Re: Standing rigging question about backstays Garret covered the upwind loads, but downwind you frequently found that rigs had running backstays...a backstay tackle that was set up on the side opposite the boom and let off on the side the boom was carried out on.
[Update] I have written a lot about Dyneema standing rigging so I now have a guide to it all in: Dyneema / Synthetic Rigging Summary[End Update] All the posts I have been writing about Dyneema rigging and chainplates have been mostly focused on Shrouds (the standing rigging that holds masts up from the sides).
From a structural view, there's really no true advantage for split backstays on a sloop, as running backstays are more 'versatile' in the function of applying additional 'helper' stress to the forestay; and, the runners are just as redundant as the second backstay.
Rigging is designed; it doesn't just happen. Fractional rigged boats and especially B&R fractional rigged boats are a special breed. There is a long but very informative discussion on the design criteria, strengths and tuning characteristics of these rigs here in the Knowledgebase which gives lots of good info but probably irrlevent to someone with a Catalina on which the backstay is even more ...
A New Backstay using Compact Strand 1×19, Hayn Hi-mod Failsafe Insulators. Maintaining the Oyster Yachts Factory Spec's. SSB is a commonly used abbreviation that stands for single side band radio.We are certainly not radio experts here at The Rigging Company.
Step 6: Assemble Plug. Push the masthead and backstay crane. Assemble the plug into the mast. Cut a 250mm Dyneema length and tie the mainsail's head to the backstay crane.