
Sail Rigging Types: A Comprehensive Guide
by Emma Sullivan | Jul 22, 2023 | Sailboat Racing
Short answer sail rigging types:
Sail rigging types refer to the various configurations and arrangements of ropes, cables, and fittings used to support and control sails on a sailing vessel. Common types include the sloop, cutter, ketch, yawl, schooner, and catboat. Each type has different advantages and is suited for different sailing conditions and purposes.
Sail Rigging Types: A Comprehensive Guide for Exploring Different Options
Title: Sail Rigging Types: A Comprehensive Guide for Exploring Different Options
Introduction: Mastering the art of sail rigging is an essential skill for every sailor. It not only contributes to boat performance but also determines your ability to harness the wind effectively. With various types of sail rigging available, understanding their differences and knowing when to use them can be a game-changer on the water. In this comprehensive guide, we will explore different sail rigging options, providing you with professional insights and some witty anecdotes along the way.
1. Bermuda Rig: Elegant and versatile, the Bermuda rig is undoubtedly the most common type found in modern sailing. Consisting of a single triangular mainsail and a jib in front, this arrangement allows sailors to easily control their sails while providing excellent maneuverability even in challenging conditions. Its origins can be traced back to the early 17th century, proving its timelessness as a reliable choice across various sailing disciplines.
2. Gaff Rig: For those seeking a classic look and craving nostalgia on the open seas, gaff rigs provide an impressive aesthetic appeal reminiscent of days gone by. Characterized by horizontal wooden poles (gaffs) supporting a four-sided mainsail, this traditional rig offers substantial power and good downwind performance. However, managing larger sails in heavier winds may demand more effort from the crew.
3. Cat Rig: Simplicity meets efficiency with cat rigs – perfect for solo or short-handed sailors who prefer straightforwardness without multiple lines cluttering their cockpit. This type comprises only one mast located near the bow carrying a large mainsail for optimum power-to-weight ratio. While cats excel at upwind sailing due to their balanced weight distribution, they might lack versatility compared to other rig types.
4. Ketch Rig: The sophisticated charm of ketch rigs has captured many sailors’ hearts throughout history. Featuring two masts – a taller main mast towards the front and a shorter mizzen mast towards the rear – ketch rigs offer versatility and fine-tuned sail options for diverse wind conditions. The presence of multiple sails enables better balance, making them ideal for long-distance cruising or upwind sailing when the going gets tough.
5. Schooner Rig: Sailors with a taste for grandeur will find themselves enchanted by the elegant schooner rig. Comprising of two or more masts, the fore-and-aft configuration differentiates it from its square-rigged counterparts. Schooners boast exceptional sail area flexibility and are often admired for their majestic appearance, ensuring an impressive sight among fellow seafarers. However, this elegance comes at the cost of additional complexity in sail management.
Conclusion: Choosing the right sail rigging type requires careful consideration of various factors such as your sailing style, boat size, intended use, and personal preferences. Each rigging type brings its unique set of advantages and limitations to the table, so finding the perfect fit might take some experimentation.
Remember: understanding how these different types influence your boat’s performance will not only enhance your sailing skills but also add excitement to each adventure on the water.
Happy smooth sailing with your newfound knowledge about sail rigging types!
Exploring the Pros and Cons of Sail Rigging Types: How to Choose the Right Setup for Your Needs
Title: Navigating the Seas of Sail Rigging: Weighing the Pros and Cons to Find Your Perfect Setup
Introduction: Setting sail on a mesmerizing voyage brings an unparalleled sense of freedom and exhilaration, but the success of your nautical adventure largely hinges on a crucial decision – choosing the right sail rigging setup. With a plethora of options available, it becomes vital to explore the pros and cons of sail rigging types in order to find the perfect fit for your specific needs. In this blog post, we will delve into the intricacies of various sail rigging types, providing you with detailed insights that will steer you towards making an informed choice.
Picture yourself standing at the helm while salty ocean breeze fills your lungs and gleaming waters extend as far as the eye can see. Now, imagine having complete control over how your vessel harnesses wind power to propel through these vast expanses. This is precisely where sail rigging comes into play – it ensures optimal utilization of wind energy through systematic arrangement and configuration of sails, masts, and supporting structures.
Anchoring Down: Understanding Key Sail Rigging Types
1. Bermuda Rig: Pros: – Efficiency: The Bermuda rig provides exceptional maneuverability due to its triangular shape which allows you to swiftly change course while maintaining stability. – Performance in varied conditions: Its versatility enables sailors to navigate efficiently across different wind speeds. – Ease of handling: The simplicity and user-friendly nature make it an ideal choice for both seasoned sailors and beginners alike.
Cons: – Limited sail area: Compared to other rigs like gaff or lug rigs, Bermuda rigs tend to have slightly smaller overall surface area which may impact speed in light winds. – Heightened stress on mast: The tall mast required by this type of rig increases bending forces when facing strong gusts or storms.
2. Gaff Rig: Pros: – Enhanced downwind performance: The large main gaff sail enables excellent downwind sailing, making it an ideal choice for cruisers seeking leisurely voyages. – Easy short-handed handling: With fewer sails to manage, the gaff rig is particularly advantageous for those who prefer solo or small crew sailing adventures. – Classic aesthetics: The timeless appeal of gaff rigs stands out from the crowd, inviting admiration from fellow sailors and onlookers alike.
Cons: – Limited upwind performance: Due to the relatively narrower sail area and lower aspect ratio compared to Bermuda rigs, gaff rigs may struggle when facing strong headwinds or sailing close to the wind. – Potential complexity in rigging: Setting up a proper gaff rig demands more time and meticulousness due to additional halyards and peak adjustments required.
3. Lug Rig: Pros: – Excellent adaptability: Lug rigs offer significant versatility as their sails can be easily set and adjusted according to varying wind conditions with minimal effort. – Broad range of applications: This type of rig is renowned for its robustness, making it a popular choice among dinghy sailors, coastal cruisers, and even historical vessels restoration enthusiasts. – Single-masted simplicity: Lug rigs often utilize a single mast arrangement that simplifies handling maneuvers, reducing any potential confusion during sailing operations.
Cons: – Suboptimal upwind performance: Similarly to gaff rigs, lug rigs may face limitations when attempting to sail efficiently upwind due to their narrower sail area. – Reduced speed potential: Despite providing stability in various conditions, lug rigs are generally not designed for maximizing speed over longer distances.
In your quest to find the perfect sail rigging setup tailored to your needs, understanding both the advantages and disadvantages associated with different types becomes paramount. From the nimble Bermuda rig ensuring swift course changes, through classic elegance offered by gaff rigging methods enabling relaxing jaunts on calm waters, to versatile lug setups favored by rugged adventurers – there exists a rigging choice that aligns with your sailing aspirations.
Remember, choosing the right sail rigging type involves considering factors such as intended usage, personal preferences, and the geographical locations you plan to explore. By navigating through this comprehensive analysis of the pros and cons outlined above, you will confidently chart a course towards seamless control, superior performance, and unbridled satisfaction on every voyage.
Step-by-Step Guide: Understanding the Basics of Sail Rigging Types
Are you curious about sail rigging types? Maybe you’ve heard some terms like sloop and ketch, but aren’t quite sure what they mean. Don’t worry, we’ve got you covered! In this step-by-step guide, we will take you through the basics of sail rigging types, helping to demystify these terms and give you a clearer understanding of how different sailing vessels are set up.
Step 1: First Things First – What is Sail Rigging? Before diving into the different rigging types, it’s important to understand what sail rigging actually refers to. In simple terms, sail rigging encompasses all the components and systems that support and control the sails on a boat or ship. These include masts, booms, stays (cables or ropes), and various other hardware.
Step 2: Sloop Rig – The Most Common Type The sloop rig is undoubtedly the most common type of sailboat rig out there. It features a single mast located towards the bow (front) of the vessel with a mainsail attached to it. Additionally, there is usually a smaller headsail called a jib or genoa at the front of the boat. This arrangement provides versatility and ease of handling for sailors in varying wind conditions.
Step 3: Ketch Rig – Double The Fun If you’re looking for a bit more complexity in your sail rigging setup, then let’s talk about ketch rigs. Ketch rigs feature two masts – a taller mainmast towards the center of the boat and a shorter mizzenmast towards its stern (back). This configuration adds an extra dimension to sailing as it allows for more independent adjustments between sails on each mast. Ketch rigs are often favored by those embarking on long-distance cruising voyages due to their ability to balance sails effectively.
Step 4: Schooner Rig – A Majestic Sight For those with a penchant for classic sailing vessels, the schooner rig is sure to capture your imagination. The schooner rig typically consists of two or more masts, with the forward mast (the foremast) being shorter than or equal in height to the aft mast (the mainmast). Schooners were historically used as fast cargo vessels, and their elegant rigs earned them a reputation for speed. Today, schooners are favored by enthusiasts who appreciate their unique aesthetic appeal.
Step 5: Cutter Rig – Versatility at Its Finest The cutter rig may not be as commonly known as the sloop or ketch rigs, but it certainly has its advantages. This configuration features a single mast located towards the bow with multiple headsails attached to it. Typically, cutters have two headsails – a jib/forestaysail and a staysail. These additional sails give cutters greater flexibility to adapt to various wind conditions, making them ideal for both racing and cruising purposes.
Step 6: Cat Rig – Simplified Sailing Last but not least, we have the cat rig – a straightforward and minimalist sail setup that is common on smaller sailboats. The cat rig features a single mast positioned near the bow of the boat and only one mainsail attached directly to it. Due to its simplicity, this rigging type is often preferred by novice sailors or those seeking an easy-to-handle setup.
In conclusion, understanding sail rigging types can greatly enhance your sailing experience and help you make informed decisions when choosing a vessel for your adventures on the water. Whether you opt for the versatility of a sloop rig or yearn for the majestic sight of a schooner rig, each configuration offers its own set of benefits and appeals to different types of sailors. So go out there, discover which sail rigging type suits you best, and let your sails take you wherever your love for sailing desires!
Frequently Asked Questions about Sail Rigging Types: All You Need to Know
Sailing is an art that requires attention to detail, skill, and knowledge of various elements such as sail rigging types. As a sailor or someone interested in the world of sailing, it is essential to familiarize yourself with the frequently asked questions about sail rigging types. In this blog post, we aim to provide you with detailed professional insights while maintaining a witty and clever tone.
1. What are the different types of sail rigging?
When it comes to sail rigging, there are several types commonly used in sailing vessels. The most common ones include sloop rig, ketch rig, schooner rig, cutter rig, catboat rig, and yawl rig. Each type has its distinctive features and advantages depending on factors like boat size, wind conditions, and intended use.
2. What is the sloop rigging type?
The sloop rig is the most popular one among cruising yachts due to its simplicity and versatility. It consists of a single mast located towards the bow (front) of the boat with only one head-sail called a jib or genoa ahead of the mast. The mainsail is attached aft (back) of the mast.
Imagine a sleek and elegant vessel cutting through the waters effortlessly – that’s precisely what you get with a sloop rigged yacht!
3. What about ketch rigs?
Ketch rigs feature two masts: one mainmast taller than the other called the mizzen mast located aft of the mainmast. This configuration allows for better weight distribution and more flexibility in sail handling by dividing sails between two masts.
Picture yourself aboard an impressive vessel gliding across calm seas while enjoying full control over your sails – that’s what makes a ketch rigged yacht stand out!
4. How does schooner rigging work?
Schooner rigs boast two or more masts where all but one are shorter than or equal in height to the foremast, creating a distinct and captivating appearance. The larger area of sail provided by multiple masts allows for increased speed, making schooners highly sought-after in sailing races.
If you dream of commanding a magnificent vessel with multiple sails majestically billowing in the wind as you traverse the open ocean, consider investing in a schooner rigged yacht!
5. What sets cutter rigs apart?
Cutter rigs feature a single mast set slightly further back than the sloop rig, along with two or more headsails attached to the forestay. This configuration grants sailors greater flexibility to adjust their sails based on changing weather conditions.
Imagine yourself skillfully tacking your yacht against strong winds while effortlessly adjusting your foresail configurations – that’s precisely what cutter rigging offers!
6. How do catboat rigs function?
Catboat rigs are known for their simplicity and ease of handling. They typically have a single mast mounted forward with a single large mainsail without any accompanying headsails or jibs. This type of rig is perfect for leisurely cruising and is often favored by novice sailors due to its straightforward setup.
Picture yourself aboard an adorable catboat smoothly gliding across calm waters, appreciating the simplicity and charm it offers – that’s what makes catboats stand out from the crowd!
7. What about yawl rigs?
Yawl rigs resemble ketch rigs but possess a shorter mizzen mast positioned aft near the stern (rear) of the boat. The smaller mizzen mast improves balance and control during tricky maneuvers such as heaving-to or sailing downwind while preventing excessive weather helm.
Imagine yourself confidently navigating through rough seas while maintaining optimal control over your maneuvering options – that’s where yawl rigging truly shines!
By now, you should have gained a comprehensive understanding of various sail rigging types frequently encountered in the thrilling world of sailing. Remember to choose your sail rigging wisely based on your vessel size, intended use, and desired sailing experience. Bon voyage!
A Beginner’s Journey into Sail Rigging Types: Where to Start and What to Expect
Have you ever dreamt of embarking on an exciting sailing adventure, feeling the wind in your hair and the thrill of being one with the open sea? If so, then understanding sail rigging types is an essential first step towards turning that dream into a reality. In this beginner’s guide, we will take you through the fascinating world of sail rigging, providing you with valuable insights on where to start and what to expect.
First and foremost, let’s unravel the enigma behind sail rigging. So, what exactly is sail rigging? In simple terms, it refers to the arrangement and positioning of sails on a boat or ship. While this may sound straightforward, there are numerous types of rigs out there – each catering to specific sailing conditions and personal preferences. Fear not! We’ll navigate you through these options.
One commonly adopted type of rig is known as the sloop rig. This traditional setup features a single mast located near the bow (front) of the boat along with a main sail at its aft (rear) end. Additionally, there may be a jib or genoa placed forward of the mast for better control. The sloop rig offers excellent versatility and ease of handling for beginners due to its simplicity.
For those seeking more excitement and challenge on their sailing journey, consider exploring catamarans or trimarans – vessels featuring multiple hulls connected by crossbeams. These boats often employ a variant called the fractional sloop rig which adds exhilaration with increased speed potential while maintaining relative ease in managing sails.
Another popular option is the ketch rig – notable for its two masts: one taller main mast towards the boat’s centerline and another smaller mizzen mast positioned further aft. This arrangement provides greater flexibility when it comes to distributing sail area for different wind conditions while also offering redundancy should any one mast or sail be compromised.
If you’re yearning for a touch of history and aesthetics, delving into the world of schooners might just be what your heart desires. Schooners boast an elegant rig featuring multiple masts – two or more – with both fore-and-aft sails (sails that run parallel to the boat’s centerline) and square-rigged sails (sails perpendicular to the centerline). Though it may require a more skilled hand, sailing on a schooner can transport you to a bygone era with its majestic charm.
Now that we’ve covered some popular sail rigging types, let’s discuss where to start as a beginner. As appealing as it may be to dive straight into more advanced setups like schooners, it’s crucial to first gain familiarity and confidence with simpler rigs such as sloops. Take your time to understand the basics of sail controls, wind direction awareness, and safety precautions before progressing towards more complex rigs.
When it comes to expectations, remember that learning sail rigging is not just about memorizing technicalities but also developing a deep connection with your vessel and nature itself. Sailing demands patience, adaptability, and an ability to read winds and waters intuitively. Embrace the challenges along your journey while keeping in mind that mistakes are part of the learning process – every experienced sailor has faced them at some point!
In conclusion, embarking on a beginner’s journey into sail rigging entails discovering various types of rigs suited for different purposes and preferences. Start by acquainting yourself with simpler setups like sloops before venturing into more intricate designs such as catamarans or historic schooners. Remember that progress takes time; focus on building foundational skills while embracing the joy and challenges sailing offers. So, hoist those sails high and set forth confidently into the vast ocean – adventure awaits!
Mastering Advanced Sail Rigging Techniques: Taking Your Sailing Experience to the Next Level
Are you ready to elevate your sailing skills and dive into the world of advanced sail rigging techniques? If you’re seeking to enhance your sailing experience with a touch of expertise, then look no further! In this blog post, we will explore the intricate realm of advanced sail rigging techniques that will undoubtedly take your passion for sailing to new heights. So grab a pen and paper, or bookmark this page, because you won’t want to miss out on these valuable insights.
Before we delve into the nitty-gritty details, let’s first understand what sail rigging entails. Sail rigging is the art of setting up and adjusting the sails on your boat in such a way that maximizes performance when catching those delightful winds. It involves an amalgamation of knowledge about different types of sails, their various components, and how they interact with each other in different wind conditions.
Now that we have established the importance of sail rigging let’s explore some advanced techniques that can set you apart from average sailors:
1. Fine-Tuning Your Mast Bend: The curve of your mast plays a crucial role in determining sail shape and overall performance. Knowing how to adjust this bend incrementally can optimize your boat’s speed and stability across varying wind strengths. By mastering mast bend adjustments using shroud tension or cunningham lines, you’ll harness every gust nature throws at you!
2. Perfecting Your Sail Twist: Achieving ideal twist in your sails can be a game-changer on the water. Adjusting the angle between the top and bottom sections of your sail enables controlled power distribution throughout its surface area. This technique allows you to maintain optimal balance while navigating unpredictable wind patterns, giving you an edge over other sailors struggling with less refined twists.
3. Utilizing Adjustable Tracks: Ever wished you could move your jib car forward or aft without hoisting it up the mast? Well, with adjustable tracks, you can! These clever inventions allow you to tweak your sail’s positioning effortlessly, adapting to various wind angles without compromising your boat’s balance. So say goodbye to inefficient sailing angles and hello to greater control!
4. Mastering Cunningham Controls: The cunningham is a powerful tool that regulates the tension along the luff of the sails. By skillfully manipulating this control line, you can flatten your sails during high winds or create depth for enhanced power in lighter breezes. Truly an advanced technique that adds finesse and versatility to your sailing repertoire.
5. Exploring New Sail Materials: Dacron may be tried and true, but have you ventured into the realm of exotic sail materials? With advancements in technology, innovative fabrics like carbon fiber or laminated materials offer superior strength-to-weight ratios and unbeatable performance gains. By experimenting with these new-age materials, you can unlock heightened speed potential while keeping your boat well-equipped for whatever Mother Nature throws at it.
Now that we’ve touched upon these advanced sail rigging techniques, remember that practice makes perfect! Experimentation and fine-tuning are vital components of mastering these skills. Don’t be afraid to reach out to experienced sailors or seek professional guidance in understanding these techniques better.
In conclusion, making strides from a proficient sailor to an extraordinary one involves exploring advanced sail rigging techniques meticulously. By adding these skills to your arsenal and implementing them effectively on the water, you’ll find yourself sailing circles around others who haven’t yet embraced these novel practices.
So gear up (pun intended), dive deep into masterful sail rigging methods – bending masts, twisting sails just right, utilizing adjustable tracks smartly – and let your newfound expertise take you on an exhilarating journey where average simply doesn’t exist!
Recent Posts

- Sailboat Gear and Equipment
- Sailboat Lifestyle
- Sailboat Maintenance
- Sailboat Racing
- Sailboat Tips and Tricks
- Sailboat Types
- Sailing Adventures
- Sailing Destinations
- Sailing Safety
- Sailing Techniques
The Ultimate Guide to Sail Types and Rigs (with Pictures)
What's that sail for? Generally, I don't know. So I've come up with a system. I'll explain you everything there is to know about sails and rigs in this article.
What are the different types of sails? Most sailboats have one mainsail and one headsail. Typically, the mainsail is a fore-and-aft bermuda rig (triangular shaped). A jib or genoa is used for the headsail. Most sailors use additional sails for different conditions: the spinnaker (a common downwind sail), gennaker, code zero (for upwind use), and stormsail.
Each sail has its own use. Want to go downwind fast? Use a spinnaker. But you can't just raise any sail and go for it. It's important to understand when (and how) to use each sail. Your rigging also impacts what sails you can use.

On this page:
Different sail types, the sail plan of a bermuda sloop, mainsail designs, headsail options, specialty sails, complete overview of sail uses, mast configurations and rig types.
This article is part 1 of my series on sails and rig types. Part 2 is all about the different types of rigging. If you want to learn to identify every boat you see quickly, make sure to read it. It really explains the different sail plans and types of rigging clearly.

Guide to Understanding Sail Rig Types (with Pictures)
First I'll give you a quick and dirty overview of sails in this list below. Then, I'll walk you through the details of each sail type, and the sail plan, which is the godfather of sail type selection so to speak.
Click here if you just want to scroll through a bunch of pictures .
Here's a list of different models of sails: (Don't worry if you don't yet understand some of the words, I'll explain all of them in a bit)
- Jib - triangular staysail
- Genoa - large jib that overlaps the mainsail
- Spinnaker - large balloon-shaped downwind sail for light airs
- Gennaker - crossover between a Genoa and Spinnaker
- Code Zero or Screecher - upwind spinnaker
- Drifter or reacher - a large, powerful, hanked on genoa, but made from lightweight fabric
- Windseeker - tall, narrow, high-clewed, and lightweight jib
- Trysail - smaller front-and-aft mainsail for heavy weather
- Storm jib - small jib for heavy weather
I have a big table below that explains the sail types and uses in detail .
I know, I know ... this list is kind of messy, so to understand each sail, let's place them in a system.
The first important distinction between sail types is the placement . The mainsail is placed aft of the mast, which simply means behind. The headsail is in front of the mast.
Generally, we have three sorts of sails on our boat:
- Mainsail: The large sail behind the mast which is attached to the mast and boom
- Headsail: The small sail in front of the mast, attached to the mast and forestay (ie. jib or genoa)
- Specialty sails: Any special utility sails, like spinnakers - large, balloon-shaped sails for downwind use
The second important distinction we need to make is the functionality . Specialty sails (just a name I came up with) each have different functionalities and are used for very specific conditions. So they're not always up, but most sailors carry one or more of these sails.
They are mostly attached in front of the headsail, or used as a headsail replacement.
The specialty sails can be divided into three different categories:
- downwind sails - like a spinnaker
- light air or reacher sails - like a code zero
- storm sails

The parts of any sail
Whether large or small, each sail consists roughly of the same elements. For clarity's sake I've took an image of a sail from the world wide webs and added the different part names to it:

- Head: Top of the sail
- Tack: Lower front corner of the sail
- Foot: Bottom of the sail
- Luff: Forward edge of the sail
- Leech: Back edge of the sail
- Clew: Bottom back corner of the sail
So now we speak the same language, let's dive into the real nitty gritty.
Basic sail shapes
Roughly speaking, there are actually just two sail shapes, so that's easy enough. You get to choose from:
- square rigged sails
- fore-and-aft rigged sails
I would definitely recommend fore-and-aft rigged sails. Square shaped sails are pretty outdated. The fore-and-aft rig offers unbeatable maneuverability, so that's what most sailing yachts use nowadays.

Square sails were used on Viking longships and are good at sailing downwind. They run from side to side. However, they're pretty useless upwind.
A fore-and-aft sail runs from the front of the mast to the stern. Fore-and-aft literally means 'in front and behind'. Boats with fore-and-aft rigged sails are better at sailing upwind and maneuvering in general. This type of sail was first used on Arabic boats.
As a beginner sailor I confuse the type of sail with rigging all the time. But I should cut myself some slack, because the rigging and sails on a boat are very closely related. They are all part of the sail plan .
A sail plan is made up of:
- Mast configuration - refers to the number of masts and where they are placed
- Sail type - refers to the sail shape and functionality
- Rig type - refers to the way these sails are set up on your boat
There are dozens of sails and hundreds of possible configurations (or sail plans).
For example, depending on your mast configuration, you can have extra headsails (which then are called staysails).
The shape of the sails depends on the rigging, so they overlap a bit. To keep it simple I'll first go over the different sail types based on the most common rig. I'll go over the other rig types later in the article.
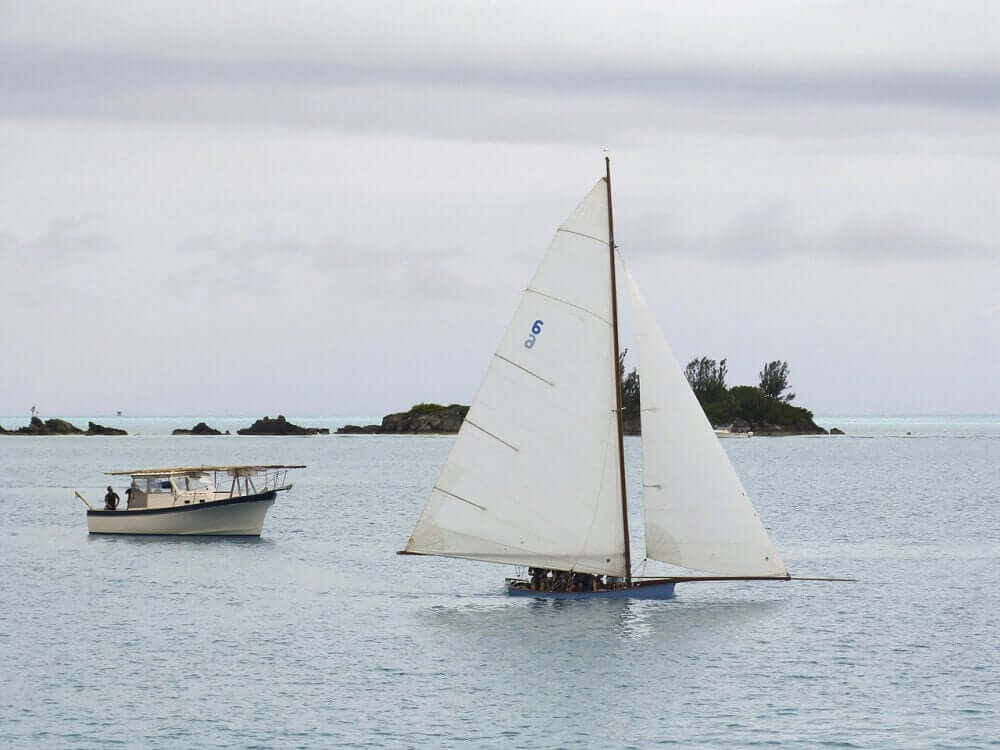
Bermuda Sloop: the most common rig
Most modern small and mid-sized sailboats have a Bermuda sloop configuration . The sloop is one-masted and has two sails, which are front-and-aft rigged. This type of rig is also called a Marconi Rig. The Bermuda rig uses a triangular sail, with just one side of the sail attached to the mast.
The mainsail is in use most of the time. It can be reefed down, making it smaller depending on the wind conditions. It can be reefed down completely, which is more common in heavy weather. (If you didn't know already: reefing is skipper terms for rolling or folding down a sail.)
In very strong winds (above 30 knots), most sailors only use the headsail or switch to a trysail.
The headsail powers your bow, the mainsail powers your stern (rear). By having two sails, you can steer by using only your sails (in theory - it requires experience). In any case, two sails gives you better handling than one, but is still easy to operate.
Let's get to the actual sails. The mainsail is attached behind the mast and to the boom, running to the stern. There are multiple designs, but they actually don't differ that much. So the following list is a bit boring. Feel free to skip it or quickly glance over it.
- Square Top racing mainsail - has a high performance profile thanks to the square top, optional reef points
- Racing mainsail - made for speed, optional reef points
- Cruising mainsail - low-maintenance, easy to use, made to last. Generally have one or multiple reef points.
- Full-Batten Cruising mainsail - cruising mainsail with better shape control. Eliminates flogging. Full-length battens means the sail is reinforced over the entire length. Generally have one or multiple reef points.
- High Roach mainsail - crossover between square top racing and cruising mainsail, used mostly on cats and multihulls. Generally have one or multiple reef points.
- Mast Furling mainsail - sails specially made to roll up inside the mast - very convenient but less control; of sail shape. Have no reef points
- Boom Furling mainsail - sails specially made to roll up inside the boom. Have no reef points.
The headsail is the front sail in a front-and-aft rig. The sail is fixed on a stay (rope, wire or rod) which runs forward to the deck or bowsprit. It's almost always triangular (Dutch fishermen are known to use rectangular headsail). A triangular headsail is also called a jib .
Headsails can be attached in two ways:
- using roller furlings - the sail rolls around the headstay
- hank on - fixed attachment
Types of jibs:
Typically a sloop carries a regular jib as its headsail. It can also use a genoa.
- A jib is a triangular staysail set in front of the mast. It's the same size as the fore-triangle.
- A genoa is a large jib that overlaps the mainsail.
What's the purpose of a jib sail? A jib is used to improve handling and to increase sail area on a sailboat. This helps to increase speed. The jib gives control over the bow (front) of the ship, making it easier to maneuver the ship. The mainsail gives control over the stern of the ship. The jib is the headsail (frontsail) on a front-and-aft rig.
The size of the jib is generally indicated by a number - J1, 2, 3, and so on. The number tells us the attachment point. The order of attachment points may differ per sailmaker, so sometimes J1 is the largest jib (on the longest stay) and sometimes it's the smallest (on the shortest stay). Typically the J1 jib is the largest - and the J3 jib the smallest.
Most jibs are roller furling jibs: this means they are attached to a stay and can be reefed down single-handedly. If you have a roller furling you can reef down the jib to all three positions and don't need to carry different sizes.

Originally called the 'overlapping jib', the leech of the genoa extends aft of the mast. This increases speed in light and moderate winds. A genoa is larger than the total size of the fore-triangle. How large exactly is indicated by a percentage.
- A number 1 genoa is typically 155% (it used to be 180%)
- A number 2 genoa is typically 125-140%
Genoas are typically made from 1.5US/oz polyester spinnaker cloth, or very light laminate.

This is where it gets pretty interesting. You can use all kinds of sails to increase speed, handling, and performance for different weather conditions.
Some rules of thumb:
- Large sails are typically good for downwind use, small sails are good for upwind use.
- Large sails are good for weak winds (light air), small sails are good for strong winds (storms).
Downwind sails
Thanks to the front-and-aft rig sailboats are easier to maneuver, but they catch less wind as well. Downwind sails are used to offset this by using a large sail surface, pulling a sailboat downwind. They can be hanked on when needed and are typically balloon shaped.
Here are the most common downwind sails:
- Big gennaker
- Small gennaker
A free-flying sail that fills up with air, giving it a balloon shape. Spinnakers are generally colorful, which is why they look like kites. This downwind sail has the largest sail area, and it's capable of moving a boat with very light wind. They are amazing to use on trade wind routes, where they can help you make quick progress.
Spinnakers require special rigging. You need a special pole and track on your mast. You attach the sail at three points: in the mast head using a halyard, on a pole, and on a sheet.
The spinnaker is symmetrical, meaning the luff is as long as its leech. It's designed for broad reaching.

Gennaker or cruising spinnaker
The Gennaker is a cross between the genoa and the spinnaker. It has less downwind performance than the spinnaker. It is a bit smaller, making it slower, but also easier to handle - while it remains very capable. The cruising spinnaker is designed for broad reaching.
The gennaker is a smaller, asymmetric spinnaker that's doesn't require a pole or track on the mast. Like the spinnaker, and unlike the genoa, the gennaker is set flying. Asymmetric means its luff is longer than its leech.
You can get big and small gennakers (roughly 75% and 50% the size of a true spinnaker).
Also called ...
- the cruising spinnaker
- cruising chute
- pole-less spinnaker
- SpinDrifter
... it's all the same sail.

Light air sails
There's a bit of overlap between the downwind sails and light air sails. Downwind sails can be used as light air sails, but not all light air sails can be used downwind.
Here are the most common light air sails:
- Spinnaker and gennaker
Drifter reacher
Code zero reacher.
A drifter (also called a reacher) is a lightweight, larger genoa for use in light winds. It's roughly 150-170% the size of a genoa. It's made from very lightweight laminated spinnaker fabric (1.5US/oz).
Thanks to the extra sail area the sail offers better downwind performance than a genoa. It's generally made from lightweight nylon. Thanks to it's genoa characteristics the sail is easier to use than a cruising spinnaker.
The code zero reacher is officially a type of spinnaker, but it looks a lot like a large genoa. And that's exactly what it is: a hybrid cross between the genoa and the asymmetrical spinnaker (gennaker). The code zero however is designed for close reaching, making it much flatter than the spinnaker. It's about twice the size of a non-overlapping jib.

A windseeker is a small, free-flying staysail for super light air. It's tall and thin. It's freestanding, so it's not attached to the headstay. The tack attaches to a deck pad-eye. Use your spinnakers' halyard to raise it and tension the luff.
It's made from nylon or polyester spinnaker cloth (0.75 to 1.5US/oz).
It's designed to guide light air onto the lee side of the main sail, ensuring a more even, smooth flow of air.
Stormsails are stronger than regular sails, and are designed to handle winds of over 45 knots. You carry them to spare the mainsail. Sails
A storm jib is a small triangular staysail for use in heavy weather. If you participate in offshore racing you need a mandatory orange storm jib. It's part of ISAF's requirements.
A trysail is a storm replacement for the mainsail. It's small, triangular, and it uses a permanently attached pennant. This allows it to be set above the gooseneck. It's recommended to have a separate track on your mast for it - you don't want to fiddle around when you actually really need it to be raised ... now.

Why Use Different Sails At All?
You could just get the largest furling genoa and use it on all positions. So why would you actually use different types of sails?
The main answer to that is efficiency . Some situations require other characteristics.
Having a deeply reefed genoa isn't as efficient as having a small J3. The reef creates too much draft in the sail, which increases heeling. A reefed down mainsail in strong winds also increases heeling. So having dedicated (storm) sails is probably a good thing, especially if you're planning more demanding passages or crossings.
But it's not just strong winds, but also light winds that can cause problems. Heavy sails will just flap around like laundry in very light air. So you need more lightweight fabrics to get you moving.
What Are Sails Made Of?
The most used materials for sails nowadays are:
- Dacron - woven polyester
- woven nylon
- laminated fabrics - increasingly popular
Sails used to be made of linen. As you can imagine, this is terrible material on open seas. Sails were rotting due to UV and saltwater. In the 19th century linen was replaced by cotton.
It was only in the 20th century that sails were made from synthetic fibers, which were much stronger and durable. Up until the 1980s most sails were made from Dacron. Nowadays, laminates using yellow aramids, Black Technora, carbon fiber and Spectra yarns are more and more used.
Laminates are as strong as Dacron, but a lot lighter - which matters with sails weighing up to 100 kg (220 pounds).
By the way: we think that Viking sails were made from wool and leather, which is quite impressive if you ask me.
In this section of the article I give you a quick and dirty summary of different sail plans or rig types which will help you to identify boats quickly. But if you want to really understand it clearly, I really recommend you read part 2 of this series, which is all about different rig types.
You can't simply count the number of masts to identify rig type But you can identify any rig type if you know what to look for. We've created an entire system for recognizing rig types. Let us walk you through it. Read all about sail rig types
As I've said earlier, there are two major rig types: square rigged and fore-and-aft. We can divide the fore-and-aft rigs into three groups:
- Bermuda rig (we have talked about this one the whole time) - has a three-sided mainsail
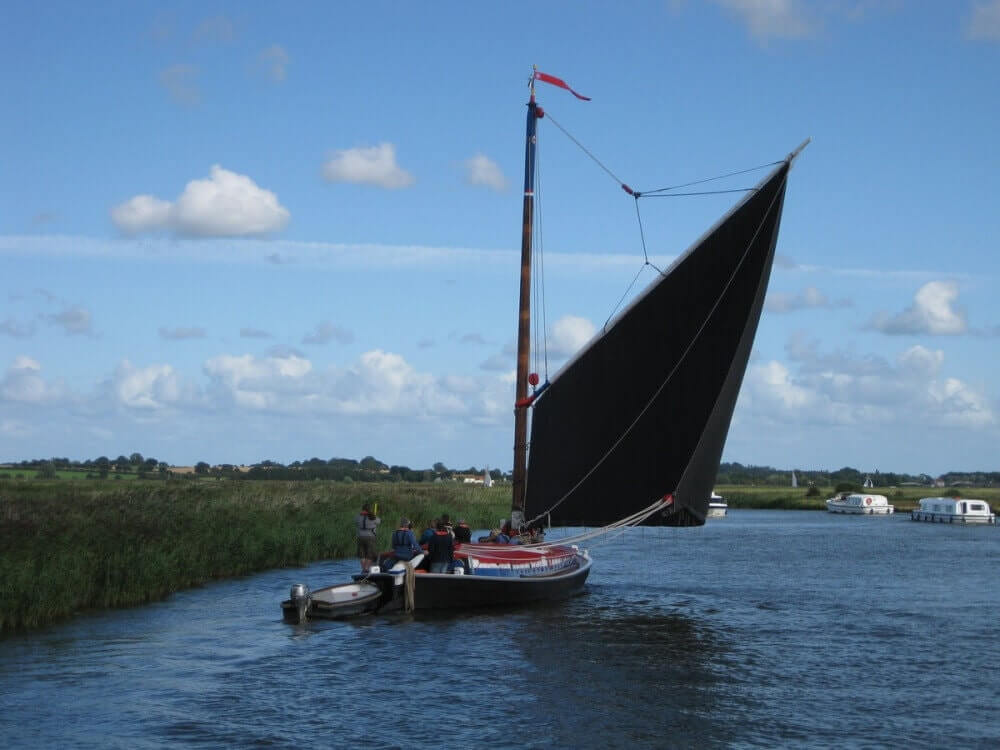
- Gaff rig - has a four-sided mainsail, the head of the mainsail is guided by a gaff
- Lateen rig - has a three-sided mainsail on a long yard

There are roughly four types of boats:
- one masted boats - sloop, cutter
- two masted boats - ketch, schooner, brig
- three masted - barque
- fully rigged or ship rigged - tall ship
Everything with four masts is called a (tall) ship. I think it's outside the scope of this article, but I have written a comprehensive guide to rigging. I'll leave the three and four-masted rigs for now. If you want to know more, I encourage you to read part 2 of this series.
One-masted rigs
Boats with one mast can have either one sail, two sails, or three or more sails.
The 3 most common one-masted rigs are:
- Cat - one mast, one sail
- Sloop - one mast, two sails
- Cutter - one mast, three or more sails
1. Gaff Cat

2. Gaff Sloop
Two-masted rigs
Two-masted boats can have an extra mast in front or behind the main mast. Behind (aft of) the main mast is called a mizzen mast . In front of the main mast is called a foremast .
The 5 most common two-masted rigs are:
- Lugger - two masts (mizzen), with lugsail (cross between gaff rig and lateen rig) on both masts
- Yawl - two masts (mizzen), fore-and-aft rigged on both masts. Main mast much taller than mizzen. Mizzen without mainsail.
- Ketch - two masts (mizzen), fore-and-aft rigged on both masts. Main mast with only slightly smaller mizzen. Mizzen has mainsail.
- Schooner - two masts (foremast), generally gaff rig on both masts. Main mast with only slightly smaller foremast. Sometimes build with three masts, up to seven in the age of sail.
- Brig - two masts (foremast), partially square-rigged. Main mast carries small lateen rigged sail.

4. Schooner

5. Brigantine

This article is part 1 of a series about sails and rig types If you want to read on and learn to identify any sail plans and rig type, we've found a series of questions that will help you do that quickly. Read all about recognizing rig types
Related Questions
What is the difference between a gennaker & spinnaker? Typically, a gennaker is smaller than a spinnaker. Unlike a spinnaker, a gennaker isn't symmetric. It's asymmetric like a genoa. It is however rigged like a spinnaker; it's not attached to the forestay (like a jib or a genoa). It's a downwind sail, and a cross between the genoa and the spinnaker (hence the name).
What is a Yankee sail? A Yankee sail is a jib with a high-cut clew of about 3' above the boom. A higher-clewed jib is good for reaching and is better in high waves, preventing the waves crash into the jibs foot. Yankee jibs are mostly used on traditional sailboats.
How much does a sail weigh? Sails weigh anywhere between 4.5-155 lbs (2-70 kg). The reason is that weight goes up exponentially with size. Small boats carry smaller sails (100 sq. ft.) made from thinner cloth (3.5 oz). Large racing yachts can carry sails of up to 400 sq. ft., made from heavy fabric (14 oz), totaling at 155 lbs (70 kg).
What's the difference between a headsail and a staysail? The headsail is the most forward of the staysails. A boat can only have one headsail, but it can have multiple staysails. Every staysail is attached to a forward running stay. However, not every staysail is located at the bow. A stay can run from the mizzen mast to the main mast as well.
What is a mizzenmast? A mizzenmast is the mast aft of the main mast (behind; at the stern) in a two or three-masted sailing rig. The mizzenmast is shorter than the main mast. It may carry a mainsail, for example with a ketch or lugger. It sometimes doesn't carry a mainsail, for example with a yawl, allowing it to be much shorter.
Special thanks to the following people for letting me use their quality photos: Bill Abbott - True Spinnaker with pole - CC BY-SA 2.0 lotsemann - Volvo Ocean Race Alvimedica and the Code Zero versus SCA and the J1 - CC BY-SA 2.0 Lisa Bat - US Naval Academy Trysail and Storm Jib dry fit - CC BY-SA 2.0 Mike Powell - White gaff cat - CC BY-SA 2.0 Anne Burgess - Lugger The Reaper at Scottish Traditional Boat Festival
Hi, I stumbled upon your page and couldn’t help but notice some mistakes in your description of spinnakers and gennakers. First of all, in the main photo on top of this page the small yacht is sailing a spinnaker, not a gennaker. If you look closely you can see the spinnaker pole standing on the mast, visible between the main and headsail. Further down, the discription of the picture with the two German dinghies is incorrect. They are sailing spinnakers, on a spinnaker pole. In the farthest boat, you can see a small piece of the pole. If needed I can give you the details on the difference between gennakers and spinnakers correctly?
Hi Shawn, I am living in Utrecht I have an old gulf 32 and I am sailing in merkmeer I find your articles very helpful Thanks
Thank you for helping me under stand all the sails there names and what there functions were and how to use them. I am planning to build a trimaran 30’ what would be the best sails to have I plan to be coastal sailing with it. Thank you
Hey Comrade!
Well done with your master piece blogging. Just a small feedback. “The jib gives control over the bow of the ship, making it easier to maneuver the ship. The mainsail gives control over the stern of the ship.” Can you please first tell the different part of a sail boat earlier and then talk about bow and stern later in the paragraph. A reader has no clue on the newly introduced terms. It helps to keep laser focused and not forget main concepts.
Shawn, I am currently reading How to sail around the World” by Hal Roth. Yes, I want to sail around the world. His book is truly grounded in real world experience but like a lot of very knowledgable people discussing their area of expertise, Hal uses a lot of terms that I probably should have known but didn’t, until now. I am now off to read your second article. Thank You for this very enlightening article on Sail types and their uses.
Shawn Buckles
HI CVB, that’s a cool plan. Thanks, I really love to hear that. I’m happy that it was helpful to you and I hope you are of to a great start for your new adventure!
Hi GOWTHAM, thanks for the tip, I sometimes forget I haven’t specified the new term. I’ve added it to the article.
Nice article and video; however, you’re mixing up the spinnaker and the gennaker.
A started out with a question. What distinguishes a brig from a schooner? Which in turn led to follow-up questions: I know there are Bermuda rigs and Latin rig, are there more? Which in turn led to further questions, and further, and further… This site answers them all. Wonderful work. Thank you.
Great post and video! One thing was I was surprised how little you mentioned the Ketch here and not at all in the video or chart, and your sample image is a large ship with many sails. Some may think Ketch’s are uncommon, old fashioned or only for large boats. Actually Ketch’s are quite common for cruisers and live-aboards, especially since they often result in a center cockpit layout which makes for a very nice aft stateroom inside. These are almost exclusively the boats we are looking at, so I was surprised you glossed over them.
Love the article and am finding it quite informative.
While I know it may seem obvious to 99% of your readers, I wish you had defined the terms “upwind” and “downwind.” I’m in the 1% that isn’t sure which one means “with the wind” (or in the direction the wind is blowing) and which one means “against the wind” (or opposite to the way the wind is blowing.)
paul adriaan kleimeer
like in all fields of syntax and terminology the terms are colouual meaning local and then spead as the technology spread so an history lesson gives a floral bouque its colour and in the case of notical terms span culture and history adds an detail that bring reverence to the study simply more memorable.
Hi, I have a small yacht sail which was left in my lock-up over 30 years ago I basically know nothing about sails and wondered if you could spread any light as to the make and use of said sail. Someone said it was probably originally from a Wayfayer wooden yacht but wasn’t sure. Any info would be must appreciated and indeed if would be of any use to your followers? I can provide pics but don’t see how to include them at present
kind regards
Leave a comment
You may also like, 17 sailboat types explained: how to recognize them.
Ever wondered what type of sailboat you're looking at? Identifying sailboats isn't hard, you just have to know what to look for. In this article, I'll help you.

How Much Sailboats Cost On Average (380+ Prices Compared)
Own your first boat within a year on any budget.
A sailboat doesn't have to be expensive if you know what you're doing. If you want to learn how to make your sailing dream reality within a year, leave your email and I'll send you free updates . I don't like spam - I will only send helpful content.
Ready to Own Your First Boat?
Just tell us the best email address to send your tips to:
No products in the cart.
Sailing Ellidah is supported by our readers. Buying through our links may earn us an affiliate commission at no extra cost to you.
The Standing Rigging On A Sailboat Explained
The standing rigging on a sailboat is a system of stainless steel wires that holds the mast upright and supports the spars.
In this guide, I’ll explain the basics of a sailboat’s hardware and rigging, how it works, and why it is a fundamental and vital part of the vessel. We’ll look at the different parts of the rig, where they are located, and their function.
We will also peek at a couple of different types of rigs and their variations to determine their differences. In the end, I will explain some additional terms and answer some practical questions I often get asked.
But first off, it is essential to understand what standing rigging is and its purpose on a sailboat.
The purpose of the standing rigging
Like I said in the beginning, the standing rigging on a sailboat is a system of stainless steel wires that holds the mast upright and supports the spars. When sailing, the rig helps transfer wind forces from the sails to the boat’s structure. This is critical for maintaining the stability and performance of the vessel.
The rig can also consist of other materials, such as synthetic lines or steel rods, yet its purpose is the same. But more on that later.
Since the rig supports the mast, you’ll need to ensure that it is always in appropriate condition before taking your boat out to sea. Let me give you an example from a recent experience.
Dismasting horrors
I had a company inspect the entire rig on my sailboat while preparing for an Atlantic crossing. The rigger didn’t find any issues, but I decided to replace the rig anyway because of its unknown age. I wanted to do the job myself so I could learn how it is done correctly.
Not long after, we left Gibraltar and sailed through rough weather for eight days before arriving in Las Palmas. We were safe and sound and didn’t experience any issues. Unfortunately, several other boats arriving before us had suffered rig failures. They lost their masts and sails—a sorrowful sight but also a reminder of how vital the rigging is on a sailboat.
The most common types of rigging on a sailboat
The most commonly used rig type on modern sailing boats is the fore-and-aft Bermuda Sloop rig with one mast and just one headsail. Closely follows the Cutter rig and the Ketch rig. They all have a relatively simple rigging layout. Still, there are several variations and differences in how they are set up.
A sloop has a single mast, and the Ketch has one main mast and an additional shorter mizzen mast further aft. A Cutter rig is similar to the Bermuda Sloop with an additional cutter forestay, allowing it to fly two overlapping headsails.
You can learn more about the differences and the different types of sails they use in this guide. For now, we’ll focus on the Bermuda rig.
The difference between standing rigging and running rigging
Sometimes things can get confusing as some of our nautical terms are used for multiple items depending on the context. Let me clarify just briefly:
The rig or rigging on a sailboat is a common term for two parts:
- The standing rigging consists of wires supporting the mast on a sailboat and reinforcing the spars from the force of the sails when sailing.
- The running rigging consists of the halyards, sheets, and lines we use to hoist, lower, operate, and control the sails on a sailboat.
Check out my guide on running rigging here !
The difference between a fractional and a masthead rig
A Bermuda rig is split into two groups. The Masthead rig and the Fractional rig.
The Masthead rig has a forestay running from the bow to the top of the mast, and the spreaders point 90 degrees to the sides. A boat with a masthead rig typically carries a bigger overlapping headsail ( Genoa) and a smaller mainsail. Very typical on the Sloop, Ketch, and Cutter rigs.
A Fractional rig has forestays running from the bow to 1/4 – 1/8 from the top of the mast, and the spreaders are swept backward. A boat with a fractional rig also has the mast farther forward than a masthead rig, a bigger mainsail, and a smaller headsail, usually a Jib. Very typical on more performance-oriented sailboats.
There are exceptions in regards to the type of headsail, though. Many performance cruisers use a Genoa instead of a Jib , making the difference smaller.
Some people also fit an inner forestay, or a babystay, to allow flying a smaller staysail.
Explaining the parts and hardware of the standing rigging
The rigging on a sailing vessel relies on stays and shrouds in addition to many hardware parts to secure the mast properly. And we also have nautical terms for each of them. Since a system relies on every aspect of it to be in equally good condition, we want to familiarize ourselves with each part and understand its function.
Forestay and Backstay
The forestay is a wire that runs from the bow to the top of the mast. Some boats, like the Cutter rig, can have several additional inner forestays in different configurations.
The backstay is the wire that runs from the back of the boat to the top of the mast. Backstays have a tensioner, often hydraulic, to increase the tension when sailing upwind. Some rigs, like the Cutter, have running backstays and sometimes checkstays or runners, to support the rig.
The primary purpose of the forestay and backstay is to prevent the mast from moving fore and aft. The tensioner on the backstay also allows us to trim and tune the rig to get a better shape of the sails.
The shrouds are the wires or lines used on modern sailboats and yachts to support the mast from sideways motion.
There are usually four shrouds on each side of the vessel. They are connected to the side of the mast and run down to turnbuckles attached through toggles to the chainplates bolted on the deck.
- Cap shrouds run from the top of the mast to the deck, passing through the tips of the upper spreaders.
- Intermediate shrouds run from the lower part of the mast to the deck, passing through the lower set of spreaders.
- Lower shrouds are connected to the mast under the first spreader and run down to the deck – one fore and one aft on each side of the boat.
This configuration is called continuous rigging. We won’t go into the discontinuous rigging used on bigger boats in this guide, but if you are interested, you can read more about it here .
Shroud materials
Shrouds are usually made of 1 x 19 stainless steel wire. These wires are strong and relatively easy to install but are prone to stretch and corrosion to a certain degree. Another option is using stainless steel rods.
Rod rigging
Rod rigging has a stretch coefficient lower than wire but is more expensive and can be intricate to install. Alternatively, synthetic rigging is becoming more popular as it weighs less than wire and rods.
Synthetic rigging
Fibers like Dyneema and other aramids are lightweight and provide ultra-high tensile strength. However, they are expensive and much more vulnerable to chafing and UV damage than other options. In my opinion, they are best suited for racing and regatta-oriented sailboats.
Wire rigging
I recommend sticking to the classic 316-graded stainless steel wire rigging for cruising sailboats. It is also the most reasonable of the options. If you find yourself in trouble far from home, you are more likely to find replacement wire than another complex rigging type.
Relevant terms on sailboat rigging and hardware
The spreaders are the fins or wings that space the shrouds away from the mast. Most sailboats have at least one set, but some also have two or three. Once a vessel has more than three pairs of spreaders, we are probably talking about a big sailing yacht.
A turnbuckle is the fitting that connects the shrouds to the toggle and chainplate on the deck. These are adjustable, allowing you to tension the rig.
A chainplate is a metal plate bolted to a strong point on the deck or side of the hull. It is usually reinforced with a backing plate underneath to withstand the tension from the shrouds.
The term mast head should be distinct from the term masthead rigging. Out of context, the mast head is the top of the mast.
A toggle is a hardware fitting to connect the turnbuckles on the shrouds and the chainplate.
How tight should the standing rigging be?
It is essential to periodically check the tension of the standing rigging and make adjustments to ensure it is appropriately set. If the rig is too loose, it allows the mast to sway excessively, making the boat perform poorly.
You also risk applying a snatch load during a tack or a gybe which can damage the rig. On the other hand, if the standing rigging is too tight, it can strain the rig and the hull and lead to structural failure.
The standing rigging should be tightened enough to prevent the mast from bending sideways under any point of sail. If you can move the mast by pulling the cap shrouds by hand, the rigging is too loose and should be tensioned. Once the cap shrouds are tightened, follow up with the intermediates and finish with the lower shrouds. It is critical to tension the rig evenly on both sides.
The next you want to do is to take the boat out for a trip. Ensure that the mast isn’t bending over to the leeward side when you are sailing. A little movement in the leeward shrouds is normal, but they shouldn’t swing around. If the mast bends to the leeward side under load, the windward shrouds need to be tightened. Check the shrouds while sailing on both starboard and port tack.
Once the mast is in a column at any point of sail, your rigging should be tight and ready for action.
If you feel uncomfortable adjusting your rig, get a professional rigger to inspect and reset it.
How often should the standing rigging be replaced on a sailboat?
I asked the rigger who produced my new rig for Ellidah about how long I could expect my new rig to last, and he replied with the following:
The standing rigging should be replaced after 10 – 15 years, depending on how hard and often the boat has sailed. If it is well maintained and the vessel has sailed conservatively, it will probably last more than 20 years. However, corrosion or cracked strands indicate that the rig or parts are due for replacement regardless of age.
If you plan on doing extended offshore sailing and don’t know the age of your rig, I recommend replacing it even if it looks fine. This can be done without removing the mast from the boat while it is still in the water.
How much does it cost to replace the standing rigging?
The cost of replacing the standing rigging will vary greatly depending on the size of your boat and the location you get the job done. For my 41 feet sloop, I did most of the installation myself and paid approximately $4700 for the entire rig replacement.
Can Dyneema be used for standing rigging?
Dyneema is a durable synthetic fiber that can be used for standing rigging. Its low weight, and high tensile strength makes it especially popular amongst racers. Many cruisers also carry Dyneema onboard as spare parts for failing rigging.
How long does dyneema standing rigging last?
Dyneema rigging can outlast wire rigging if it doesn’t chafe on anything sharp. There are reports of Dyneema rigging lasting as long as 15 years, but manufacturers like Colligo claim their PVC shrink-wrapped lines should last 8 to 10 years. You can read more here .
Final words
Congratulations! By now, you should have a much better understanding of standing rigging on a sailboat. We’ve covered its purpose and its importance for performance and safety. While many types of rigs and variations exist, the hardware and concepts are often similar. Now it’s time to put your newfound knowledge into practice and set sail!
Or, if you’re not ready just yet, I recommend heading over to my following guide to learn more about running rigging on a sailboat.
Sharing is caring!
Skipper, Electrician and ROV Pilot
Robin is the founder and owner of Sailing Ellidah and has been living on his sailboat since 2019. He is currently on a journey to sail around the world and is passionate about writing his story and helpful content to inspire others who share his interest in sailing.
Very well written. Common sense layout with just enough photos and sketches. I enjoyed reading this article.
Thank you for the kind words.
Leave a Reply Cancel reply
Your email address will not be published. Required fields are marked *
- Boat Rigging: Setting Sail for Success
In the world of sailing, boat rigging plays a crucial role in ensuring the safety, efficiency, and performance of your vessel. From standing rigging to sail rigging types, it's essential to understand the intricacies of rigging a yacht to embark on smooth sailing adventures. In this comprehensive guide, we'll dive into the nuances of boat rigging, helping you navigate the open waters with confidence.
Boat Rigging Basics
Before we delve into the details, let's start with the fundamentals of boat rigging. Understanding the key components and their functions is essential for any sailor, whether you're a novice or a seasoned pro.
Standing Rigging
Standing rigging refers to the fixed support structure of a boat's mast, including wires, cables, and rods. It plays a critical role in maintaining the mast's vertical position and overall stability.
Sail Rigging Types
Sail rigging is not a one-size-fits-all concept, but rather a diverse world with various types and configurations to suit different sailing needs. Understanding these rigging types is essential for any sailor looking to optimize their boat's performance and safety.
Ship Riggings
Ship riggings have played a pivotal role in shaping the history of seafaring and maritime exploration. These complex systems of ropes, wires, and sails have been integral to the functionality and success of various vessels throughout the ages.Explore the significance of ship riggings, their evolution, and their influence on modern-day boat rigging.
Materials Matter
The choice of materials for your boat rigging is a decision that can't be taken lightly. Two popular options, Dyneema and Kevlar, offer distinct advantages.
Dyneema Rigging
Dyneema rigging represents a breakthrough in the world of sailboat rigging. This cutting-edge material, known for its remarkable strength and low stretch properties, has revolutionized the way sailors experience the open water. Often referred to as the ultimate innovation in the world of sailing, Dyneema rigging offers a myriad of advantages:
- Exceptional Strength: Dyneema rigging boasts remarkable strength-to-weight ratio, making it incredibly robust and reliable even in demanding conditions.
- Low Stretch: Dyneema has minimal stretch, which translates to improved sail control and responsiveness, ensuring better performance.
- Lightweight: It's significantly lighter than traditional rigging materials like steel, reducing the overall weight of your vessel and enhancing speed and maneuverability.
- Low Maintenance: Dyneema rigging requires minimal maintenance, offering sailors peace of mind and more time on the water.
- Resistance to Corrosion: Unlike metal rigging, Dyneema is not susceptible to corrosion, ensuring a longer lifespan and durability.
- UV Resistance: Dyneema is highly resistant to UV rays, making it ideal for prolonged exposure to sunlight.
- Easy Handling: Its flexibility and ease of handling simplify rigging installation and adjustments.
- Enhanced Safety: Dyneema's strength and reliability contribute to safer sailing experiences, reducing the risk of rigging failure.
- Versatility: It's suitable for a wide range of applications, from standing rigging to halyards, making it a versatile choice for sailors.
- Eco-Friendly: Dyneema is an environmentally friendly option as it doesn't release harmful substances into the water, contributing to a cleaner marine ecosystem.
Dyneema vs. Kevlar
Weigh the pros and cons of Dyneema and Kevlar to determine which suits your sailing needs best:
Dyneema Rigging:
- Exceptional Strength: Dyneema boasts impressive strength, making it highly reliable for rigging purposes.
- Low Stretch: It has minimal stretch, enhancing sail control and overall performance.
- Lightweight: Dyneema is significantly lighter than traditional materials, reducing the vessel's weight.
- Low Maintenance: Requires minimal upkeep, saving time and effort.
- Corrosion Resistance: Dyneema is not susceptible to corrosion, ensuring durability.
- UV Resistance: It's highly resistant to UV rays, making it suitable for extended exposure to sunlight.
- Safety: Dyneema's strength and reliability contribute to safer sailing experiences.
- Versatility: Suitable for various rigging applications, from standing rigging to halyards.
- Cost: Dyneema can be more expensive than some traditional materials, initially.
- Abrasion Resistance: It may be less resistant to abrasion compared to Kevlar.
Kevlar Rigging:
- Excellent Abrasion Resistance: Kevlar is highly resistant to wear and tear, ensuring longevity.
- High Tensile Strength: It offers impressive tensile strength, making it suitable for demanding applications.
- Stiffness: Kevlar is stiffer than Dyneema, which can be advantageous for some rigging configurations.
- Heavy: Kevlar is heavier than Dyneema, potentially impacting vessel performance.
- Low UV Resistance: It is less resistant to UV radiation, which can affect its durability over time.
- Higher Stretch: Kevlar tends to stretch more than Dyneema, which can impact sail control.
- Prone to Corrosion: Unlike Dyneema, Kevlar can be susceptible to corrosion.
- Cost: It can be expensive, and the initial investment may be higher than other materials.
Choosing between Dyneema and Kevlar depends on your specific sailing needs and priorities. Dyneema is favored for its strength, low stretch, and light weight, while Kevlar excels in abrasion resistance and tensile strength. Consider these factors when making your rigging material selection.
Stainless Steel Yacht Rigging
When it comes to yacht rigging, durability is paramount, and stainless steel rigging wires stand out as a top choice. Their robust nature, coupled with an unmistakable touch of elegance, makes them an ideal option for discerning sailors. Stainless steel yacht rigging is highly resistant to corrosion, even in the harsh marine environment. This resistance not only ensures a longer lifespan but also reduces maintenance efforts, allowing you to spend more time on the water. Additionally, the sleek appearance of stainless steel adds a touch of sophistication to your vessel. Whether you're cruising the open seas or participating in regattas, stainless steel yacht rigging combines style and substance to offer a premium sailing experience.
Spectra Standing Rigging
Spectra standing rigging is a game-changer for sailors seeking top-tier performance and durability. This advanced material, known for its incredible strength and low stretch properties, has revolutionized the way we approach standing rigging. Spectra rigging offers advantages that are hard to beat – it enhances the stability and safety of your vessel while providing exceptional responsiveness. The minimal stretch ensures precise sail control, making it the go-to choice for those who demand the utmost from their rigging. If you're looking to take your sailing experience to the next level, Spectra standing rigging is a choice that can't be ignored.
Read our top notch articles on topics such as sailing, sailing tips and destinations in our Magazine.
Rigging a Yacht: A Step-By-Step Guide
Now that you've grasped the basics and material options, let's dive into the practical aspect of rigging a yacht. Follow these steps to ensure a smooth and safe sailing experience.
Planning and Preparation
Rigging a yacht is a meticulous process that requires careful planning and thorough preparation. Before embarking on your sailing adventure, it's crucial to ensure that every aspect of your yacht's rigging is in top-notch condition. The advantages of this step-by-step guide are manifold. It guarantees the safety of both the vessel and its passengers, reduces the risk of mid-sail complications, and ultimately enhances your overall sailing experience. By meticulously inspecting your rigging and addressing any issues during the planning and preparation phase, you can set sail with confidence, knowing that your yacht is ready to navigate the open waters seamlessly.
Inspecting Your Rigging
Rigging a yacht is a meticulous process that demands careful attention to detail. One crucial aspect is inspecting your rigging. This step ensures the safety and efficiency of your sailing adventure. Regular inspections , even before you set sail, can identify potential issues and help prevent mishaps on the water . Inspecting your rigging is not only a safety measure but also a way to guarantee that your yacht performs at its best, allowing you to enjoy smooth and stress-free sailing experiences.
Rigging Replacement
When it comes to maintaining your yacht's rigging, the necessity of rigging replacement cannot be overstated. Whether due to wear and tear or a desire to upgrade to modern materials, knowing when and how to replace your rigging is crucial.
Specialized Rigs for Small Sailboats
For small sailboat enthusiasts , specialized rigs can enhance your sailing experience. Explore the options available for these nimble vessels.
Ship Rigging Terms
Sailboat rigging comes with its unique terminology. Get acquainted with the essential terms:
- Mast: The vertical spar or structure that supports sails and rigging.
- Boom: A horizontal spar that extends from the mast to support the bottom of a sail.
- Shroud: Rigging wires that support the mast from the sides.
- Stay: Rigging wires that support the mast from the front or back.
- Halyard: Lines used to raise and lower sails.
- Sheet: Lines used to control the angle of the sails with respect to the wind.
- Jib: A triangular foresail set in front of the mast.
- Tack: The lower forward corner of a sail.
- Clew: The lower after corner of a sail.
- Topping Lift: A line that supports the boom when the sail is not in use.
Understanding these ship rigging terms is essential for efficient and safe sailing, allowing you to communicate effectively with your crew and navigate the open waters with confidence.
Sailboat Stays and Shrouds
Sailboat rigging comprises various components, and among the most critical are sailboat stays and shrouds. Stays are the fixed support cables or wires that keep the mast upright, while shrouds add lateral support, preventing the mast from swaying. These components work together to maintain the mast's stability and ensure safe and efficient sailing. The proper tension and alignment of stays and shrouds are crucial for the overall performance and safety of a sailboat. Regular inspections and maintenance of these rigging elements are essential to prevent wear and tear, making sure they remain reliable on your sailing adventures. Understanding the role of sailboat stays and shrouds is fundamental for any sailor, whether you're navigating coastal waters or crossing the open sea.
In conclusion, boat rigging is a multifaceted subject that greatly influences your sailing experience. Understanding the fundamentals, material choices, and the process of rigging a yacht is essential for a successful voyage.
So what are you waiting for? Take a look at our range of charter boats and head to some of our favourite
sailing destinations .
The global authority in superyachting
- NEWSLETTERS
- Yachts Home
- The Superyacht Directory
- Yacht Reports
- Brokerage News
- The largest yachts in the world
- The Register
- Yacht Advice
- Yacht Design
- 12m to 24m yachts
- Monaco Yacht Show
- Builder Directory
- Designer Directory
- Interior Design Directory
- Naval Architect Directory
- Yachts for sale home
- Motor yachts
- Sailing yachts
- Explorer yachts
- Classic yachts
- Sale Broker Directory
- Charter Home
- Yachts for Charter
- Charter Destinations
- Charter Broker Directory
- Destinations Home
- Mediterranean
- South Pacific
- Rest of the World
- Boat Life Home
- Owners' Experiences
- Interiors Suppliers
- Owners' Club
- Captains' Club
- BOAT Showcase
- Boat Presents
- Events Home
- World Superyacht Awards
- Superyacht Design Festival
- Design and Innovation Awards
- Young Designer of the Year Award
- Artistry and Craft Awards
- Explorer Yachts Summit
- Ocean Talks
- The Ocean Awards
- BOAT Connect
- Between the bays
- Golf Invitational
- Boat Pro Home
- Pricing Plan
- Superyacht Insight
- Product Features
- Premium Content
- Testimonials
- Global Order Book
- Tenders & Equipment
.jpg/r%5Bwidth%5D=320/c01b08f0-3198-11ec-b3da-5dc06521023f-Black%20Pearl%20-%20Tom%20Van%20Oossanen%20(3).webp "sailboat rigging options")
The definitive guide to sailing yacht rigging
Related articles, superyacht directory.
Do you know your Bermudan rig from your DynaRig or wingsails? And which is best? BOAT explains it all...
Take a look at a modern racing yacht from above, beating to windward and heeled to the breeze, and you can see at a glance why Bermudan rigs have stood the test of time. With its fore and aft sails bladed into efficient aerodynamic shapes, a modern yacht can slice close to the wind and be driven hard. Such a sight would have been outlandish a century ago. Then, a typical trading barquentine could set 18 sails to catch light airs, but it needed a large crew to battle with canvas far out on the yards. In a modern miracle as incredible in its way as flight, today’s racing yachts can sail faster than the speed of the wind – in some cases several times faster.
A mainsail set on a single spar is an age-old concept but only in the 19th century was it adapted as the Bermudan or Marconi rig. A one-piece mainsail set on a mast without a gaff, hoisted with one halyard and controlled by one sheet, was simpler and more efficient. This revolution became the power train of pleasure yachting and racing.
But perhaps the time is coming for a re-evaluation of simpler rigs requiring fewer crew – alternatives with lower loads operated by automated systems. In an era of reduced carbon consumption, could more radical sailplans even herald a revival in sail power?
The evergreen Bermudan rig
The Bermudan rig is the all-rounder, able to perform well at all angles of sail. It is efficient upwind, while downwind the sail area can be significantly boosted with a big gennaker or spinnaker. For good reasons, it is the first choice for nearly every modern sailing yacht up to around 60 to 65 metres for cruising and regatta racing alike. At larger sizes, however, things start to become trickier, and the trade-offs get interesting.
Over the last decade, sail handling technology has steadily advanced to allow sloop rigs to grow larger and larger. “But with that comes a highly loaded rig, many tonnes of compression from tension in the rigging, and you have to build structure in the boat to accept that,” explains Paul MacDonald, founder and superyacht sales manager of Southern Spars.
“You have to have a lot of deck gear and captive winches below decks and the machinery for that. But over the years, boom furling systems and MPS [Multi Purpose Sails for downwind angles] stored on a drum, for example, have made sail handling safer.
Bill Tripp is the designer behind the 86-metre Aquijo , which broke new ground in 2015 as the world’s largest Bermudan ketch. Tripp prefers to call the rig a "sketch", a portmanteau word for a rig that is neither a sloop nor a ketch “because the main and mizzen are identical”. Even though the sailplan is divided over two masts, each spar is still a towering 90 metres above the water. Aquijo perfectly illustrates the issues involved with a Bermudan rig when scaled up.
“The sloop is great but I prefer the ‘sketch’ for sailing around the world under full control due to the desirability of a two-masted rig for reaching ability, which dominates passages, and the safety of controllable loads when sailing in all kinds of conditions miles from nowhere,” he says.
Upwind, Aquijo sets a jib, staysail, mainsail and mizzen, all in North Sails 3Di, totalling 3,821 square metres. A furling Code sail for reaching and downwind angles increases that to a vast 5,051 square metres.
While Aquijo has a crew retinue of 17, it can be controlled under sail by six or seven people. With custom winches to handle halyards and sheets, the sails can be hoisted astonishingly quickly for such a large rig. “It takes five minutes to put the main up, on average, and the main and mizzen can go up at the same time,” Tripp says. Aquijo has now sailed 100,000 nautical miles around the world and the owner is planning another circumnavigation through the Northwest Passage.
Tripp is not convinced of the wisdom of a much larger single-masted sloop rig. “If you are day sailing in the Med, a sloop would be awesome, but I am not sure if you had fewer sails you would be able to [reduce canvas] well enough. Also the mast is a windage problem when the keel is up and you are beam-to. If you are on anchor, that’s no problem but you’d have to be able to cope with being on the docks in 70 knots. The windage at 120 metres is not only more but the centre of effort is so much higher, and so the heeling loads all go up.”
However, British designer Malcolm McKeon , the name behind the high-performance, sloop-rigged carbon composite superyachts Missy and Ribelle , is pushing the sloop rig to new heights. His 85-metre design concept Apex, developed with Royal Huisman , would be the largest sloop-rigged yacht in the world. “The loads are enormous,” he admits, “but it is all scalable.”
“The big disadvantage is sail handling. The downwind sails are pretty complicated once you start hoisting and retrieving, even with drum and reel systems. It is not straightforward.” But, he adds, “I think we know the advantages of a sloop: if you want all-round performance you can’t beat it, even at the top end.”
Advantages of a clipper rig
The DynaRig has been around as a concept since the 1960s when German engineer Wilhelm Prölss devised these free-standing, rotating rigs as a fuel-saving solution for large commercial vessels. The idea was ahead of its time, so much so that its first realisation came nearly 40 years later when American owner Tom Perkins bought the residual technology and commissioned Dykstra Naval Architects to create a three-masted DynaRig for Maltese Falcon , his 88-metre Perini Navi.
The DynaRig is not as efficient upwind as the Bermudan rig, and is probably not the best solution for a yacht smaller than around 65 metres, suggests Jeroen de Vos of Dykstra. “We wouldn’t advise putting a DynaRig on a small yacht because there are other ways to manage sail handling. But on a larger yacht the DynaRig becomes an alternative because there is no rigging, no highly loaded sheets, low-tech [small] sails and no big winches.”
The beauty of the DynaRig is that its automatic systems can be handled by one or two people and, notes de Vos, “you don’t have to get out of your chair to go sailing. Maltese Falcon can sail on and off the anchor and can set 2,400 square metres of sail in six minutes. On other boats it takes six minutes to get the sail cover off.”
Damon Roberts of Magma Structures, which built the rigs for Maltese Falcon and the only other DynaRig yacht to date, the 106-metre Black Pearl , says: “You can do any manoeuvre easily; it’s like sailing a dinghy. There are no highly loaded sheets or ropes or flogging lines. You can luff up, bear away, tack and gybe at any time and really enjoy sailing the boat without any apparent fuss.”
So with all these advantages, why has the DynaRig been chosen for only two sailing superyachts? For some designers, such as Malcolm McKeon, it is partly to do with compromises imposed by the large mast tubes and bearing diameters on the internal structure and layout, “particularly in the cockpit area,” he says. He also points out that the clipper ship look is not to every owner’s taste. “Sloops are more conventional looking,” he says.
Damon Roberts says there is still development work to be done. He has teamed up with Southern Spars and, with their additional resources, expects evolution with several new projects. “These include two at the moment that are twin-masted DynaRigs,” he says. “We did quite a lot of wind tunnel work early on as we felt that was really the sweet spot for it, and people will be stunned at how efficient these are.”
The future of the wingsail
Wingsails have been around for decades too, but with their adoption by the last two America’s Cups and the confluence with foiling technology, they have undergone rapid and revolutionary development.
To date, there is no proven solution for reefing a wing that would be suitable for offshore cruising or ocean passages. As the pronounced aerodynamic “nose” at the leading edge of a wing can develop force in strong winds, they could potentially make a large yacht uncontrollable in port as well.
“How do you get rid of sail and how does [a boat] handle when caught out in heavy wind conditions – which you will be? How do you keep the angle of attack all the way up the rig and how do you handle squalls?” Roberts asks. “A mechanism to reduce sail might be easy to sketch out but it is difficult to engineer.”
Jeroen de Vos says: “The wingsails are more developed towards performance and I wouldn’t say that they are as practical as soft sails or would ever make handling easier. But if somebody wants that, why not? Reefable soft sails, wings that are inflated, hoisted panels, possibly these are applicable. The development of this area is happening very rapidly.”
Paul MacDonald of Southern Spars agrees that the time is not here yet but thinks it will come. “In reality we are in the early days of wings. For the America’s Cup, they are the most efficient way of sailing by a long shot, but with them comes handling issues, which the industry hasn’t resolved yet. But I am sure they will be in 10 years’ time. Designers such as VPLP are starting to [work on concepts] and we are going to see something that is usable and efficient and suitable for ocean work eventually,” he says. “And whatever the solution is, you imagine that it will scale.”
Looking to the future
A drive for greener superyachts could present an opportunity for sail, but perhaps it needs to be less daunting.
“There is this intimidation of sheets and backstays, and sailing is a language you don’t learn in a year,” Tripp says. “But we have a project we are doing now with a yard with some new rig technology and some soft wings that we think is going to be viable.
“We can uncomplicate sailing more. If we can win people over from motorboats it will help, but we are only winning these battles one or two at a time. We need [more] projects like Sailing Yacht A , which are something really different, and do more things better with less energy. We as architects need to elicit change.”
McKeon also sees change coming. “People are more and more concerned about keeping their image green and sails are the way to do that,” he says. “Simpler sailing systems are needed. The current generation is used to Bermudan sloops. In years to come, the traditionalists will all be gone, and maybe new people will be more accepting of [different ideas]. I think in the future we will certainly have wings.”
More about this yacht
Yachts for sale, similar yachts for sale, yachts for charter, more stories, most popular, from our partners, sponsored listings.
- BOAT OF THE YEAR
- Newsletters
- Sailboat Reviews
- Boating Safety
- Sailing Totem
- Charter Resources
- Destinations
- Galley Recipes
- Living Aboard
- Sails and Rigging
- Maintenance
- Best Marine Electronics & Technology
Understanding Running Rigging
- By Ralph Naranjo
- Updated: January 22, 2020

Regardless of whether you sail a modern, fractional-rigged sloop or a wishbone-rigged staysail schooner, it’s the running rigging that sets, trims, reefs and furls the sails. In the bad old days, decks were full of wobbly, sheaved high-friction blocks and essentially one kind of cordage. Today, running rigging has attained full-system status, with its primary goal being friction abatement.
Various types of synthetic- fiber cordage, with specific strength, stretch and creep characteristics, run through ultraslippery blocks and fairleads. Each line is aimed at the exact spot a team of ergonomics experts determined it should go. Even the halyard hardware that attaches the line to the head of a sail has been computer-modeled and scrutinized with finite element analysis. Soft shackles and strops, made from Dyneema fiber rope, are showing up in high-load locations. In short, we are in the midst of a running-rigging revolution, and much of the new stuff offers real value to the cruising sailor.
What’s My Line?
Just as pistons and cylinders play a primary role in a diesel auxiliary, rope and blocks are the guts of every sail-handling system. A few decades ago, Dacron (polyester cordage) ruled the roost. It remains a key player, but stronger, lighter, and less-stretchy options are gaining ground. Racers have embraced Dyneema, Vectran, Torlon, Zylon and a growing list of other odd-sounding esoteric fibers. The old enemy stretch has been tamed, but the big remaining question is whether a running-rigging makeover is worth the expense. It takes a little cost-benefit analysis to answer that question.
There’s consensus among sailors, riggers and yacht designers that there are cost-effective crossover points, where performance and value intersect. Take, for example, a mainsail halyard upgrade. Polyester has proved to be too stretchy, but PBO (Zylon) cored rope, sometimes called liquid crystal, is way too costly. But for cruisers, a midrange medium-tech upgrade makes a lot of sense. The line of choice is often a double braid with a high-modulus Dyneema core and a conventional polyester cover. This midrange combo results in a halyard with much lower stretch and good handling characteristics, plus it retains a chafe- and ultraviolet-resistant cover.
Going higher-tech in fiber selection for sheets on a cruising boat might not be as desirable. This is because a good-quality double-braid polyester remains a sensible solution, at least on cruising boats under 40 or so feet. Its stretchy nature might even add a little shock-absorber effect, lessening the fatigue cycle on mast, boom and line. However, higher-modulus (less-stretchy) line is a superior halyard material, and it also makes sense for use in running backstays, topping lifts, tack and head pennants, and boom-vang tackles.

When choosing the right high-modulus line, make sure it’s rated for tight turns around small-radius blocks and masthead sheaves. In the early days of synthetic fibers, many ultra-low-stretch lines stiffened with time, making line handling more like wrapping a tree branch around a winch drum. Today, Samson, Yale, New England Ropes and others have tamed this problem, and offer a wide range of products that meet the needs of cruisers and racers. Do some research, talk with a local rigger, and pick the right rope for your boat and your specific sailing requirements.
Around the Blocks
Every ball- and roller-bearing block spins like a roulette wheel when there’s no load on the sheave. But when you add hundreds, even thousands, of pounds of tension to a halyard or sheet, it’s only the better-built blocks that hold friction at bay. Usually these blocks have well-engineered frames and bearing races that resist deformation under heavy loads.
Ironically, cruisers don’t need the highest-tech line, but we certainly do benefit from the best-built blocks. These not only run smoothly under load, but they also continue to do so despite the test of time.
Over the years, as ingested salt spray is baked into grit by the unrelenting sun, bearing abrasion becomes a big problem. Keep in mind that if you can see the high-molecular-weight Delrin, Torlon or other plastic bearings, so can the sun, and this means that UV degradation will become an issue.
It’s also important to recognize that choosing the smallest, lightest block for a given line size makes little sense. A better approach is to pick a one-size-larger block that’s still appropriate for the given line diameter. It will deliver a higher safe working load, and therefore, the normal load will be a smaller percentage of the SWL. Such blocks will also have a larger bearing surface and will operate with less friction. Add to this the fact that lower loading also equates to longer hardware life, and you have another good reason to opt for a size uptick.
Power to the Winches
I think that the hand-crank winch is one of sailing’s most elegant inventions. And the good news is this piece of hardware continues to evolve. New designs come packed with better bearings, improved self-tailers and multiple gear ratios, making them even better muscle-power multipliers.

Modern winches are more ergonomic, and there’s even a model that lets you trim in and ease out via opposite rotations of the winch handle. The shorthanded cruiser has more trimming tools from which to choose—even a push-button electric winch that eliminates the old question: “Where’s the winch handle?”
However, when it comes to power winching, it’s important to rethink the way you handle a sheet or halyard. With the old hand-cranking approach, arm and shoulder strength provided both torque and feedback. Unfortunately, this feedback loop is absent when using an electric winch. As the tension increases, the button doesn’t get any harder to push. Therefore, we need to look more closely at the luff and head of the sail to make sure the halyard or sheet is not being overtensioned.
In the early days of power winches, I watched the crew of a 60-foot sloop set sail with the aid of electric winches. As the mainsail was being unfurled, the furling line hung up, causing the tension on the outhaul to reach full force in the matter of a second or two. A loud bang announced the separation of the clew from the mainsail. It was an attention-grabbing demonstration of the brute force delivered by a power winch—and a costly lesson in how high-modulus, low-stretch materials endure minimal elongation prior to failure. The takeaway from this episode was that careful attention must be paid to the line being tensioned and what’s happening to the sail. Beware of dodgers and Biminis that hide the sails from view and leave the person operating a power winch without any direct visual feedback.
Clutch Plays
Some see the self-tailing winch as the ultimate answer to handling a line under load. But there are other opinions that continue to hold sway. The oldest belongs to traditionalists who swear by horn cleats, just the way Nat Herreshoff intended. It’s a functional approach, especially if the deck is festooned with non-self-tailing winches that remain in good working order.
But we are in a rope-clutch revolution that’s realigned deck layouts and changed the approach to line handling. These lever-operated, clamplike devices allow one winch to cope with several lines, but not all at once. With badgerlike jaws, rope clutches lock lines in place, immobilizing the line under full load. Some clutches allow a sailor to release the fully tensioned line, but lines under load behave more sedately if, prior to releasing, they are wrapped on the winch and re-tensioned prior to releasing the clutch. The line is then eased from the winch drum.
There’s a fine art to making the right rope-clutch commitment. The “too much of a good thing” rule once again prevails, and surrounding a winch with four or five clutched lines can cause more problems than it solves. This is especially true if two or more heavily loaded lines are involved in the same sail-handling evolution. I’ve sailed on boats where a main halyard and mainsheet are clutched off at the same winch. The assumption is that once the sail is set, the halyard will remain locked in the clutch and the winch can be used to handle the sheet. All is copacetic up until it’s time to reef, and the mainsheet and halyard have to be handled with only one winch. Add darkness, a significant seaway and a crew just rousted from a deep sleep, and the value of an extra winch, rather than too many rope clutches, becomes very clear.
Furling systems are center stage aboard modern cruising sailboats. They make sail handling easier and safer because the majority of maneuvers can take place in the cockpit.
Headstay-mounted headsail furlers adorn almost every sailboat seen at in-water boat shows. They come in two distinct generic designs. Both types are comprised of a slotted alloy extrusion that fits over the headstay. A jib or genoa is initially hoisted via a rope halyard, then torque to wind in the sail is provided by a drum affixed to the bottom end of the foil. The difference between the two systems is that one relies on a mast-mounted sheave that leads a jib halyard to a sliding swivel that rides up and down the foil. The other system, usually found on smaller boats, has a sheave assembly affixed to the top foil section and the halyard(s) is not run to the mast. Owners with the latter system often continually fight the stretchiness of the small-diameter polyester line used for the halyard. Switching to a higher-modulus (less-stretchy) line lessens the stretch and is worth the investment.

Both systems rely on a spooled line to deliver the furling and reefing torque. This “in-haul” line endures years of UV and chafe damage, but at some point, failure becomes inevitable. It’s more likely to occur when the sail is reefed and the inhaul line is under significant load. For some reason, such failures seem to occur on a dark, rainy night at about 0300. And when a reefing line parts, the deeply reefed jib becomes a full genoa flogging like a flag in the breeze. Even worse, the line to haul it in is no longer usable. That’s why it makes sense to check for chafe and grow skeptical of a furling line that has been exposed to sunlight for more than a decade.
Endless or continuous line furlers are designed to tame large drifter/reachers and nylon asymmetric spinnakers. There are bottom-up and top-down versions, and each is designated by where the sail first begins to furl. Bottom-up furlers are used for light air, lightweight genoa-like sails (codes and reaching sails). Instead of furling with a fishing-reel-like drum arrangement, these endless line furlers rely on a continuous loop. Line tension turns into torque at the disk-shaped drum that holds only a partial turn of line. The twin leads of the elongated loop can be led aft to the cockpit via multiple sets of double blocks mounted on lifeline stanchions.
Asymmetric spinnakers utilize a top-down furling rotation that is telegraphed from the drum to the head of the sail using a torsion line. The splices on these endless-loop furling lines should be regularly checked, and so should the points where the torsion rope enters the hardware.
Cordage—like the hardware that leads and locks running rigging in place—has been vastly improved, and it makes sense for sailors to tap into what it has to offer. This can be done in a full-scale makeover or in a bit-at-a-time tuneup. With the latter, start with halyards, add some new blocks, and check or replace the mast sheaves. If winches and clutches are part of the redo, make sure the deck structure can handle the load, or have some extra reinforcement added.
Whatever the scale of the rigging refit, keep in mind that on a cruising boat, saving ounces isn’t the issue. Our goal is to add efficiency and reliability, and that involves picking hardware and cordage with the right specs, and using them in a layout that keeps the rigging running as friction-free as possible.
Technical expert Ralph Naranjo is a veteran circumnavigator and ocean racer, and author of The Art of Seamanship .
- More: hardware , How To , print 2020 winter , rigging
- More How To

How to Rig Everything in Your Favor

Is There a Doctor Aboard?

3 Clutch Sails For Peak Performance

It’s Time to Rethink Your Ditch Kit

Cruising the Northwest Passage

Balance 442 “Lasai” Set to Debut

A Legendary Sail

10 Best Sailing Movies of All Time
- Digital Edition
- Customer Service
- Privacy Policy
- Email Newsletters
- Cruising World
- Sailing World
- Salt Water Sportsman
- Sport Fishing
- Wakeboarding
- AROUND THE SAILING WORLD
- BOAT OF THE YEAR
- Email Newsletters
- Best Marine Electronics & Technology
- America’s Cup
- St. Petersburg
- Caribbean Championship
- Boating Safety
Simple Ways to Optimize Running Rigging
- By Erik Shampain
- December 6, 2022

It’s easy to underestimate the benefits of good running rigging. There are many rope products on the market, and there is a time and a place for most of them. Let’s take a look at lines that need the most attention and why, as well as basic rules for using low-stretch line, using lightweight or tapered line where most beneficial and using rope that is easy to work with.
Let’s start up front with the headsail halyard. Luff tension greatly affects shape and thus performance of the jib or genoa, so having a halyard that is as low-stretch as possible is paramount. Saving a little weight aloft is also key, so find a lightweight rope as well. It’s a little against the norm, but for club racing boats that aren’t tapering their halyards, I really like some of the Vectran-cored ropes. Products like Samson’s Validator and New England Ropes V-100 are easy on the hands and easy to splice. For a little more grand-prixed tapered halyard, talk to our local rigger about using a DUX core, or other heat-set Dyneema, with a Technora-based cover. Lately, I’ve been using a lot of Marlow’s D12 MAX 78 and 99. Tapering the halyard saves weight aloft as well. I like soft shackles for jib halyards. There, weight savings aloft generally outweighs the little extra time a bowman needs to attach the sail. This is especially true in sprit boats where the jib is rarely removed from the headstay.
Pro Tip: When not racing, use a halyard leader to pull the halyards to the top of the mast, getting the tapered section out of the sun. For extra protection, put all the halyard tails into an old duffle bag at the base of the mast when not in use.
For jib sheets, I follow the same low-stretch rule as the jib halyard. I don’t want the jib sheet to stretch at all when a puff hits. On boats with overlapping genoas, I don’t generally recommend tapering the line because by the time the genoa is trimmed all the way in, the clew is really close to the block. On boats with non-overlapping jibs, tapering is an easy way to save a little weigh. Plus, the smaller core size runs through across the boat more easily in tacks. I’ve been using soft shackles on the jib or genoa sheets for a while now, mostly because they don’t beat the mast up during tacks. There also a bit “softer” when they hit you.
What about jib lead adjusters? There are a couple of approaches here. Some believe a little stretch is okay, as it allows the lead to rock aft a couple of millimeters in puffs, which twists the top of the jib off slightly. This can be fast as it helps the boat transition through puffs and lulls. I am a fan of this as long as it isn’t too stretchy. I use low-stretch Dyneema for the gross part of the purchase and then a friendlier-on-the-hands rope for the fine tune side, the part that is being handled. Samson Warpspeed or New England Enduro Braid work well.
Spinnaker sheets are a fun one. They should be relatively low-stretch but not necessarily the lowest stretch. I’ve found that near-zero stretch lines can wreak havoc on people and hardware when flogging or when the chute is collapsing. They have to be easy on the hands, as they are the most moved sheets on the boat, and they should be tapered as far as you can get away with. Tapering saves weigh, which is very important in keeping the spinnaker clew lifting up, especially in light air when sails want to droop. Again, Samson Warpseed and New England Enduro braid are good. For boats with grinders or even small boats with no winches, a cover that is a little grippier or stronger is good. Most Technora-based covers work well for this purpose.
Pro Tip No. 2: On boats with asymmetric spinnakers I like to connect the ‘Y’ sheet with a soft shackle that also goes to the spinnaker. This saves weight. I sew a Velcro strip around one part of the shackle (see picture) so that the soft shackle stays with the ‘Y’ sheet when open. This is beneficial when you have to quickly disconnect or re-run a sheet, replace one sheet, or even quickly replace a soft shackle. On most boats I will keep one spare spinnaker sheet with soft shackle down below as a spare side, changing sheet, or code zero sheet. On boats with a symmetric spinnaker, we’ll splice the spinnaker sheet to the afterguy shackle to save weight in the clew.

The spinnaker halyard has a couple of more options. For halyards supporting code zeros, zero stretch is important. The same principals we used when talking about the jib halyard apply here. For boats without code zeros, I like a little softer halyard with a touch of give. Those tend to run though sheaves better without kinking. Enduro and Warpseed are good for these applications. Most bowmen prefer a shackle that is quick and easy to open. Since a happy bowman is a good thing, I will generally use an appropriately sized Tylaska shackle or dogbone style shackle for those halyards
For symmetric spinnaker boats, the afterguy must be very low stretch line. I go back to products like covered Vectran for club-level sheets. I also find that afterguys generally last longer if I don’t taper them. When the pole is squared back, the afterguys often run pretty hard across the lifelines, producing a fair amount of chafe. Covered lines help minimize that.
For tack lines on asymmetric boats, I like matching spinnaker halyard material on club-level boats and using low-stretch heat-set Dyneema cores with a chafe resistant cover for grand prix and sportboats.
Like the headsail halyard, a near-zero stretch main halyard is also important. For me the same line applications apply. Keep the mainsail head at full hoist at all costs. I will often match the material I use for main and jib halyards.
It is most important that the main sheet sit in the winch jaws well and tail perfectly. This is a strict combination of sizing and pliability. I’ve found that the New England Ropes Enduro braid and the Samson Warpspeed II work well for club-level boats with and without winches. For a slightly longer lasting product with some chafe resistance, try any manufacturer’s Technora-based covered line.
The most under-appreciated and least thought about rope on a boat always seems to be the outhaul. The last thing you want when the wind comes up is for your mainsail to get fuller. Spend some time here and use very low-stretch rope. Most heat-set Dyneemas will work great for the gross tune side of the purchase.
Pro Tip No. 3: Minimizing the last purchase of an outhaul greatly increases the ease with which it can be pulled on or eased out. For example, you could have a 6-to-1 to one pulling a 2-to-1, pulling a 2-to-1 and then to the sail for a 24-to-1. Or, better yet, you could have a 4-to-1 pulling a 3-to-1, pulling a 2-to-1 for a 24-to-1 as well. The latter example will work better. Trust me. I’m a doctor . . . sort of. We built an outhaul like this on a SC50. I can pull it on upwind in heavy air with little problem. On the flip side, in light air downwind, it eases just as well. In fact, if memory serves me right, we did a 3-to-1 in the end rather than the 4-to-1 for a total of 18-to-1 and it worked well.
Runners and backstays should have extremely low stretch. A pumping mast and sagging forestay in breeze isn’t fast. Runner tails, like the mainsheet, should perfectly fit the winch and tail easily without kinking.
With so many options readily on the market now, it can be very confusing. I always recommend contacting your local rigger if you have any questions at all about what rope is right for you. They’ll get you pulling in the right direction.
- More: cordage , running rigging , sailboat gear

Wingfoiling Gear: A Beginner’s Guide

Suiting Up with Gill’s ZenTherm 2.0

Gill Verso Lite Smock Keeps it Simple

A Better Electronic Compass

Brauer Sails into Hearts, Minds and History

Anticipation and Temptation

America’s Offshore Couple

Jobson All-Star Juniors 2024: The Fast Generation
- Digital Edition
- Customer Service
- Privacy Policy
- Cruising World
- Sailing World
- Salt Water Sportsman
- Sport Fishing
- Wakeboarding
Better Sailing

What is Sailboat Rigging?
The domain of rigging is an essential matter for the safety and good performance of your sailboat. Nowadays, the type of rigging is still evolving. Generally, rigging is depending on the type of sail used or the number of masts. As a basic rule, the replacement of the standing rig should be done every 10 years, except for multihulls or regattas, and rod or composite fiber rigging. A good set of rigging is of great importance in order to ensure navigation without causing any damage. A useful tip is to perform often thorough checks of the state of the rigging of your sailboat. Like this, you will prevent any possible damages from happening. So, let’s examine what exactly is sailboat rigging.
Standing and Running Rigging
Standing rigging supports your sailboat’s mast. The standing rigging consists of all the stainless steel wires that are used to support the mast. Moreover, standing rigging includes the rods, wires, and fixed lines that support the masts or bowsprit on a sailing vessel. In addition, all these reinforce the spars against wind loads transferred from the sails. On the other hand, running rigging is the rigging for controlling and shaping the sails on a sailboat. Running rigging consists of the main and jib sheet, the boom vang, the downhaul, and the jib halyard.
The subdivision of running rigging concerns the jeers, lifts, and halyards (halyards). This supporting equipment raises or lowers the sails and also controls the lower corners of the sails, i.e. the tacks and sheets. Over the centuries and up until nowadays, the history of sailboats rigging is still developing. What we’ve learned by now is that the combination of square and fore-and-aft sails in a full-rigged ship creates a highly complex, and mutually reliant set of components.
Wire Rigging
Wire rigging is the most common form of standing rigging on sailboats today. Furthermore, the style of the wire used is made of stainless steel, which is also a common wire style. What is advantageous with wire is that it’s quite affordable, especially when using swage fittings. The wire has also a long life expectancy, about 10 to 20 years, depending on use and the region you’re sailing to. However, wire rigging is more elastic than rod and synthetic rigging, thus it offers the lowest performance.
Rod Rigging
The rod rigging composition is of high-quality materials that provide low stretching. Moreover, it has a very long lifespan and great breaking strength, much more than that of its wire counterpart. Its life expectancy is attributed to the design, which is a mono strand, as well as to its composition that makes it very corrosion resistant.
Synthetic Rigging
Synthetic rigging is a new type of rigging and just like a rod, has minimum breaking strength. Nowadays, synthetic rigging offers low stretch performance features (that may vary depending on construction type), which are quite good for sailboats, among others. However, synthetic rigging will not last as long as the metal components. Most of the time, metal wire and rod are far better than synthetic rigging.
Based on the two rig types which are square-rigged and fore-and-aft, let’s divide the fore-and-aft rigs into three groups:
- Lateen Rig has a three-sided mainsail on a long yard.
- Bermuda rig which has a three-sided mainsail.
- Gaff rig is the head of the mainsail and has a four-sided mainsail.

Parts of a Sailboat Rigging and Terminology
Cruising sailboats will usually have their mast supported by 1 x 19 stainless steel wire. However, there are some racing sailboats that may choose rod rigging. Why? That’s because rod rigging has a stretch coefficient that is some 20% less than wire. The downside is that it’s more difficult to install and adjust, as well as less flexible with a shorter life span. So, let’s move on and see the parts of the sailboat’s rigging and their terminology:
- Forestay and Backstay : Forestay and backstay support the mast fore and aft. The forestay keeps the mast from falling backward. It attaches at the top of the mast. The backstay is important for the sail’s control because it directly affects the headsail and mainsail.
- Cap Shrouds and Lower Shrouds : These parts hold the mast steady athwartship. The shrouds are attached to the masthead and via chainplates to the hull. Moreover, forward and aft lower shrouds provide further support. The lower shrouds are always connected to the mast, just under the first spreader, and at the other end to the hull.
- Spreaders : In general, spreaders keep the shrouds away from the mast. What is of high importance, in terms of stability, is their length and fore-and-aft angle. The rigs of cruising boats may have up to three pairs of spreaders, depending on a number of factors such as the sailboat’s size and type. Keep in mind that the more spreaders a sailboat has then the lighter the mast section can be. Last but not least, the spreaders must be robust in order to withstand the compression loads of the shrouds.
- Masts and Booms : Masts are tall spars that carry the sails, navigate the sailboat, and control its position. Sailboat booms are horizontal spars to which the foot of a sail is bent. The booms attach to the lower part of the mast. There are some sailboats with unstayed masts, like the junk rig and catboat rigs. They have no standing rigging at all, and neither stays to support them. For example, a Bermuda rig has a single mast and just one headsail, thus a relatively simple rigging layout. On the other hand, schooners or ketches have a really complex rigging, i.e. with multi-spreader rigs. Apparently, the mast on a sailboat is an important component.
- Chainplates, Toggles, and Turnbuckles : These important components of sailboat rigging attach the shrouds to the hull. The chainplate is a metal plate that fastens to a strong point in the hull. Toggles are comprised of stainless steel fittings that absorb non-linear loads, located between the shrouds and the chainplate. Turnbuckles (or rigging screws) are also stainless steel materials that allow the shroud tension to adjust better.
- Parts of Running Rigging : As mentioned above, running rigging has to do about shaping, supporting, and stabilizing the sails on a sailing boat. Therefore, the necessary materials for running rigging are numerous and need further explanation. Some of these materials are: The topping lifts, the halyards, the outhauls and downhauls, the boom vangs, the sheets, and more.
Sailboat Rigging – Summary
So, what is sailboat rigging? Sailboat rigging concerns the wires, lines, and ropes that hold the rig and control the sails. To be more accurate, this means the tensioned stays and shrouds that support the mast. Rigging has to do about the booms, masts, yards, sails, stays, and cordage. Same way with cars, sailboats also have an engine, but in the form of sails. This is the standing and running rigging. When we refer to standing rigging this means that the stays and shrouds are supported by the mast. On the other hand, running rigging refers to rope halyards, sheets, and other control lines. Depending on the type of your sailboat, this sail-engine might be old, new, or maybe somewhere in between.

Peter is the editor of Better Sailing. He has sailed for countless hours and has maintained his own boats and sailboats for years. After years of trial and error, he decided to start this website to share the knowledge.
Related Posts

Sailing with Friends: Tie Knots, Navigate the Seas and Create Unforgettable Memories

Atlantic vs Pacific: Which is More Dangerous for Sailing?

Lagoon Catamaran Review: Are Lagoon Catamarans Good?

Best Inboard Boat Engine Brands
- Buyer's Guide
- Destinations
- Maintenance
- Sailing Info
Hit enter to search or ESC to close.
Yachting Monthly
- Digital edition

Boat rigging: a guide to going composite
- Sam Fortescue
- July 1, 2021
Considering changing you boat rigging to composite but confused by the options? Sam Fortescue takes a look at the pros and cons of various solutions

‘Like the shift from wooden spars to alloy spars after the Second World War, we are moving to carbon spars and composite boat rigging for cruising boats,’ says well-known surveyor Kim Skov-Nielsen. ‘We are living on the cusp of a major shift to all-composite rigs.’
Four broad options for modern boat rigging run from ultra-high molecular weight polyethylene (HMPE) to aramid, PBO (poly-benzoxazole) and finally full carbon.
Compared to steel, all these options offer much lighter weight, which makes for less pitching and rolling in a sea. Greater rig stiffness improves sail trim and transfers forces more efficiently – particularly in lighter winds. And synthetic fibres resist the invisible fatigue that undoes stainless steel systems.
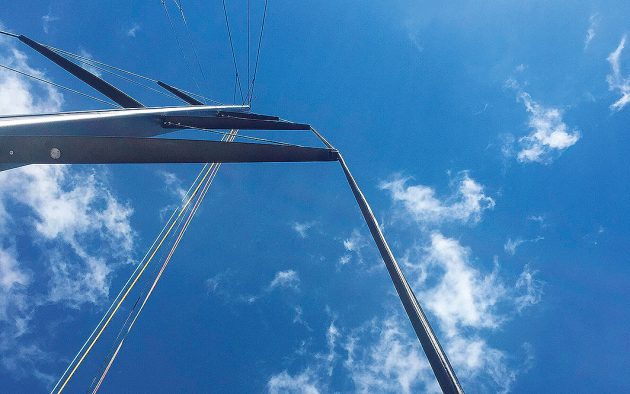
For budget-conscious boaters looking to save weight aloft, carbon rigging is a much cheaper way to do it than carbon spars
On the other hand, the cost can be two to four times that of wire boat rigging, and repairs are tricky outside major sailing centres. Some of the fibres degrade rapidly with exposure to UV or moisture, so damage to the sheathing will shorten the lifespan of the stay.
Carbon in particular is also susceptible to impacts from the side. Every sailor will weigh up the options differently, but here are your choices:
HMPE (Dyneema/Spectra)
Dyneema and Spectra has extraordinary tenacity and a very low weight, but many riggers are wary of using it on cruisers because they consider it too elastic.
However, US specialist Colligo Marine says it is just a question of picking the right grade of Dyneema and sizing it correctly. ‘Many people have mistakenly sized Dyneema for break strength and ended up with a very stretchy rig,’ says John Franta of Colligo Marine. ‘Stretch is a function of cross-sectional area, so all you need to do is pick the right diameter for your application.’
That means you’re going to end up with a bigger Dyneema line than your original wire, causing marginally more windage, albeit at a fraction of the weight. For example, the 8mm wire that is standard on many 40ft cruisers would have to be replaced with 11mm Dyneema in a Colligo Dux system, but this should creep less than 3mm per year.
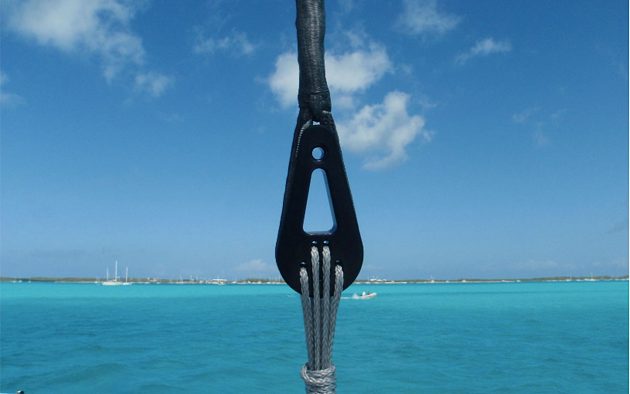
Colligo’s aluminium chainplate eye can be tensioned with a lashing on sub-30ft boats
The variety of HMPE you use is vital, too, as the strands within the line align themselves with the load.
‘A 50ft-long backstay made from normal Dyneema can grow 4-6 inches in length,’ says Franta. That’s why Colligo only uses heat-stretched Dyneema SK75, where the fibres are already very tightly aligned, instead of higher-tech grades like SK99 and DM20.
A typical HMPE stay is spliced around a lightweight aluminium thimble, which fits easily to traditional fork at the deck end. You’ll need a special Colligo stemball fitting aloft or a CheekyTang, spliced into a loop at the top end of the shroud, then bolted through the mast.
Chafe and UV are the chief enemies of Dyneema rigs. ‘It is easier to cut and has a low melting point of 100°, so a fast-moving sheet could cut through it in seconds,’ warns Marlow sales director Paul Honess. Colligo is PVC shrink-wrapped for this reason and should last eight to 12 years without mishap.
Aromatic polyamides (Kevlar is a Dupont trademark) have low creep and high tenacity, but they also resist abrasion well – important when pitching and rolling across the Atlantic, for example.
Article continues below…
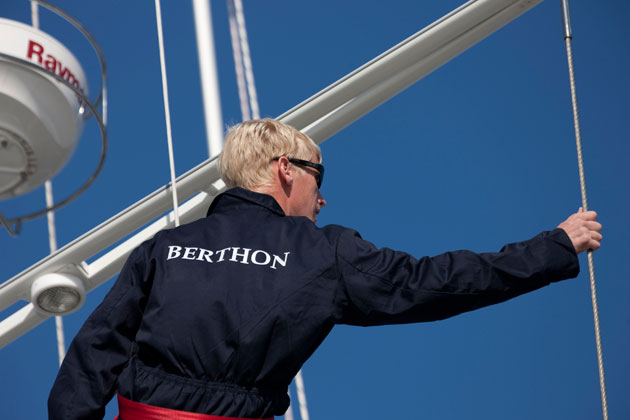
Improving performance through tuning standing rigging
To tune or not to tune? Would you drive your car with wheels misaligned? Run a marathon with your shoelaces…

How to check your rigging – video guide
A screwdriver, a straight edge and a good set of eyes are all that’s required for a basic rig check.…
Aramids are five times stronger than steel rope weight-for-weight, but that multiple falls if the fibres become wet and UV light causes them rapid damage, so cables have to be well sealed and protected.
Aramid stays
OYS has been designing Kevlar backstays with stainless steel terminations for years, and recommends a maximum working load of 40% of the cable’s breaking strain to minimise creep, so aramid stays are a little fatter than rod equivalents.
For example, an 8.5mm cable can take loads of 3000kg and yet weighs just 60g per metre. Compare that to Nitronic, where 7.5mm rod offering the same working load weighs 350g per metre. ‘You size it for stretch, and then you end up with a much higher safety factor,’ says Robbie Sargent of OYS. ‘It’s flexible and you can coil it up, plus it’s relatively price competitive and looks smart. Aramid is to all intents and purposes a cruising product.’
Black sheathing is standard, but lighter custom colours can reduce the cable’s resistance to UV. OYS does not recommend aramid shrouds on a monohull. ‘Rod and wire is pretty bullet-proof in terms of chafe and physical damage,’ says Sargent. ‘Composite rigging is a lot more fragile. A mid-sized Oyster or Swan has full battens – can go that goes through the textile sheath very quickly.’
The material works well in fore- and backstays, runners and inner fore-stays, or as lateral rigging on a multihull, he adds.
Dutch-based Aramid Rigging uses an advanced endless winding machine for made-to-measure stays. The bundle of fibres is in turn wrapped in heat shrink to keep out water, then an outer protective braid with a UV-resistant coating. The metal thimbles at each end are then sealed inside a polyurethane moulding, eliminating one common point of failure for steel rigs.
Developed in the 1980s, polybenzoxazole or PBO was seen as a step up from aramid for rigging raceboats, with nearly twice the strength and modulus – stiffness. It weighs less than 20% of rigging wire, and manufacturers have developed an easy-to-fit cruising product.
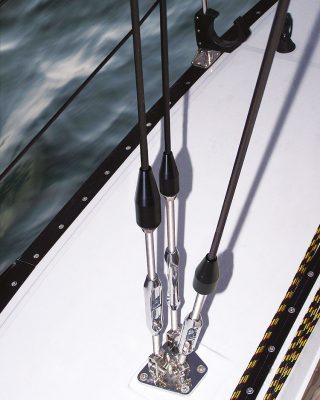
Powerlite PBO cables from Applied Fiber
Westmarine in the US worked with Applied Fiber to develop the Powerlite brand – fully compatible with normal terminations at the mast and deck, so it can be swapped for an existing wire or rod stay.
A sheath is extruded on to pre-tensioned bundles of PBO at the manufacturing stage, protecting the fibres from UV, water and abrasion. It can even be run through the spreaders like steel.
Allspars is the UK supplier for the Dutch EasyRigging system, but both manufacturers agree the rig should be replaced after eight years – sooner if the boats have been raced hard. Babystays, runners and removable forestays should be replaced after just four years. Some riggers, however, say that PBO has been eclipsed by carbon for performance, while Dyneema and aramid stays are cheaper and more robust. ‘PBO has proven unreliable, inexplicably brittle and very susceptible to UV damage,’ says surveyor Skov-Nielsen. ‘It doesn’t even get discussed these days when contemplating new rigging.’
The state of the art remains carbon, where Future Fibres dominates. Before you turn the page with a scoff, know that costs have plunged and manufacturing has improved – bringing carbon rigging within reach of cruising boats.
‘ECthree is entry-level for those that want to move away from rod rigging for better performance and more comfort at sea,’ says general manager James Austin. ‘We have a mission to democratise that and make it a more accessible product for someone in the 30-60ft category.’
ECthree is made of rods of pure carbon, bundled, sheathed and fitted with stainless steel terminations, making them easy to retrofit. It is similar to the peak performance ECsix product. ‘It is 20% lower in modulus but one fifth of the cost,’ says Austin. ‘We think that’s a good compromise.’
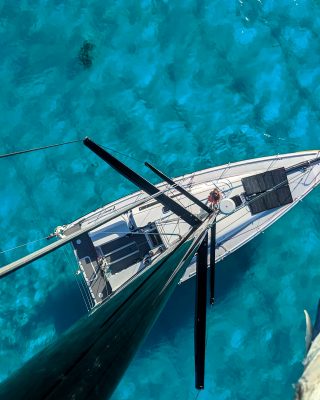
Moving from rod to carbon rigging on a 45ft yacht is ‘equivalent to having an extra person sitting on the rail’
Carbon boat rigging saves 65% of the weight of rod rigging. It is invulnerable to water or UV, so is ideal for use on a yacht. True, carbon doesn’t handle lateral forces as well as steel, but the construction allows the fibres to move and flex within the sheath.
The stainless-steel fittings are designed to be replaceable, but the cable should be inspected and serviced regularly – a service Future provides in the package.
‘It is unrealistic to think we can get to the same price as rod, but we would hope to be less than double,’ says Austin. ‘It’s undoubtedly a cost premium to have composite rigging, but you have to look at it over 15- to 20-year life-cycle of the boat.’ The lateral rigging on a Grand Soleil 46 refitted recently cost around £15,000.
LightSpeed, a smaller US manufacturer that is also trying to drive carbon rigging into the sub-80ft cruising bracket, uses the same Toray T700 as Future, with smart titanium terminals that fit most common types of standard rigging screw and mast fitting. ‘We are unique in building an integrated Technora blend into the hoop structure of the cable, which delivers unmatched cable chafe protection and durability without adding bulk of a cover,’ says technical specialist Mike Wasten.
Comparative boat rigging costs
- Wire and rod – rigging a Dehler 38 with standard 1×19 wire or Nitronic rod, would be an estimated £2,280 for wire and around £5,000 for rod.
- HMPE (Dyneema/ Spectra) – Cables to rig a Dehler 38 would cost £2,900-3,700.
- Aramid – costs of around £7,500 for the Dehler 38 are 40-60% more than rod rigging
- PBO – Powerlite claims its cables cost just 30% more than rod, quoting $8,525 (£6,210) for a Dehler 38 with running backstays.
- Carbon – $20,000 (£14,600) for a complete set of stays with runners to suit a Dehler 38.
Enjoyed reading this?
A subscription to Yachting Monthly magazine costs around 40% less than the cover price .
Print and digital editions are available through Magazines Direct – where you can also find the latest deals .
YM is packed with information to help you get the most from your time on the water.
- Take your seamanship to the next level with tips, advice and skills from our experts
- Impartial in-depth reviews of the latest yachts and equipment
- Cruising guides to help you reach those dream destinations
Follow us on Facebook , Twitter and Instagram.
My Cruiser Life Magazine
Cutter Rigged Sailboats [GUIDE] Advantages, Sailing, Options & Features
Cutter rigs are often more prevalent in boating magazines and theory than they are in your marina. Most cruising sailboats are Bermuda rigged sloops with just one permanently attached headsail. So, are two headsails better than one? Or, are they double the trouble?
Table of Contents
- History of Cutters
What is a Cutter Rig?
Cutter features, cutter rig options, sailing a cutter rigged sailboat, 5 popular manufacturers making cutter rigs, it takes two to tango, cutter rigged sailboat faqs.

History of Cutters
Cutters became popular in the early 18th century. These traditional cutters were decked (instead of open) and featured multiple headsails. Smugglers used cutters to smuggle goods, and the coast guard used cutters to try to catch the smugglers.
Various navies also used the cutter rig. Navy cutters featured excellent maneuverability and were better at sailing to windward than square-rigged ships.
Navies used cutters for coastal patrol, collecting customs duties, and “cutting out” raids. These “cutting out” operations consisted of a boarding attack. Fast, maneuverable cutters could stealthily approach an enemy vessel and board it. This type of attack was common in the late 18th century.
US Coast Guard ships, now powerful, fast, engine-driven, steel vessels, are still called cutters today as a nod to their past.
A cutter rig sailboat has two headsails instead of just one. The jib is located forward and is either attached to a bowsprit or the bow. The inner sail is called the staysail and is attached to an inner forestay.
Traditional cutters were built for speed. Today, cutter rigged sailboats are popular with ocean-crossing sailors, cruisers, and sailors looking for an easy to manage, versatile rig for all conditions.
It’s important to distinguish cutters from other types of boats with a single mast. Cutters regularly fly two headsails on nearly every point of sail. Many sloops are equipped to fly different-sized headsails, but it is unusual or unnecessary for them to fly more than one at a time.

Solent Rig vs Cutter Rig
A solent rig is traditionally called a slutter–a little bit sloop and a little bit cutter. This configuration features two large headsails mounted close together. The solent rig is good if you do a lot of downwind sailing. You can pole out both headsails and go wing-on-wing, with one headsail on the starboard side and one on the port side.
If you are on any other point of sail, you can only use one solent rig headsail at a time. If you use the inner sail, the wind flow is disrupted by the furled forward sail. And, if you use the forward sail, you’ll have to furl it to tack because there’s not enough space between the forestays.
The solent rig is a way to add more sail options to a standard sloop. Most solent stays are not required rigging to keep the mast up, so owners remove them when not in use to make tacking the primary headsail easier.
Advantages of a Cutter Rig
There are a lot of reasons to like a cutter. A cutter rigged boat has redundant rigging and spreads the sail load across its rigging. And a cutter rig offers increased sail options–it offers increased sail area in light winds and easy and efficient ways to decrease sail area in heavy weather.
In heavy weather, a cutter will drop or furl her larger headsail – usually a yankee or a genoa. That leaves just the smaller inner staysail. This arrangement is superior to the standard sloop, which sails in high winds by reefing her headsail. The staysail, however, lowers the center of effort on the sail plan and maintains draft over the reefed mainsail. That makes the boat more stable, maintains performance, and reduces stresses on the rig.
If you imagine the sailor going to sea and needing to reef, it’s easy to see how many more choices they have than the sloop sailor. While each sailor can reef their mainsail, a cutter skipper has full control over both headsails as well.
Because a cutter rig spreads the load across two headsails, it’s easier to manage. There might be more sails, but each sail is smaller and has smaller loads on it. That makes cutters the preferred option for sailing offshore when short-handed, as are more cruising couples.
Lastly, it has to be added that there’s something appealing about the traditional looks of a cutter.
Disadvantages of a Cutter Rig
While there are many benefits of a cutter, there are drawbacks and disadvantages too.
Sailors will have more lines to manage and more processes to think through. More sails mean more halyards and sheets. And when it comes to maintenance and upkeep, a cutter will have more standing and running rigging to replace, along with one more sail.
Cutters are also harder to tack. You’ll be dealing with two headsails instead of just one. Many designs deal with this problem by making the staysail self-tacking. This has fallen out of favor, but it’s a great advantage if you find yourself short-tacking up or down rivers.
Regardless of whether you need to tack both headsails or not, getting the larger sail to tack through the slot and around the inner forestay is sometimes a challenge. Many skippers find themselves furling the headsail, at least partially, to complete the tack.
Cutters need extra foretriangle room, which can mean adding a bowsprit, moving the mast back, or both.
Cutter Rig Position
Looking at a cutter rigged sailboat diagram, you might see a bowsprit depicted. Often, cutters fly their yankee from a bowsprit. Bowsprits allow boat designers to increase the fore triangle’s size without making the mast taller. Other cutters don’t use a bowsprit and mount the yankee sail on the bow.
A cutter sailboat might seem like more work. After all, there are two sails to trim and manage. In addition, you’ll have to perform maintenance on two sails and purchase and maintain double the hardware.
However, the two headsail arrangement can be easier to manage when the sails are under load. Instead of having one jib or genoa to trim, the weight and pressure are spread across two sails.
Mast Location
Today’s modern boat designers often focus on providing living space in the cabin. Designers often move the mast forward to create a larger, more open saloon. When the mast is forward, there’s less space to mount two headsails. A cutter sailboat needs a decent foretriangle area.
A cutter rigged sailboat is also more expensive for boat builders. The deck must be strong enough to handle the inner forestay’s loads. Between the additional building costs, saloon design issues, and customers’ concern over increased complexity, boat builders often favor a single headsail.
Easier on the Boat and Crew
Since the loads are distributed between two smaller sails instead of being handled by one large genoa. This means there’s less pressure on attachments points and hardware, and therefore less wear and tear. In addition, because there are separate attachment points on the deck for each sail, the load is distributed across the deck instead of focused on one spot.
Because each headsail is smaller, the sails are easier to winch in, so the crew will find it easier to manage the sails.

There’s nothing cookie-cutter about a sailing cutter. From the cut of the jib to the configuration of the staysail, each cutter sailboat is unique.
Yankee, Jib, or Genoa
Traditional cutters have a yankee cut headsail along with a staysail. The yankee is high-cut and usually has no overlap. The high cut improves visibility, and a yankee has less twist than a typical jib. By sloop standards, it looks very small, but on a cutter it works in unison with the staysail.
A jib is a regular headsail that does not overlap the mast, while a genoa is a big jib that does overlaps. The amount of overlap is measured in percentage, so a 100-percent working jib fills the foretriangle perfectly. Other options include the 135 and 155-percent genoas, which are popular for sailors in light winds.
The problem with using a big jib or genoa with a staysail is that there will often be a close overlap between the two headsails. If flown together, the air over the staysail interferes with the air over the outer sail, making each one slightly less efficient. In these cases, it’s often better to drop the staysail and leave it for when the wind pipes up.
Roller Furler, Club, or Hank-On Sails
Sailors have many options to manage and store their cutter’s sails. Sailors can mix and match the options that work for them.
Roller Furler vs Hank-on Sails
You can have both sails on roller furlers, both hanked on, or a mix of the two.
Buying and maintaining two roller furlers is expensive, but it makes the sails easy to manage. You can easily unfurl, reef, and furl both headsails from the cockpit without having to work on the deck.
Hank-on sails are fool-proof and offer less expense and maintenance. You can use a hank-on staysail, either loose-footed or club-footed, depending on your needs. Hank-on sails make sail changes easy and they never jam or come unfurled unexpectedly.
The most common setup on most cutters is to have the larger yankee or jib on a furler, and the smaller and more manageable staysail hanked on.
Club-footed Staysail
A club-footed staysail is attached to a self-tacking boom. Since there is only one control sheet to handle, there’s a lot less work to do to tack from the cockpit. It tacks just like another mainsail. You can tack the yankee while the club-footed staysail self-tacks.
Island Packets and many other cutters feature this arrangement, which makes tacking easy.
However, a club-footed staysail takes up space on the foredeck–it’s always in the way. It’s harder to get to your windlass and ground tackle. In addition, it’s harder to store your dinghy on the foredeck under the staysail boom. The boom also presents a risk to anyone on the foredeck, since it can swing during tacks and jibes and is even lower to the deck than the mainsail boom.
Loose-footed Staysail
Keeping a loose-footed staysail on a furler clears space on the deck. Without the boom, you can more easily move around the foredeck, and you’ll have more space when you are managing the anchor. In addition, you can more easily store your dinghy on the foredeck.
However, the staysail loses its self-tacking ability. You’ll now have to have staysail tracks for the sheet’s turning blocks and another set of sheet winches in the cockpit. When it comes time to tack the boat, you’ll have two headsails with four sheets and four winches to handle. Most owners choose to furl the outer headsail before the tack. Then, they can perform the maneuver using the staysail alone.
The good news is that most offshore boats are not tacking very often. If you’re on a multi-day passage, chances are you’ll only tack once or twice on the whole trip.
Downwind and Light Air Sails
There are a number of light air sails that will help your cutter perform better when the wind is light. Popular options include the code zero, gennaker, and asymmetrical spinnaker.
Adding one of these sails to your inventory can make it a dream sailing machine. A code zero can be flown in light air. Since the cutter is already well equipped for sailing in heavy air, a light air sail really gives you the ability to tackle anything.
Sloop Rig, Ketch, and Yawl
While some describe a cutter as a cutter-rigged sloop or a sloop cutter, a modern sloop has one mast and one permanent headsail.
But you’ll also find the cutter rig used on a ketch or a yawl. A cutter ketch or yawl offers a cruising sailor increased sail area and choices by adding the mizzen mast and sail behind.
Sailing a cutter rigged boat is not that different from sailing a traditional sloop. Sailors will have to pay close attention to trim and tacking.
Sailing a Cutter Rig to Windward
A cutter usually can’t point as high as a sloop when sailing to windward. The yankee hinders the staysail’s airflow, and the staysail starts to stall.
Tacking a Sailboat Cutter
If you need to short tack up a narrow channel, and both your sails are loose-footed, you can roll up one of the headsails and just use one headsail to tack. Many staysails have a boom and are self-tacking. This means you can tack the yankee, and the staysail will take care of itself.
Reefing a Cutter
A cutter sailboat has more options to easily get the right amount of sail. You can add a reef to your mainsail, then furl or reef the yankee a little, and then add another reef to the mainsail. As the wind increases, you can take the yankee in all together, and sail with a double-reefed mainsail and the staysail. Finally, you can add the third reef to the mainsail. Some staysails can be reefed, too.
A cutter rig offers many options during heavy weather. For example, you may end up taking the mainsail down altogether and leaving the staysail up. Or, you might choose to replace the staysail with a tiny storm sail.
Adding a storm jib on a sail cutter is much easier than a standard sloop. On a sloop, you’d have to remove the large genoa from the bow and then add the storm sail. This operation places the skipper in a challenging situation, which can be avoided on a cutter.
On a cutter, you can remove the staysail and add the storm jib to the inner forestay. Working a little aft of the bow will give you increased stability while managing the staysail’s smaller load.
While many modern sailboats are sloop-rigged, cutter-seeking sailors still have options.
Rustler Yachts
While many new yachts have ditched the sturdy offshore cutter rig in favor of greater simplicity, Rustler is making a name for themselves by bringing it back. It’s still one of the best options for offshore sailing, and it’s great to see a modern yacht company using the rig to its full potential.
The Rustler doesn’t need a bowsprit to accommodate its cutter rig. The Rustler is set up for single-handed and offshore cruising with all lines managed from the cockpit. Their smaller boats are rigged as easier-to-sail sloops for coastal hops, while the larger 42, 44, and 57 are rigged as true cutters with staysails and yankees.
Cabo Rico Cutters
Cabo Rico built cutters between 34 and 56 feet long. They aren’t currently in production but often come up on the used boat market. They are beautiful, semi-custom yachts that turn heads where ever they go. Of all the cutters the company built, the William Crealock-designed Cabo Rico 38 was the most long-lived, with about 200 hulls built. The second most popular design was the 34. The company also built a 42, 45, 47, and 56—but only a handful of each of these custom beauties ever left the factory. Most of the larger Cabo Ricos were designed by Chuck Paine.
Cabo Ricos have bowsprits, and the staysail is usually club-footed, although owners may have modified this. Cabo Ricos are known for their solid construction, beautiful teak interiors, and offshore capabilities.
View this post on Instagram A post shared by Hold Fast Sailing (@sparrowsailing)
Pacific Seacraft
Pacific Seacraft features a full line of cutters. Pacific Seacraft boats are known for their construction, durability, and overall quality.
Just a few of the best-known cutters built by Pacific Seacraft include the following.
- Pacific Seacraft/Crealock 34
- Pacific Seacraft/Crealock 37
- Pacific Seacraft 40
View this post on Instagram A post shared by Jeffersön Asbury (@skipper.jeff)
Island Packet Yachts
Island Packet boats are probably the most popular cutter design available today. Designer and company founder Bob Johnson created beautiful cutter-rigged full-keel boats with shallow drafts that were very popular around Florida, the Bahamas, and the east coast of the US.
Island Packets are known for their comfortable, spacious layouts. Older models could be ordered from the factory as either sloop or cutter-rigged. The result is that you see a mix of the two, as well as plenty of cutters that have removed their staysails to make a quasi-sloop.
Island Packet is still in business today, but now favors solent-rigged sloops with twin headsails.
View this post on Instagram A post shared by SV Miette (@sv_miette)
Hess-Designed Cutters
Lyle Hess designed several famous cutter-rigged boats, including the Falmouth Cutter 22 and the Bristol Channel Cutter 28. These gorgeous boats are smaller than most cruising boats but are a joy to sail. Lyle Hess’ designs were popularized by sailing legends Lin and Larry Pardey, who sailed their small wood-built cutters Serraffyn and Taleisin around the world multiple times.
These beautiful cutters have a timeless look like no other boats. They have inspired many other designs, too. You’ll find them built from both wood or fiberglass, but a variety of builders and yards have made them over the years.
View this post on Instagram A post shared by Professional photographer (@gary.felton)
Cutter rigged boats offer cruising sailors a flexible sail plan that’s perfect for offshore sailing. Sailors can adjust the amount of sail according to the current wind conditions. Traditional cutters were known for being fast and agile, and today’s cutters carry on the tradition with pride.
What is a cutter rigged yacht?
A cutter rigged yacht features two headsails. One headsail, usually a high-cut yankee, is all the way forward, either on a bowsprit or the bow. The staysail is smaller and attached to an inner forestay.
What is the advantage of a cutter rig?
A cutter rig offers cruising sailors more flexibility. They can easily increase and decrease the sail area and choose the optimum combination for the sailing conditions. While there are more lines and sails to handle, each sail is smaller and therefore easier to manage.

Matt has been boating around Florida for over 25 years in everything from small powerboats to large cruising catamarans. He currently lives aboard a 38-foot Cabo Rico sailboat with his wife Lucy and adventure dog Chelsea. Together, they cruise between winters in The Bahamas and summers in the Chesapeake Bay.
Leave a comment
Your email address will not be published. Required fields are marked *
Save my name, email, and website in this browser for the next time I comment.
The Ultimate Guide to Sailboat Rigging Rope

What is sailboat rigging rope?
Sailboat rigging rope is the lifeline of a sailboat , connecting the sails to the mast and allowing the boat to harness the power of the wind.
Essentially, it is a specialized type of rope that is designed to withstand the forces and stresses encountered while sailing.
Why is a rope called a line on a boat?
In nautical terms, a line refers to a rope that has a specific purpose or is used for a particular function.
For example, a halyard line is used to hoist a sail, while a sheet line controls the position of the sail.
By using the word “line” instead of “rope,” sailors were able to clearly communicate their intentions and actions on a boat.
What ropes are used for ship rigging?
When it comes to sailboat rigging ropes, there are a variety of types available, each with its own unique characteristics and applications.
Let’s explore some of the most common types and their uses.
Polyester ropes.
Polyester ropes are popular for their durability, strength, and resistance to UV rays and saltwater corrosion. They are suitable for a wide range of applications, from halyards and sheets to control lines and running rigging.
Dyneema ropes
Dyneema ropes, also known as high-performance ropes, are incredibly strong and lightweight. They are perfect for high-load applications such as rigging and running backstays, where strength and low stretch are crucial.
Sta-Set ropes
Sta-Set ropes are made from polyester and are known for their flexibility and ease of handling. They are commonly used for general-purpose applications like halyards, sheets, and control lines.
Wire ropes, made from stainless steel, provide excellent strength and resistance to abrasion. They are commonly used for standing rigging , such as shrouds and stays, where stiffness and stability are required.
Vectran ropes
Vectran ropes offer high strength and low stretch properties, making them suitable for applications that require minimal elongation, such as halyards and control lines.
- Boat Rigging: Everything You Need to Know
- Line or Rope of Your Boats (explained)
- Choosing The Right Mooring Lines Or Dock Lines For Your Boat
- What’s the Difference Between a Spring line, a Breast line, and a Dock Line?
Which type of rope used in rigging is the strongest?
- One of the strongest types of rope used in rigging is Dyneema.
This high-performance rope is incredibly strong and lightweight, making it perfect for high-load applications. Its low stretch characteristics also contribute to its strength, ensuring minimal elongation under heavy loads.
- Stainless steel wire ropes are also known for their exceptional strength.
Made from corrosion-resistant stainless steel, these ropes provide excellent tensile strength and resistance to abrasion.
What are the three ropes on a boat?
On a sailboat, three primary ropes play essential roles in controlling and maneuvering the boat.
The first rope is called the halyard, and it is used to raise and lower the sails.
The halyard connects to the top of the sail and allows you to adjust its position and tension. Common options for Halyard include polyester, nylon, and dyneema.
The second rope is known as the sheet. Sheets are used to control the angle and position of the sails in relation to the wind.
There are typically separate sheets for the main sail and jib or genoa. By adjusting the tension and angle of the sheets, you can optimize the sail’s performance and power.
Common options for sheets include polyester, nylon, and blended ropes.
Control line
The third rope is the control line.
Control lines are used for various purposes, such as adjusting the shape of the sails, controlling the boom, or operating the boat’s various systems.
They are typically found on larger boats with more complex rigging setups.
Generally, control lines need to be strong and durable, with good grip and flexibility. Common options include polyester, nylon, and braided ropes.
How do i choose a rigging rope?
Here is a step-by-step guide to help you make an informed decision:
1. Assess your sailing needs
Consider the size of your boat, the sailing conditions you typically encounter, and your rigging setup. This will help you determine the strength and durability requirements for your rigging rope .
2. Research different rope materials
Look into the characteristics and benefits of materials like polyester, Dyneema, and stainless steel. Understand how each material performs in terms of strength, UV resistance, and corrosion resistance.
3. Determine the appropriate size
Based on your boat size and rigging setup, identify the ideal thickness and strength of rope needed. Larger boats and high-performance rigs will generally require thicker and stronger ropes, while smaller boats may benefit from lighter options.
4. Consider flexibility and handling
Ensure that the rope you choose is easy to work with and provides a good grip. It should be flexible enough to maneuver but not overly stretchy.
5. Consult with experts
If you’re unsure about any aspect of choosing a rigging rope, don’t hesitate to seek advice from professionals or experienced sailors. They can provide valuable insights and help you make the best decision for your specific needs.
What size rope do i need for my boat?
The size of the rope you need will depend on the size of your boat, the specific rigging setup, and the intended use of the rope.
For example a 20 foot sailboat , you would typically need a halyard rope that is around 5/16 to 3/8 inches in diameter. The length of the rope should be long enough to reach from the masthead to the cockpit, allowing for proper hoisting and trimming of the sails.
Generally, a sheet rope with a diameter of 5/16 inch or 3/8 inch should suffice for most sailboats. As a general guideline, the length of the rope should be at least twice the length of your boat. This will allow for proper handling and maneuvering of the sail.
Why is a line called a sheet?
The term “sheet” likely comes from the old English word “sceata,” which means corner or border. The ropes were called sheets because they controlled the corners or edges of the sail.
Over time, the term “sheet” became associated with any rope that controls the position or angle of a sail.
How long should boat lines be?
Boat lines are ropes used for various purposes, such as docking, anchoring, and securing the boat.
A general guideline is to ensure that boat lines are at least 2-3 times the length of your boat. This will provide enough length to handle different docking scenarios and ensure the safety of your vessel.
It’s also a good idea to have a variety of lengths available to accommodate different situations.
Common Problems and Solutions for Sailboat Rigging Ropes
Here are some common problems you may encounter with sailboat rigging ropes and their troubleshooting solutions:
1. Fraying or wear
If you notice any signs of fraying, it’s important to replace the rope immediately to avoid accidents. Regularly inspect your ropes for wear and tear and replace them as needed.
2. Tangling or kinking
To prevent tangling or kinking, always store your rigging ropes neatly coiled and avoid knots or tangles. If your rope becomes tangled, carefully untangle it to restore its proper function.
3. Stiffness or difficulty in maneuvering
If your rope becomes stiff or difficult to maneuver, it may need lubrication. Apply a suitable lubricant to the moving parts of the rope to restore smooth operation.
4. Slippage
If your rope slips or loses tension, you may need to adjust the knot or connection. Ensure that all knots are properly tied and secure, and adjust the tension as needed.
5. Corrosion or rust
Stainless steel wire ropes are resistant to corrosion, but they can still develop rust over time. Regularly inspect your stainless steel ropes for any signs of rust and replace them if necessary.
6. Overloading
Avoid overloading your ropes beyond their recommended weight limits. Be aware of the maximum load capacity of your ropes and use appropriate ropes for heavier loads.
- New Sailboats
- Sailboats 21-30ft
- Sailboats 31-35ft
- Sailboats 36-40ft
- Sailboats Over 40ft
- Sailboats Under 21feet
- used_sailboats
- Apps and Computer Programs
- Communications
- Fishfinders
- Handheld Electronics
- Plotters MFDS Rradar
- Wind, Speed & Depth Instruments
- Anchoring Mooring
- Running Rigging
- Sails Canvas
- Standing Rigging
- Diesel Engines
- Off Grid Energy
- Cleaning Waxing
- DIY Projects
- Repair, Tools & Materials
- Spare Parts
- Tools & Gadgets
- Cabin Comfort
- Ventilation
- Footwear Apparel
- Foul Weather Gear
- Mailport & PS Advisor
- Inside Practical Sailor Blog
- Activate My Web Access
- Reset Password
- Pay My Bill
- Customer Service

- Free Newsletter
- Give a Gift
How to Sell Your Boat

Cal 2-46: A Venerable Lapworth Design Brought Up to Date

Rhumb Lines: Show Highlights from Annapolis

Open Transom Pros and Cons

Leaping Into Lithium

The Importance of Sea State in Weather Planning

Do-it-yourself Electrical System Survey and Inspection

Install a Standalone Sounder Without Drilling

When Should We Retire Dyneema Stays and Running Rigging?

Rethinking MOB Prevention

Top-notch Wind Indicators

The Everlasting Multihull Trampoline

How Dangerous is Your Shore Power?

DIY survey of boat solar and wind turbine systems

What’s Involved in Setting Up a Lithium Battery System?

The Scraper-only Approach to Bottom Paint Removal

Can You Recoat Dyneema?

Gonytia Hot Knife Proves its Mettle

Where Winches Dare to Go

The Day Sailor’s First-Aid Kit

Choosing and Securing Seat Cushions

Cockpit Drains on Race Boats

Rhumb Lines: Livin’ the Wharf Rat Life

Re-sealing the Seams on Waterproof Fabrics

Safer Sailing: Add Leg Loops to Your Harness

Waxing and Polishing Your Boat

Reducing Engine Room Noise

Tricks and Tips to Forming Do-it-yourself Rigging Terminals

Marine Toilet Maintenance Tips

Learning to Live with Plastic Boat Bits
- Sails, Rigging & Deck Gear
Do Twin Sheets Better Control the Mainsail?
Practical sailor compares using twin sheets instead of a conventional sliding traveler to manage the main..

The main traveler is one of those love-hate pieces of gear on a boat. We love that it separates control of twist and angle of attack into a quick and instinctive process. We hate it when it clutters up a cockpit and fear it when it slashes across the deck during a breezy weather jibe. A traditional alternative is a split- or twin-mainsheet system. We thought this setup had become extinct, but in fact we’re seeing it on a few of today’s high-performance multihulls, which suggests it still has merit. Every user we interviewed loved it. And so some testing was in order.
There are three main arguments in favor of a split mainsheet.
- Convenience. The traveler track is in the way. Often a twin mainsheet system can be designed to span a cockpit or cabin.
- Simplicity. Travelers are expensive, wear over time, and occasionally fail spectacularly.
- Better jibe control . Because the two lines create a triangle, the boom can be fully controlled through the jibe. Countless MOBs and notable fatalities have resulted from accidental jibes, (see “ Risk Management and Renting Adventure ,” PS January 2017).
Even if you have no interest in converting your system or buying a boat with twin mainsheets, it can be a robust jury rig that every cruising sailor should understand. As long as you have a pair of unused winches, a twin-sheet system can be rigged from gear on hand in a matter of minutes.
How We Tested
It was a simple matter to rig our test boat for both traveler sheeting and twin-tackle sheeting. We don’t use our secondary winches under working sail, so we installed a pair of turning blocks where the rail of a monohull would be and set up a simple 2:1 block and tackle led to winches. We equipped both systems with a quick connect at the boom end so that we could easily switch back and forth between sheeting systems.

Observations
Retraining is required. Instead of adjusting the twist with the sheet and angle of attack with the traveler, the adjustments are combined. When sailing to windward the sheets are each about the same length, both highly loaded and most adjustments require pulling two strings. When the leeward sheet is trimmed, the leach closes and the boom moves to leeward. If the windward sheet is trimmed, the leach closes and the boom moves to windward. Perfecting boom position and twist requires adjusting both in a trial and error process. Dumping a sheet in a gust increases twist, but not as quickly or dramatically as releasing a single sheet. You can’t play the traveler in a breeze, the way many racers do, varying the angle of attack without increasing twist.
Marking the sheets at the centered, windward position can be handy during the learning phase. Mark both the low-tension setting, used during jibes and when the main is furled, and the fully loaded windward position. This will reduce trial and error.

Like many running rigging modifications, switching to a twin-mainsheet arrangement has advantages and disadvantages. One of the most rewarding benefits has been the ability to prevent unnecessary movement of the boom.
- Jibing. Better control and less traveler hazard in heavy air.
- Boom does not bounce around as much in lumpy conditions.
- No vang. (Actually, the need for a vang is about equal in both systems.)
- May better accommodate cabins and dodgers.
- Better stabilizes boom at anchor, but may block cockpit.
- From 5 to 35 percent less sheet purchase is required, depending on the width of the sheeting base. (Typically, a dual-sheet system offers little or no advantage for multihulls.)
- Cheaper. However good block and tackle setups still aren’t cheap.
- Jibing. More trimming in light to moderate conditions.
- Sail can back and fill violently in certain conditions, since the boom cannot move.
- More complex sheeting. Unlike traveler systems, twist and angle of attack are not separate adjustments.
- More weight on the boom.
- Tackle can block cockpit when reaching.
- Nearly double sheet length. Tripping and entanglement hazard.
- More expensive if you need two additional winches. Slightly cheaper if tackles will work, though a pair of good tackles still aren’t cheap.
There is a lot to like about twin sheets when jibing in a breeze. First, pull in the leeward sheet to the center position mark. Then pull the windward sheet to same length, centering the boom and securing it. Once through the eye, release the new windward sheet followed by easing the leeward sheet as needed. The process is very smooth and the boom is fully controlled throughout the jib. The boom will lift a little more than with a traveler, but not excessively so.
Using a traveler, you first sheet the main in fairly tight, then center the traveler or even bring it a bit to windward. The boom will thump a short distance when the wind moves from one side to the other, but only a little if the mainsheet was snug, after which the traveler is eased all the way down, followed by the easing the sheet as required. If the sheeting base of the twin mainsheet system is the same as the traveler length (both should be as wide as practical) the amount of mainsheet out during the jibe is the same in both cases.
When jibing in light winds, the advantage is goes to the traveler system, which can be left to run free. In moderate winds jibing safety and ease becomes roughly equal, with the edge on trimming speed going to the traveler, and often, the edge on trimming range, to the twin sheet system.
Some say twin sheets work like a vang. Well no, not really, no more than a traveler system does. Most multihulls dispense with a vang entirely for this reason; a full width traveler provides sufficient twist control. Neither functions exactly like a vang. However, using a vang with twin mainsheets is a bit like scratching your head and patting your tummy at the same time. We found it hard to keep straight and would avoid it. With a traveler system, it is simple to switch between vang sheeting and traveler sheeting, and they can even be combined without complication.
A single continuous sheet was simpler to manage with twin sheets. It saves some length, since the leeward tackle is always shorter than windward tackle. It also reduces tangling, because there is no free end to form knots. You can always bring both ends to the windward rail. It does leave a lot of line on the floor. Remember the old saying, “Mainsheet men hop on one leg?” You’ll need to watch your footing and learn some boat-specific line management.
No traveler equals less cockpit clutter. Yes, a traveller divides the cockpit in two. But the twin-sheets interfere in a similar way. We really dislike the mid-cockpit traveler on the F-24. If you want to go aft you have to step over it; with twin sheet systems through-transom access is clear. But with the twin mainsheet system, we had to duck under the windward sheet, especially when off the wind, a time when the cockpit is normally free.
The same argument can be made for securing the boom at anchor. On one hand this is dead easy with two sheets. On the other hand, even if you secure it off to one side, one of the sheets still crossed the cockpit. On our PDQ we would often move the traveler to one side to clear the aft cockpit walk-trough and secure the boom with a short line to a cleat, creating the same sort of triangle. The overall advantage or disadvantage is boat specific.
A common argument for twin sheets is safety since the most powerful sail on the boat is also the most dangerous, but a traveler used correctly is just as safe.

- A boom brake can help control a jibe, but it is not the same as having a mainsheet that will set and hold.

- For testing twin sheets we attached the sheet leads to the trimaran’s beams using a strap with D-rings at each end.

- When reaching the two sheets combine to help control the height of the boom above the deck.

In addition to the twin-sheet arrangement described in the adjacent article, Practical Sailor has looked at various techniques to trim and tame the mainsail. Many of the measures are relatively inexpensive and are simple to carry out.
Some related reports include:
“ The Multifarious Mainsheet ” PS May 2013.
“ Tools to Tame the Jibe ” PS July 2017.
“ Testers Examine Running Rigging Options ,” PS November 2010.
“ Undoing Mainsheet Twist. ” PS February 2018.
“ Taming the Main: Sail-Handling Systems for Bigger Mainsails ,” February 2008.
There is no traveler car potentially zipping from side to side. On the other hand, the extra rope poses a tripping and entanglement hazard. Both can be managed.
We’ve heard it said a twin sheet system can serve as a preventer of sorts, because if the sheet is kept short, the boom cannot fly across the cockpit center line.
We reject this as an advantage, because exactly the same can be said of a properly used traveler. With the traveler locked down at the end of its travel, and with each sheet in a dual-sheet system kept the same length, the swing of the boom is the same.
However, if you run downwind with the traveler centered, the boom held down with the vang, and a lot of sheet out, or you do not lock the traveler car down at the end, the boom can move violently, but only because you are not using the equipment correctly.

Extreme beam of multihulls affects how traveler and twin sheet systems are used. Travelers are typically full width and aft swept shrouds limit easing the boom to about 50 degrees from the centerline. As a result, there is little sheet out when the traveler is fully eased, even running. Likewise, twin-sheet systems have only a little sheet out to leeward. The downside is that widely spaced, twin-sheet tackle anchor points result in an obtuse angle between the tackles and very high sheet loads when sailing upwind.
Less banging in sloppy light airs. With two sheets, the boom can be secured. But we very seldom had this problem, and we could always rectify it with a line to a stern cleat. On the other hand, in light moderate conditions, instead of the boom being able to move a bit and the sail flexing with the wind, the fixed boom made for some atrocious “booms” as the sail filled and backed when rolling. When it became a problem, there was no easy solution, as there would be with a traveler system. In the end, we decided this over-control of the boom was more minus than plus, but this probably varies with the motion of the boat and others may feel differently. Let’s call it a wash.
More complex sheeting. With a traveler and mainsheet system, the sheet primarily controls twist and the traveler controls the angle of attack. With two sheets they work together to form a triangle that controls the position of the boom. To windward, most adjustment require pulling two strings. When the leeward sheet is trimmed, the leach closes and the boom moves to leeward. If the windward sheet is trimmed, the leach closes and the boom moves to windward. Often both must be moved, in a sort of trial-and-error process. All of the same boom positions are possible, but it requires more thought and fiddling.
Less sheet purchase. It’s true that if the sheeting base is narrow, the tackles can be smaller, since they share the load when sailing to windward. On the other hand, with the wide base typical of a multihull (base 16 feet, boom height 5 feet), the angle is disadvantageous and the sheet load is not appreciably reduced. In both cases, there are now two tackles to be tensioned instead of one. Because our sheeting systems were different in each mode, we can only comment on the obvious math.
Load distribution. A traveler track is often a structural member of the boat. When the boat jibes, the stress is spread over a span of deck. With a twin sheet system, the loads, both vertical and transverse, are point loads, and either hard on the wind or during a jibe they can be massive. If converting from traveler to twin system, remember that managing the loads is more complicated than just adding a big backing plate; the cockpit coamings or cabin must be able to transfer potentially enormous shock loads safely to the hull. We’ve heard of cockpits crushed when a sailor removed a structurally necessary traveler bridge.
Conclusions
After weeks of playing with twin sheets, we went back to the traveler and single-sheet system. We enjoyed sailing with twin sheets and felt that a well engineered twin-sheet system will suit some boats and some sailors. We like twin sheets for cruising and even reefed down in heavy weather. Controlled jibing is nice. But racing or powered-up in a multihull or sport boat, rapid, simple adjustment is vital. In the end, we understand the overwhelming popularity of traveler-based systems on both cruising and race boats. Sailing is simpler.
RELATED ARTICLES MORE FROM AUTHOR
12 comments.
If you had these issues in paperback I would love to subscribe to your magazine . I want something I can refer back to . But you don’t , so I don’t .
You can easily download issues onto a computer. Beats the hell out of lugging 10 years of paper documents around. Takes up zero space and also adds zero weight – other than that of the computer.
Having said that, I have years of paper issues stored (most of which I have been able to download electronically) and would be happy to give them to you if you would pay for the expense to send them.
Practical Sailor is available in print. Check the subscription page.
Practical Sailor is available in print. Check the subscription page. Additionally, a subscription comes with full digital access to all back issues.
My F-9AXR trimaran was built with a twin sheet system, designed by Mike Leneman, who also supplied the wing mast & forestay. The boom is extended (approximately 18”) so that the sheets attach from the end of the boom down to the coaming near the aft end of the cockpit. It is a 12:1 continuous line with a shive on the boom joining both sides. We race more than cruise. Observations after 7 years; we love the openness of the cockpit & only miss the traveller a little when racing upwind. When reaching, we just crack off a little & go. When running downwind with an assym spin, the main seems to work well cracked off a little more than a reach, but surprisingly much less than 45 degrees. We use the mainsail leach telltales to help us dial in trim. Bottom Line; From my experience, the added complexity, weight & expense does not outweigh what would appear to be the small potential gains of a traveller system.
My wife and I have been living for 11 years aboard a 1997 Catana 44 with a twin sheet main. On our first crossing from Ft Lauderdale to Bimini in 2010 we noticed the single-point attachment of the mainsheet dead end and turning block was flexing the coaming under load. We pulled the deck rings from the coaming and used a hole saw to remove the fiberglass skin and discovered the coaming balsa core was saturated. We dug out all the wet core and filled the space out to about 2X the diameter of the deck ring bases with glass mat and epoxy, and enlarged the backing plates. We also added a second hard point for each sheet so that each dead end tied off on the original ring and the turning blocks on new ones, set three feet wider than the originals, these hard points also set on the coaming after replacing the balsa core as on the originals. This change effectively halved the load on the coaming rings, and substantially improved our ability to tweak the main with the wider spread of the mainsheet dead ends and turning blocks.
I’m surprised to read your technique for jibing with a traveler, and the comment about the traveler potentially “zipping across the cockpit”. I prefer to keep the traveler centered when sailing downwind.
I know that you Americans have your own brand of my language, but the verb ‘to better control’ can’t be found in any dictionary, yours or mine. Your headline should read ‘Do twin sheets control the mainsheet better’. PLEASE !
I have been using the traveler system for most of my life, 40+ years, and I just bought a catamaran with a Delta mainsheet system (Twin mainsheets). To me, the biggest factor is control of the leach and boom. My experience has been that I can get to a trim faster with the Traveler system but with a little more patients and fiddling around I can get to the same trim with the Delta. The other point that I think is important to consider when choosing mainsheet systems is preventing accidental jibes. I think most readers know that one can use a preventer with the Traveler to avoid accidental jibes and this works well but it is still uncomfortable to say the least when it happens. The Delta system has a built in preventer out to a certain angle. If the boom is out past the leeward sheet deck attachment in the Delta system, you can still have problems though not as big as with the Traveler system. To me, many of the other points addressed are about configuration and comfort. In my case, I still like the Traveler mainsheet over the Delta mainsheet because I am more oriented towards performance so I may convert my catamaran to a Traveler setup in the future. I’d be interested in experiences in converting from a Delta or Twin setup to a Traveler. Thank you for the read.
Maybe I missed it, but one issue you don’t address is ease of access (or lack thereof) to both main sheet & traveler when you’re at the helm or tiller, i.e. right at the stern of the boat. This wasn’t a problem with my J24 as both traveler and main sheet are right at the helm/tiller, and so control of the main is extremely easy & convenient, and safe. But surely if the main is controlled from a traveler on the cabintop, this means that on most boats you have to leave the tiller or wheel and go forward to adjust the mainsheet and/or traveler?
If sailing single-handed, especially when entering/leaving port or a river or anchorage, having to leave the helm to go forward to the cabintop to adjust the mainsheet and/or traveler is surely a big inconvenience, maybe even dangerous? I would have thought that in this situation, a twin mainsheet leading to each quarter near the tiller or wheel where the helmsman can easily adjust the Main – would be invaluable – and far safer/more practical than trying to adjust the mainsheet and/or traveler on a cabintop.
So in short handed situations, especially in confined waters where maybe quite a bit of tacking/jibing is required, or spilling wind from the mainsail – surely this is where twin sheets led aft would really shine?
Hi. Good article. I’d like to describe what I have on my boat. It won’t be for everyone, because my trimaran is a center cockpit, ala Jim Brown, so I don’t have the problem of the lines draping over the cockpit when sheets are eased. My points of attachment are approx 7 ft apart. Boom height about 5 ft. I originally had a single line system with 3 blocks on the end of the boom, but that always sought its own level, like water, and would not stay where I wanted it. After looking at a Cantana at Raiatea with the twin, and separate, set up, I cut the sheet in two and run it through a fiddle on top and fiddle with becket on bottom, both sides. 3:1 purchase, I believe. The sheets come to a deck organizer on center, then through a double rope clutch and to a single, small, 2 speed winch, all of which, I can reach easily from the wheel. When gybing, I put one wrap of each sheet on the winch, clutches closed, and haul together. When the leeward one reaches vertical, and stops, I take the slack out of the windward one and I’m ready for gybing. Pulling both stops a ton of slack from laying around the deck and causing problems. I also had to reinforce under my deck attachments as the loads when the leeward one is vertical are pretty strong. I have a tackle vang, but when sheets are eased, I take a preventor out to a midships cleat and back to a winch, so then have a 3 point hold on the boom end. Having raced for many years, I really did not want a traveller with all the lines, winches and tackles. When going to weather, or close reach, it’s easy to put which ever sheet needs adjusting on the winch and give it a tweak. A couple of improvements that I’m thinking about when I get to return to the boat (Separate story: It’s in New Zealand and I’m stuck here in US, Covid, coming up 2 years now) is to have the 2 sheets different colors. There’s a lot of white line spread around sometimes. Also thinking about having only 2 feet, or so, of tackle and 4-5 ft of dyneema strops to the boom. This would save 20ft +/- of sheet length but might end up having flying blocks, if the gybe got out of hand. Overall, the system works really well for me and mainsail trim is where I want it.
You almost got it right. If you attach the preventers/sheets to the toe-rail just aft of the side chain plates and attach/use 2 boom bails to separate load on the boom, you will have control of the mainsail all the way out over the water, there are no dangerous lines in the cockpit, you cannot have a dangerous accidental jibe, all jibes are controlled safe events, control lines can be run along the side deck into the cockpit. You need to attach the preventer out on the toe rail. I’ve been using that system for decades and installed it on several boats successfully.
LEAVE A REPLY Cancel reply
Log in to leave a comment
Latest Videos

Bahamas Travel Advisory: Cause for Concern?

Island Packet 370: What You Should Know | Boat Review

How To Make Starlink Better On Your Boat | Interview

Catalina 380: What You Should Know | Boat Review
- Privacy Policy
- Do Not Sell My Personal Information
- Online Account Activation
- Privacy Manager
IMAGES
VIDEO
COMMENTS
In this comprehensive guide, we will explore different sail rigging options, providing you with professional insights and some witty anecdotes along the way. 1. Bermuda Rig: Elegant and versatile, the Bermuda rig is undoubtedly the most common type found in modern sailing. Consisting of a single triangular mainsail and a jib in front, this ...
The sail rig is determined by the number of masts and the layout and shape of sails. Most modern ships are fore-and-aft rigged, while old ships are square-rigged. ... But it has a limited sail area and doesn't give you the control and options you have with more sails. Sloop. The most common sail plan is the sloop. It has one mast and two sails ...
Sailboat rigging systems can vary depending on the type of sailboat and its intended use. The two main types of rigging systems are the masthead rig and the fractional rig. ... However, it is crucial to consult with a professional rigger to ensure proper installation and tuning of synthetic rigging. Another upgrade option is replacing older ...
Headsail Options. The headsail is the front sail in a front-and-aft rig. The sail is fixed on a stay (rope, wire or rod) which runs forward to the deck or bowsprit. It's almost always triangular (Dutch fishermen are known to use rectangular headsail). A triangular headsail is also called a jib. Headsails can be attached in two ways:
The rig or rigging on a sailboat is a common term for two parts: The standing rigging consists of wires supporting the mast on a sailboat and reinforcing the spars from the force of the sails when sailing. The running rigging consists of the halyards, sheets, and lines we use to hoist, lower, operate, and control the sails on a sailboat.
10. 2023. In the world of sailing, boat rigging plays a crucial role in ensuring the safety, efficiency, and performance of your vessel. From standing rigging to sail rigging types, it's essential to understand the intricacies of rigging a yacht to embark on smooth sailing adventures. In this comprehensive guide, we'll dive into the nuances of ...
A beginners guide to sailboat rigging, including standing rigging and running rigging. This animated tutorial is the first in a series and covers sails, line...
Credit: Bill Tripp Design. The Bermudan rig is the all-rounder, able to perform well at all angles of sail. It is efficient upwind, while downwind the sail area can be significantly boosted with a big gennaker or spinnaker. For good reasons, it is the first choice for nearly every modern sailing yacht up to around 60 to 65 metres for cruising ...
Understanding Running Rigging. Standing rigging keeps the mast in place, but it's the running rigging that handles all the action aboard a boat under sail. The many components in a modern running rigging system—sheets, outhauls, vang control, halyards—work in conjunction with wide range of blocks to keep friction to a minimum. Ralph ...
Standing rigging is the collective term for the system of wires (or rods) that supports the mast, both fore-and-aft and laterally. Lateral stays are known as shrouds and each has its own name (see diagram). The "shroud angle" is the angle between the mast and the cap shroud, typically never less than 12 degrees.
Sails and rigging are the engine room of any sailing boat from small dinghies up to giant superyachts. No matter how big or how new your boat, the sails and rigging need to be checked regularly and will need intermittent updating. Updating of rigging on a yacht in particular will often be a requirement for insurance purposes so any owner will ...
Pro Tip No. 3: Minimizing the last purchase of an outhaul greatly increases the ease with which it can be pulled on or eased out. For example, you could have a 6-to-1 to one pulling a 2-to-1 ...
The domain of rigging is an essential matter for the safety and good performance of your sailboat. Nowadays, the type of rigging is still evolving. Generally, rigging is depending on the type of sail used or the number of masts. As a basic rule, the replacement of the standing rig should be done every 10 years, except for multihulls or regattas, and rod or composite fiber rigging. A good set ...
Comparative boat rigging costs. Wire and rod - rigging a Dehler 38 with standard 1×19 wire or Nitronic rod, would be an estimated £2,280 for wire and around £5,000 for rod. HMPE (Dyneema/Spectra) - Cables to rig a Dehler 38 would cost £2,900-3,700. Aramid - costs of around £7,500 for the Dehler 38 are 40-60% more than rod rigging.
Advantages of a Cutter Rig. There are a lot of reasons to like a cutter. A cutter rigged boat has redundant rigging and spreads the sail load across its rigging. And a cutter rig offers increased sail options-it offers increased sail area in light winds and easy and efficient ways to decrease sail area in heavy weather.
Here is a step-by-step guide to help you make an informed decision: 1. Assess your sailing needs. Consider the size of your boat, the sailing conditions you typically encounter, and your rigging setup. This will help you determine the strength and durability requirements for your rigging rope. 2.
It was a simple matter to rig our test boat for both traveler sheeting and twin-tackle sheeting. We don't use our secondary winches under working sail, so we installed a pair of turning blocks where the rail of a monohull would be and set up a simple 2:1 block and tackle led to winches. ... "Testers Examine Running Rigging Options," PS ...
Sailboat Rig Options. A sailboat rig consists of a number of elements: the mast(s), boom(s) and the shrouds or stays that hold up the mast(s). Different names are applied to different rig configurations. Sloop. A sloop is a sailboat with one mast that supports one mainsail (behind the mast) and one headsail (ahead of the mast).